• TalkBass has been independent since 1998. Add your voice.
    Create a free account to reply to discussions, view embedded media, and browse with fewer display ads.
    Join freeLog in
    Want zero display ads or expanded classifieds tools? Compare plans.

Magnets & Copper Wire: A Pickup Building Thread

Rudy;

Have you ever seen a Nechville Meteor? It's a very well developed electric banjo. It's basically built like an electric guitar with a round wood body. Then they've mounted a little 8" dia head in the middle of it. They've tuned and damped the little head so that it has some mechanical banjo function, but can operate in a loud stage environment. Most of the tone is from the pickup, like an electric guitar, but it does have a pleasant mix of genuine banjo twang in there. A nice engineering job, making a useful high-volume electric banjo.

Meteor Electric Banjo - Nechville Musical Products

Some years back, a local LA customer brought a Meteor to me and had me build a long neck for it. Nechville doesn't offer a long neck version. I built the only one that exists! The customer loves it and has been playing it exclusively for about a decade. That gave me the opportunity to mess around with it, and I liked it overall. It's not as pure a banjo sound as a "real" banjo, but they did a good job and found a compromise. It was fun to play and appealing. Although I really suck at playing banjo.....

The neck tunnels the 5th string all the way out to the headstock. That was tricky. A long brass tube buried under the fingerboard.
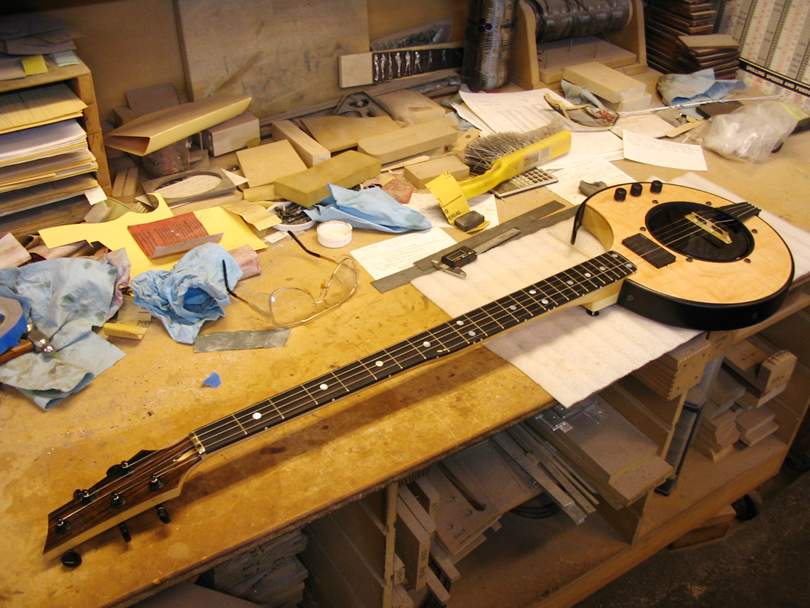
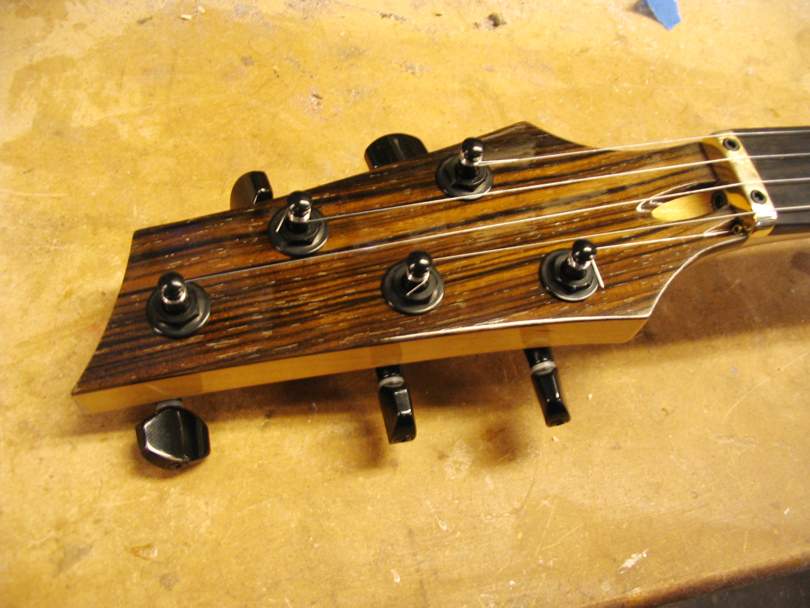
IMG_1859B.jpg


IMG_1864B.jpg


The dangerous secret world of banjos and pickups and amps......Is it morally justifiable?
 
Rudy;

Have you ever seen a Nechville Meteor?

Hi Bruce,
Yes, I'm familiar with Tom's products. He's been "instrumental" in pushing the envelope of banjo design. Good job on the retro-fit of your long neck on the Meteor.

Five string banjo players can certainly be divided into two basic camps; traditionalists and those who are more willing to accept variance from the firmly entrenched older designs. The long neck banjo is in a sub-catagory all its own, and there's always been a small number of rabid long neck advocates. The interesting thing is 99% of the long neck players have a capo more or less semi-permanently installed at the third fret. It's a hold-over from the folk scare era when a lot of players used the 5 string as vocal accompaniment, and it just doesn't happen much in actual performance. (Yes, I'm aware that there ARE exceptions!)

I've been making tunneled necks for several years and it is one of the trickiest parts to do correctly. Tunneled fifths are all about making the string path as straight and free from bends as possible to reduce any internal friction. I opted for stainless steel micro-tubing as it resists any possibility of the string wearing into the tubing at any point of contact.

Nechvilles are certainly an option for players who want to purchase a banjo that's ready for prime time.

My M.O. has always been about providing information to folks who would like to build their own instruments, so in the past I marketed complete construction guides for building various types of instruments. The technology represented by some of the companies like Nechville is often beyond what a small home shop is capable of producing, so I went a different direction on my designs and processes.

I've always been an advocate of making as many of the parts of an instrument as possible, and have posted "how to" guides for making items such as the raw brass shoes typically found on banjos.

I know that this is certainly a focus point for your instruments as well. I think there's something special in making music on instruments created by your own hands.

Again, no intention of side-tracking the topic here, but this stuff is ALL interesting to me!
 
Last edited:
To everyone interested, I found the paper about pickups form a pure physicist perspective that I referred to in one of my posts. It might be an interesting read.
Be warned it contains some hard-core math :bag:

Link Removed

Also, from the same author, point 2. up to 2.1, might seem interesting as well. Supposedly a permanent magnet core has no effect on the inductance of a coil. I'm not sure how that would relate to guitar pickups though :bookworm:

Link Removed
 
I've found a new product for potting the wire coils. Most folks use hot wax, but I like soaking the wire coil with a very thin epoxy. This keeps the turns of wire from vibrating and going microphonic. I've been potting my pickups with Smith's CPES (Clear Penetrating Epoxy Sealant) for years, but I'm trying a new product: Total Boat Penetrating Epoxy. Like CPES, it's a very low viscosity epoxy used for reinforcing rotted wood. The CPES works well, but it has very strong Acetone-like fumes. Nasty.

This Total Boat product is supposed to be similar to CPES, but has almost no fumes. I've done three coils with it now, and I like it. It seems to soak in and do the potting very well. And very minor odor; almost like it's water-base.

It mixes 2:1 by weight; I use a small scale to measure it. It's nearly clear, but I guess you could add some tint to it if you wanted dress up the look of your coils. I just dabbed it on with the mixing stick, letting it soak in, turning it over and dabbing on more until it looked like no more was soaking in. It cures in about 6 hours.

Available on Amazon and at major boating chains; $38 for 1.5 pints. That'll probably pot a hundred pickups.

https://www.amazon.com/TotalBoat-Pe...d_rd_i=B0141F71II&psc=1&ref_=pd_bap_d_rp_53_i

img_8430b-jpg.jpg


It leaves a nice semi-hard clear shell over the wire. Neat and professional looking.

img_8431b-jpg.jpg


Out of curiosity, I sawed apart a potted coil that I accidentally ruined, to see how far the Total Boat soaked in. It looks good. There's a fully encased layer about 1/16" thick on the surface. The center area is pretty well saturated and bonded together. Only a small amount right in the middle isn't saturated. But the rest of it is holding it all together solidly. This is what you want the potting to do.

img_8432b-jpg.jpg
 
As an Amazon Associate, TalkBass may receive commissions from qualifying purchases made via links on this site.
I bought some of the totalboat penetrating epoxy last year to stabilize a burl top. I really like it compared to CPES. Haven't used it for pickup potting yet, I guess my wax pot is just too convenient to consider alternatives.
 
There's a few things I wonder about with windings
-what do they coat that tiny wire with when they make it?
-HOW in the name of science do they manage doing that?
-what kind of temps and chemicals do you have to start worrying about degrading that coating?
 
There's a few things I wonder about with windings
-what do they coat that tiny wire with when they make it?
-HOW in the name of science do they manage doing that?
-what kind of temps and chemicals do you have to start worrying about degrading that coating?

There are a couple of different types of insulation you'll find when you research purchasing your wire. I don't remember all of them off the top of my head, (polyester and lacquer are two of the insulation types...) but the type I purchased requires sanding the insulation off the wire in order to solder it. That's a bit of a stress producing operation (for me, not the wire...) I originally bought two 7 pound spools of #42 so I don't think I'll be changing insulation in my lifetime!

Many choose wire that is coated with an insulation that doesn't require removing the insulation to solder. The insulation sort of vaporizes when you touch the soldering iron to it. Lacquered wire can be "stripped" with solvent, of course.

I dislike breathing fumes, so keep solvent and lacquer out of the coil winding process.

When I wind coils I stop every 2000 turns and paint a 1" long band of clear nail polish over the center of the flat areas of the coil using the tiny brush in the nail polish bottle. The last wraps get the entire coil painted over with the nail polish. It seems to soak in to the coil sufficiently to keep the coil from becoming microphonic, the ends are always tight enough not to need any treatment.

I cut a piece of (black cloth) electrician's friction tape to fit the bobbin space, cover the exposed wire, and top coat it with clear nail polish. I do love the look of cotton string outer covering on exposed pickups, though.

The "nail polish" coil potting has consistently worked well for me, I can do it as a part of the winding process, and the little bottle is convenient and easy to use.

Some of the top boutique winders claim that coils that are too well encased don't sound as good as coils that have the right amount of "give" incorporated into the coils. The extent of that process of inhibiting a pickup's ability to be microphonic certainly is part of the "secret sauce" for boutique winders.
 
Last edited:
  • Like
Reactions: RichterScale
Whatever they use to insulate the wire must be pretty tough.
Any idea what solvent base the nail polish is? I know they use acetone to remove it, but not sure what it's made of.
BTW, that nail polish trick is clever.
 
Whatever they use to insulate the wire must be pretty tough.
Any idea what solvent base the nail polish is? I know they use acetone to remove it, but not sure what it's made of.
BTW, that nail polish trick is clever.
Formvar is a synthetic film insulation containing polyvinyl acetal and phenolic resins. It has been in general use in the electrical industry as a Class 105°C. There are lots of thin dielectrics. If @Bruce Johnson wants to send me the pickup he cut in half I can polish and analyze it in the SEM to look at the penetration and measure the thickness of the formvar coating and share the results.
 
Whatever they use to insulate the wire must be pretty tough.
Any idea what solvent base the nail polish is? I know they use acetone to remove it, but not sure what it's made of.
BTW, that nail polish trick is clever.
I checked to make sure that it wasn't reactive to the wire insulation before use, of course. I'm all about easy; as they say, laziness is the mother of invention. I ALWAYS look for the quickest, easiest, and safest way to do anything. ;)
 
There's a few things I wonder about with windings
-what do they coat that tiny wire with when they make it?
In the old days it was lacquer, and these days it's often polyester or some other rubbery synthetic instead, but lacquered wire is still available.

Either way you can melt off the insulation with a soldering iron. Lacquer evaporates so quickly you can solder a freshly-snipped end right on the terminal. Synthetic doesn't evaporate as easily but a couple scrapes with an ultra-fine emery board makes up for it. There isn't much insulation since a thick coat is counterproductive. Attaching an alligator clip behind the wire end you're soldering helps keep the heat from traveling far up the wire. You really only need to expose a couple mm of wire for a solid connection on the terminal so being overly thorough wastes your time.

My experience is largely from working with litz wire (which is effectively coil wire braided together), so I don't know whether techniques have to adjust to dealing with wire coils.
 
I like using epoxy for potting my coils because it's simple and neat. I wind the coil dry start-to-finish, solder the wire ends to the terminals, and dab on the epoxy. Let it dry overnight. Minimal labor time. And I'm not dunking the coil, so the potting isn't getting all over everything. I'm applying it only to the bundle of wire.

Also, I like that the epoxy is more permanent than wax. Wax dries out and cracks over the years. I'm sure you've seen vintage pickups where the wax has shrunken and cracked and the coil has failed. I'm confident that the epoxy potting will last 50 years or more.
 
  • Like
Reactions: Kinkh and dwizum
Bruce, every time you talk about how you pot coils, I get one step closer to giving up on wax!

@RichterScale if you're going to start from scratch and don't care about "historically correct" reproductions, ignore formvar wire. Just get poly lacquer wire. You can solder it easily as if it was bare wire, no scraping or coating removal required. Formvar needs to be stripped, poly burns right off. Here's where I have bought most of my wire, they have an eBay store too if you want to go that route:

Magnet Wire, 42 AWG Enameled Copper - 5 Spool Sizes / 2 Colors
 
Way back in post #814 I wound a single coil blade bobbin. I recently cut some wood covers for them on the CNC. The next step was to figure out how to wire some leads. I fiddled with some fiberboard backings fitted with those little eyelets, but the cover is only about 1.5 mm wider than the bobbin itself on each end so very little room to work. Since I just made a PCB for my second amp project, and KiCad was still running, I decided to take a shot at a PCB for these pickups:
bass_blade_front.png


I left some exposed copper on the back (bobbin facing side) ground plane in case it comes in handy for grounding magnets -- though these pickups are ceramic so no need for them here:
bass_blade_rear.png


They are sized for both 5 and 6 string bobbins so I can use the board for either by just trimming to length.

Since there are no mounting holes in the bobbin I think I will just epoxy the board to the bobbin -- maybe I will even pot it with the same epoxy.

We'll see how they work when the come back from fab in a few weeks.
 
I drew a new pickup design a couple months ago but have had other projects in the works so I never built it. I made time over this week to get started, but I'm going out of town today through the weekend so the prototypes are paused at the 1 yard line.

Here's the main flatwork being cut on the mini cnc.

IMG_20220313_164549.jpg


Main flatwork and bobbin flatwork all cut and prepped.

IMG_20220313_181312 (1).jpg


Bobbins, assemble!

IMG_20220314_070408 (1).jpg


At this point, you may be questioning why I'm building extra tall Jazz pickups and what that other flatwork is for. These are very close to Jazz bobbins. The magnets are .781" x .195 alnico 5. I wound the coils with 41 gauge wire.

That other flatwork is basically BC soapbar shaped. The slots in the soapbar flatwork are sized to fit slugs cut from 1" x 1/8" low carbon rounded-edge steel bar stock. The jazz-like bobbins go on that flatwork sideways, between the slots.

IMG_20220317_073012.jpg


Solder it up, trim the extra coil wire back to the eyelets, get those little steel slugs prepped, and then it's time to assemble the whole mess:

IMG_20220317_074243.jpg


I did these prototypes in vulcanized fiberboard since I had it on hand and know how to cut it well on the cnc. The "real" version is going to be other better looking materials. And I'm going to change a few dimensions on the bobbin flatwork to make winding easier (they're full right to the edge, I want a little extra space so I don't risk pinching the coil wires). But I'm really happy with how these went together in general. It's rewarding to have a design kicking around in your head for a couple months and then finally see it come together. I literally put that one together as I was packing the car for our trip, so I won't have a chance to put the other one together or put them in a test bass until next week. The suspense is killing me, I can't wait to hear how they sound!
 
I drew a new pickup design a couple months ago but have had other projects in the works so I never built it. I made time over this week to get started, but I'm going out of town today through the weekend so the prototypes are paused at the 1 yard line.

Here's the main flatwork being cut on the mini cnc.

View attachment 4624413

Main flatwork and bobbin flatwork all cut and prepped.

View attachment 4624414

Bobbins, assemble!

View attachment 4624415

At this point, you may be questioning why I'm building extra tall Jazz pickups and what that other flatwork is for. These are very close to Jazz bobbins. The magnets are .781" x .195 alnico 5. I wound the coils with 41 gauge wire.

That other flatwork is basically BC soapbar shaped. The slots in the soapbar flatwork are sized to fit slugs cut from 1" x 1/8" low carbon rounded-edge steel bar stock. The jazz-like bobbins go on that flatwork sideways, between the slots.

View attachment 4624416

Solder it up, trim the extra coil wire back to the eyelets, get those little steel slugs prepped, and then it's time to assemble the whole mess:

View attachment 4624417

I did these prototypes in vulcanized fiberboard since I had it on hand and know how to cut it well on the cnc. The "real" version is going to be other better looking materials. And I'm going to change a few dimensions on the bobbin flatwork to make winding easier (they're full right to the edge, I want a little extra space so I don't risk pinching the coil wires). But I'm really happy with how these went together in general. It's rewarding to have a design kicking around in your head for a couple months and then finally see it come together. I literally put that one together as I was packing the car for our trip, so I won't have a chance to put the other one together or put them in a test bass until next week. The suspense is killing me, I can't wait to hear how they sound!

Those look great! Can't wait to see the "better looking"ones, and of course, how they sound.
 
  • Like
Reactions: dwizum
I drew a new pickup design a couple months ago but have had other projects in the works so I never built it. I made time over this week to get started, but I'm going out of town today through the weekend so the prototypes are paused at the 1 yard line.

Here's the main flatwork being cut on the mini cnc.

View attachment 4624413

Main flatwork and bobbin flatwork all cut and prepped.

View attachment 4624414

Bobbins, assemble!

View attachment 4624415

At this point, you may be questioning why I'm building extra tall Jazz pickups and what that other flatwork is for. These are very close to Jazz bobbins. The magnets are .781" x .195 alnico 5. I wound the coils with 41 gauge wire.

That other flatwork is basically BC soapbar shaped. The slots in the soapbar flatwork are sized to fit slugs cut from 1" x 1/8" low carbon rounded-edge steel bar stock. The jazz-like bobbins go on that flatwork sideways, between the slots.

View attachment 4624416

Solder it up, trim the extra coil wire back to the eyelets, get those little steel slugs prepped, and then it's time to assemble the whole mess:

View attachment 4624417

I did these prototypes in vulcanized fiberboard since I had it on hand and know how to cut it well on the cnc. The "real" version is going to be other better looking materials. And I'm going to change a few dimensions on the bobbin flatwork to make winding easier (they're full right to the edge, I want a little extra space so I don't risk pinching the coil wires). But I'm really happy with how these went together in general. It's rewarding to have a design kicking around in your head for a couple months and then finally see it come together. I literally put that one together as I was packing the car for our trip, so I won't have a chance to put the other one together or put them in a test bass until next week. The suspense is killing me, I can't wait to hear how they sound!

That's a cool pickup! I've actually wondered if it would work to turn a coil on it's side like that, but that humbucking design is off the hook! I can't wait to hear how it sounds. Have a good vacation!
 
  • Like
Reactions: dwizum

Latest posts