• TalkBass has been independent since 1998. Add your voice.
    Create a free account to reply to discussions, view embedded media, and browse with fewer display ads.
    Join freeLog in
    Want zero display ads or expanded classifieds tools? Compare plans.

My New Studio Build (perhaps overly detailed)

Demolition day three:

I woke up on Saturday morning ready to slay the beast, aka the remaining block wall. As a point of reference to get the ball rolling, here is a picture of the remaining wall. To get an idea of the overall size, each block is 8" high

That doesn't look TOO bad right?
3126D494-8C19-486F-A6B7-35DA441DE419.jpg


I ran down to the rental shop and picked up the Hilti T1000 that I'd mentioned previously. I'm probably dating myself, but it's interesting to note that T1000 was the designation of the evil Terminator in T2: Judgement Day. In that instance, the T1000 was a nearly unstoppable agent of destruction. In this case, the T1000 was an agent of "put some nice scuff marks in the monolith that is the block wall but little more." It didn't pack quite the punch I was looking for.

See the scuffing and little pock marks? That's what discouragement looks like.
BAA1B7D8-FDD1-4DF7-9943-35AD23B60EF0.jpg


I went at it for less than an hour, but long enough to know that I knew my initial plan was simply not going to work. To refresh those who have been following this saga since the beginning: My plan here was to attack the grout lines of the blocks in the hope that the weak point would separate and I could push the blocks off of the wall one at a time. It would be a systematic approach that lacked any big and exciting pay-offs, but it seemed like the most reasonable approach. Rather than wasting a day in an act of futility, I decided to return the T1000. The rental shop was kind enough to not charge me a penny since I brought it back so quickly.

Have you ever heard the expression about not shooting the bear, it'll just make it mad? That's how I felt about using a T1000 on the block wall.
CA07D5FE-F7B5-4294-864F-8952791DD576.jpg


While I was at the rental shop I made the decision that I had to do this with a Bobcat. There's no way for me to break it up by hand. Over the course of the week I'll be shoveling all of the dirt out of the interior of the blocks and into a neat and tidy pile just to the north of the remaining structure. That will leave the rest of it clear for me to get in there with a Bobcat and a hydraulic breaker bar. Removing all of the dirt first will allow me to work exclusively from the alley which will keep me from driving on my lawn, or accidentally piloting the Bobcat off of the adjacent rockery or steep slope. Remember kids, when human power fails...

bobcat_hydraulic_breaker.jpg
 
If I don't move the dirt out first, I have to access it from a really treacherous direction. It might be okay, but the penalty could be as massive as rolling down a 20' tall terraced slope, with the potential of going down another 40' slope beyond that. I'll put in the time with a shovel to avoid that possibility.

EDIT: Well... I take that back. There's one other approach I could take, but the possibility of tipping the Bobcat over backwards gets pretty high. The good news is that if it tips over backwards on this approach it wouldn't be a danger to anything but my ego. I'll give it some consideration. I'll also need to see how easy it is to switch out the bucket for the breaker bar. If I can do that myself it might be feasible to remove the dirt with the bucket.
 
Last edited:
Backstory:

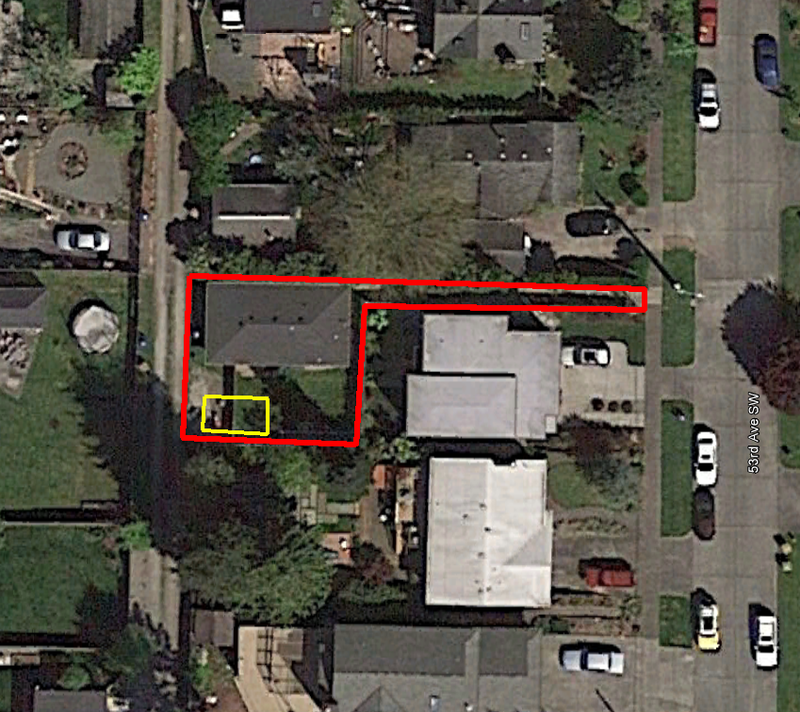
I bought a house back in April of 2011 in West Seattle with the intent of adding a small structure in the backyard to serve as a studio. It’s what we call a “flagpole” lot here in Washington, and maybe elsewhere too. Effectively it’s a small lot with a house that sits behind another house (this becomes the flag portion) and a long skinny access walkway down one side (this becomes the pole portion). As such, it was a small house on a small lot and I needed permission from the neighbors (legally binding permission in the form of a contract mind you) to build the structure closer to the property line than building codes would normally allow. They would not give me this permission.

The red lines are the property boundaries, and the yellow is the approximate size and location of the proposed studio building.
Old%20House%20Layout.png


That fact coupled with a few other growing pains forced us to sell the house. Very fortunately, I bought the home at the bottom of Seattle’s market and sold near the top. I made a killing. I nearly doubled the original purchase price at closing in only four years of ownership. That also meant that I had to buy in a very hot market, so my massive gains would largely be neutralized by a considerably larger mortgage in an equally hotter market. C’est la vie! My wife and I battled it out in the market and in June of 2015, we finally ended up with a new house after losing out on three others. This new place has ample space for my new studio (that statement comes with a host of caveats that I’ll explain in detail later).

With the backstory out of the way, let the fun begin!

I did the same up in Everett at the same time as you (bought in 2011, sold in April with a full-priced cash offer the next day and bought it in a hot market), my condo doubled in equity and was able to fully fund the down payment on a 3 bedroom, 2,000 square foot home with a garage big enough for a full home gym, a full sized studio room and a backyard to play volleyball in. Congrats and can't wait to see how your studio turns out!
 
If I don't move the dirt out first, I have to access it from a really treacherous direction. It might be okay, but the penalty could be as massive as rolling down a 20' tall terraced slope, with the potential of going down another 40' slope beyond that. I'll put in the time with a shovel to avoid that possibility.

EDIT: Well... I take that back. There's one other approach I could take, but the possibility of tipping the Bobcat over backwards gets pretty high. The good news is that if it tips over backwards on this approach it wouldn't be a danger to anything but my ego. I'll give it some consideration. I'll also need to see how easy it is to switch out the bucket for the breaker bar. If I can do that myself it might be feasible to remove the dirt with the bucket.

Obviously precede with caution. A few weeks ago I had a guy working in my yard with a Bobcat. And switched attachments quite easily.

 
I did the same up in Everett at the same time as you (bought in 2011, sold in April with a full-priced cash offer the next day and bought it in a hot market), my condo doubled in equity and was able to fully fund the down payment on a 3 bedroom, 2,000 square foot home with a garage big enough for a full home gym, a full sized studio room and a backyard to play volleyball in. Congrats and can't wait to see how your studio turns out!

It's definitely a crazy market out there right now. Glad to hear that others have capitalized on it as well.

Obviously precede with caution. A few weeks ago I had a guy working in my yard with a Bobcat. And switched attachments quite easily.

That's encouraging. Hopefully it's a simple switch. I'm going to call the rental shop this afternoon to confirm the process.
 
  • Like
Reactions: subsonicbassist
image_11.jpg


The rental shop told me that switching the bucket and the breaker are very simple. They said it's easily accomplished with just one person. Winner winner chicken dinner! That saves me several days of shoveling. As I mentioned before, the approach isn't without risk, but fortunately damage to myself, the equipment or my house aren't severe enough for me not to take the lightened workload.
 
  • Like
Reactions: peterpalmieri
YES! LOL right from the start I am saying to myself... why hasn't he rented a Bobcat?....
LOL....yes, that teeny Hilty jackhammer will take you a week of hard labour to knock that wall down.

Bobcat rental, with jackhammer and bucket. That is the only way to go... unless you can hire a guy.. that may be cheaper than renting and doing yourself.

I f you do it yourself....the jackhammer is easily switched out for the bucket.
will take a couple minutes. ...disengage the lock...tilt ... disconnect the hydraulic lines... go to bucket... tilt... lock it in.. Bob's your uncle.

That jack hammer will tear that s*** up easy. I was working a job a couple months ago and needed to remove a large solid concrete step. The guy I was working with tried the little Hilty hammer .... LOL he lasted about 20 minutes and said screw that... went and rented a big hammer to use with his bobcat... turned a long ugly job into an easy one that took less than an hour. I would say that job you have there won't take more than a couple hours ......to bust up.... and then scoop up the rubble into the dumpster. yeah maybe two hours or so.
It will be pretty easy if you already know how to run a bobcat.
 
  • Like
Reactions: peterpalmieri
Hiring someone to do it definitely won't be cheaper. I had one guy come out and he wanted $3,500 for the whole thing. Renting a Bobcat and hydraulic breaker bar will be about $500 plus the cost of gas to run the thing. The concrete is all clean and metal free (I think), so it'll only be $5 per ton, plus a $225 delivery and pickup fee for the container. All told I'll be well under a third of the cost to do it myself.

The Bobcat was something I was trying to avoid as I wanted to keep costs down, and honestly I underestimated the level of effort that's required to do this job. Lesson learned. Hopefully this works out well.
 
image_11.jpg


The rental shop told me that switching the bucket and the breaker are very simple. They said it's easily accomplished with just one person. Winner winner chicken dinner! That saves me several days of shoveling. As I mentioned before, the approach isn't without risk, but fortunately damage to myself, the equipment or my house aren't severe enough for me not to take the lightened workload.
Wear a helmet! This is an awesome read; something I would've never thought to do at home. :thumbsup:

 
Wear a helmet! This is an awesome read; something I would've never thought to do at home. :thumbsup:

Having space to build a proper studio, either inside the house or simply on the property as I'm doing now, was one of the critical items on our list when purchasing our new house. I had looked around at places to rent for this purpose, but I was running into two problems:

1. If the place was agreeable to things as loud as drums and cranked guitar amps, that meant there were other people doing the same thing along adjoining walls. This was commonly at rehearsal studios and other places of a similar type. The problem then becomes that with everybody enjoying the freedom to be loud, my microphones get to enjoy it as well. The bleed and spill was simply too much to setup an effective studio. Sidenote: Bleed and Spill is a great name for a metal album.

2. If the place was quiet enough around it to not have to deal with bleed and spill problems, that meant that things as loud as drums and cranked guitar amps simply would not be tolerated.

Of the two options, number 1 was the most confining. I had considered places under the umbrella of option 2, but that required a couple of particular operating compromises. No live acoustic drums, and instead I would spend the money on a high end set of Roland V-Drums to power software like Toontrack's Superior Drummer 2.0. No live guitar or bass amplifiers and instead I would spend the money on high end DIs, a Fractal Audio Axe-FX, etc. That would subdue most of the spill concerns for neighbors, but it did mean that the likelihood of getting any clients into my new space would be very difficult. I would likely be relegated to only working with people that already knew and trusted me beyond my gear limitations. I could get great results using the aforementioned gear, but if you didn't know me, and you showed up to my "studio" and saw nothing but a set of V-Drums and an Axe-FX for tracking, would you hire me? Yeah... Me neither.
 
  • Like
Reactions: Marial
Demolition day four:

First thing Saturday morning I was awakened by a sound I’d been simultaneously excited about and dreading. The Bobcat that I’d rented the week prior was being dropped off in the alley next to my house. I hopped out of bed, threw on a pair of shorts and a shirt, and charged out the door barefoot to meet the delivery guy. He showed me the ins and outs of operating the Bobcat very briefly, and then with no further instruction headed off to his next delivery. I went back inside, grabbed some breakfast, put on more fitting attire and nervously got to work. I worked construction during college, so I’m no stranger to operating equipment, but that was 15 years ago and there was no risk of me piloting a machine into my new house.

This looks safe. I mean… What’s the worst that could happen?
IMG_0197.jpg


My first task was to demolish the remaining slab in front of the old garage foundation. This seemed like a good place to start given that it was flat, even, and would make a good training area for using the Bobcat. The only downside was that it was the point closest to my house. Fortunately, and I’m proud to say, I never so much as bumped the house with the machine and the slab came apart with relative ease compared to my hand-operated jackhammer a couple weeks ago. This hammer was driven by a 5,000psi pump combined with the weight of the machine pressing down on it. You literally set the bit on the offending surface, push the boom control down which causes the Bobcat to do a wheelie, and then engage the hammer. Quite a different experience this time around. I wasn’t sure if it was concrete or soft cheese.

Now we’re getting somewhere!
IMG_0204.jpg


My initial plan for the wall was simple: Dig the dirt out of the center of the U (if you remember, there are only three sides to this block wall), knock down the northern wall (the non-parallel section of the U), and then working west to east from the alley, take out the two parallel walls. This would facilitate the least amount of having to move the concrete around to continue working. It didn’t exactly pan out as smoothly as I’d planned. For those of you that aren’t aware, a bucket mounted on the front of a Bobcat being operated by an untrained musician is anything but surgically precise. I was able to easily dig out a large section of dirt through the center of the U, but getting anything done on the sides was impossible, or at least it was for me. More specifically the risk of toppling the Bobcat over the sides of the parallel walls became too great and I had to change gears.

Best laid plans of mice and men… and Bobcats.
IMG_0210.jpg


My new plan was to dig around the outside of the western wall, which abuts the alley, and then work straight across. Digging, breaking, hauling, digging, breaking, hauling, and so on. It was a slow process, but an effective one. The concrete of the wall was considerably more difficult to break apart than the slab from earlier in the day. There was no reinforcing metal in the wall as I’d feared, but the concrete mix of rock to cement was heavily favoring the rock side of the argument. It was stout. I mentioned previously, I think, that one of my construction engineers at work told me that concrete achieves its maximum cure strength right at about 50-years. This stuff may be as old as 69-years, which means it was pretty stout. Still, the Bobcat and breaker bar had the upper hand over the concrete and I was making good progress.

Tedious? Yes. Effective? Yes. Annoying to the neighbors? Oh you’d better believe it!
IMG_0207.jpg


By the end of Saturday the western wall completely removed, the non-parallel northern wall removed save for one 2’ long chunk, the top of the eastern wall was all gone, and most of the interior dirt was piled up north of the remaining structure. All in all it was a productive day and my Bobcat’ing skills were definitely increasing. I had even dared to move the throttle slightly away from the ‘turtle’ setting and slightly closer to ‘rabbit.’ A proud day indeed!

The scene at the end of the day.
IMG_0213.jpg


Sunday began with a little bit of anxiety. I knew I had to get everything done with the Bobcat that day as it was being picked up first thing Monday morning, and I had to return to my pesky day job. I was determined to get this demo project wrapped up. I enlisted the help of my wife to operate a Mattock and shovel to clear away the excess dirt around the remaining chunks of wall. While she did that, I hauled pieces of concrete out of the work zone. By “pieces” I mean large hulking sections that in some cases were approaching 100lbs. Thankfully I’m a gym rat that never skips deadlifts, so I was capable of getting the work done. I’m understandably sore and stiff as a result of the weekend, but I was able to get it done none the less.

I can’t pay myself even an indirect compliment without at least being SOMEWHAT self-depricating.
hanz-and-franz.jpg


In an hour we were ready to do some real work. The Bobcat made short work of the remaining concrete. We then piled all of the rubble onto the now demolished slab. To finish things off, I took the Bobcat with the bucket attachment and proceeded to somewhat level off the work zone. It still looks awful, but it’ll suffice until the new slab and structure are added. I was tired and there was still a bunch of work to do, but I felt as if I’d won the day.

VICTORY!!!
IMG_0234.jpg


There were two tasks left before we got to kick off our work boots and call it a day. First, we had to pile up demolished concrete and get it ready to go into the concrete recycling container that I’ve got scheduled to arrive later in the week. This wasn’t a complicated task, but certainly a heavy, tedious, and spirit-crushing one. It took about an hour of intensely heavy lifting, but we got it done and were left with a nice pile of clean, nearly 70-year old concrete outside our backdoor. Just what ever happy couple wants right?

Everything all neat and tidy… Relatively speaking of course.
IMG_0251.jpg


The final task was spreading out six cubic yards of crushed rock into the void left where the slab had previously sat. No problem, I’ve got a Bobcat! Have you ever seen heavy equipment operators using considerably larger and unwieldy equipment to turn huge piles of dirt into pristine, smooth, level, even surfaces? Imagine that same process, but with something like a really inept Basset Hound, or a small child in an oversized hat attempting to do it and you’ll have a good representation of how it went for me. I thumped around on the pile of dirt with the Bobcat for a while, and got everything in the right vicinity, but ultimately decided to park the machine for the last time, break out the shovels and a rock rake, and finish it off by hand. Once again, more tedious back breaking work, but we got it done.

For future reference: Six yards equates to one large pile of rock.
IMG_0179.jpg


Remember a moment ago when I said “final task?” Well, we decided to add a couple of pavers to cap the whole thing off and create a walkway from the alley to our back steps. My wife operates a small doctor’s office out of the house (she’s a doctor, not me) and her patients having a clean and visible approach to the entrance was paramount. We popped down to Home Depot, grabbed twelve 16” x 16” concrete pavers and dropped them in place only to find that we needed four more. One final trip and we were all set.

This is what we call “scope creep” at work when the amount of work done on a project increases beyond the original parameters.
IMG_0255.jpg


The only thing left to do on the demolition is to get another concrete recycling container on-site, load it up, and send it on its way. I won’t do another full update for that as it will no doubt be quite a lackluster couple of hours. I’m working on getting the concrete contractor out to do the new slab, and the ball is rolling with the garage manufacturer. All in all, things are moving along relatively smoothly. Things are largely out of my hands at this point since the next phases of work are all dependent on contractors. I hate not being in control, but I also like the prospect of limiting the excruciating work for a while. Well… At least until I get to start hanging drywall.

This will be the last major update for a while as the wait for anything driven by a contractor here in Seattle has become punishingly long. There’s a major construction boom and everybody is super busy. I’ll update things as they become available. In the meantime, here’s me using our new living room rug to look like some character from Game of Thrones.

IMG_0189.jpg
 
Just a quick update on this: The concrete container will be here on Friday. That will allow me to load up the pile of concrete on Saturday and have it picked up on Monday. At that point it will FINALLY feel like I've got a clean slate from which to work.

Next week, and beyond, I'll be pecking away at evening out the dirt pile as best as I can with a shovel, rock rake, mattock, and a plate compactor. It will be slow going, but it has to be done. There are some rains on the horizon after a massive dry spell, so the sooner I get that done and get some straw down for erosion control the better.

The bigger part of this update is that I've decided to go with a shed style building rather than a garage. Initially we had planned on a garage so that if we ever decide to sell this house we could convert it back to a garage from a studio and capitalize on higher resale value. I crunched some numbers and the potential resale value increase for a garage gets cut WAY down when you realize that a shed doesn't require full access to the front which frees up a host of much more attractive landscaping options. My wife also had a brilliant idea for how to construct a carport off the side of the house that will also provide a covered area where our back steps head towards the alley. The garage's resale value increase also came with increased upfront costs (concrete slab foundation, conversion of the garage door to a set of French doors, higher structure cost). All told, this will be the smarter financial decision.

The shed sits on a galvanized metal substructure which you put on top of a 4" thick (compacted) base of 5/8"-minus crushed rock. That means more excavation and spreading, leveling, compacting of crushed rock for me. No worries there. I can certainly handle that type of work. Once the structure is in place, a series of eight Manta Ray earth anchors are shot into the ground to keep the structure in place. All told it should be very slick, save us some money, allow for cooler landscaping at the house, and keep everything rolling forward smoothly. We have to make a few decisions tonight, but tomorrow I should be putting in the order for the structure. Their delivery window is out until around the beginning of October, so I'll have about a month to get things ready.

Now it's starting to feel real!