• TalkBass has been independent since 1998. Add your voice.
    Create a free account to reply to discussions, view embedded media, and browse with fewer display ads.
    Join freeLog in
    Want zero display ads or expanded classifieds tools? Compare plans.

New Build: Chambered 4-string fretless bass

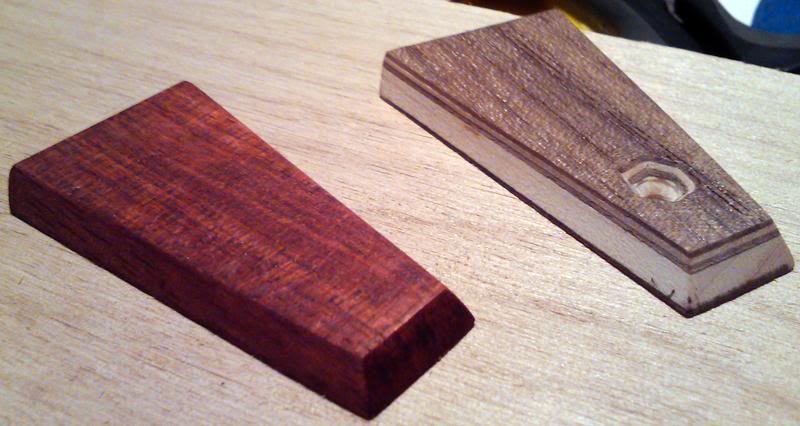
Made a TR cover to match the bridge, and I think it's the way to go:
tr_covers_2.jpg


I unfortunately cut it a little short. There is about a 0.1" (2.5mm) gap between the TR cover and the nut, so I'm going to make a new one.

Kinda killing time waiting for a new router bit to arrive. I've ordered an Amana 1/2" pattern bit with a 1/4" cutting depth. It should make routing the bridge pocket and electronics cavity cover recess easier.

 
Made a TR cover to match the bridge, and I think it's the way to go:

tr_covers_2.jpg


I unfortunately cut it a little short. There is about a 0.1" (2.5mm) gap between the TR cover and the nut, so I'm going to make a new one.

Kinda killing time waiting for a new router bit to arrive. I've ordered an Amana 1/2" pattern bit with a 1/4" cutting depth. It should make routing the bridge pocket and electronics cavity cover recess easier.

That bloodwood looks great - more towards the warm color of padauk, and away from the cool/purple cast bloodwood I've seen.

Re the polygonal countersink in the other cover, if you had the same problem that I did and you want to avoid it this time, keep your revs higher while countersinking. Worked for me.
 
Just subscribed. Bit late, but only joined up a few days ago.

Nice timber. Nice precise design. I'm building a replacement body for a yamaha bass at the moment (on another thread that I won't link, to be polite), which I'm doing very much by eye and feel, but I really appreciate the attention to detail in this build.

I have started using cobalt countersink bits designed for stainless steel cutting, to bore countersinks in wood. They're amazingly sharp, and with controlled pressure (in a press with the work held fast) you can get great results. You'd need a small one to do this kind of work though. I think I'll order myself a new small one for my build.


Simon.
 
Worked on the bridge this afternoon.

First I attached the template and drilled the string-through holes:
bridge_drilled.jpg


Then I scribed the contour lines with an awl and started sanding the contours with the spindle sander. Sides first:

bridge_contour_1.jpg


Then the front edge:
bridge_contour_2.jpg


Then I radiused the top with a 10" radius block (to match the 10" radius of the neck):
bridge_contour_3.jpg


Then I used the same radius block to slope the the top of the bridge down toward the back:
bridge_contour_4.jpg


I'm pretty happy with how it is coming along. I need to build a slotting jig and acquire a plunge router (or plunge base for an existing router) before I can cut the saddle slot. But...it looks good, and I'm pleased.

I think the bloodwood bridge with matching truss rod cover and electronics cavity cover will be nice colorful accents to the rest of the bass.
 
Made the new TR cover today.

satine_tr_cover.jpg


I made it a little overlarge, then sanded to fit. Still need to sand the edges, but I think it's looking nice.

I'm going to cut the chambered body out today, then route for the battery box. I need the 1/4" cutting height router bit before I can route the electronics access cavity. Then I can glue the walnut plate on and route the bridge and neck pockets.
 
I got the body cut out:

body_cut_out.jpg


I cut it out with a bandsaw about 1/8" outside the line, then trimmed it to the template with the router table.

I also routed the control cavity opening:

control_cavity.jpg


There was a little tear-out when routing the body. Won't be a problem, though, as I am putting a 3/4" radius roundover on all the body edges. Hopefully, I'll be able to do that without any more tear-out.
 
I routed the top of the body today:
body_routed-1.jpg


And trimmed the neck pocket:
mockup_1-1.jpg


It's a tight fit.

There really isn't much left to do on the body. I've got to drill the neck attachment holes, route the cavity cover recess, and drill the output jack hole. That's about it. I'm pretty happy with how it is coming out.
 
That top is really good looking. I'm about to make something similar, swamp ash chambered body with walnut top. It's for my trapezoidal profile torzal twisted headless neck. I like to test different body woods and compare the sound they provide.
Marko
