
Enjoy the benefits of a premium membership!
Upgrade Account
-
TalkBass has been independent since 1998. Add your voice.
Create a free account to reply to discussions, view embedded media, and browse with fewer display ads.
Join free Log in
Want zero display ads or expanded classifieds tools? Compare plans.
You are using an out of date browser. It may not display this or other websites correctly.
You should upgrade or use an alternative browser.
You should upgrade or use an alternative browser.
New build - concept: Oz Oz Oz...
- Thread starter Harry Cahyadi
- Start date
More options
Who Replied?

I live in Melbourne. I'm not quite sure why you thought that I'm a mexican though...
As Frank once sang... "South of the border, down Mexico way"

I'm dying to start the build. I'm still trying find a local business who provides wood cutting service. The wood that I get from my supplier is not the right thickness, and I don't want to plane it down because I will waste quite a thick cut that could be used for later.
As soon as I got that done, the progress will be posted.
I wish I got a big band saw...
I had that issue as well. Thankfully I've got a few mates who are woodphiles. One was nice enough to recut it for me. Another helped me to a lot of other stuff. Have you looked to see if there's a 'Mens Shed' in your area. They often have wood working machinery.

Nice, the camphor looks good.
I'm in Sydney, its good to see the build with all Aus woods.
I've built a bass using all Aus woods, I find our woods to be a bit heavy, but with a bit of ingenuity you can get the weight down.
Cant wait to see the progress.
I was aware of it as well. Once I get everything cut to the right dimension, I will weigh them down. If it is too heavy (more than 5kg), I'm going to chamber the body to reduce the weight (I hope that is not the one you are referring as ingenuity...
).I had that issue as well. Thankfully I've got a few mates who are woodphiles. One was nice enough to recut it for me. Another helped me to a lot of other stuff. Have you looked to see if there's a 'Mens Shed' in your area. They often have wood working machinery.
Mens Shed is a good point. I didn't know there is a place like that. Apparently there are a few around me. I will give it a shot.
Thank you.

I was aware of it as well. Once I get everything cut to the right dimension, I will weigh them down. If it is too heavy (more than 5kg), I'm going to chamber the body to reduce the weight (I hope that is not the one you are referring as ingenuity...
I've made a few basses out of Aust hardwoods now. I'd suggest chambering from the word go. My first bass was heavily chambered but still weighed in at 4.5kg, which in my book is too heavy. What I figured out for the second one was to reduce the body thickness as much as possible. The last instrument I build was a baritone with a 27mm body thickness. There were a few tense moments in the design stage. However with a good set neck joint there were no dramas in the end.
I've made a few basses out of Aust hardwoods now. I'd suggest chambering from the word go. My first bass was heavily chambered but still weighed in at 4.5kg, which in my book is too heavy. What I figured out for the second one was to reduce the body thickness as much as possible. The last instrument I build was a baritone with a 27mm body thickness. There were a few tense moments in the design stage. However with a good set neck joint there were no dramas in the end.
I see your point on reducing the thickness of the body.
However, I noticed that by reducing the thickness of the body, the cavity depth is also reduced. As a result of it, a modern preamp, such as Mike Pope Flexcore, could not fit in there.
I did that on my recent build, 6 string fretless. The thickness of the body is about the same with your build. Around 25mm to 27mm. Here is the picture for it:
It is
- Pine body
- Flame maple neck (stewmac wood), matching pine headstock facing
- Red Oak fingerboard, red oak nut
- Home made bridge with camel bone saddle
- Delano SBC6 set
- Discouraging at first but turned out pretty good was the chinese 3 band preamp replacing the Mike Pope that I wanted to put in at the first place
On the other hand, heavily chambered body need extra attention on the routing works. The cavity routings could overlap the chambers, which will give less professional result, although it might not be clearly visible from the outside
So I need to find the perfect balance I think.
Thank you for the tips. I appreciate it.
I was aware of it as well. Once I get everything cut to the right dimension, I will weigh them down. If it is too heavy (more than 5kg), I'm going to chamber the body to reduce the weight (I hope that is not the one you are referring as ingenuity...
Thank you.
ahh maybe.... Yeah I was talking about chambering, but you can also reduce weight by making all the edges roll off alot, larger electronics cavity than needed, belly carve/ arm carve oversized and oh yeah chambering.
I agree chambering for me was not what I originally intended either, but if you keep safely away from the belly / arm carve and design it well before cutting wood it should turn out ok.
I now find I'm having to chamber all my instruments, as I'm always using a heavy wood for majority of my builds, I also like the idea of balancing the body to match the electonics cavity cut out aswell.
Mmm, interesting. Could you post a link the chinese preamp?
I'm sorry, I can't remember the link. I bought that a while ago, purely for fun. Never thought that I'm going to use it.
I reckon all Chinese preamp are pretty much the same. I bought few different kinds just to compare, and they all sounds pretty much the same in term of the boost and cut freqs.
They probably from the same parent manufacturers, just branded differently.
In my opinion the quality of the vibration receiver, which is the pickups, is the number one determining factor of the sound quality, and of course the density of the wood, especially in solid body electric guitar.
Guys,
Sorry for the delayed update. It has been a very busy week for me at my real job.
Finally, I found a place to cut my wood. Coincidently, it is my house builder's place. He owns a joinery, and the best part is it is FREE.
I'm going to go there this wednesday, and hopefully after that, the ball will start rolling a little faster.
On the weekend, I started of building templates for my control cavity and it's cover.
So far, I've been using STEWMAC cavity template for my previous builds. However, I found that the shape does not fit well with my design, especially the inside pattern.
In addition, the clear acrylic gets melted very easily by the router bearing. I prefer MDF templates than acrylic one, although the see-through feature of acrylic comes very handy sometimes.
I know that this is the boring part, but hopefully it will start to get more interesting as we go.
I thought I will post some pictures of the templates, not for all of the masters, because it is far from perfect, but to give some hope to others who is trying to build their first bass.
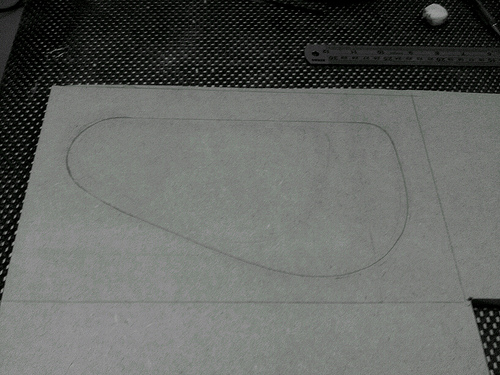
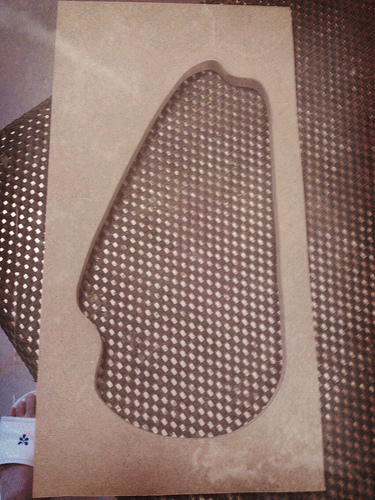
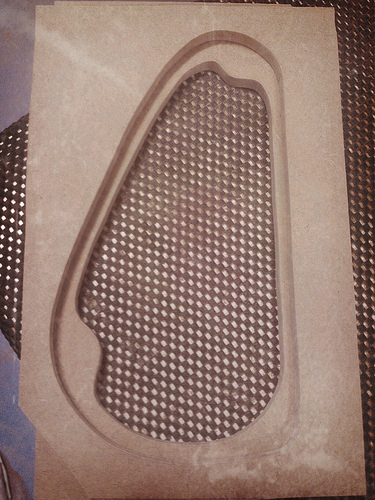
Started of by drawing the cavity outlines, and then cutting it off using jigsaw and a little sanding to make a smoother surface when routing.
Outer side cavity template
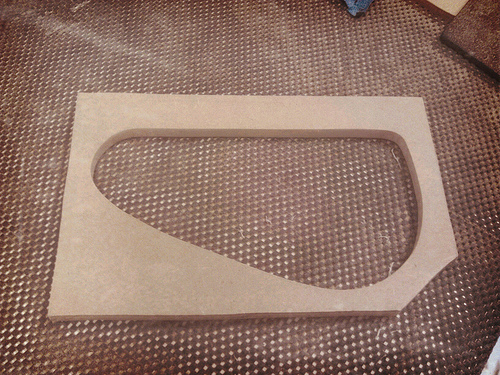
Inner side cavity template
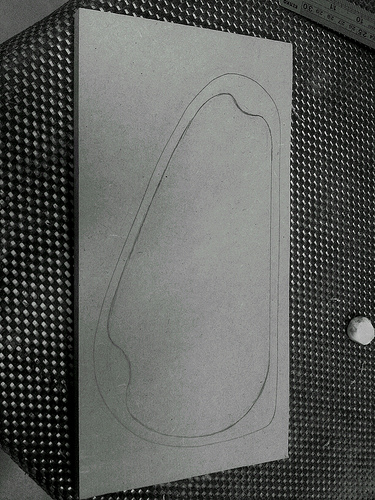
The cavity will look like below
Using the outer side of the template, I make the template for the cavity cover, so I can use the trimmer flush router bit to make the tight fit cavity cover. I just thought that it will be easier this way.
Here is the cover template
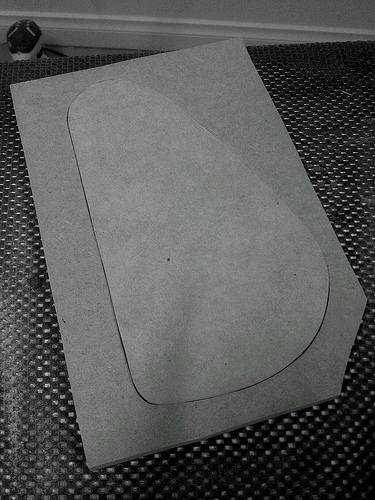
I made it a little tight at this point, so with a little sanding on the real wood, it will be perfect fit later.
Earlier, I thought that I would go for my single cut body style design. However, after doing the rendering for my double cut design, it looks nice too. I'm honestly confused. I think I would need some of you to help me with the decision. Any votes will be greatly appreciated.
Below are the body style designs.

Next up will be the wooden pickup covers. Initially, I was thinking to put Nordy DC5, but I changed my mind. I will go with the Nordy NJ5. The pickups position will be 70's jazz bass pickup positions.
I don't really like the 4 "little ears", to place the screws, that the traditional J pickup has. I will make slim-soapbar-like wooden pickup covers, with exposed pole pieces.
I will get the wooden covers cap from the top wood where the pickups will be placed later. I'm really nervous to do this, since there would be no room for mistakes.
Hopefully, this could be useful/interesting for you guys.
Stay tuned.
Harry
Sorry for the delayed update. It has been a very busy week for me at my real job.
Finally, I found a place to cut my wood. Coincidently, it is my house builder's place. He owns a joinery, and the best part is it is FREE.
I'm going to go there this wednesday, and hopefully after that, the ball will start rolling a little faster.
On the weekend, I started of building templates for my control cavity and it's cover.
So far, I've been using STEWMAC cavity template for my previous builds. However, I found that the shape does not fit well with my design, especially the inside pattern.
In addition, the clear acrylic gets melted very easily by the router bearing. I prefer MDF templates than acrylic one, although the see-through feature of acrylic comes very handy sometimes.
I know that this is the boring part, but hopefully it will start to get more interesting as we go.
I thought I will post some pictures of the templates, not for all of the masters, because it is far from perfect, but to give some hope to others who is trying to build their first bass.
Started of by drawing the cavity outlines, and then cutting it off using jigsaw and a little sanding to make a smoother surface when routing.
Outer side cavity template
Inner side cavity template
The cavity will look like below
Using the outer side of the template, I make the template for the cavity cover, so I can use the trimmer flush router bit to make the tight fit cavity cover. I just thought that it will be easier this way.
Here is the cover template
I made it a little tight at this point, so with a little sanding on the real wood, it will be perfect fit later.
Earlier, I thought that I would go for my single cut body style design. However, after doing the rendering for my double cut design, it looks nice too. I'm honestly confused. I think I would need some of you to help me with the decision. Any votes will be greatly appreciated.
Below are the body style designs.
Next up will be the wooden pickup covers. Initially, I was thinking to put Nordy DC5, but I changed my mind. I will go with the Nordy NJ5. The pickups position will be 70's jazz bass pickup positions.
I don't really like the 4 "little ears", to place the screws, that the traditional J pickup has. I will make slim-soapbar-like wooden pickup covers, with exposed pole pieces.
I will get the wooden covers cap from the top wood where the pickups will be placed later. I'm really nervous to do this, since there would be no room for mistakes.
Hopefully, this could be useful/interesting for you guys.
Stay tuned.
Harry
Guys,
I didn't have much to do last evening, but too late to fire off my power tools without my neighbours threatening to burn down my house, so I drew out my design on a thin piece of MDF for the body and neck template.
Neck - 34" Scale, 24 Frets, with zero fret

Body - 2 jazz style pickups with wood covers, 70's jazz bass pickup position (neck 27 13/16", bridge 31 13/16", centre-to-centre, from zero fret).
Please correct me if I'm wrong on the positions. I just read it from somebody else's post who measured his original fender '66.
I got the neck pickup position from his post and I added 4" from the neck pickup to get my bridge pickup position.
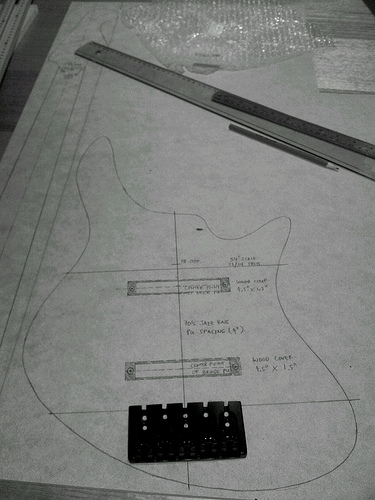
Overal View
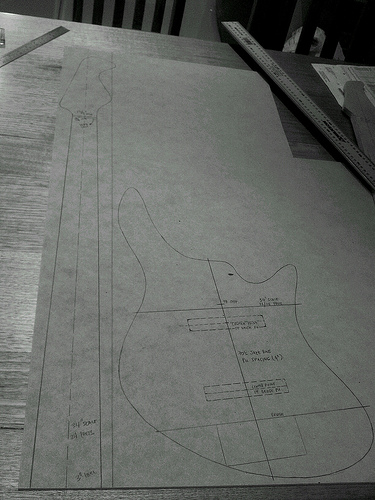
I will cut those template today and make my wood covers.
I will also get my wood cut today, so I can start gluing them up.
Thank you for reading and Stay tuned.
Harry
I didn't have much to do last evening, but too late to fire off my power tools without my neighbours threatening to burn down my house
, so I drew out my design on a thin piece of MDF for the body and neck template.Neck - 34" Scale, 24 Frets, with zero fret
Body - 2 jazz style pickups with wood covers, 70's jazz bass pickup position (neck 27 13/16", bridge 31 13/16", centre-to-centre, from zero fret).
Please correct me if I'm wrong on the positions. I just read it from somebody else's post who measured his original fender '66.
I got the neck pickup position from his post and I added 4" from the neck pickup to get my bridge pickup position.
Overal View
I will cut those template today and make my wood covers.
I will also get my wood cut today, so I can start gluing them up.
Thank you for reading and Stay tuned.
Harry

Your bridge placement sounds wrong. The bridge has to be placed with respect to the nut, regardless of any pickup position....
Neck - 34" Scale, 24 Frets, with zero fret
...
Body - 2 jazz style pickups with wood covers, 70's jazz bass pickup position (neck 27 13/16", bridge 31 13/16", centre-to-centre, from zero fret).
Please correct me if I'm wrong on the positions. I just read it from somebody else's post who measured his original fender '66.
I got the neck pickup position from his post and I added 4" from the neck pickup to get my bridge position.
Draw a line 34" from your zero fret line - this is your virtual bridge line. Then move the bridge saddles so that they are adjusted all the way towards the headstock, and mount the bridge so that the witness points on the saddles -- the point where the vibrating string first makes contact with the saddle --- is above the virtual bridge line. If you are worried about allowing for error, then do this with the saddles adjusted 1/8" short of all the way up, instead of all the way up.
Your bridge placement sounds wrong. The bridge has to be placed with respect to the nut, regardless of any pickup position.
Draw a line 34" from your zero fret line - this is your virtual bridge line. Then move the bridge saddles so that they are adjusted all the way towards the headstock, and mount the bridge so that the witness points on the saddles -- the point where the vibrating string first makes contact with the saddle --- is above the virtual bridge line. If you are worried about allowing for error, then do this with the saddles adjusted 1/8" short of all the way up, instead of all the way up.
Pilotjones,
Thanks for checking out my post.
Sorry for my missleading description. What I meant by the 4" is not the actual bridge, but the bridge pickup.
The way I measured the bridge position is exactly as you mentioned.
Harry
Today was a beatiful ANZAC day. I said to myself, "I will do a little bit of work".
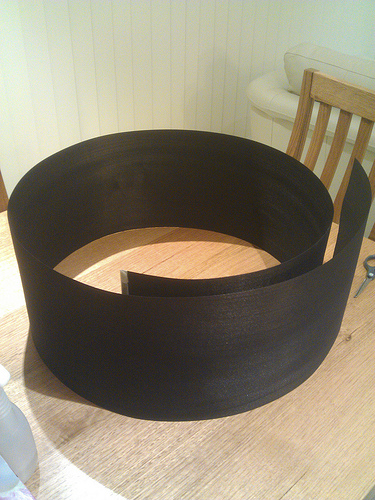
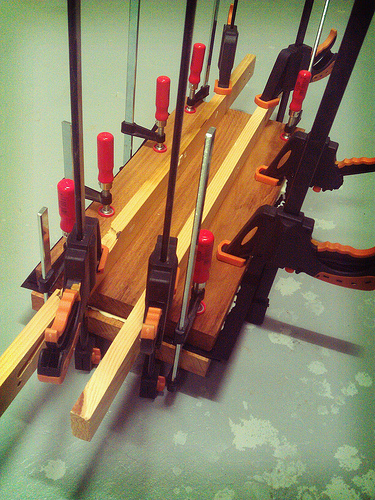
Just received the black dyed veneer yesterday. I glued up the veneer to the body wood.
The veneer was a pretty good deal from an eBay seller in the UK. 325cm x 20cm x 0.6mm for around AU$30 including shipping.
Here is the veneer
It is still being glued up to the body wood at the moment
Until next time. Stay Tuned...
Harry
Just received the black dyed veneer yesterday. I glued up the veneer to the body wood.
The veneer was a pretty good deal from an eBay seller in the UK. 325cm x 20cm x 0.6mm for around AU$30 including shipping.
Here is the veneer
It is still being glued up to the body wood at the moment
Until next time. Stay Tuned...
Harry
G'day,
Today is one of those days, when you really don't feel like going to work at all.
I got up around 7.30 and decided to call in sick.
Since I woke up pretty early, I thought, I might do some more work with the bass...
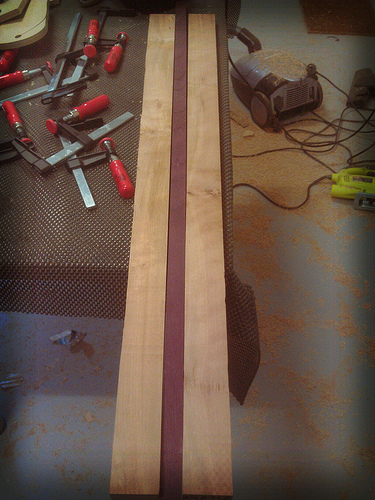
On monday, I received my Brasilian purpleheart for the neck laminate. I decided to go for 3 piece neck.
At this point, the bass is no longer 100% Oz... It has brasilian descent.
Initially, what I had in mind was, "today at least I can glue up the neck". Nothing was overly ambitious.
Low and behold, I started with cutting the neck core wood into half, so I could glue up the purpleheart in the middle.
Finished cutting the core neck wood in half, I took my router to trim the rough surface, so I could have a smooth, flat and straight gluing surface.
I prefer to use router instead of hand planner. I couldn't afford a jointer at this point.
I was using 2 router bits to do this. 1/2" with top bearing and 1/2" with bottom bearing. The catch was, I need to change it back and forth between them, which was really a pain in the bump, because my router is not the fancy key-less one.
Everything seemed to go very well. I just needed to do another pass, but I needed to change the bit from the top bearing to the bottom bearing one.
I tried to loosen the key nut, and suddenly my left hand slip and hit the bit...
Luckily the router was off, otherwise I wouldn't be able to write this post.
My pinky start bleeding. The cut quite deep. I stopped for a while, and I was thinking, that probably I would not be able to achieve anything today.
Here is the link to the picture (my finger), just in case anyone interested to see http://farm9.staticflickr.com/8123/8694515863_cdee143296.jpg
I dont want to embed it into the post, just in case some people might throw up.
I washed it up, applied antiseptic and put the band aid on. I said to myself, "let't try putting on a vinyl glove and continue, if it hurts, then I will stop".
Surprisingly, not only finished gluing the neck, I also managed to cut the body and glued the 2 piece body as well.
Enough telling story, lets see some progress pictures...
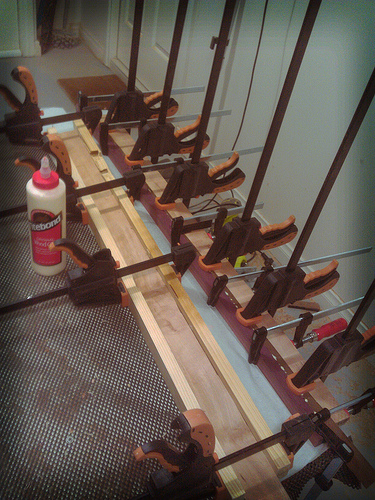
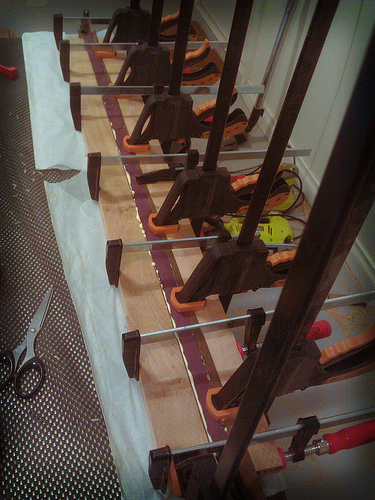
Neck before glued up
Neck gluing up
I decided to add brown veneers between the timbers. I glued up the first half and then the second half
I also managed to do more work...
Fretboard - Gluing up the black veneer
I also decided to use a black veneer under the fretboard
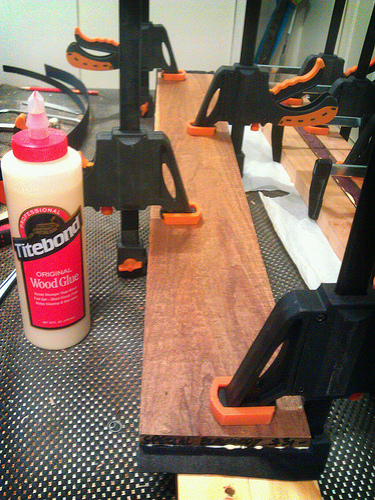
Body rough cut and gluing up

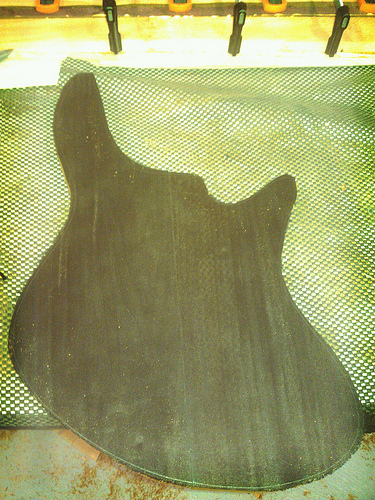
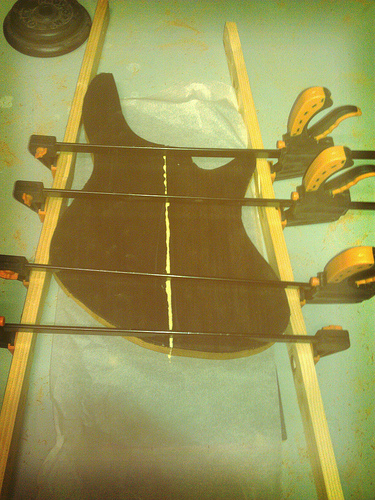
Top rough cut
I cut the middle part to cover the neck extension using a coping saw
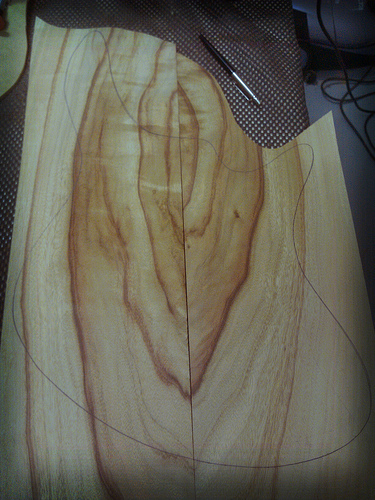
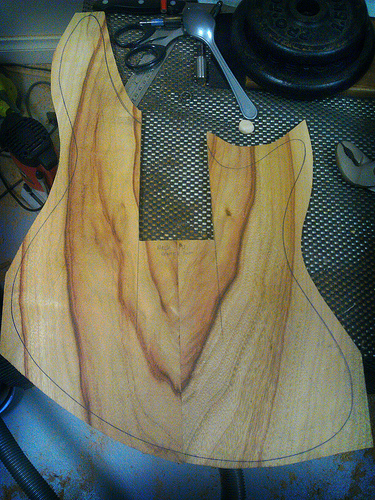
Headstock facing
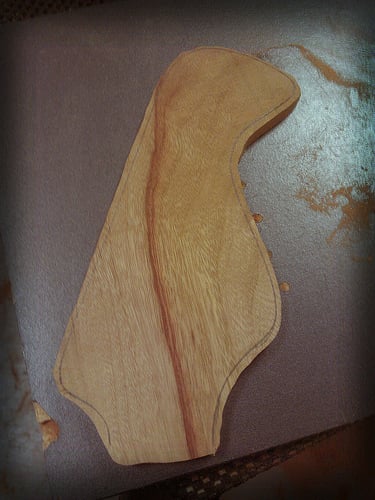
It ended up as a pretty productive day... and the best thing is my finger is healing quickly and looking and feeling better by now.
Talk to you soon. Stay tuned...
Harry
Today is one of those days, when you really don't feel like going to work at all.
I got up around 7.30 and decided to call in sick.
Since I woke up pretty early, I thought, I might do some more work with the bass...
On monday, I received my Brasilian purpleheart for the neck laminate. I decided to go for 3 piece neck.
At this point, the bass is no longer 100% Oz... It has brasilian descent.
Initially, what I had in mind was, "today at least I can glue up the neck". Nothing was overly ambitious.
Low and behold, I started with cutting the neck core wood into half, so I could glue up the purpleheart in the middle.
Finished cutting the core neck wood in half, I took my router to trim the rough surface, so I could have a smooth, flat and straight gluing surface.
I prefer to use router instead of hand planner. I couldn't afford a jointer at this point.
I was using 2 router bits to do this. 1/2" with top bearing and 1/2" with bottom bearing. The catch was, I need to change it back and forth between them, which was really a pain in the bump, because my router is not the fancy key-less one.
Everything seemed to go very well. I just needed to do another pass, but I needed to change the bit from the top bearing to the bottom bearing one.
I tried to loosen the key nut, and suddenly my left hand slip and hit the bit...
Luckily the router was off, otherwise I wouldn't be able to write this post.
My pinky start bleeding. The cut quite deep. I stopped for a while, and I was thinking, that probably I would not be able to achieve anything today.
Here is the link to the picture (my finger), just in case anyone interested to see http://farm9.staticflickr.com/8123/8694515863_cdee143296.jpg
I dont want to embed it into the post, just in case some people might throw up.
I washed it up, applied antiseptic and put the band aid on. I said to myself, "let't try putting on a vinyl glove and continue, if it hurts, then I will stop".
Surprisingly, not only finished gluing the neck, I also managed to cut the body and glued the 2 piece body as well.
Enough telling story, lets see some progress pictures...
Neck before glued up
Neck gluing up
I decided to add brown veneers between the timbers. I glued up the first half and then the second half
I also managed to do more work...
Fretboard - Gluing up the black veneer
I also decided to use a black veneer under the fretboard
Body rough cut and gluing up
Top rough cut
I cut the middle part to cover the neck extension using a coping saw
Headstock facing
It ended up as a pretty productive day... and the best thing is my finger is healing quickly and looking and feeling better by now.
Talk to you soon. Stay tuned...
Harry
Talkbassers,
Just about to start another build. I'm posting it with a thought that somebody might be interested in it.
Being from Melbourne, Australia, I though my concept is Oz Oz Oz. I call it that way because all of the woods I'm using for the build is Australian native exotic woods (So, no macassar ebony, amboyna burl or anything like that)
The specs will be:
- Single cut body
- 5 Strings, 35" scale
- Abalone Dot/Block inlay (to be confirmed)
- Body: 2 piece, Australian Blackwood
- Top: Bookmatched Australian Camphor Laurel
- Back: Bookmatched Australian Camphor Laurel (to be confirmed)
- Neck: 1 piece (could be more), Australian Myrtle Burl
- Matching headstock cover
- FB: Figured, Dark Australian Blackwood
- Dark red accent veneers between the body and top, FB and core neck wood, Headstock cover and core neck wood
- 2 pickups Nordstrand DC5 pickups (to be confirmed)
- Australian Blackwood pickup cover with Camphor Laurel cap (the pieces will be taken from the top wood before it is glued up)
Below are some pictures of the wood for your enjoyment...
Body - 2 piece, Australian Blackwood
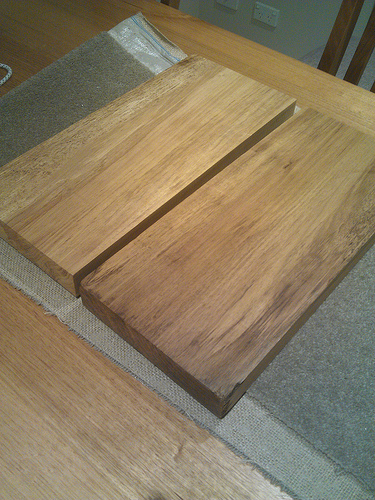
Neck - Australian Myrtle Burl
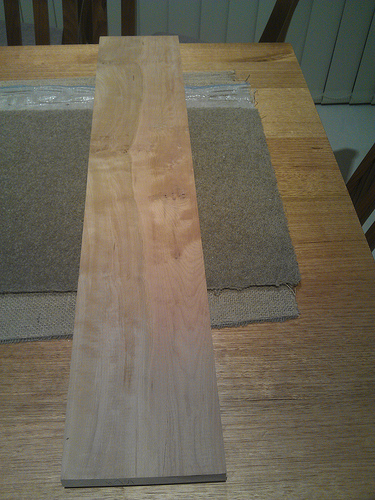
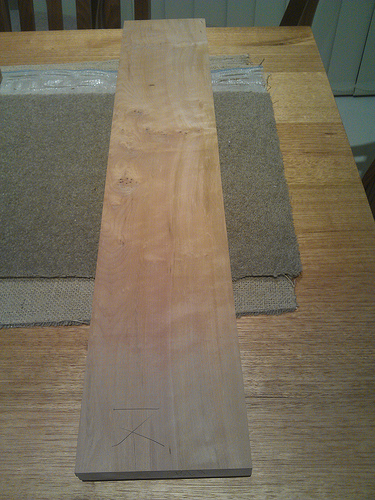
Fingerboard - Figured, Dark Australian Blackwood
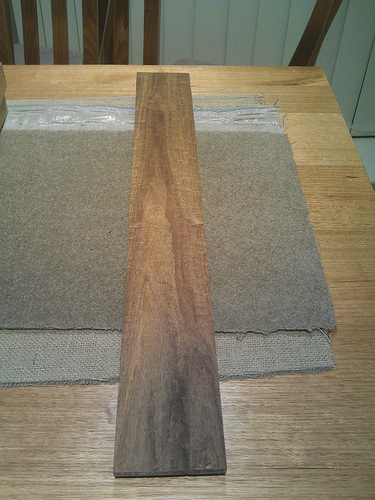
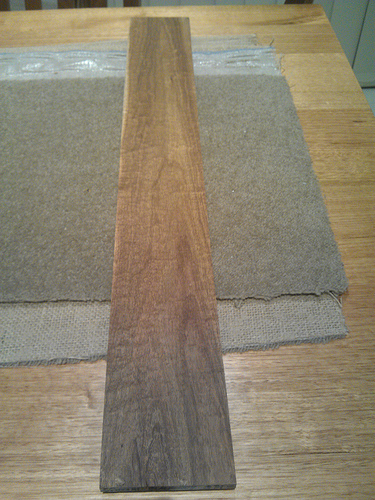
Top and/or Back - Bookmatched, Australian Camphor Laurel
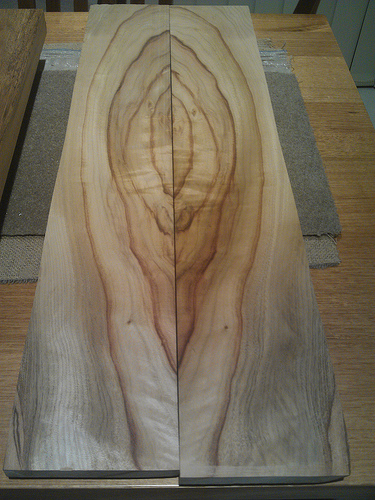
Thank you for reading. More progress should come shortly...
Harry
Sorry mate, but Camphor Laurel is NOT native to Australia...
It is a highly invasive species introduced from SE Asia in the 1800's and has become very widespread (It's quite common here in W.A.)
It does have nice wood though, so you're excused ;-)
G'day,
My pinky start bleeding. The cut quite deep. I stopped for a while, and I was thinking, that probably I would not be able to achieve anything today.
Here is the link to the picture (my finger), just in case anyone interested to see http://farm9.staticflickr.com/8123/8694515863_cdee143296.jpg
I dont want to embed it into the post, just in case some people might throw up.
Without sounding heartless, it doesn't look too bad. I'll try and find the pic of when my grinder jumped out of my hands and tried to bury itself in my leg...

But, I can see why you freaked out a the time a little. Hands bleed a lot.

Hopkins
Commercial User
I guess I cut myself to often, so im used to it, but I probably wouldnt have even put a band aid on that cut. Then again my hands arw pretty much one big scar.
Sorry mate, but Camphor Laurel is NOT native to Australia...
It is a highly invasive species introduced from SE Asia in the 1800's and has become very widespread (It's quite common here in W.A.)
It does have nice wood though, so you're excused ;-)
Hahaha... Thanks for the compliment.
Good to know about the history of the Camphor Laurel.
At least I'm using the one that cut in Oz forest.
Without sounding heartless, it doesn't look too bad. I'll try and find the pic of when my grinder jumped out of my hands and tried to bury itself in my leg...
But, I can see why you freaked out a the time a little. Hands bleed a lot.
Yeah. It is not so much about the pain. It was more about the amount of blood coming out.
In fact, It was not painful at all.
I guess I cut myself to often, so im used to it, but I probably wouldnt have even put a band aid on that cut. Then again my hands arw pretty much one big scar.
I put on the band aid just to cover it from dust.
A little updates...
I've got no plan for friday night, so I decided to do a little work.
Planed the neck wood and got it ready to be cut tomorrow.

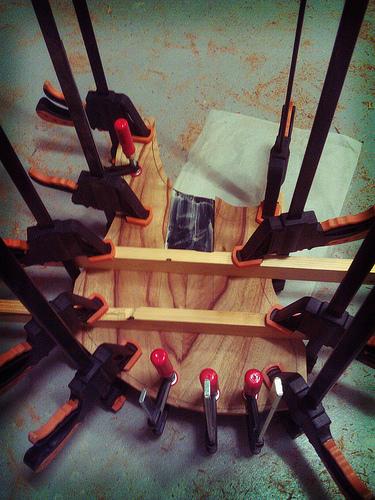
Glued the top to the body
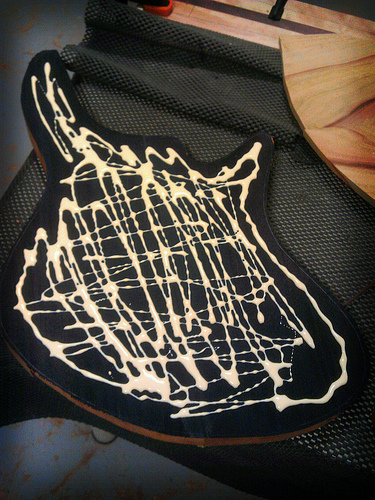

Tomorrow should have more progress updates...
Stay Tuned...
Harry
I've got no plan for friday night, so I decided to do a little work.
Planed the neck wood and got it ready to be cut tomorrow.
Glued the top to the body
Tomorrow should have more progress updates...
Stay Tuned...
Harry


