• TalkBass has been independent since 1998. Add your voice.
    Create a free account to reply to discussions, view embedded media, and browse with fewer display ads.
    Join freeLog in
    Want zero display ads or expanded classifieds tools? Compare plans.

New build - concept: Oz Oz Oz...

Hi,

Today, I expected to get a lot of things done, but apparently, I didn't achieve what I wanted to do.

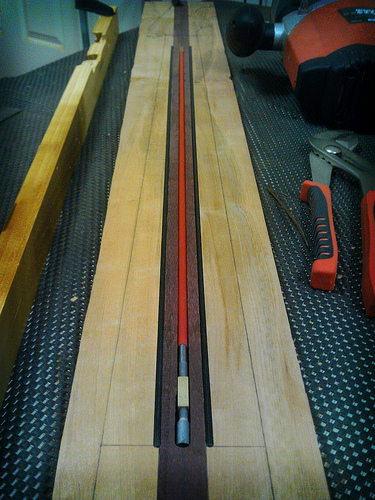
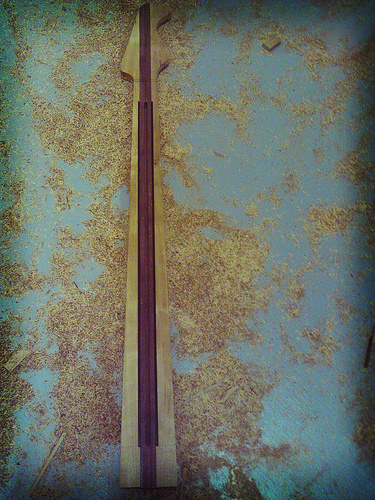
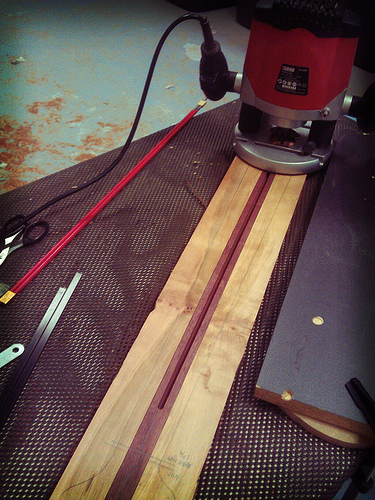
Anyway, I routed the truss rod and 2 carbon fibre reinforcements cavities and cut and trim the neck

Routing the truss rod and 2 carbon fibre reinforcements cavities
I prefer to install the truss rod in reversed position (anti-clockwise to tighten and clockwise to loosen/relieve). Unlike the traditional approach, there will be no gap between the fingerboard and the truss rod nut.
8706296551_382ec30b1c.jpg
8707418732_5088004c4f.jpg
8707390244_e2b9d0f59a.jpg


Cut and trimmed neck

8706264337_431a113e31.jpg
8706263041_88180cab16.jpg


Thank you for reading.

Stay tuned...


Harry
 
What's up...

Here is more progress update on the bass...

Neck is done. Only shapping needed.
Headstock facing glued up and trimmed, even lightly shaped.

8726540652_b0d3c4d92c.jpg
8726550124_9cca4eaf09.jpg


Body is trimmed. No shaping yet.

8726609628_071b9d2404.jpg
8726672694_74a6635d56.jpg


Here is the overal look. Very close to first assembly.
The neck extension will be covered with matching veneer later on.

8726576898_a151da696a.jpg


I hope you guys enjoy watching the process. I'm not sure whether this could help anybody. The most important thing is to have fun.

Thank you for watching. Stay Tuned!!!


Harry
 
More updates,

Today is wood pickup cover day...

I'm using the TAS myrtle (neck off cut) as the body and blackwood (fingerboard off cut) as the cap.
I'm also using the black accent veneer under the cap.

I haven't rounded the edges, and haven't routed the pickup hole either.

Some pictures...

8727571825_3a01eaac8f.jpg
8727761797_4ae9334d9d.jpg
8727569433_caa5f45052.jpg


I'm trying to make it as thin as I can, so it will still have the jazz pickup look instead of soapbar.

The inside cap will be 2mm thick. I will look thicker from the outside (1/8"), which I prefer that kind of look.

The wall will be 1/8". I'm aware that some people do 1/16". I'm not brave enough to do that.

Tomorrow will cavities and neck pocket routing day.

Stay Tuned...


Harry
 
Yo...

More updates.

Routed neck pocket and pickup cavities
8734935698_f6f750a23e.jpg


Routed wood pickup covers
Not perfect, and it was a pain, routed ones for jazz bass style pickups.
8734939156_1070f92878.jpg
8733814441_55a433311c.jpg


I utilised the bridge pickup cavity to route the pickup covers' hole. Most builders will tell me that I'm a cowboy (for doing it this way, which was very error prone), but here is how I did it (thats why they are not perfect)...
8734937338_328b3e7cc3.jpg


Those 2 piece of thin MDF were there to balance the router out, so it didn't fall to the right or left side, which could have been the worst nightmare.

Anyway, here is the overall look.
8734930372_5404b42bb8.jpg


I'm currently gluing up the neck extension veneer, so it will match the top and look nicer. It will be on the next update.

Thank you for reading.

Stay Tuned...!!!


Harry
 
Looks awesome. I have very little idea how those woods will sound together, so you'll have to make some hot soundclips for us.

Thank you. My prediction is, it will sound quite punchy, because all timbers are high-density timbers.

I would try to get somebody good to give a test drive and record it, since my playing is not that good... :D
 
This is me again...

I have just done the neck shaping earlier today. It is not all smooth out yet, but it turned out very nicely.

With this build, I want to achieve a modern and exotic take of vintage jazz bass. So I decided to go extreme with the neck thickness.

This is the thinnest neck that I have ever made/played for 5 string (even 4 string). It is around 17.5mm @ nut and 18 @ 12th fret.

I'm hoping that the stiffness of the purpleheart plus the 2 carbon fibre reinforcements can help to keep the neck intact.
I will never know until I try it, and here am I trying it.:)

Here is some pictures... Later I will put more from different angles.

8770611404_b993cdb5b6.jpg
8769383474_8aa6e85c24.jpg
8769353908_f6d2167dd1.jpg
8770651510_8ee1d79695.jpg


Stay Tuned
 
Wow, I like it! The figure on the body looks great, and you chose a great piece for the headstock as well, that one graceful curve looks great. I like how the pickup covers contrast just a bit and that their grain runs parallel with the pickups and against the figure of the body wood. Can't wait to see the finished product. What are you planning to do as far as finish goes?
 
Wow, I like it! The figure on the body looks great, and you chose a great piece for the headstock as well, that one graceful curve looks great. I like how the pickup covers contrast just a bit and that their grain runs parallel with the pickups and against the figure of the body wood. Can't wait to see the finished product. What are you planning to do as far as finish goes?

Thank you for the compliment.

The pickup covers' base are actually taken from the neck off cut, cap are taken from fretboard off cut.
I thought, it would be better to match the little details with the core woods (body and neck), rather than using a completely different wood.

The finish, firstly would be a clear type of finish.
I'm thinking to do satin poly for the body and headstock and danish oil for the neck and fretboard.

Thank you again for stopping by.


Harry