

Enjoy the benefits of a premium membership!
Upgrade Account
-
TalkBass has been independent since 1998. Add your voice.
Create a free account to reply to discussions, view embedded media, and browse with fewer display ads.
Join free Log in
Want zero display ads or expanded classifieds tools? Compare plans.
You are using an out of date browser. It may not display this or other websites correctly.
You should upgrade or use an alternative browser.
You should upgrade or use an alternative browser.
More options
Who Replied?
That looks great!
Thanks my friend. I'm looking forward to getting some color on this burl, which should make it really come alive.

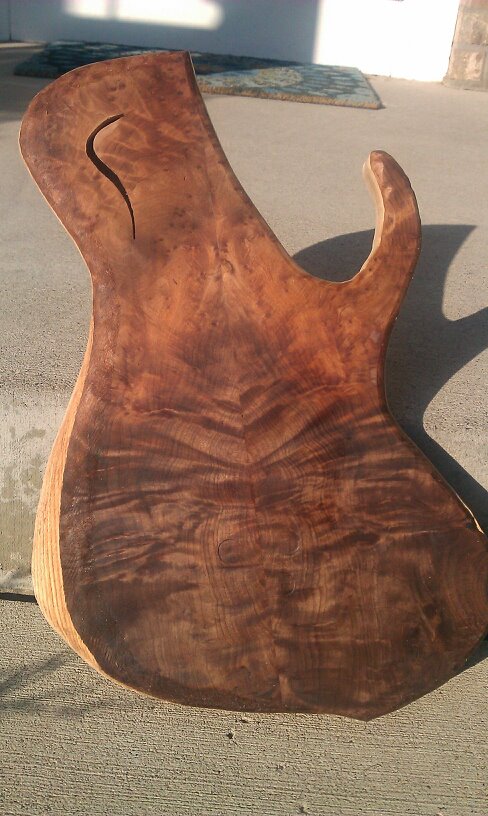
The body has been edge trimmed using the template and rounded over using a 1/2" bit. I'm really digging on this wood combo, especially the contrast of the alder with the burl and how it's translating on the body shape.
I'm very eager to get Transtints on this top - based on the way the grain is oriented, I'll likely cover the whole thing in dark mission brown, then sand back and apply a reddish orange down the center flamed portion. This will get blended with a light amber that I'll use to hit the darker burled bands in the wings, to really jack up the contrast. So hopefully very subtle in terms of color usage to match the wood pattern, but with the added three-dimensional effect.


I'm very eager to get Transtints on this top - based on the way the grain is oriented, I'll likely cover the whole thing in dark mission brown, then sand back and apply a reddish orange down the center flamed portion. This will get blended with a light amber that I'll use to hit the darker burled bands in the wings, to really jack up the contrast. So hopefully very subtle in terms of color usage to match the wood pattern, but with the added three-dimensional effect.
Yup, that's what I meant. There are surprisingly few edge guide routing examples out there, so it is nice to see someone doing it the way I had hoped to since my homemade router table is not made to handle a long feed.
Bass is coming together nicely, man! Excellent work!
Rich, one more tip for edge guiding that I forgot to mention - you need to make sure both sides of the boards are squared up - not just the laminate sides getting glued. The outsides need to be square and true in order for the edge guide to have a straight and level path to follow.

Rich, one more tip for edge guiding that I forgot to mention - you need to make sure both sides of the boards are squared up - not just the laminate sides getting glued. The outsides need to be square and true in order for the edge guide to have a straight and level path to follow.
Indeed! Not sure there are too many squiggly truss rods on the market.

The neck heel is edge trimmed as well, so the neck pocket can be lined up and routed during the next few days. Here the whole thing is measured to 34" scale with the bridge template so everything can be double checked for positioning.

The edges of the body have been sanded out and the round over is a very smooth 1/2" radius.
Despite the shop lights, I managed to capture a decent photo showing some of the color and grain hiding in the walnut. Way more red than I've ever noticed before...

Despite the shop lights, I managed to capture a decent photo showing some of the color and grain hiding in the walnut. Way more red than I've ever noticed before...

Oh Lordy that's a nice looking piece of walnut! I share your frustration on being dragged away from the shop, knee deep in Honeydo bathroom renovations myself. It's carpentry, but nowhere else near as satisfying as luthiery. Nice bass you got going there, definitely some walnut in my future. Do you source your walnut locally? I have a hard time finding anything like that where I live.
Oh Lordy that's a nice looking piece of walnut! I share your frustration on being dragged away from the shop, knee deep in Honeydo bathroom renovations myself. It's carpentry, but nowhere else near as satisfying as luthiery. Nice bass you got going there, definitely some walnut in my future. Do you source your walnut locally? I have a hard time finding anything like that where I live.
Man, it's been a rough couple weeks - we went down to Florida for spring break and got rear-ended at a red light. No major injuries, but my back and neck have been sore enough that doing anything at the workbench would have been pretty uncomfortable. Add on top of that all the kiddie stuff and home projects...neverending! Are you guys having an early spring? Last weekend was pretty much entirely devoted to landscaping and seasonal start-up...instead of making sawdust (not fair).
I am able to find nice 2" walnut for bodies from a nicely equipped sawmill and floor paneling company about 25 minutes from where I live in the Twin Cities. Occasionally, Rockler gets in some stuff that would be worthy of using for tops, but I've had the best luck at Oregon Wild Wood, including this particular top.

Lonny,
Still really digging the book matched black walnut top. Can't quite envision your dye scheme but bet it will really pop when you are done!
Brent
Still really digging the book matched black walnut top. Can't quite envision your dye scheme but bet it will really pop when you are done!
Brent
Lonny,
Still really digging the book matched black walnut top. Can't quite envision your dye scheme but bet it will really pop when you are done!
Brent
Thanks Brent!
I've had some really good luck making darker burls really pop using a bit of red, orange and amber. The grain on this this walnut has a sort of butterfly wing pattern to it, so I'm going to use it as a guide to fan out from center. The darkest part of the burls extend parallel to the wings of the bass, so these will get hit with the lightest amber color for the most vivid contrast to the burl. And the central portion beneath the neck already has a lot of red and orange highlights in the flame, so I'll hit those with the dyes along the same lines to really make the most of the pattern.
Here's a redwood burl top I did last year. This followed more of a traditional sunburst pattern, but you can really see how the subtle use of color made the burl completely pop.
BEFORE
AFTER

Love that contrasting wood look!Thanks Brent!
I've had some really good luck making darker burls really pop using a bit of red, orange and amber. The grain on this this walnut has a sort of butterfly wing pattern to it, so I'm going to use it as a guide to fan out from center. The darkest part of the burls extend parallel to the wings of the bass, so these will get hit with the lightest amber color for the most vivid contrast to the burl. And the central portion beneath the neck already has a lot of red and orange highlights in the flame, so I'll hit those with the dyes along the same lines to really make the most of the pattern.
Here's a redwood burl top I did last year. This followed more of a traditional sunburst pattern, but you can really see how the subtle use of color made the burl completely pop.
BEFORE
AFTER

Love that contrasting wood look!
Thanks! I've been really getting a kick out of the dye process lately, all in finding ways to maximize what's going on with the boards. If you like that contrast, check this one out!
Don't know if you saw the other build thread I've got underway, but I used the triple step dye process to do a burled tigereye which came out GREAT.
Dark mission brown, some red, some orange, some amber. It's like MAGIC!

BEFORE
AFTER


