

Enjoy the benefits of a premium membership!
Upgrade Account
-
TalkBass has been independent since 1998. Add your voice.
Create a free account to reply to discussions, view embedded media, and browse with fewer display ads.
Join free Log in
Want zero display ads or expanded classifieds tools? Compare plans.
You are using an out of date browser. It may not display this or other websites correctly.
You should upgrade or use an alternative browser.
You should upgrade or use an alternative browser.
- Status
- Not open for further replies.
More options
Who Replied?

Just ordered my bass...spalted fingerboard is a no-go...
Did you ask for the "hard as nails" epoxy over it?
I brought it up on the Forums and no one's ever heard of it, seen it requested, or anything....but everyone agrees it's a KICKIN' idea.


Hello,
I'm the happy owner of a fretless carvin bass.
I'm actually loving it, very good sound and feel.
The bass "should" be a LB75F, made in 1995 (last year Sperzel tuners were used on Carvin basses, according to the catalogue)
I was wondering about electronics though.
The catalogue says "optional midrange boost" but the pot has no center detect.
Link Removed
Any idea anyone ?
Thanks a lot!
Francesco
I'm the happy owner of a fretless carvin bass.
I'm actually loving it, very good sound and feel.
The bass "should" be a LB75F, made in 1995 (last year Sperzel tuners were used on Carvin basses, according to the catalogue)
I was wondering about electronics though.
The catalogue says "optional midrange boost" but the pot has no center detect.
Link Removed
Any idea anyone ?
Thanks a lot!
Francesco
Keith went into a lengthy explanation of why it was too soft, crumbly, etc to use spalt as a fingerboard. I figured it was a longshot. And, I want a bass I can play at a gig and not have to worry if frets are gonna pop out!
I tried to have them let me pick out a particular sheet of wood, but since spalt is so hard to come by, you cant pick out a top specifically, or even (for $100) describe the shape of the wood grain you want, as you could with other tops. For $50 I could request 'highly figured' but he said it doesn't make sense for spalt due to the randomness and rarity.
Whatever! I'm just hyped Carvin #3 is in the works...
I tried to have them let me pick out a particular sheet of wood, but since spalt is so hard to come by, you cant pick out a top specifically, or even (for $100) describe the shape of the wood grain you want, as you could with other tops. For $50 I could request 'highly figured' but he said it doesn't make sense for spalt due to the randomness and rarity.
Whatever! I'm just hyped Carvin #3 is in the works...

OK..here's a weird one...I have owned my LB75 for 20 years (bought it new in '92). I've played it several times a week since then, played hundreds and hundreds of gigs and countless hours practicing with it. I just realized something strange about it tonight...the p'up pan pot works backwards  . I never realized this because I have always played it with the pan pot in the center detent. That tone just always seemed to work for me. Tonight I was playing with the pan pot and listening for the tone to get brighter as I rolled the pot CCW, but instead it got "darker". Rolling the pot CW, the tone got brighter...now I'm no noob to bass playing...I've been playing for almost 25 years.
I rolled the pot ccw again and tapped the p'ups with an allen wrench I had handy and was surprised to find that the neck p'up was active. I rolled the pot CW and tapped again and the bridge p'up was active. Is this normal for a Carvin 20 year old LB75? I suspect not. A month or so I bought a 98ish LB75 fretless and it acts like I expected it to.
I'm confused....I'm hoping when I take the back cover off tomorrow, I'm going to find that I can swap two wires going to the pot and that the pot's legs are not firmly attached to a circuit board.
. I never realized this because I have always played it with the pan pot in the center detent. That tone just always seemed to work for me. Tonight I was playing with the pan pot and listening for the tone to get brighter as I rolled the pot CCW, but instead it got "darker". Rolling the pot CW, the tone got brighter...now I'm no noob to bass playing...I've been playing for almost 25 years. I rolled the pot ccw again and tapped the p'ups with an allen wrench I had handy and was surprised to find that the neck p'up was active. I rolled the pot CW and tapped again and the bridge p'up was active. Is this normal for a Carvin 20 year old LB75? I suspect not. A month or so I bought a 98ish LB75 fretless and it acts like I expected it to.
I'm confused....I'm hoping when I take the back cover off tomorrow, I'm going to find that I can swap two wires going to the pot and that the pot's legs are not firmly attached to a circuit board.

I just realized something strange about it tonight...the p'up pan pot works backwards
Same here with my B25P. When I first got it, it worked 'normally'. I sent it back to Carvin for a preamp swap, then a pickup swap and when I got it back, it was reversed. I remember saying something but never really got a definitive answer. FWIW, that's the same way Sadowsky does theirs.

Same here with my B25P. When I first got it, it worked 'normally'. I sent it back to Carvin for a preamp swap, then a pickup swap and when I got it back, it was reversed. I remember saying something but never really got a definitive answer. FWIW, that's the same way Sadowsky does theirs.
Hmmm, maybe if it's not obvious what to do when I pop the back off, I'll contact Carvin customer service. I'm an electronics tech so It shouldn't be that big of a deal to make the pan pot so it acts intuitively...shouldn't being the operative here

Hmmm, maybe if it's not obvious what to do when I pop the back off, I'll contact Carvin customer service. I'm an electronics tech so It shouldn't be that big of a deal to make the pan pot so it acts intuitively...shouldn't being the operative here
I did it before. Apparently all you need is some solder, a soldering iron, ice, burn cream and bandages.
Anyone ever ask them for a spalted maple fingerboard?
Pics are showing up on multiple threads now...(Carvin Forums, that is)
timmus, my '92 LB70 has the pan pot "reversed" like yours. I suppose it should be an easy fix, but I've just left it as is.
Same panpot problem on my Carvin.
My tech tried swapping the pickups input in the board but it did not work. Any idea ? Will post photos soon. Thanks
My tech tried swapping the pickups input in the board but it did not work. Any idea ? Will post photos soon. Thanks


I think I posted my BB76 in Koa when I first joined the group, but last weekend I played both Carvins at a local festival. All white SB5000, and my flamed koa BB76 fretless. Great basses for the show. Love the fretless, and every day I am more and more impressed with the SB5000.
Invalid Link Removed
Invalid Link Removed
OK, I fixed the "reverse pan pot syndrome" (aka RPPS) that seems to plague some, but curiously not all, older Carvin LB series basses. It was actually very simple to figure out why the p'ups were reversed and what I needed to do to rectify the problem, at least on my bass. I have the older LB75 which I bought in either '92 or '93. This bass has the 4 knobs on it with the preamp that has two stacked boards connected together with several black wires.
Locate the two shielded, two conductor wires that come into the control cavity from each p'up...on the end, you'll see a shield with heatshrink on each one and a black and red wire as well on each p'up wire.
With the guitar on it's face (on a soft cloth like a towel), the neck to your left and the preamp boards exposed, the board furthest from you has those wires going to it (this circuit board has the volume and pan pot soldered to it). Mine had the bridge p'up wire going to solder pads on the left end of the board and the neck p'up wire was going to some pads about 1/2 way down the length of the board to the right. All these pads are right on the top edge of the circuit board.
This will take some careful soldering. The wires (on mine) were left to right...shield-black-red.
Carefully remove the wires (read: fragile wires) from the circuit board by unsoldering them and using solder wick (you can get this at Radio Shack), clean the solder off the pads, both sides of the circuit board. Be very careful...you don't want to remove the pads. These circuit boards don't seem to be very beefy so you want to be very careful....Did I say you have to be careful? If you remove the pads it's big time suck city
Once you have all the solder cleaned out of all six holes, it's time to reinstall the wire from the p'ups correctly.
On mine, I installed and soldered the wires from the bridge p'up to the left most three holes and the neck p'up wires to the three holes that were halfway down on the circuit board. Check your work, making sure you don't have any solder bridges, easy to do as tight as it is in there if you're not practiced up on soldering.
While I was in there, I cleaned the pots with Caig D5 pot cleaner as some were getting a tad scratchy.
Lay the wires you had to move in the cavity as neatly as you can making sure you don't stress any solder joints and lay the cavity cover on and screw it down (don't pinch any wires).
Plug in your bass and check your work....when you rotate the pan pot CW, your neck p'up should be soloed, and when you spin it CCW, your bridge p'up should be soloed.
This is easy to check...with one p'up soloed and the bass plugged into your amp, tap the p'ups with a screwdriver (or something else ferrous)...you'll hear a loud tapping on the active/soloed p'up and practically nothing on the other. Spin the pan pot the other way and check that the other p'up is active and the previously checked p'up is inactive....
Easy peasy
********If you don't feel adequate to the job, please ask a qualified technician to do it for you. I did mine in less than a half hour so to have a tech do it that knows what he or she is doing would be far better than trashing your wonderful Carvin and should be able to be done for not alot of money (you know, the whole "peace of mind" thing?). I am not responsible if you decide to go it alone without the necessary experience and bring ruination upon your preamp board*********
Locate the two shielded, two conductor wires that come into the control cavity from each p'up...on the end, you'll see a shield with heatshrink on each one and a black and red wire as well on each p'up wire.
With the guitar on it's face (on a soft cloth like a towel), the neck to your left and the preamp boards exposed, the board furthest from you has those wires going to it (this circuit board has the volume and pan pot soldered to it). Mine had the bridge p'up wire going to solder pads on the left end of the board and the neck p'up wire was going to some pads about 1/2 way down the length of the board to the right. All these pads are right on the top edge of the circuit board.
This will take some careful soldering. The wires (on mine) were left to right...shield-black-red.
Carefully remove the wires (read: fragile wires) from the circuit board by unsoldering them and using solder wick (you can get this at Radio Shack), clean the solder off the pads, both sides of the circuit board. Be very careful...you don't want to remove the pads. These circuit boards don't seem to be very beefy so you want to be very careful....Did I say you have to be careful? If you remove the pads it's big time suck city
Once you have all the solder cleaned out of all six holes, it's time to reinstall the wire from the p'ups correctly.
On mine, I installed and soldered the wires from the bridge p'up to the left most three holes and the neck p'up wires to the three holes that were halfway down on the circuit board. Check your work, making sure you don't have any solder bridges, easy to do as tight as it is in there if you're not practiced up on soldering.
While I was in there, I cleaned the pots with Caig D5 pot cleaner as some were getting a tad scratchy.
Lay the wires you had to move in the cavity as neatly as you can making sure you don't stress any solder joints and lay the cavity cover on and screw it down (don't pinch any wires).
Plug in your bass and check your work....when you rotate the pan pot CW, your neck p'up should be soloed, and when you spin it CCW, your bridge p'up should be soloed.
This is easy to check...with one p'up soloed and the bass plugged into your amp, tap the p'ups with a screwdriver (or something else ferrous)...you'll hear a loud tapping on the active/soloed p'up and practically nothing on the other. Spin the pan pot the other way and check that the other p'up is active and the previously checked p'up is inactive....
Easy peasy
********If you don't feel adequate to the job, please ask a qualified technician to do it for you. I did mine in less than a half hour so to have a tech do it that knows what he or she is doing would be far better than trashing your wonderful Carvin and should be able to be done for not alot of money (you know, the whole "peace of mind" thing?). I am not responsible if you decide to go it alone without the necessary experience and bring ruination upon your preamp board*********
Same panpot problem on my Carvin.
My tech tried swapping the pickups input in the board but it did not work. Any idea ? Will post photos soon. Thanks
See my "fix" that I just posted...swapping my p'up wires fixed the problem...I'm wondering if your tech swapped the correct wires.
I did it before. Apparently all you need is some solder, a soldering iron, ice, burn cream and bandages.
 I guess I lucked out...no burned digits. I must be getting better at this soldering thing
  (Actually I've been soldering for over 40 years...trained in milspec and NASA soldering...although the soldering iron still bites occasionally
  )
)
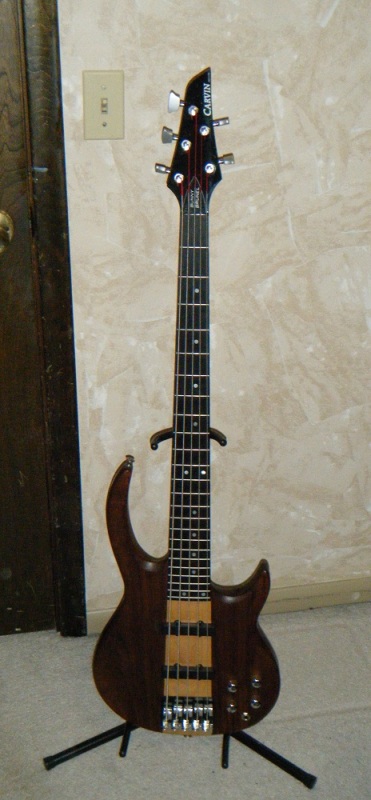
Here's my 1993 BB 75 (I ordered and bought it new). Maple neck, ebony fretboard, koa sides, tung oil finish.
- Status
- Not open for further replies.


