
• TalkBass has been independent since 1998. Add your voice.
    Create a free account to reply to discussions, view embedded media, and browse with fewer display ads.
    Join freeLog in
    Want zero display ads or expanded classifieds tools? Compare plans.

Rhiannon and Galadriel

I'm not sure what kind of super powers @mapleglo has, but it's easily been over two hours of work all told, and I am maybe 50% there....maybe. I picked up some 36 grit paper and tried that, and it seems to go a wee bit faster, but it feels like the comparison of a car going 10 miles an hour to one going 12. I realize that the 7 1/4" radius needs a lot more material taken off, but this is ridiculous.

;)

One useful modification has come out of the experience, though. I shortened the sanding block so that I can get a single half sheet of sandpaper mounted rather than having to cut up the sheet into odd sized increments to fill the block, and it's much easier to handle.

Oak is somewhere in that 1200 to 1400 range on the Janka hardness scale, and I am guessing that the figured maple for the fingerboard on the bass proper is most likely in the 800 to 900 range...at least I am hoping that will be true.

In any case I am getting a serious upper body workout. Rest assured I will suppress any urges to post pictures of me flexing.
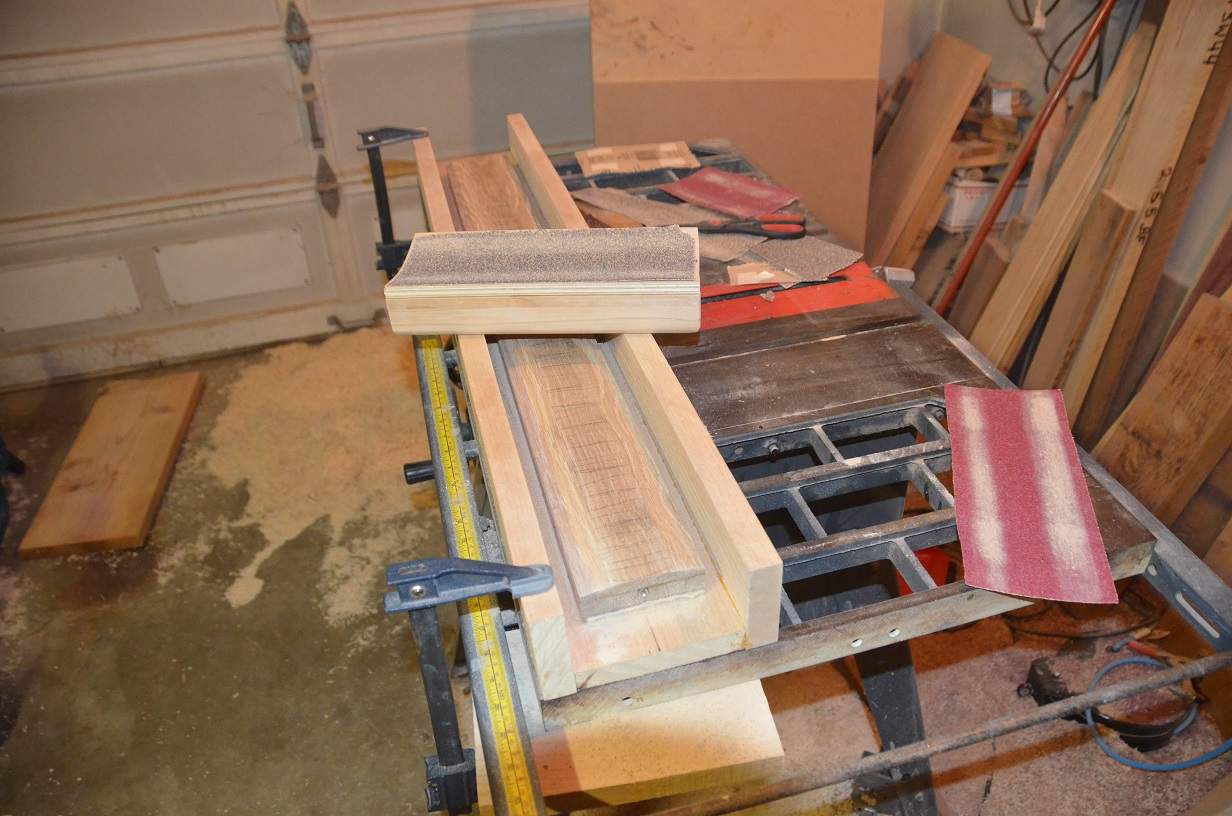

DSC_0125.JPG
 
I was considering putting some sort of handle on the top of my radius block, like a handplane type handle and ball, seems like it'd make things easier. I haven't tried it yet, but maybe you could try something like that?

That's a good idea! The block is fairly comfortable to use as it's wide and has a 1/2" round over on the top, but a handle might be nice. That will be reserved for a future mod as the time taken to do that would take away from the effort I need to dump into getting the radius finished. ;)

Yeah, that maple board took a couple of hours to radius, if I recall. But I went with a 10" radius. 7 1/4 is a bit more aggressive. Heh, aggressive radius. A new band?

I think you just have Goddess like arm strength and endurance. Lord's of the Underworld - I am sore this morning! ;)
 
...


I think you just have Goddess like arm strength and endurance. Lord's of the Underworld - I am sore this morning! ;)

Actually, I do not consider myself to be very strong (though I am a goddess). Being not strong, I've had to develop alternatives to doing things that many men might find easy (or easier than me). During the radius process, instead of using downward pressure from my arms, I positioned my upper body over the fingerboard, and used my body weight as the downward pressure, and used my arms to move the sanding block back and forth. I took *a lot* of breaks. And my arms were sore despite these measures.

Also, I think the curly maple fingerboard is a lot softer than oak, and I had a milder radius.

Perhaps you should not have dismissed the squirrels so soon, and asked them to help with the sanding on this project :P
 
  • Like
Reactions: michaelwayneharwood
That's a good idea! The block is fairly comfortable to use as it's wide and has a 1/2" round over on the top, but a handle might be nice. That will be reserved for a future mod as the time taken to do that would take away from the effort I need to dump into getting the radius finished. ;)

Exactly why I haven't gotten around to it, haha. Plus my blocks are radiused on both sides, so I haven't figured out how to make it removable/swappable.
 
I am *still* not done. With the time I have spent sanding by hand I could have easily built a router jig to manage this job. The main reason I have been doing this by hand is that I plan on sanding the quilted maple board - I am not going to chance major router tear out on that board. I had no idea it would take so much time. With that in mind I am going to stop and build a quick router radius jig for use on this board, and any other hard wood that would be a major pain to radius by hand.

So back to the old drawing board I went with measurements from my "sanding box" and I came up with what I believe will work for my purposes. With a 8.5" radius on the main rails a 7.25" radius can be achieved using a router bit that has a 1" cutting length.

This will put me back a day or two, but I think it's worth the effort for the oak fingerboard. I will document the entire jig build for your pleasure, and criticism. ;)

radius-jig.png
 
  • Like
Reactions: Hamish MacCleod
Michael,
Have you considered the option of employing your table saw to assist in this endeavor?
Can you tilt your blade away from the fence?
Set the blade at about 85° - 80°...or whatever is appropriate... Run the neck through on its side(s) with the back of the neck to the fence and remove just the "corners" of the waste material , not quite to the line of the radius.
This will create a facet on either side of the face of the fingerboard, greatly reducing the amount of wood you need to sand off.;)

Although I Do think a radius jig for the router is still a good idea .
Because looking at your radius sanding block from the end, it appears that there might be just a little bit of a "peak" in the center where the screws suck down the plywood.

Also , with the bulk of the material removed on the table saw ... The chances of tear out from the router are greatly reduced. (using a new or freshly sharpened bit).
:)
 
Last edited:
Then... After you have created a perfect radius using the router ...you are still going to want a sanding block that perfectly matches that radius... right? For sanding down fret line filler ...etc...?

One method I have used to create a radius sanding block to match a radiused fingerboard is to use neck itself as the "model" and take a mold off of it.
Clamp a board on either side of the neck ...(perpendicular)...that stand taller than the face by about an inch or so. Lay wax paper on top of the neck and up over the sides of the boards. (make folds to tuck it down neatly into the corners & hug the radius and up & over the boards and secure it with tape.)
Then use some clay (or your kid's play dough) ...to make a dam on either end of however long you want your sanding block.
Mix up a generous amount of ...Bondo...
(Don't use too much hardener or it will generate alot of heat as it cures).
Fill the "mold" with the Bondo ...at least 1/4" thick...then press in a board that will be the base of the sanding block .
This base needs to be pre prepared by cutting it to size to fit snug between the boards....& roughening or cutting little slots in....(you want some "tooth" for the Bondo to ...bond... to it)... It also helps to spread some bondo directly on the board before you squish it down into the mold cavity.
After the bondo cures you can un-clamp the sides, take out your newly minted sanding block ...peel off the wax paper and trim off the ends where the play dough dams were and ...voila!
I found it helped to "condition" the surface where I was going to stick the sandpaper to by rubbing it w/ a little talc or fine sanding dust... So it wouldn't be too sticky and allow the adhesive backed sandpaper to be peeled off easier.

Please forgive me if I "over explain" I have a tendency to be too ...thorough in my explanations of simplistic things. I'm just trying to make sure what I see in my head, comes through in words.

Anyway...this method of making a radius sanding block worked really well for me...
I've used mine on two necks so far... It hasn't warped or anything cause I used a sturdy chunk of maple for the base.
 
Last edited:
  • Like
Reactions: michaelwayneharwood
Very cool, Michael,
Please know that I really appreciate the work and effort you are putting into this.
Rondo

No problem man! The effort is worth it, and to it's very important to do this well. I have had a router radius jig in mind for a while now, but I have never had enough motivation to execute on it due to my strong preference for flat fingerboard radius'.

@Rôckhewer - Your suggestions were VERY helpful, and I will keep them in mind. I am going to pursue my present course of action for the time being, but really appreciate the advice. You are correct about the screw heads up to a point. They *were* raised above the surface of the plane of the curve of the radius block, but a bit of careful over sized drilling to each hole added a small bevel that allowed the screws to sit flush with the surface. Good eyes man! I need to provide some of those details in my descriptions. Many of those types of things get lost in the basic workflow and I forget that others might benefit from them.
 
This update is one of those proverbial good news / bad news posts. The good news is that I was able to fashion a decent 7 1/4" radius jig for my router, and it works well. The bad news is that due to my own carelessness the oak neck got ruined and I have to build another neck. Practice makes perfect. ;)
 
This update is one of those proverbial good news / bad news posts. The good news is that I was able to fashion a decent 7 1/4" radius jig for my router, and it works well. The bad news is that due to my own carelessness the oak neck got ruined and I have to build another neck. Practice makes perfect. ;)
Yay!!...:)
Aww...:(

Pics. Of jig??

