

Enjoy the benefits of a premium membership!
Upgrade Account
-
TalkBass has been independent since 1998. Add your voice.
Create a free account to reply to discussions, view embedded media, and browse with fewer display ads.
Join free Log in
Want zero display ads or expanded classifieds tools? Compare plans.
You are using an out of date browser. It may not display this or other websites correctly.
You should upgrade or use an alternative browser.
You should upgrade or use an alternative browser.
Rhiannon and Galadriel
- Thread starter michaelwayneharwood
- Start date
More options
Who Replied?

Rôckhewer
Commercial User
- Feb 28, 2015
- 2,922
- 9,028
- Disclosures
- Owner/Builder- RockHewer Custom Guitars LLC
DUDE!!
That... IS GENIUS!
All the radiusing jigs I have seen that work similarly, have the radius blocks mounted permanently at each end of the channel, and a full length track that the router rides on... Which seems a bit bulky...and you can't see how the cut is progressing until you're basically finished. Like this one:
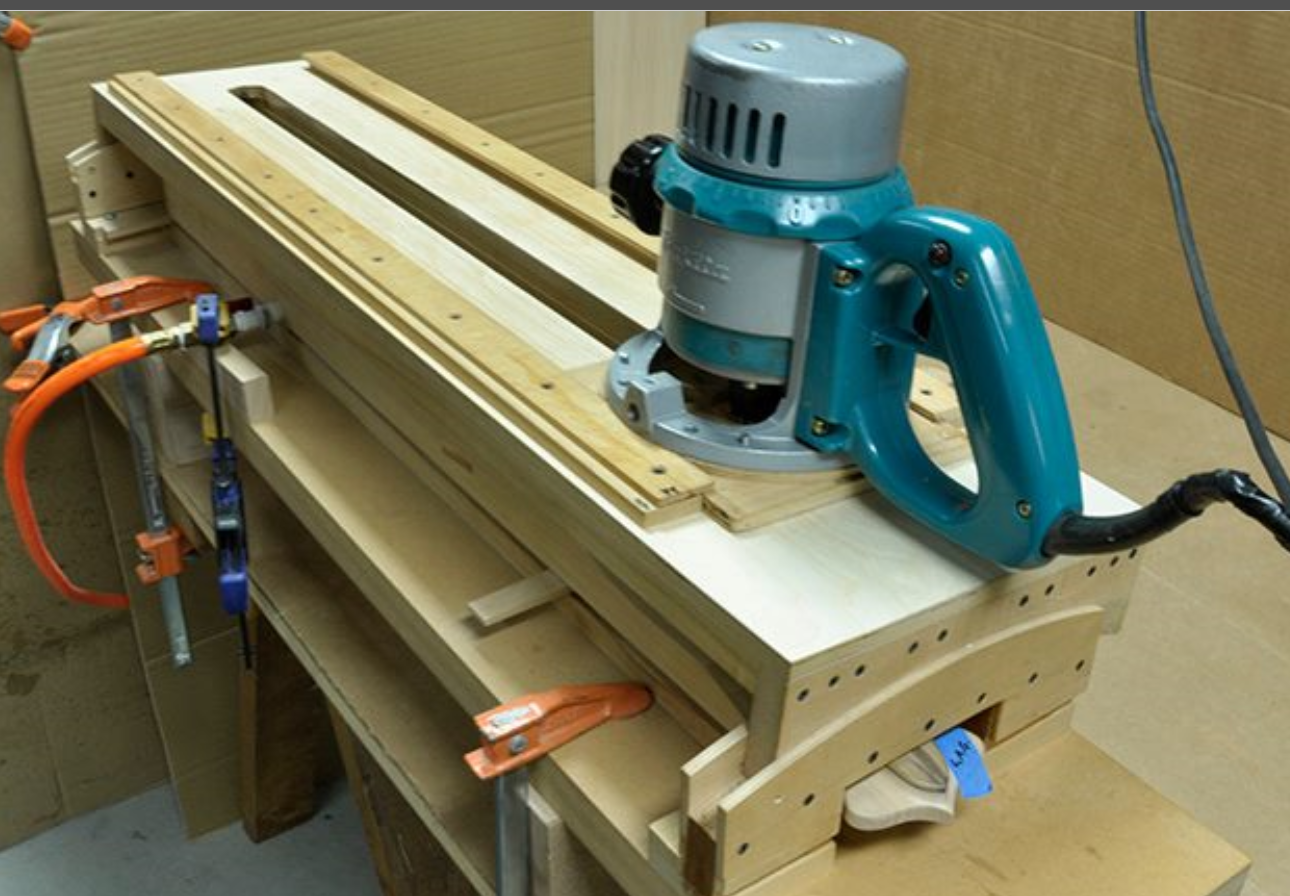
What is GREAT about yours is that it is WAY more simple to build...AND you can EASILY make several different "router cradles" for differing radium... And you can see the cut as it happens!
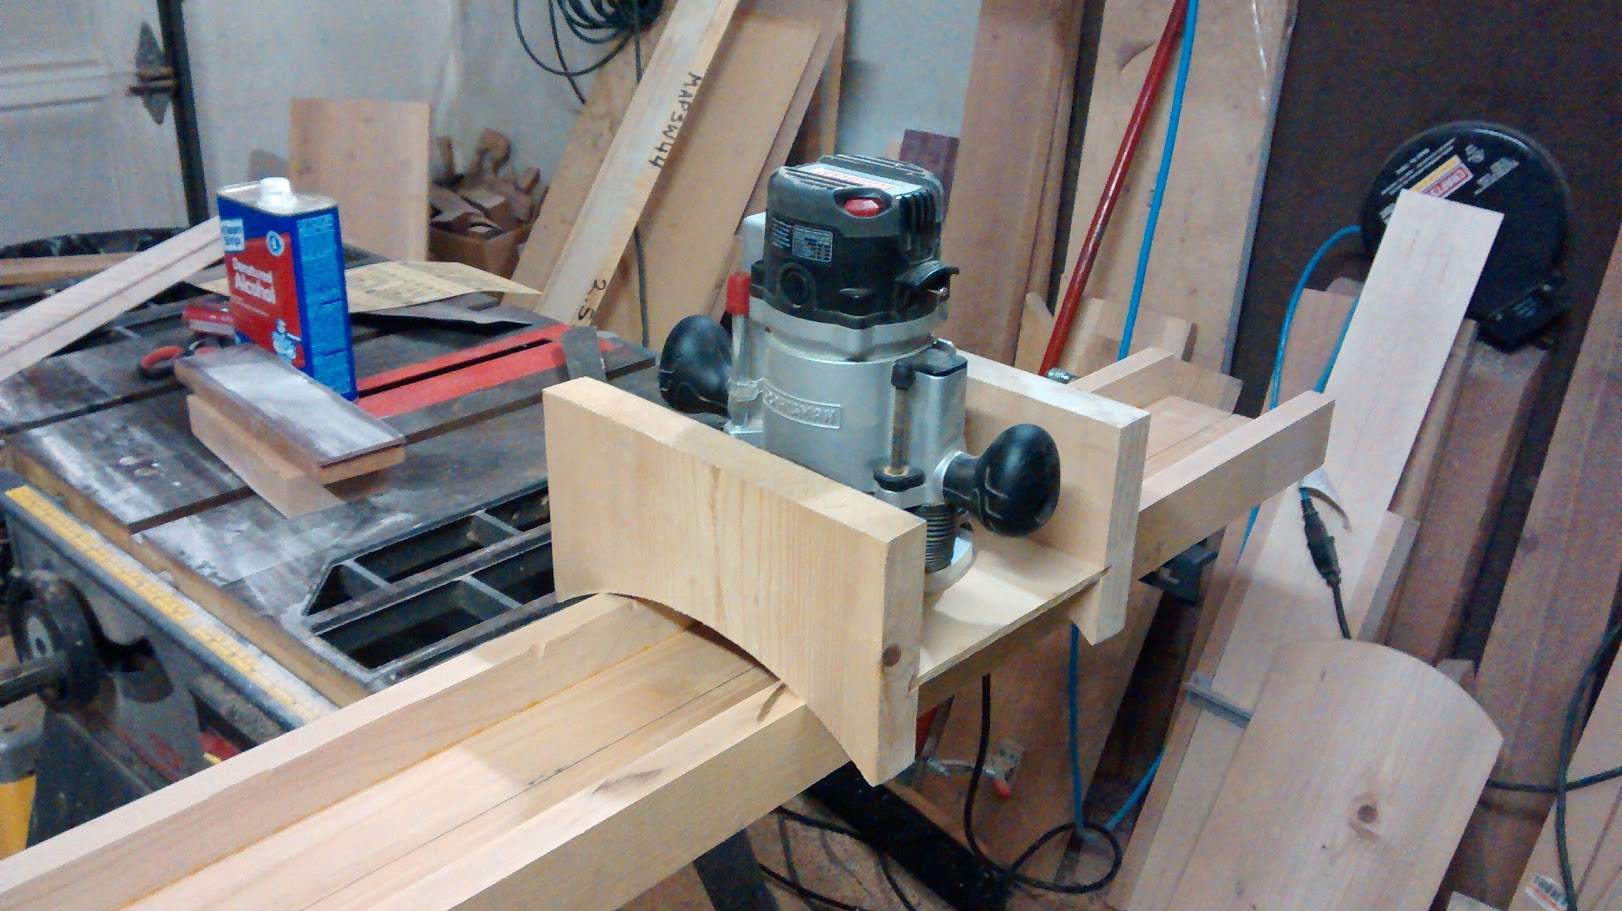
Simple yet effective, portable, convertible.
I like it alot!
Consider your design.... Borrowed!
(if you don't mind)
That... IS GENIUS!
All the radiusing jigs I have seen that work similarly, have the radius blocks mounted permanently at each end of the channel, and a full length track that the router rides on... Which seems a bit bulky...and you can't see how the cut is progressing until you're basically finished. Like this one:
What is GREAT about yours is that it is WAY more simple to build...AND you can EASILY make several different "router cradles" for differing radium... And you can see the cut as it happens!
Simple yet effective, portable, convertible.
I like it alot!
Consider your design.... Borrowed!
(if you don't mind)
Rôckhewer
Commercial User
- Feb 28, 2015
- 2,922
- 9,028
- Disclosures
- Owner/Builder- RockHewer Custom Guitars LLC
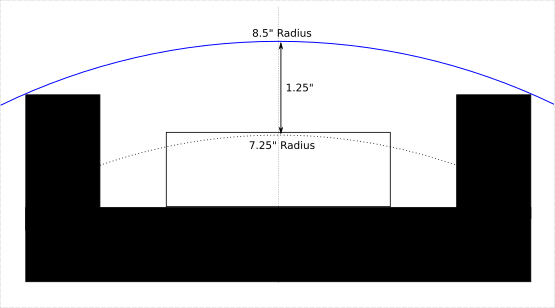
So this is correct, right?...the distance that the bit protrudes in to meet the work piece is proportional to how much bigger you need to make the radius on the router cradle /sled ?:

- May 1, 2014
- 2,494
- 2,341
- 56
- Disclosures
- Owner Melodious Resonance Constructs
@Rôckhewer - Thanks so much for your kind words! If any thing I do on any build is helpful always feel free to utilize any of my designs, jigs, or ideas. I wanted something that was fast and simple to build, and easily repeatable for other radii.
You are right on the money on the calculations needed to get to the right radius for the rails of the jig. To design the appropriate circle radius I drew up my "cradle" in Inkscape using the measurements of the real sled and neck blank dimensions, and then drew a 14.5" diameter circle. Once that was placed to be centered with the sled and intersect the neck blank properly I duplicated the circle and extended it concentrically until I had the outer circle riding the edges of the rails. This provided me with the correct measurements of the radius of the jig's rails. Once I had the math it was a simple matter of using my router and a simple circle jig to carve out the side rails with a 8.5" radius, and use a table saw to put slots just above the curve of the rails. Some 1/4" stock was used as a router mounting plate, and that piece was glued into the slots on the side rails.
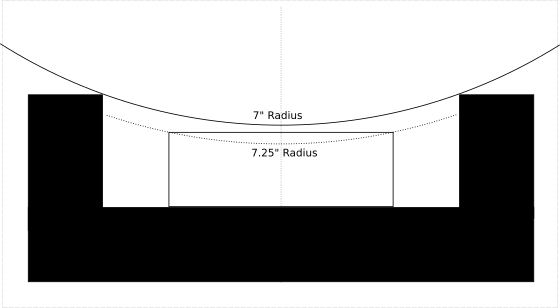
This same design can easily be reversed to provide a jig to easily route out radius blocks out of solid wood. My calculations show that I need a 7" radius circle to create a jig to make a 7 1/4" radius block.
The mistake I made last night was due to the sled being a bit too short for the neck blank I am using. I was focusing on the cut and one side of the jig rails went past the end of the sled and the router dove into the piece deep enough that it was ruined. I dug out the truss rod and will build another neck out of some maple I have on hand. In the broad view of things the only thing I wasted was a bit of oak stock and some time, but the lessons learned were invaluable.
At the end of the day (or the beginning seeing as it's morning) I have a jig that works really well for my purposes, and enough mistakes in it's utilization to provide a solid workflow. I am even thinking that this may work out for softer woods if I use a nice sharp router bit. Maybe a core box bit would work....
You are right on the money on the calculations needed to get to the right radius for the rails of the jig. To design the appropriate circle radius I drew up my "cradle" in Inkscape using the measurements of the real sled and neck blank dimensions, and then drew a 14.5" diameter circle. Once that was placed to be centered with the sled and intersect the neck blank properly I duplicated the circle and extended it concentrically until I had the outer circle riding the edges of the rails. This provided me with the correct measurements of the radius of the jig's rails. Once I had the math it was a simple matter of using my router and a simple circle jig to carve out the side rails with a 8.5" radius, and use a table saw to put slots just above the curve of the rails. Some 1/4" stock was used as a router mounting plate, and that piece was glued into the slots on the side rails.
This same design can easily be reversed to provide a jig to easily route out radius blocks out of solid wood. My calculations show that I need a 7" radius circle to create a jig to make a 7 1/4" radius block.
The mistake I made last night was due to the sled being a bit too short for the neck blank I am using. I was focusing on the cut and one side of the jig rails went past the end of the sled and the router dove into the piece deep enough that it was ruined. I dug out the truss rod and will build another neck out of some maple I have on hand. In the broad view of things the only thing I wasted was a bit of oak stock and some time, but the lessons learned were invaluable.
At the end of the day (or the beginning seeing as it's morning) I have a jig that works really well for my purposes, and enough mistakes in it's utilization to provide a solid workflow. I am even thinking that this may work out for softer woods if I use a nice sharp router bit. Maybe a core box bit would work....

That's a nice jig. I've always radiused by hand because it assures me a level board but it does get old... Just trying to wrap my head around this, couldn't you change the radius by adding different thickness tops to the rails to the box?
- May 1, 2014
- 2,494
- 2,341
- 56
- Disclosures
- Owner Melodious Resonance Constructs
Thank you! Creating a single jig and set of rails that can do multiple radii is possible, but there are constraints due to the length of the router bit. I am not communicating this very clearly...let me give an example.That's a nice jig. I've always radiused by hand because it assures me a level board but it does get old... Just trying to wrap my head around this, couldn't you change the radius by adding different thickness tops to the rails to the box?
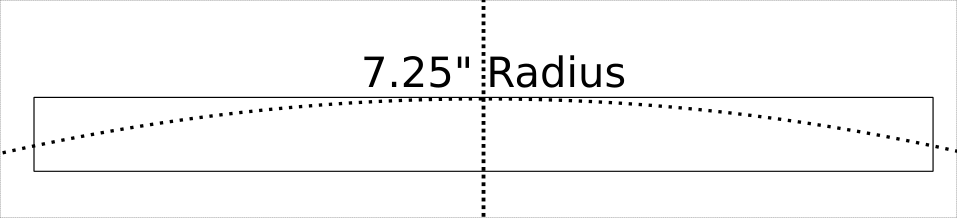
In my jig the radius of the rails on the jig is 8.5". This allows me to create a radius from 8.5" to the extent of the length of my router bit can be extended to remove the material from the fingerboard. Based on my drawing and calculations the bit length needs to extend 1 1/4" from the jig to radius the board to a 7 1/4" radius. If I were to create a jig with rails that have a 13" radius, then I could easily create a 12" radius with that bit, but if I wanted to create a 10" radius then the router bit would need to extend at least 3" from the jig to the cutting surface. My math here may be inexact, but I believe the the main principal in place to be sound.
To illustrate the point I drew three concentric circles with radii of 7.25", 10", and 12", and placed a 4" by 3/8" fingerboard in the proper location for each radius.

You could easily put end caps on the sled to prevent that. Might be a good idea to reduce the risk of injury as well.The mistake I made last night was due to the sled being a bit too short for the neck blank I am using. I was focusing on the cut and one side of the jig rails went past the end of the sled and the router dove into the piece deep enough that it was ruined. I dug out the truss rod and will build another neck out of some maple I have on hand. In the broad view of things the only thing I wasted was a bit of oak stock and some time, but the lessons learned were invaluable.
Thank you! Creating a single jig and set of rails that can do multiple radii is possible, but there are constraints due to the length of the router bit. I am not communicating this very clearly...let me give an example.
In my jig the radius of the rails on the jig is 8.5". This allows me to create a radius from 8.5" to the extent of the length of my router bit can be extended to remove the material from the fingerboard. Based on my drawing and calculations the bit length needs to extend 1 1/4" from the jig to radius the board to a 7 1/4" radius. If I were to create a jig with rails that have a 13" radius, then I could easily create a 12" radius with that bit, but if I wanted to create a 10" radius then the router bit would need to extend at least 3" from the jig to the cutting surface. My math here may be inexact, but I believe the the main principal in place to be sound.
To illustrate the point I drew three concentric circles with radii of 7.25", 10", and 12", and placed a 4" by 3/8" fingerboard in the proper location for each radius.
View attachment 631882
I get it, thanks for clarifying. They do make router bit extensions but IDK that they'd be very useful. It'd probably be easier, cheaper and more user friendly to just make a set of quick change guides with different radius cuts in them.. (I'm using the terms rails and guides as what my own mind tells me that they may be
)
This reminds me, years ago, I built this jig to make my own radius blocks.. lol


- May 1, 2014
- 2,494
- 2,341
- 56
- Disclosures
- Owner Melodious Resonance Constructs
Nice!This reminds me, years ago, I built this jig to make my own radius blocks.. lol
View attachment 631926 View attachment 631927
- May 1, 2014
- 2,494
- 2,341
- 56
- Disclosures
- Owner Melodious Resonance Constructs
A bit of extra planning and wood selection was accomplished today in between work meetings. I wanted to make sure that I could get away with a 1/4" fingerboard thickness considering the tight 7 1/4" radius. Based on a quick mock-up I think it should be OK. I cut out another neck blank from curly maple, and looking through my pile of potential fingerboard stock revealed an ambrosia maple fingerboard I have been saving. Next steps will be to route a truss rod channel, install the rod, and then glue down the fingerboard. This blank will be 30" long, which will fit properly in the 40" routing box I have - hopefully I will be able to avoid my most recent mistake.

- May 1, 2014
- 2,494
- 2,341
- 56
- Disclosures
- Owner Melodious Resonance Constructs
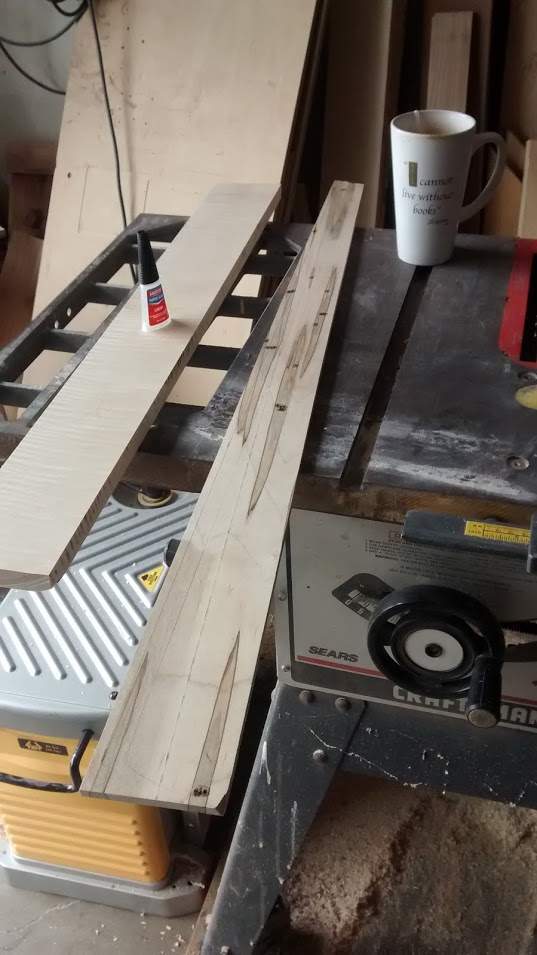
Progress has been slower than I would wish on the neck rebuild, but the more I am looking at the maple the more I am liking the choice. I am strongly tempted to rebuild the prototype body to match while I am at it... I think a curly maple core with a walnut top would look dead sexy. In any case I was able sneak in some work in between work responsibilities. The ambrosia maple has a number of worm holes that need attention, so I pulled out my trusty bottle of CA glue and started filling the voids.

- May 1, 2014
- 2,494
- 2,341
- 56
- Disclosures
- Owner Melodious Resonance Constructs
The truss rod channel has been routed, the truss rod has been installed with silicone caulk underneath, and the fingerboard is glued down.


- May 1, 2014
- 2,494
- 2,341
- 56
- Disclosures
- Owner Melodious Resonance Constructs
Just for fun I mocked up a maple and walnut combo for the prototype and I have to tell you I am tempted...
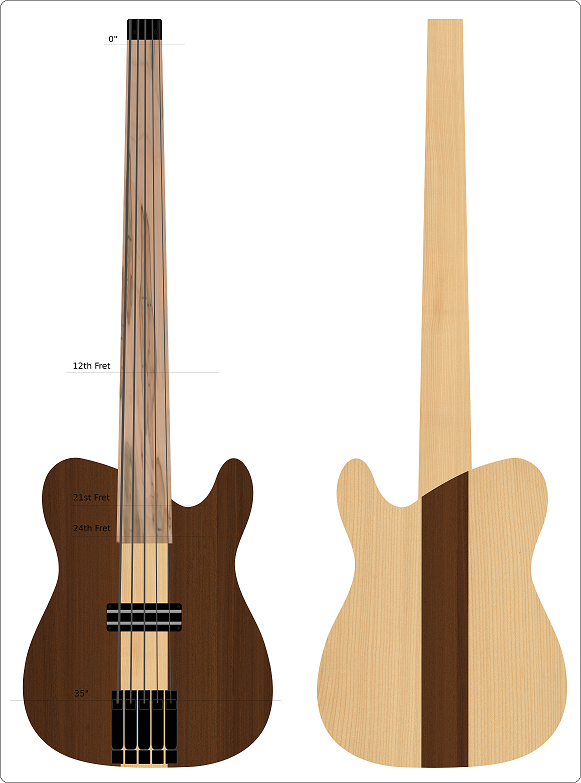
Just for fun I mocked up a maple and walnut combo for the prototype and I have to tell you I am tempted...
View attachment 632843
lol... knock yourself out man, it looks great.
Rondo
- May 1, 2014
- 2,494
- 2,341
- 56
- Disclosures
- Owner Melodious Resonance Constructs
That was about all of the encouragement I needed.lol... knock yourself out man, it looks great.
Rondo
- May 1, 2014
- 2,494
- 2,341
- 56
- Disclosures
- Owner Melodious Resonance Constructs
The core is glued up. When the clamps are freed I will glue up the top. It's going to be a nice looking prototype.


- May 1, 2014
- 2,494
- 2,341
- 56
- Disclosures
- Owner Melodious Resonance Constructs


