• TalkBass has been independent since 1998. Add your voice.
    Create a free account to reply to discussions, view embedded media, and browse with fewer display ads.
    Join freeLog in
    Want zero display ads or expanded classifieds tools? Compare plans.

Scary Neck Repairs: Two Wal Necks

Bruce Johnson

Gold Supporting Member
Commercial User
Feb 4, 2011
16,079
57,043
70
Fillmore, CA
www.xstrange.com
Disclosures
Professional Luthier
A new thread in my Scary Repairs series! In these threads, I document frightening surgical work on basses. Particularly rare, exotic and valuable basses. Jobs that most Luthiers refuse to do. But here in the Secret Underground Lab, I have no fear of misbehaving bass necks. I have the machines and technology to make them well and happy again.

This thread will cover the surgical repair of two beautiful vintage Wal necks. I've always admired Wal basses. To me, they are classic examples of basses that have been thoroughly engineered. The frame, pickups and preamp have all been carefully developed. They are handsome, high quality instruments, but they aren't exotic showpieces. They are made for performance. And they have a faithful following of owners.

Because Wals are expensive and somewhat rare, most Luthiers won't do any major work on them. It's too much risk getting into something they aren't familiar with, and they don't want to damage something that expensive. It's a business decision, and I understand that.

The owners of these two Wals looked literally for several years to find anyone who would work on them. The Wal factory even turned them down. I was the first person to step up.

I'm generally retired from doing Scary Repair work like this. I'm booked solid building my new Scroll Basses. I took in these two jobs to help out the owners, because I knew that they were out of options. I've rebuilt necks on many crazy and exotic basses over the years, and I have a whole bunch of special machines that make the job easier.

On this thread, I'm going to document the whole process of fixing these two Wal necks. I'll show that it's not Rocket Surgery, and it's not really that expensive. I want to encourage other Luthiers to step up and help other Wal owners.

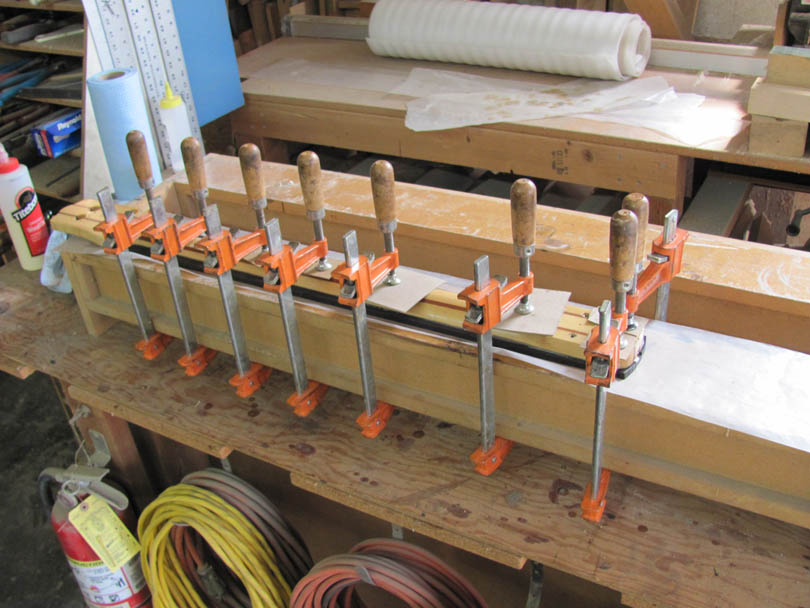
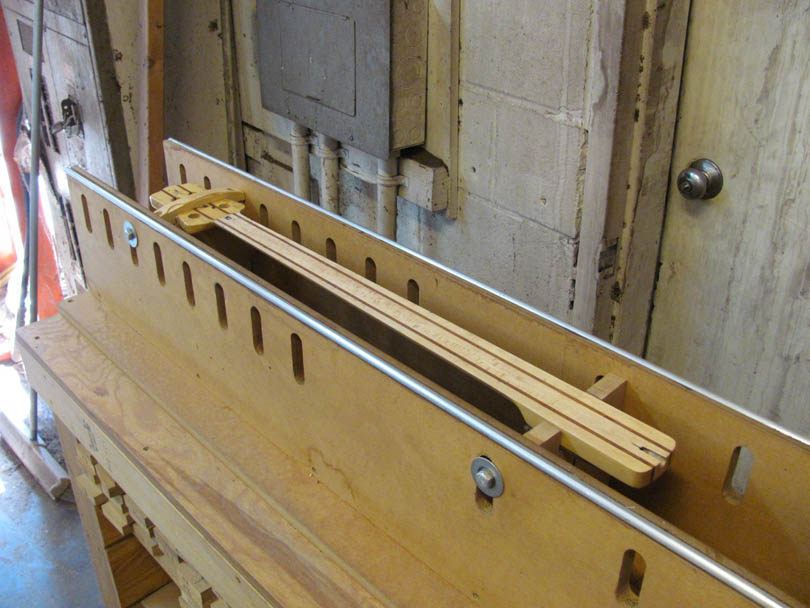
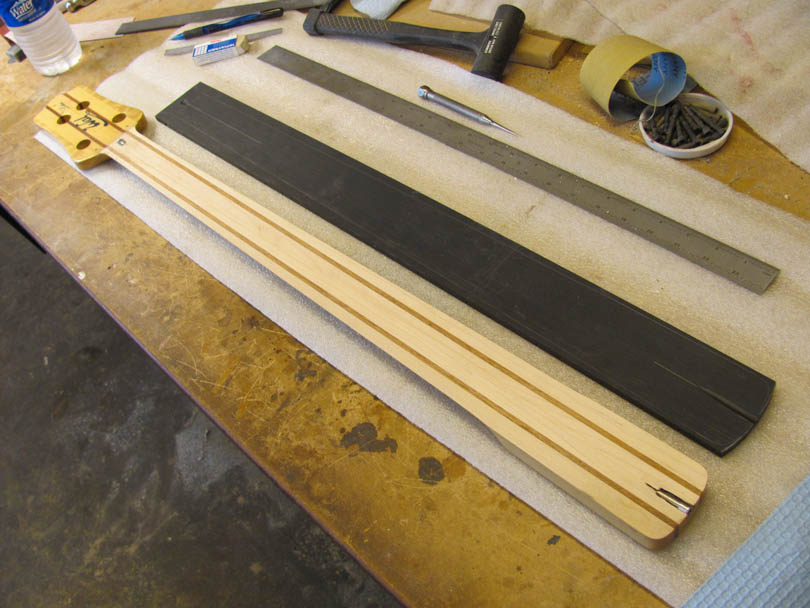
For reference, here are some pictures from 2010, when I rebuilt an early Wal neck that had developed a twist. I machined off the original fingerboard, routed it straight, and put on a new ebony fingerboard.
IMG_0238B.jpg


IMG_0242B.jpg


IMG_0243B.jpg


IMG_0245B.jpg


IMG_0273B.jpg


This is similar to what I'll be doing to one of the current Wal necks.
 
Here's the first of the two Wals that I'm going to repair. It belongs to Mike, who is a regular here on TB. He's a big Wal fan and has several of them. Mike just shipped me the neck, not the whole bass.

This is a 5-string Wal from the early '90's. It was a special bass built to display at the NAMM show, with some extra options. I believe that Mike said he bought it from Wal soon after the show, and he's had it since then.

IMG_9720B.jpg


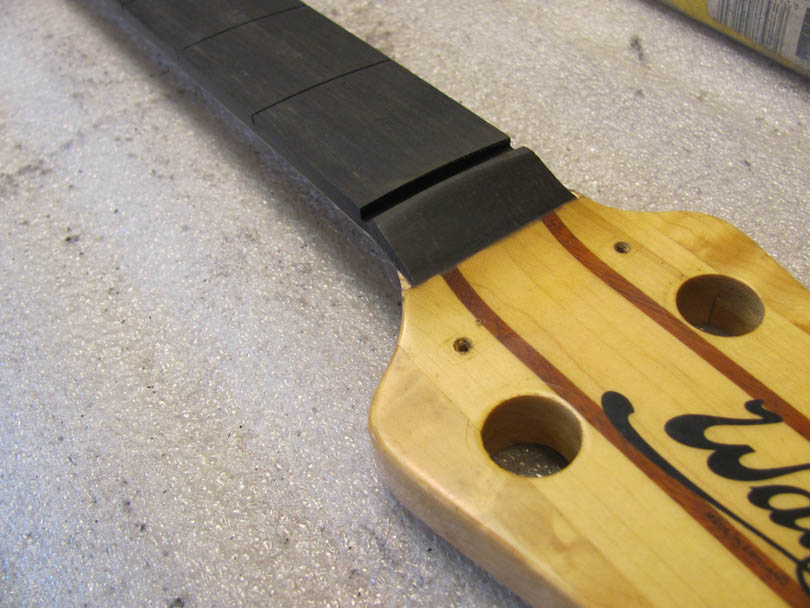
It has a beautiful Macassar ebony fingerboard, a fairly dark one, with deep reddish stripes. No surface dots.

IMG_9721B.jpg


The headstock has an optional veneer of bookmatched flame maple, which curves up onto the front end of the fingerboard. A nice detail, but it could be a problem if I need to machine off the fingerboard.

IMG_9723B.jpg


The neck is a 5-piece lamination of flame maple and purpleheart. Very high quality workmanship, a nice functional shape. Wals aren't flashy basses, they are serious and well built.

IMG_9724B.jpg


This neck also has the optional Sims LED side marker dots. For a while, Wal was offering the Sims LED's as a factory installed option. They were working directly with Sims, sending partially finished necks to Sims for the installation. I'm not sure who did what in the installation. But this neck has them.

IMG_9725B.jpg


Here's how the Sims LED system gets its power. Most of the wiring is set into routed slots in the underside of the fingerboard. The power leads come down to these two terminals set into the heel bottom surface. Note the red and black markings. I guess they contact two terminals in the neck pocket, which are wired to a battery pack in the control cavity. Nice.

IMG_9722B.jpg


So what's the problem with this beautiful neck? Mike says that, over the years, it has developed some forward bow. Not a horrible bow, but enough that he couldn't get the action down as low as he'd like it. He tightened the truss rod, which helped some at first. But then it reached a point where the truss rod locked up tight and wouldn't turn any further. He was cautious and didn't push it. He started asking around about getting it repaired. That's where other Luthiers politely refused the job. Too risky for them. He sent the neck to me, expecting that it would need heavy surgery to replace the truss rod and fingerboard.

When I got the neck here, I examined it and found a couple of things. The bow isn't very bad, actually. It's pretty shallow, but enough to interfere with getting a really nice setup. This neck is more flexible than I would have expected, and Mike says it does flex forward under string load. Unloaded, the neck needs to be flat or slightly backbowed. And the bow isn't an overall curvature thing; it's more like a dip over a shorter range. Mostly in the 5th to 7th zone. I think the ebony just settled down a bit in a soft area. Not much, maybe 0.010".

Any minute, someone will ask why not send it to Warpedneck.com to be heat straightened? I don't think heat straightening would help in this case. Heat straightening can work well to correct an overall bow, backbow or twist, but it's hard to straighten out a kink or dip in a smaller zone. Especially on a multi-lam neck like this. I like the work that Warpedneck.com does, but I don't think they are the answer here.

The truss rod in this neck isn't broken. It will tighten up and start to move the neck. But then it runs out of travel and locks up. It feels like the nut is jamming against the end of the rod. Mike had taken the nut off and put a couple of brass washers under it, which helped a little. But it still kept running out of travel. I also notice that the nut appears to be sunken in to the heel a small amount.

It's a SASR (Single-Acting, Single-Rod) truss rod, similar in design to a Fender truss rod. A very nice machined stainless nut. I think Wal machined those nuts from stainless socket head bolts. I suspect that this truss rod has been overloaded and has crushed in a little bit. The crushing is probably at the heel end, under the washers, not at the anchor end.

Here's what I recommended to Mike:

First, I'm going to work on the truss rod and see if I can get it functioning well. I'll pull out the nut and the washers and take some measurements. I'll machine up a brass spacer and get the length right so the nut can apply higher load before it runs out of travel. I want to be able to tighten up the truss rod, below the danger zone, and see the neck pull into a backbow of 0.050" or so. Give it some power to adjust the neck.

If that works okay, then I'll pull the frets and do a light resurfacing of the fingerboard. I think I can get that low spot out just by resurfacing. It's not that bad. I'll resurface the board with the truss rod tight. Then I'll re-fret it with new stainless frets. I'll also do the leveling with the truss rod tight. I may even put a bit of backbow into the leveling.

And I think that will fix this neck and bring it back to good long term health. Without having to destroy this beautiful fingerboard and the Sims markers. That would be a shame. There's some risk that it may not work, if I find more problems with the truss rod.

That's the plan for this Wal. Just for your reference, we're looking at about a $300 job here. Most of the cost is the fretwork, which takes some time. Most competent Luthiers could do this job. Nothing particularly specialized or exotic about the work.

The important thing is to get the truss rod doing its job. Then the neck will just need a small amount of correction.
 
Last edited:
Here's the second Wal that's here for repair. It's owned by Alex, who also is here on TB sometimes. This is another 5-string, and I believe he said it's from the late '80's. He sent the whole bass to me.

IMG_9726B.jpg


A handsome bass, as usual for Wal. I'm not sure what combination of woods this is.

IMG_9727B.jpg


IMG_9728B.jpg


This is the standard Wal headstock of that era.

IMG_9730B.jpg


Beautiful woodworking.

IMG_9731B.jpg


This is also a 5-piece lamination neck of lightly figured maple and purpleheart. Plain side dots, no Sims.

IMG_9732B.jpg


IMG_9729B.jpg


This poor Wal has a more serious problem. Its truss rod is broken. Alex sadly admits that he did it. It started developing a forward bow, too much relief, and he couldn't get the action low enough without top-end buzzing. He worked with the truss rod for a while, trying to flatten it, but it kept getting worse. He had a Luthier work on it some years back. He resurfaced the fingerboard, trimming it from the original 12" radius to a 16" radius, and refretted it. But the neck kept moving. Then one time he tried to tighten the truss rod a little too hard....and it snapped. I suspect that some profanities were emitted. I've snapped a few truss rods myself, and it's not a good feeling. Then this poor Wal sat in the closet for several years, while he searched for someone who could repair it. He even contacted Wal, and they were reluctant.

We believe that the truss rod snapped back at the anchor, up near the nut. It feels like the whole rod is turning in the neck. The bow is not too bad, but it definitely needs to be fixed.

On this neck, I'm going to have to rout off the whole fingerboard, like on that one I did in 2010. Then I'll take a good look at the truss rod and figure out how I'm going to repair it. I'll probably make up a new truss rod, replicating what's in there. Use the original stainless truss rod nut, if I can. I may reinforce or improve the anchors at both ends, depending on what I find.

While the fingerboard is off and the old truss rod is out, I'll take a better look at the bowing; how much and where. If it looks bad, I may send the neck like that to Warpednecks.com and let Eric work his magic on it. But, so far, it looks like I can straighten the neck mechanically with a light trim of the top gluing surface.

Alex has requested that the new fingerboard be African ebony, no surface dots, small stainless frets. Sounds good to me. This bass will look great with an ebony fingerboard.

For your reference, this will probably be about a $650 job. Not Rocket Surgery, but it does require a few special machines. I have a special fixture rig made just for routing off fingerboards and radiusing new ones. And a special saw that can cut the fret slots with the fingerboard on the neck. And I've got a machine shop so I can make up any truss rod parts needed. With those tools, this is a fairly routine job. I've replaced over 100 broken truss rods over the years. I'm pretty good at this particular surgery.
 
Last edited:
Sorry for the delay, but work is ongoing on these two Wal necks. I'm having internet service problems right now, so I can't easily upload pictures and do the documentation. Hopefully next week.
Quick update:
The truss rod in Mike's neck is fine. I added a brass spacer washer and it pulls the neck, no problem. The neck itself is almost straight. I'll be pulling the frets and doing a light resurfacing of the fingerboard in the next few days.
Alex's neck just came out of surgery. I routed off the fingerboard, no problem. The neck has stayed nice and straight with the fingerboard off, so there's no real warpage problem. I'll be extracting the truss rod today.
 
I've got the internet sort-of patched. Here's what I did to the truss rod on Mike's Wal neck:

IMG_9783B.jpg


This is what the truss rod nut looked like as it arrived here. The nut is sunken in about 0.140" from the end surface of the heel. And it tightens up real hard, as if the threads have run out of travel. Hmmm.....Why?

IMG_9784B.jpg


I had no trouble loosening the nut all the way, and taking it out. These three little steel washers shook out. Mike said that he had put in some washers, to see if it would help. I assume that's what these are.

So, why is the nut running out of threads? I took some careful measurements and determined that, yes indeed, the end of the truss rod was jamming up inside the nut. The good news is that the threads on the truss rod are in good shape, there's plenty of them, and it didn't appear that the rod is pulling out of the neck.

The problem is that the nut is going in too far. The back shoulder of the nut is going back farther than it should before it contacts something solid to push against. And, looking down inside, that appears to be a metal surface, the rear anchor block. It doesn't look like anything was crushed in, or could be crushed in.

Everything looks fine, except it needs a thick spacer/washer to bring the nut out farther. Where it will have plenty of threads and travel distance.

What happened to that spacer? Did Wal forget to put it in because this was a rush-rush trade show bass? Somewhere along the line, did someone take the nut out, drop out the spacer, and not put it back in?

I dunno.

IMG_9785B.jpg


Whatever. I took good measurements of what the spacer should be.....

IMG_9786B.jpg


....And quickly machined one up on my Logan lathe from a chunk of brass bar stock. It took about 5 minutes.

IMG_9787B.jpg


And there's the new brass spacer and the nut. I put a little grease inside the nut and put it back together.

IMG_9788B.jpg


And now the nut is flush with the heel, like I think it should be. There's plenty of engagement of the threads, and plenty of travel. I tightened it up and it seems to work just fine. I took it up to maybe 70% and was able to backbow the neck about 0.060". That's about right. That should give the truss rod enough travel to handle the working range.

IMG_9789B.jpg


With the truss rod at maybe 20%, the neck is almost dead straight, sighting down the glue line between the neck and fingerboard. The neck itself doesn't have any real warpage problem and the truss rod is functioning. It's healthy.

The only problem now is that there's a small lump and dip thing in the fingerboard surface down near the 3rd-5th fret area. I don't know whether this was from the factory, or the fingerboard wood did that by itself as it dried out.

But it's not much, and the frets are pretty low on this neck. So, next up, I'm going to pull the frets carefully and do a light block leveling of the fingerboard surface. Taking off as little wood as I can, probably about 0.010". Then refret it with small size stainless wire. Then I'll level the frets with the truss rod tightened up to maybe 40%. That should give it a good working range for adjusting the relief.

And I think that's all this neck will need. A pretty simple repair, actually.
 
Last edited:
Alex's Wal neck gets the serious surgery. You may not want to look if you are squeamish about seeing expensive bass necks cut wide open.

This Wal neck has a broken truss rod. It needs to be repaired or replaced, which means routing off the fingerboard. Turning it into sawdust. Then repairing or replacing the truss rod, and putting on a new fingerboard, and fretting it.

IMG_9791B.jpg


Here's the neck, off the bass, with the hardware removed.

IMG_9792B.jpg


Before getting into the heavy work, I experimented with the truss rod to get a better understanding of how it's broken, and what to expect inside. I noticed that the nut would tighten up fairly well and then would lock up on the end of the rod, like on Mike's neck. So I removed the nut, and quickly made up another spacer, just like the one I made for Mike's neck. I greased the nut and put it in on top of the spacer, and tightened it up. The nut turned on the rod and tightened up a fair amount, which was interesting. The rod didn't seem to be turning.

I kept turning it, and the nut eventually locked up on the threads again. You can see above that the rod has now pulled out so the end is almost flush with the heel.

IMG_9793B.jpg


Here it is with the nut removed. This tells me that the problem is down at the far end, at the anchor. The rod itself may not be sheared off, but the anchor may have broken somehow that allows it to be pulled forward. That's good information.

IMG_9794B.jpg


Okay, well, preparing for the ugly part......I pulled out all the frets with those scary looking tools....

IMG_9795B.jpg


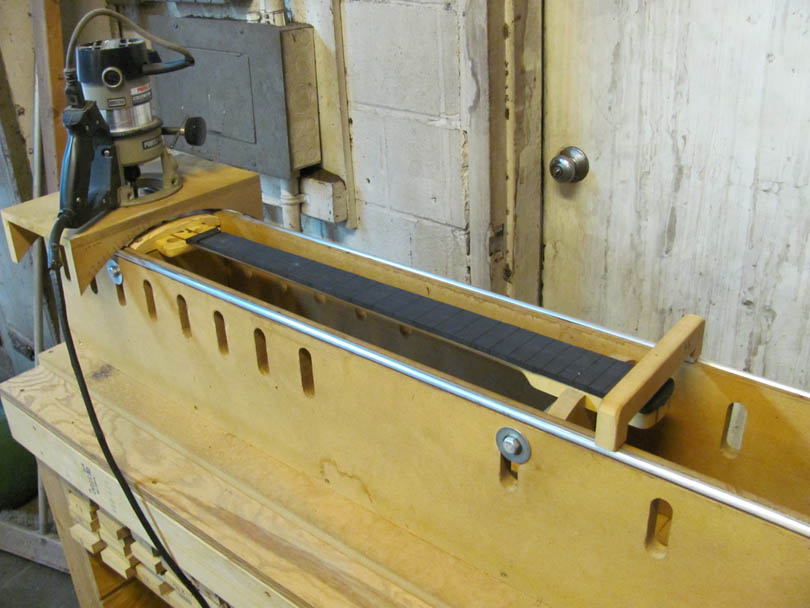
And rolled in the Universal Neck Routing Fixture. I built this contraption back around 1997, the second generation of its type. It will hold almost any size of neck for radiusing the fingerboard, flattening the top gluing surface and, occasionally, routing off a fingerboard. I've done about 2000 necks on this thing. I normally keep it over in Unit 2, across the hall, Jeremy's shop. He uses it a lot too. I roll it over here into my main shop when I'm doing a delicate job like this Wal.

IMG_9796B.jpg


The neck gets locked down into the fixture using a flat clamp block on the headstock and a side clamping block at the heel. I have stacks of different clamping blocks in the shelves under the fixture.

IMG_9797B.jpg


Then the neck gets carefully adjusted in relation to the two aluminum rails. I need to get the glue line accurately parallel to the rails lengthwise and side-to-side. I use this aluminum bar depth gauge to check it all around. The adjustments are made with shims under the blocks. Patiently and carefully.

IMG_9798B.jpg


And then starts the ugly part. You may want to look away. The router slides on the rails, down and back, in shallow passes of about 1/16" each. That nice fingerboard becomes a cloud of sawdust and those pearl dots shatter and go flying like bullets. It's not pretty, but it has to be done.

IMG_9799B.jpg


After about 5 passes in depth, the remains of the fingerboard is maybe 0.015" thick. At the two ends, some chunks start splintering off.

IMG_9800B.jpg


Here's the anchor end of the truss rod exposed, up near the nut end. It will be interesting to see what's going on in there when I peel away that maple filler strip over it.

IMG_9801B.jpg


Nothing sticking up at the heel end. This is where I stop the routing. I want to avoid cutting into the neck itself at all, if possible. I took the neck out of the fixture and walked it over to the edge sander. I spent a few minutes very gently sanding off the last paper thin layer of the old fingerboard.

IMG_9802B.jpg


And there's the neck with the fingerboard off. There are a few little patches of fingerboard wood where there must be low spots in the neck wood. So I left the patches of brown wood in them. The surface is now dead flat.

The neck is quite flat as it is, with no fingerboard and the broken truss rod. That's good news. I was concerned that the neck might have its own forward bow, which was being held back by the fingerboard. Remove the fingerboard and it might pull into a bigger bow. But that didn't happen. If anything, it flattened out with the fingerboard gone. No need to do any other straightening work.

The neck itself is basically healthy. It's just needs a working truss rod and a new, slightly thicker fingerboard.

Next up, I'll be peeling out the filler strip and taking a good look at the truss rod.
 
Bruce - Back in the day, Ian and Pete used to write that on the back on the control cavity cover - have you checked?

No, I haven't. I'm not planning on touching anything else on the bass unless I have to. The whole body is resting comfortably (and nervously) in the case while I rebuild the neck.
 
While we are talking about truss rods, and particularly about truss rod adjusting nuts locking up on the threads:

There's a very simple sign, if the truss rod nut has run out of travel and jammed up on the end of the rod: It tries to spring back. That is, you are tightening it with a short wrench, it gets real tight, and then when you release pressure on the wrench, it snaps back counterclockwise a few degrees. That's an indication that you are twisting the rod. A big flashing red light. If you feel any snap-back, Stop Right There. Do not turn the rod any farther, or you'll break it.

Carefully back off the nut, unscrew it and remove it. This is where you need to figure out why and how much it's running out of travel, and add some washers or spacers. Like what I did on Mike's Wal neck.

This applies to any SASR (Single-Acting Single-Rod) style truss rod. Like, you know, Fenders.
 
Uncovering the broken truss rod on Alex's Wal neck:

With the fingerboard off, now I can look at the truss rod, and figure out where it broke, and how to best fix it.

I noticed something interesting right away. I was expecting to see the top of a filler strip covering the truss rod, but there's a single line???

IMG_9803B.jpg


Looking closer, I can see that the center strip of the neck is itself a lamination of two halves. That's interesting. And there's no filler strip. Most of us install SASR truss rods by routing a curved slot down from the top, and then covering the truss rod with a maple filler strip. Wal apparently routs the curved slot into both sides of those center strips, and then sandwiches the rod between them.

Peavy used to do something like that on their 2-piece necks 30 years ago. I didn't know that Wal was using this design. I wonder why, what's the advantage? I can't think of any right now. But they must have had their reasons.

IMG_9804B.jpg


Looking close at the back of the neck, you can barely see the centerline seam. I hadn't noticed it before. I just checked Mike's neck, and it has it too.

IMG_9805B.jpg


Okay, well, I need to take a look at the truss rod. I suspect that the break is at the anchor end, up near the headstock, so I'll start there. I drew a pair of parallel lines, about where a filler strip would be. I scribed the lines with a sharp knife and then started wedging in a narrow chisel......

IMG_9806B.jpg


I took out a small chunk of wood, and there's the anchor. And there's the end of the truss rod........

IMG_9807B.jpg


.....And they're not connected together.....I believe I've found the problem.

IMG_9808B.jpg


I was easily able to grasp the anchor block with pliers and pull it up and out.....And there's the end of the rod...Yes, I think I've found the problem.

IMG_9809B.jpg


So, I decided to try to get the truss rod out by tapping it all the way out through the heel. Leaving the whole channel inside the neck intact.....I tapped on the end of the rod at the anchor end using a pin punch......

IMG_9810B.jpg


And it moved out about an inch....but then it seemed to jam up.....Hmmmm....

IMG_9813B.jpg


So I tapped it back the other way, toward the headstock.....And there's the problem. A chunk of the brass anchor block is still silver-soldered onto the end of the rod....That's what was hanging it up.

IMG_9814B.jpg


Okay, so then I reversed direction and tapped the rod at the heel end, driving it out the headstock end....It came out without too much applied violence.

IMG_9815B.jpg


And there's the problem. The anchor block is a small rectangular brass block with a blind hole drilled in it. The truss rod is 4mm stainless rod, inserted into the hole in the block and silver-soldered. That's a very weak design. I'm disappointed in Wal for that. All the rest of the bass seems to be very well engineered, but this is a weak spot.....

IMG_9816B.jpg


So, there's the truss rod out of the neck. My repair plan is to re-use the truss rod, repairing it with a much stronger anchor block. I'll clean up the end of the rod and cut new 4mm threads on the anchor end. I'll make up a new brass anchor block which will be longer and be drilled and tapped 4mm. The rod will thread in there and be locked with red Loctite. I always prefer to have my truss rods thread into the anchors, for strength.

I'll be chiseling out the pocket in the neck for the longer anchor block. Other than the anchor repair, the truss rod will be all original. I won't be changing anything at the heel end. Except maybe adding a spacer to make sure the rod has enough thread travel.

I also discovered that I don't have a 4mm threading die. I'll have to order one from McMaster's on Monday and get it on Tuesday.

That's the story on Alex's Wal neck. No unexpected difficulties so far. Repairing the truss rod will be simpler than I expected.

Back to Mike's neck.
 
Last edited:
Wow, so the original Wal neck had a rod that was just soldered to the anchor block, whereas your repair, with the new threaded anchor block, will be "screwed in" nice and tight. Sounds like a great plan.

Not just screwed together, also glued with red Loctite which, in this case, is as strong as a weld; as the rod will snap long before it breaks the Loctite bond.
 
Last edited:
  • Like
Reactions: Al Rivera and zuma