

Enjoy the benefits of a premium membership!
Upgrade Account
-
TalkBass has been independent since 1998. Add your voice.
Create a free account to reply to discussions, view embedded media, and browse with fewer display ads.
Join free Log in
Want zero display ads or expanded classifieds tools? Compare plans.
You are using an out of date browser. It may not display this or other websites correctly.
You should upgrade or use an alternative browser.
You should upgrade or use an alternative browser.
Scary Neck Repairs: Two Wal Necks
- Thread starter Bruce Johnson
- Start date
More options
Who Replied?
So do you have a diagram of the correct way to orient the maple portions of a 5 piece neck?
That's covered in detail in this thread:
About That Quartersawn Maple.....

Putting a new, stronger anchor on the end of the truss rod in Alex's Wal:
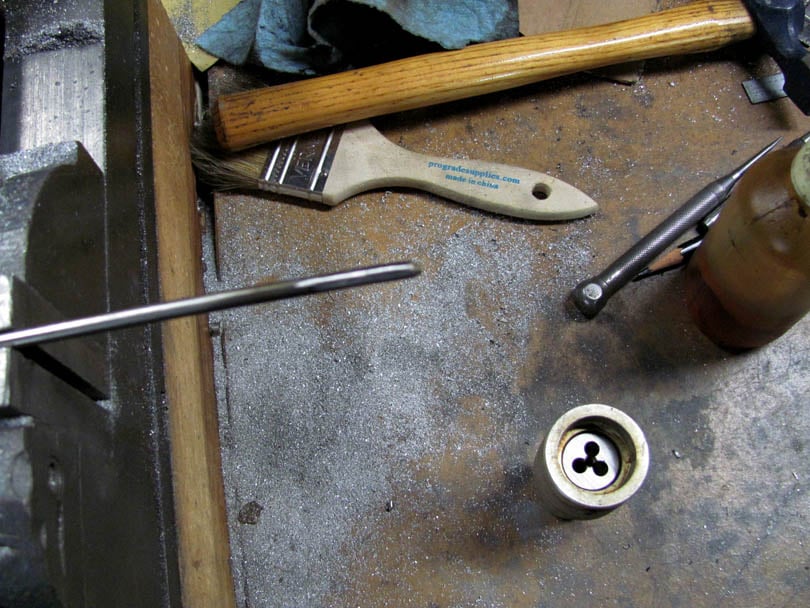
The first step was to clean up the end of the truss rod. On the Knife Belt Sander, I ground off that broken bit of the original anchor, and smoothed out the rod.
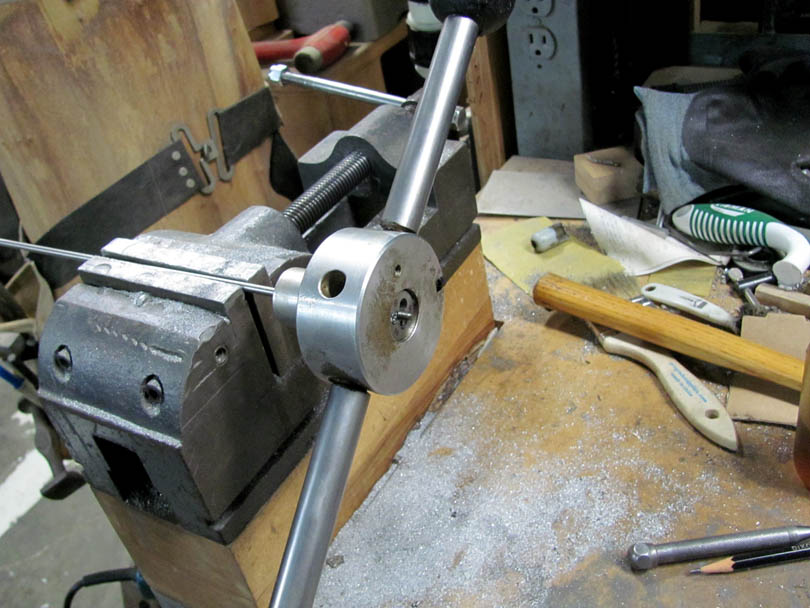
And turned the 4mm x 0.7 die over it.....
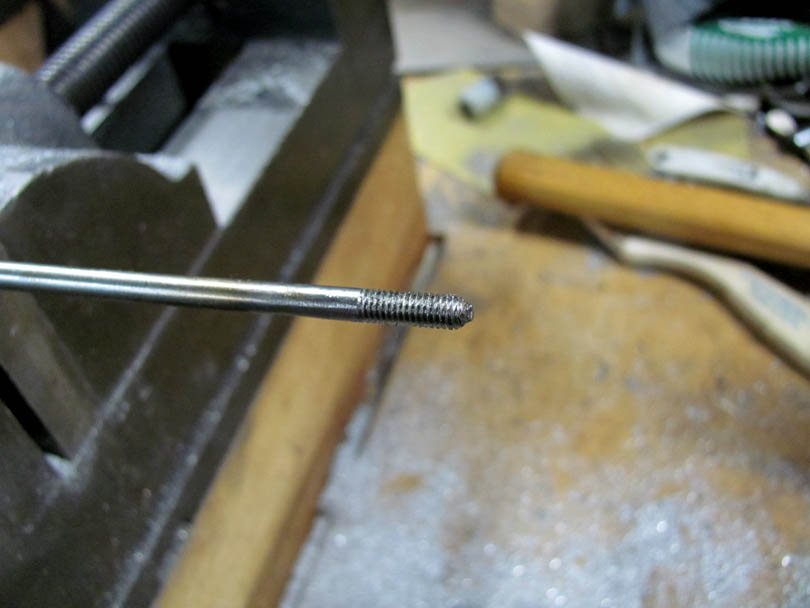
...threading it about 1/2"...
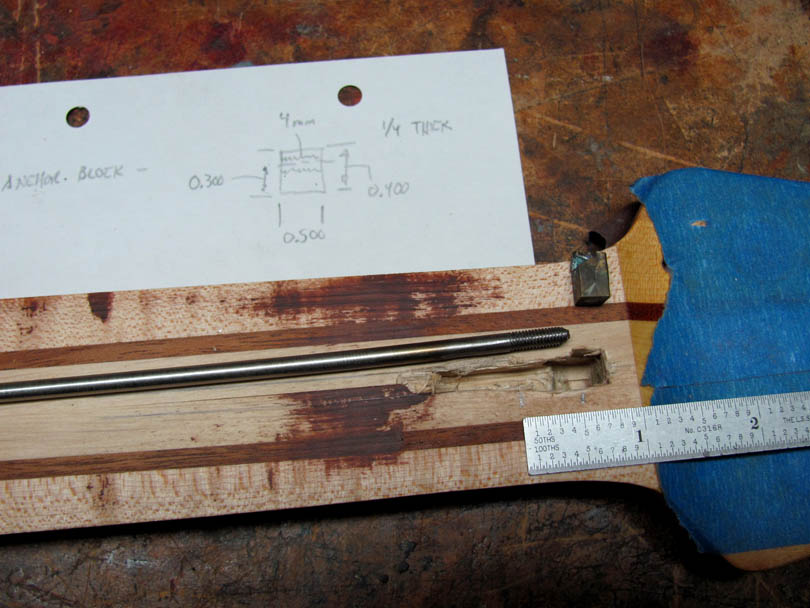
Then I took measurements and figured out what the new anchor block needed to be......Engineering on an index card.
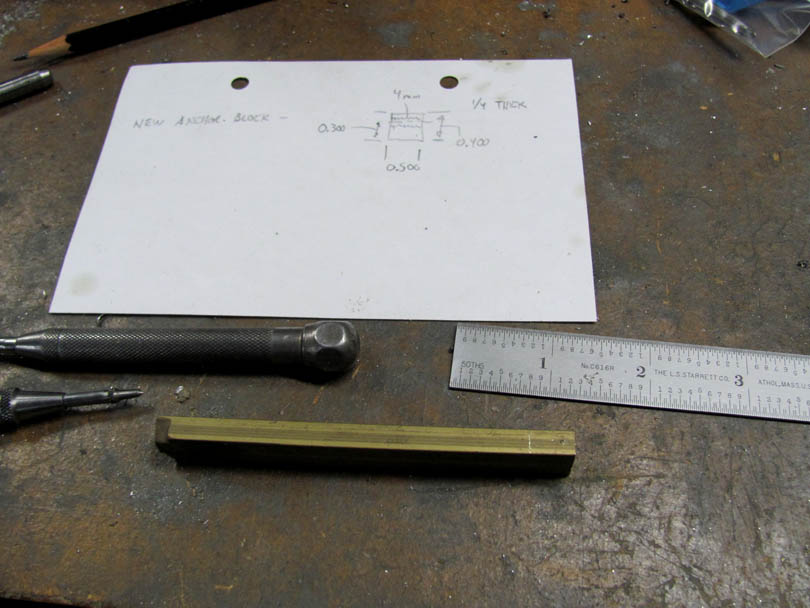
I found a short length of 1/2" x 1/4" brass bar stock in the brass cutoffs box....Layed out and marked the hole.
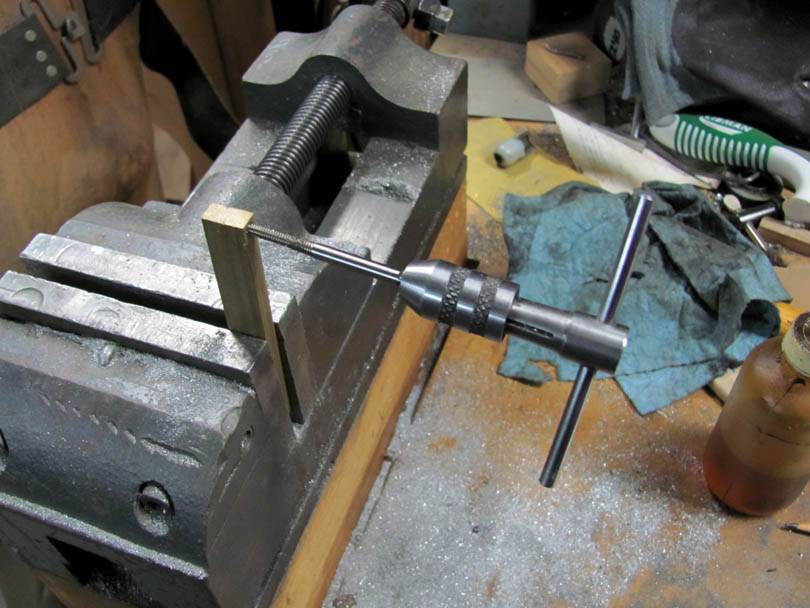
....Drilled it #30 and tapped it 4mm. Note that the hole is tilted down 2 degrees, as I described above.
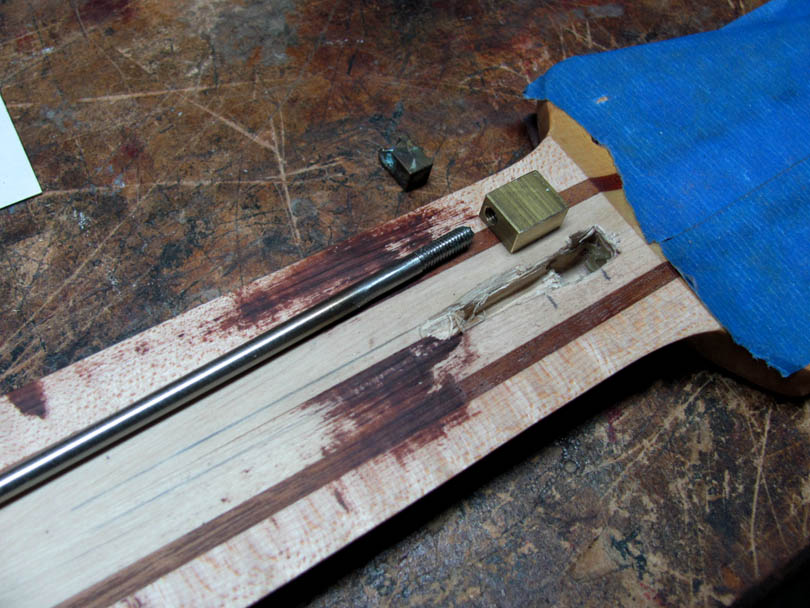
I sawed off the block, softened the edges with a file, and the new anchor block is ready to install.....
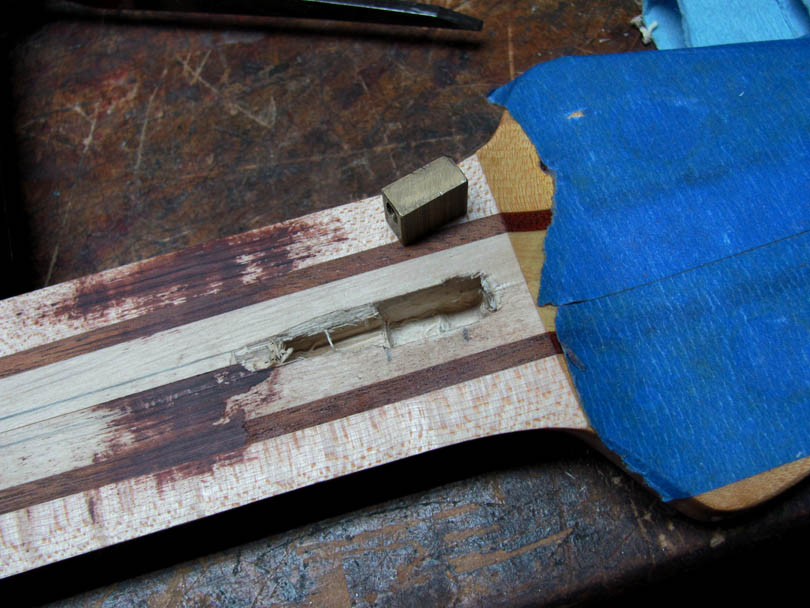
A few minutes' of careful chiseling to lengthen the rectangular pocket in the neck. Gently, to not crack the wood on the back of the neck.
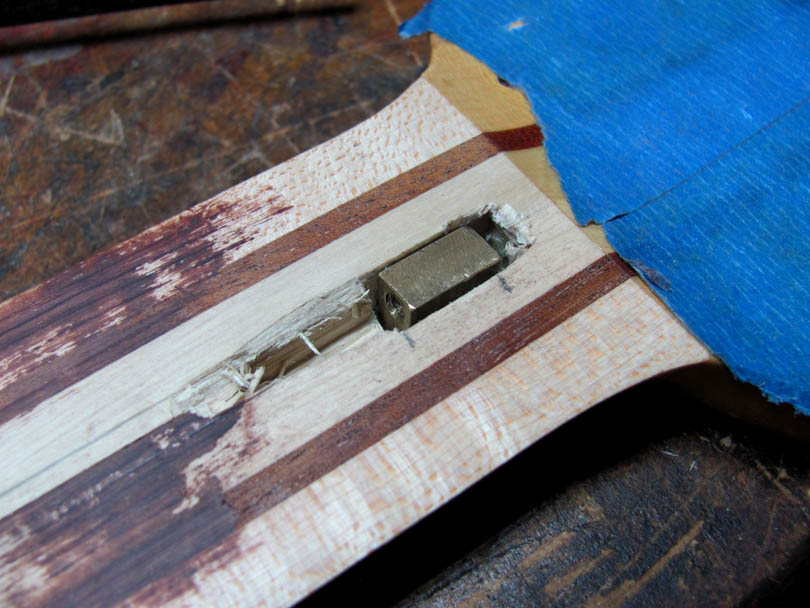
A test fit of the anchor. I had to widen the pocket a bit to allow the anchor to rotate and snap down into position.
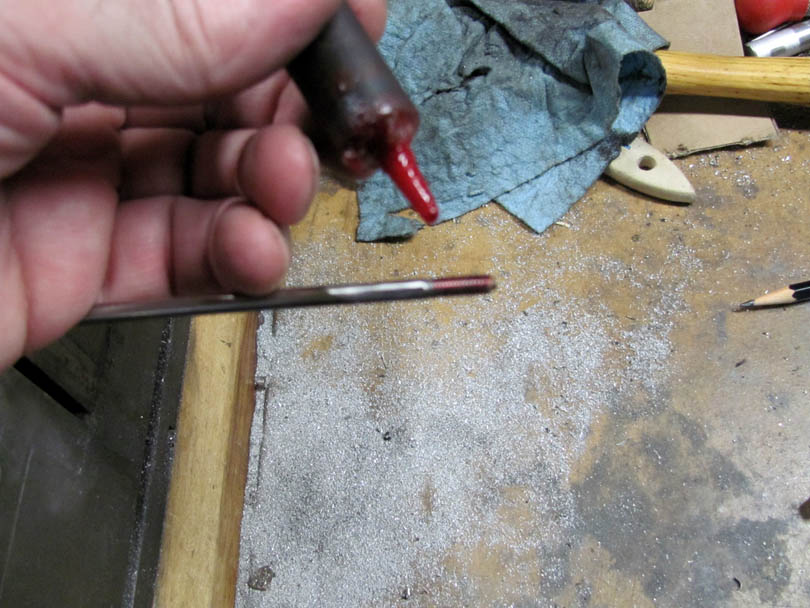
A drop of Red Loctite on the threads.....
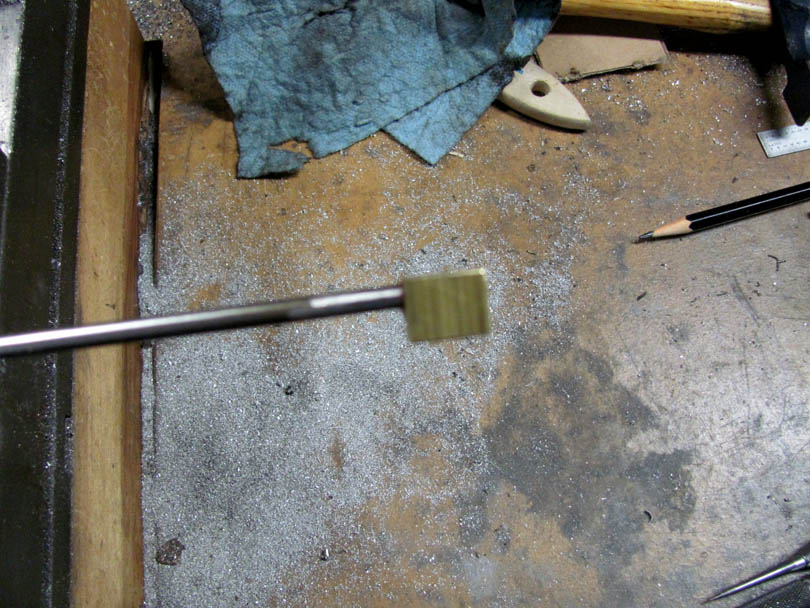
...And the anchor is threaded on the rod. It ain't goin' anywhere. Note the 2 degree angle. That's important.
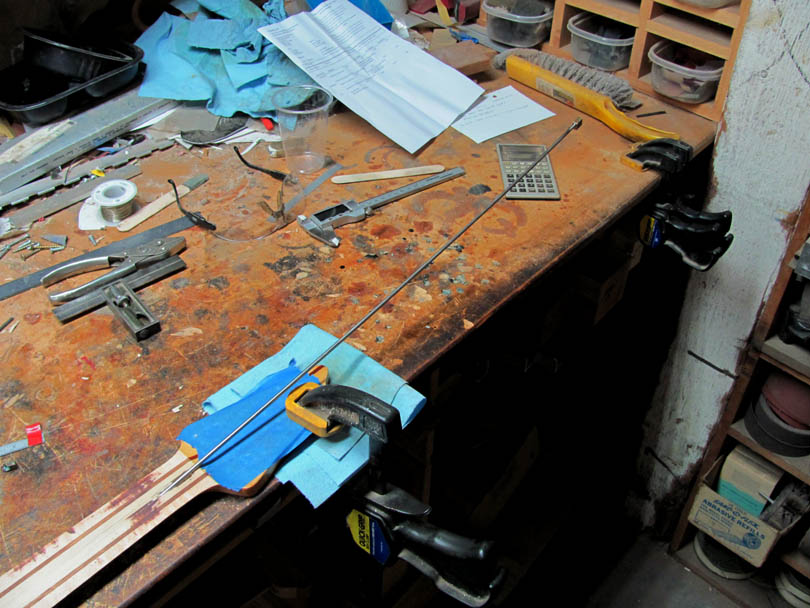
Putting the truss rod back in the neck, from the headstock end. I waxed it first. It slid in easily, then I had to wrestle with the anchor a bit to get it turned down into the pocket.
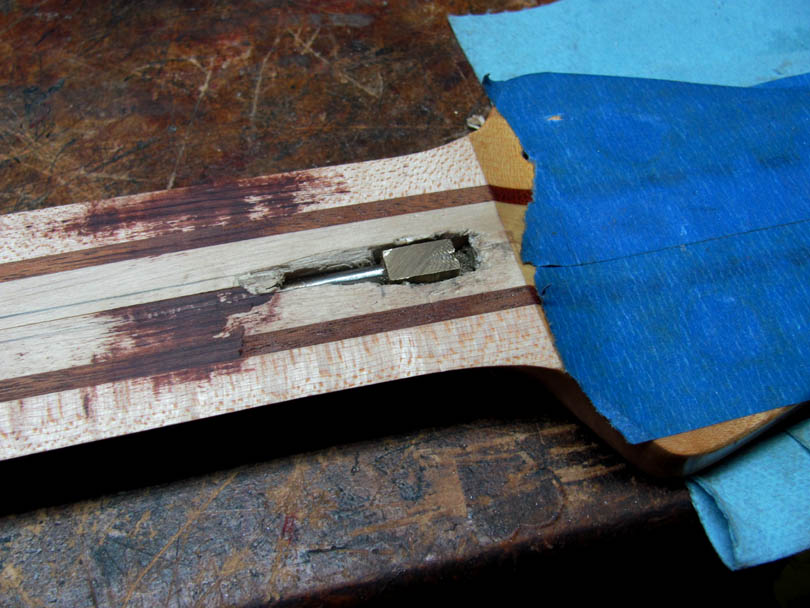
And it's in! I took a smooth file over the top surface of the anchor to make sure it's flush with the surface.
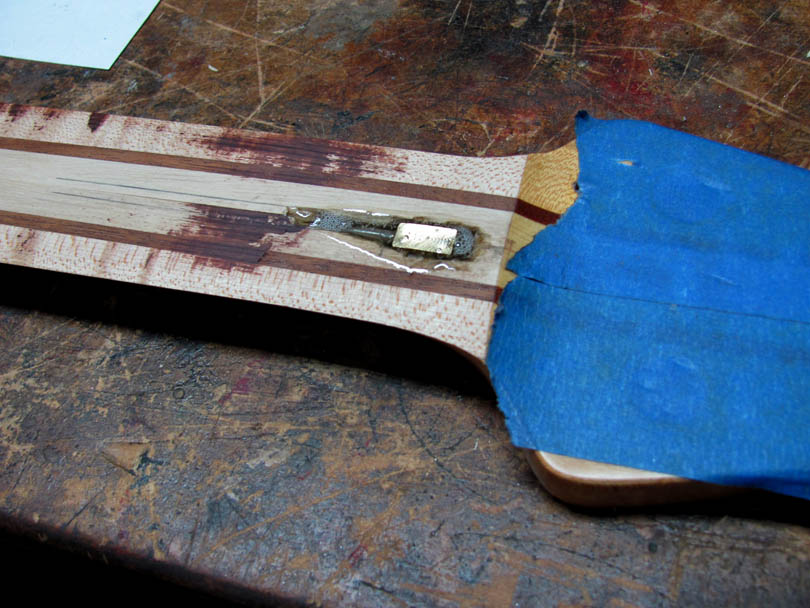
Finally, I poured West Systems epoxy into the pocket, filling all the gaps and surrounding the anchor solidly. This makes sure there can be no rattles and helps reinforce the wood in that area of the neck.
After the epoxy cures, I'll file it flush, and be ready to fit and install the new ebony fingerboard.
The first step was to clean up the end of the truss rod. On the Knife Belt Sander, I ground off that broken bit of the original anchor, and smoothed out the rod.
And turned the 4mm x 0.7 die over it.....
...threading it about 1/2"...
Then I took measurements and figured out what the new anchor block needed to be......Engineering on an index card.
I found a short length of 1/2" x 1/4" brass bar stock in the brass cutoffs box....Layed out and marked the hole.
....Drilled it #30 and tapped it 4mm. Note that the hole is tilted down 2 degrees, as I described above.
I sawed off the block, softened the edges with a file, and the new anchor block is ready to install.....
A few minutes' of careful chiseling to lengthen the rectangular pocket in the neck. Gently, to not crack the wood on the back of the neck.
A test fit of the anchor. I had to widen the pocket a bit to allow the anchor to rotate and snap down into position.
A drop of Red Loctite on the threads.....
...And the anchor is threaded on the rod. It ain't goin' anywhere. Note the 2 degree angle. That's important.
Putting the truss rod back in the neck, from the headstock end. I waxed it first. It slid in easily, then I had to wrestle with the anchor a bit to get it turned down into the pocket.
And it's in! I took a smooth file over the top surface of the anchor to make sure it's flush with the surface.
Finally, I poured West Systems epoxy into the pocket, filling all the gaps and surrounding the anchor solidly. This makes sure there can be no rattles and helps reinforce the wood in that area of the neck.
After the epoxy cures, I'll file it flush, and be ready to fit and install the new ebony fingerboard.
Last edited:




Here's why the neck twisted. Wal screwed up in the construction, and glued up the lamination with one strip reversed.
View attachment 5173928
If you want to know more about rings and orientation of rings in laminations and twisting necks, this thread covers it:
About That Quartersawn Maple.....
Wow! A great example of a picture being worth a thousand words.
It's been an absolute madhouse here in the Lab, but I got a chance to fit & glue the new fingerboard on Alex's Wal neck:
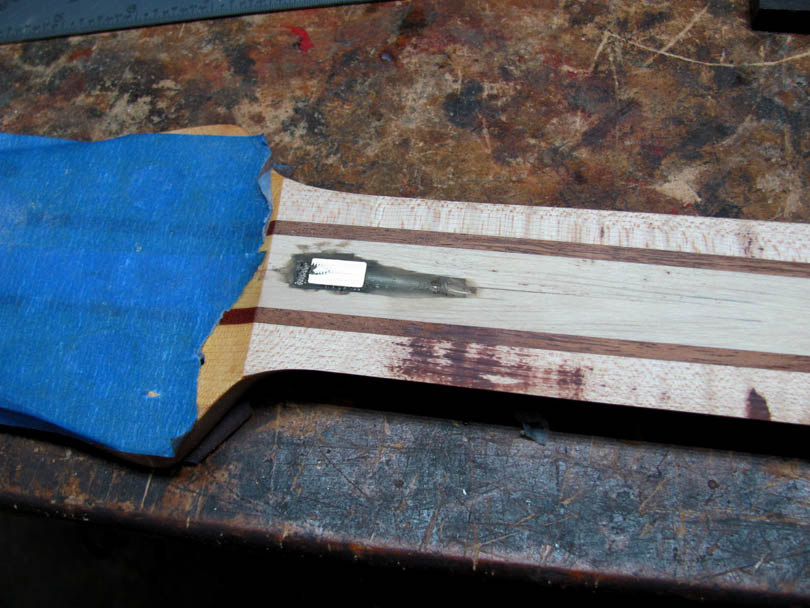
The first step is prepping the neck. On the edge sander, I trimmed down that lump of epoxy over the anchor to be flush with the surface. You can see that the pocket all around the anchor is filled completely solid with hard epoxy. That's what I want. I've only sanded a few thousandths' off the top surface of the neck.
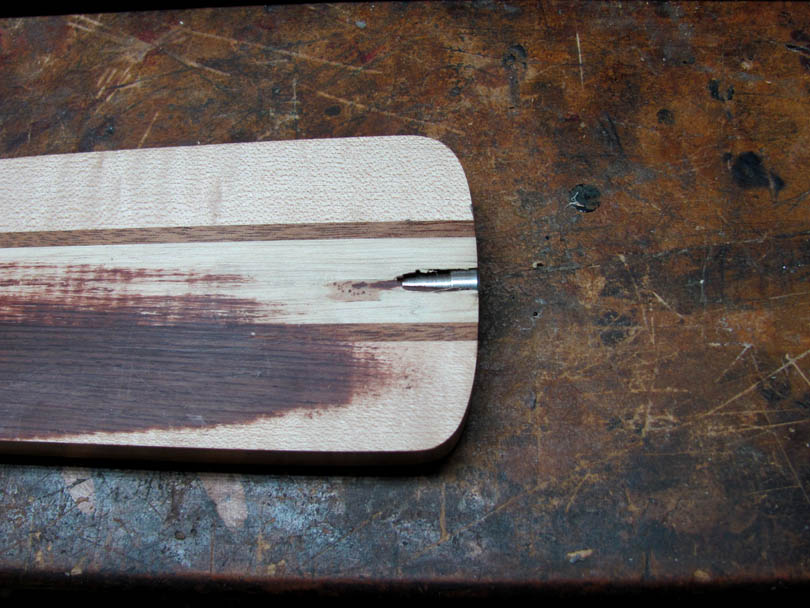
At the heel end, I lubed and installed the brass spacer and the original truss rod nut. Now the face of the nut is right out flush with the heel, as it should be, and there's plenty of travel in the threads. Same as on Mike's neck.
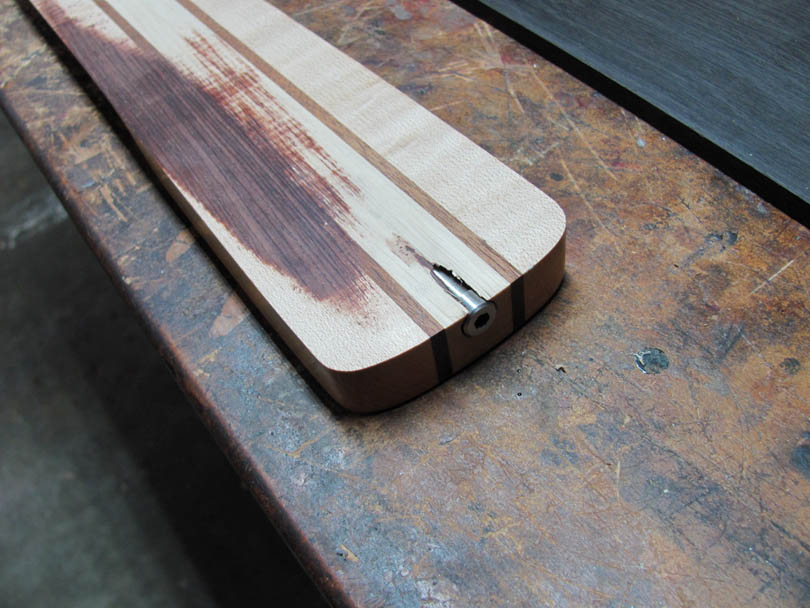
I even tightened up the truss rod a little bit to test it. Yep, without the fingerboard on there, it bent the neck very easily. I only tightened it maybe 30%, checked, and then backed it off. It works, with its new anchor.
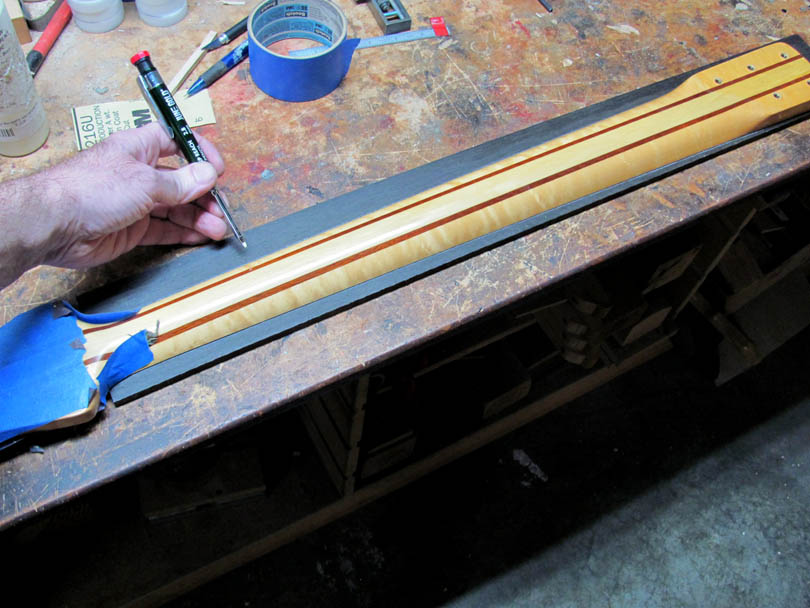
I laid the neck down on this beautiful piece of West African ebony. I figured out how to position it to get the grain going nice and straight down the center. Then drew the outline with a white pencil.
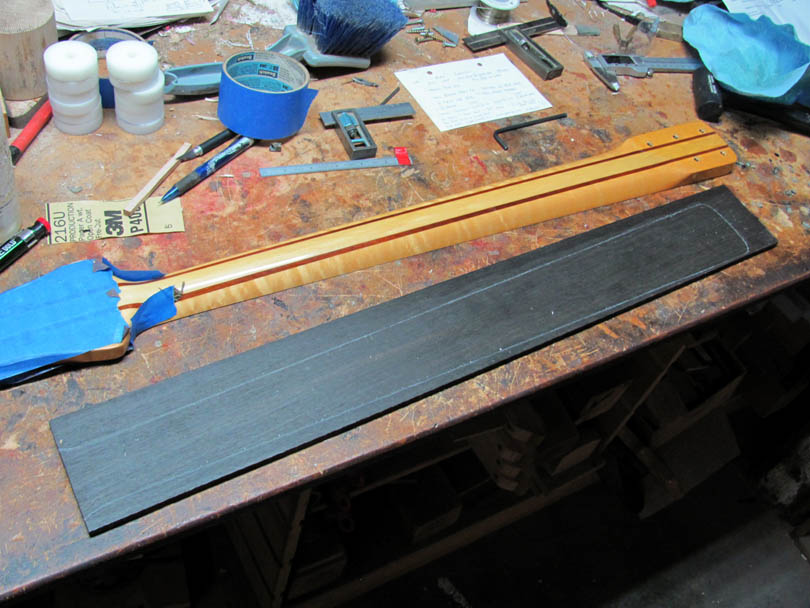
Like this. Over to my trusty medium woodworking bandsaw.
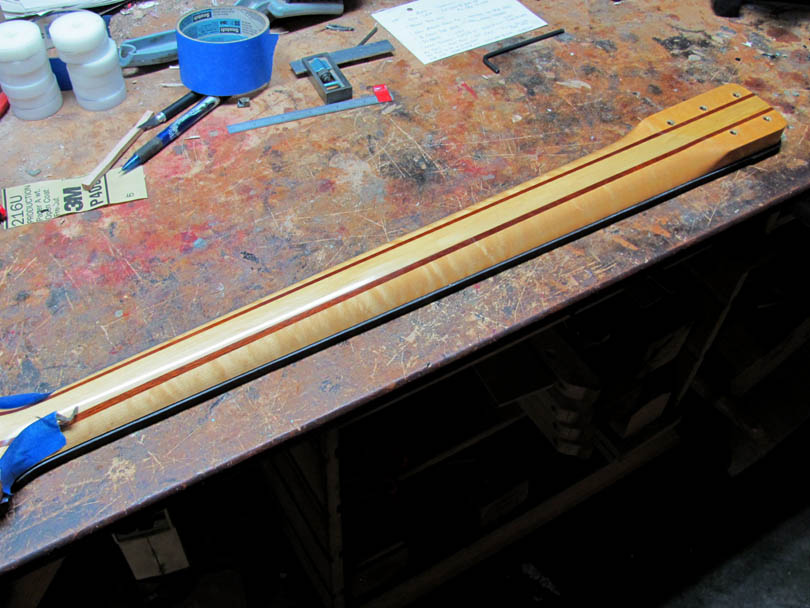
A final fit check. I cut the fingerboard outside the white line, leaving it about 1/16" oversize all around.
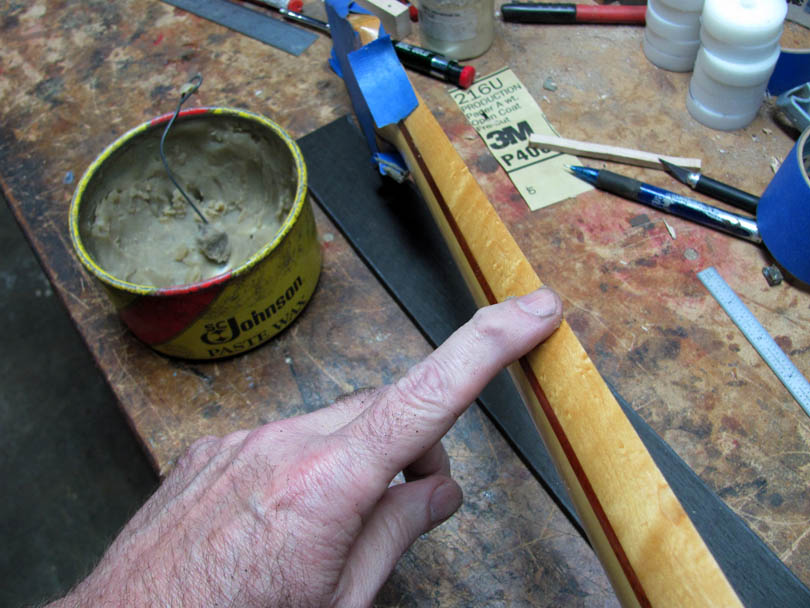
Here's an important trick when gluing a new fingerboard onto an existing neck. I rub a nice coat of Johnson's Paste Wax down the sides of the neck, right up to the edge. But not over it, obviously. The wax will prevent any epoxy that flows over the edge from sticking to the neck. Usually with no damage at all to the wood or the finish. If I'm careful during the trimming, I shouldn't have to touch up the Wal's finish at all.
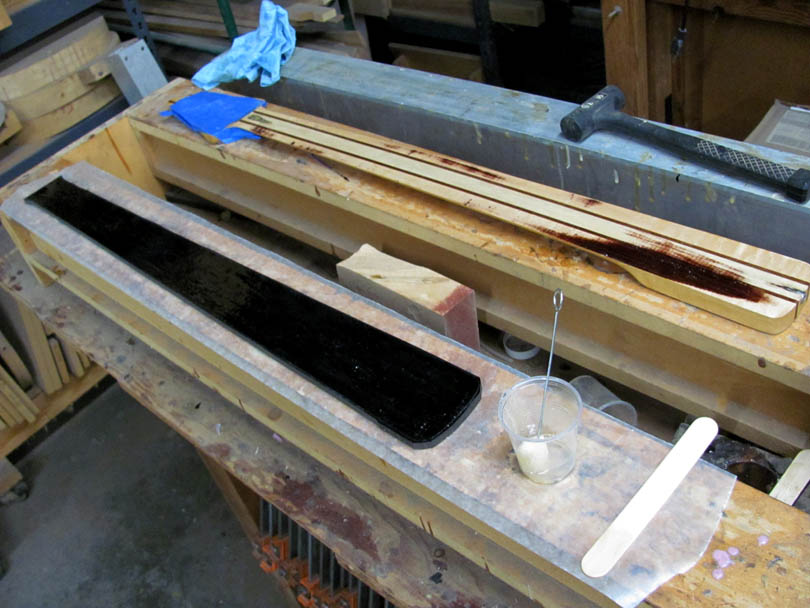
Preparing the epoxy: West Systems 105/206, applied with a dauber to both surfaces and allowed to sink in for a few minutes.
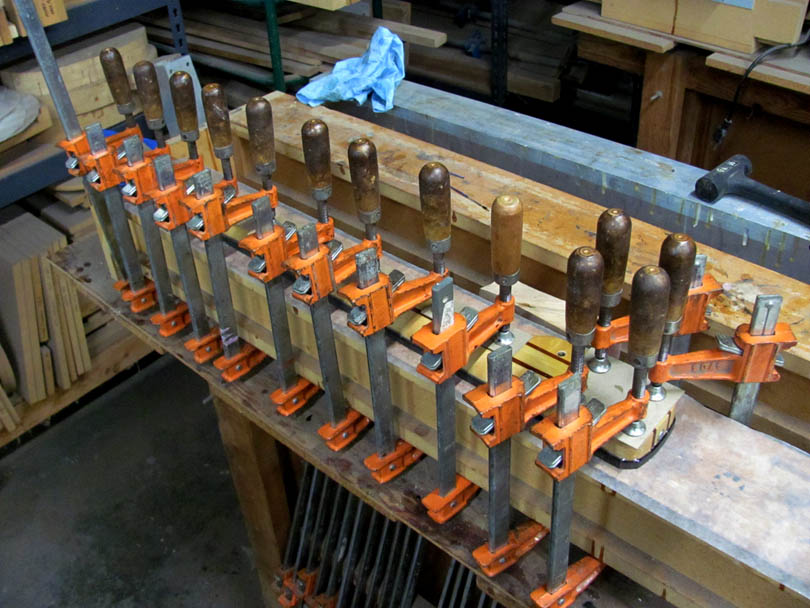
And carefully clamped up, triple checking the alignment. Cardboard pads under the clamps.
This is how I like to glue fingerboards on. Face down on the surface of a flat clamping beam. The fingerboard is still full thickness, flat. I prefer to do the radiusing and slotting with the fingerboard on the neck.
That's coming up.
The first step is prepping the neck. On the edge sander, I trimmed down that lump of epoxy over the anchor to be flush with the surface. You can see that the pocket all around the anchor is filled completely solid with hard epoxy. That's what I want. I've only sanded a few thousandths' off the top surface of the neck.
At the heel end, I lubed and installed the brass spacer and the original truss rod nut. Now the face of the nut is right out flush with the heel, as it should be, and there's plenty of travel in the threads. Same as on Mike's neck.
I even tightened up the truss rod a little bit to test it. Yep, without the fingerboard on there, it bent the neck very easily. I only tightened it maybe 30%, checked, and then backed it off. It works, with its new anchor.
I laid the neck down on this beautiful piece of West African ebony. I figured out how to position it to get the grain going nice and straight down the center. Then drew the outline with a white pencil.
Like this. Over to my trusty medium woodworking bandsaw.
A final fit check. I cut the fingerboard outside the white line, leaving it about 1/16" oversize all around.
Here's an important trick when gluing a new fingerboard onto an existing neck. I rub a nice coat of Johnson's Paste Wax down the sides of the neck, right up to the edge. But not over it, obviously. The wax will prevent any epoxy that flows over the edge from sticking to the neck. Usually with no damage at all to the wood or the finish. If I'm careful during the trimming, I shouldn't have to touch up the Wal's finish at all.
Preparing the epoxy: West Systems 105/206, applied with a dauber to both surfaces and allowed to sink in for a few minutes.
And carefully clamped up, triple checking the alignment. Cardboard pads under the clamps.
This is how I like to glue fingerboards on. Face down on the surface of a flat clamping beam. The fingerboard is still full thickness, flat. I prefer to do the radiusing and slotting with the fingerboard on the neck.
That's coming up.

G&L also does this, with the tweak that they make the seam asymmetric so the rod channel is mostly or entirely inside one of the two halvesthere's no filler strip. Most of us install SASR truss rods by routing a curved slot down from the top, and then covering the truss rod with a maple filler strip. Wal apparently routs the curved slot into both sides of those center strips, and then sandwiches the rod between them.
Peavy used to do something like that on their 2-piece necks 30 years ago. I didn't know that Wal was using this design. I wonder why, what's the advantage? I can't think of any right now. But they must have had their reasons.
anyway, super-awesome!
A crazy week here at the Lab, doing crisis management. But I finally got some time Saturday night to do some actual instrument work.
Here's Alex's Wal neck, out of the clamps.
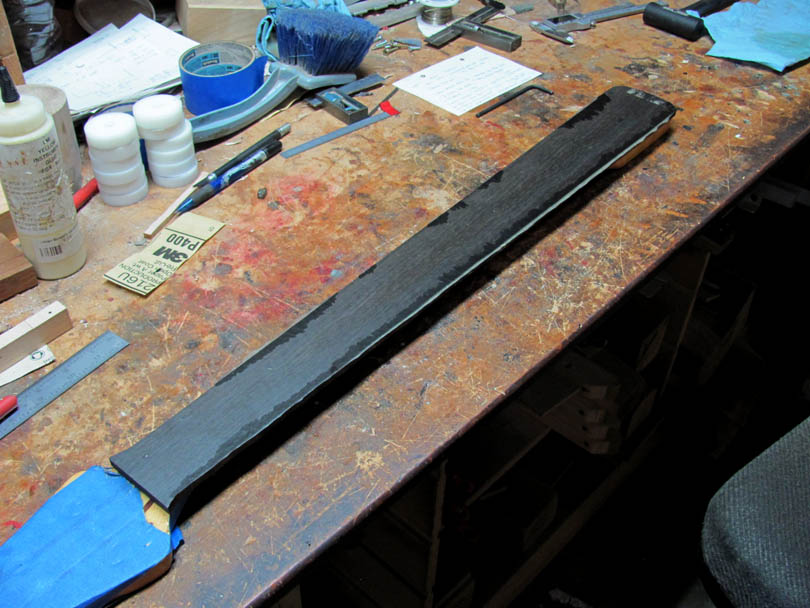
Right now, the new ebony fingerboard is flat, about 0.320" thick and about 1/16" extra width on either side. I took it over to the edge sander and cleaned off the excess epoxy, but left the fingerboard extra wide.
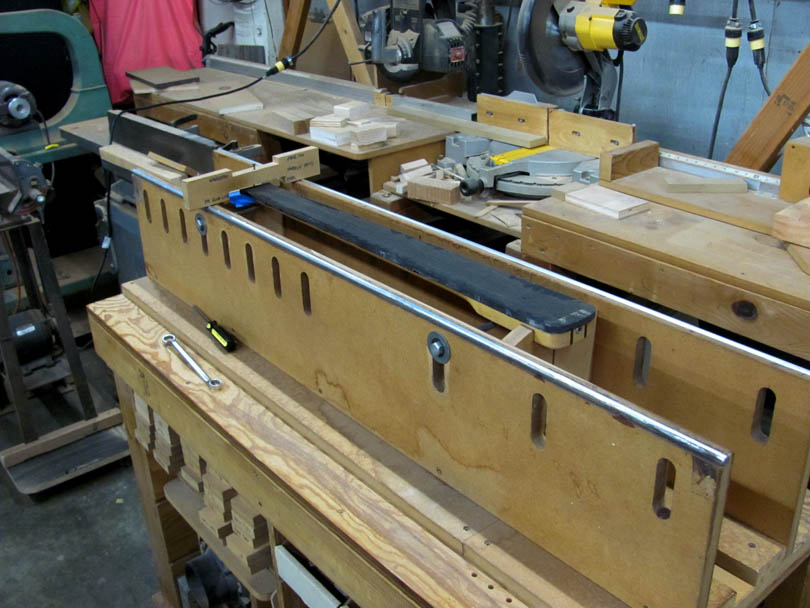
Back to the big Universal Neck Routing Fixture! I set the neck up in it, in the clamping blocks at the headstock and heel. But now the neck is raised up a little bit above the aluminum rails.
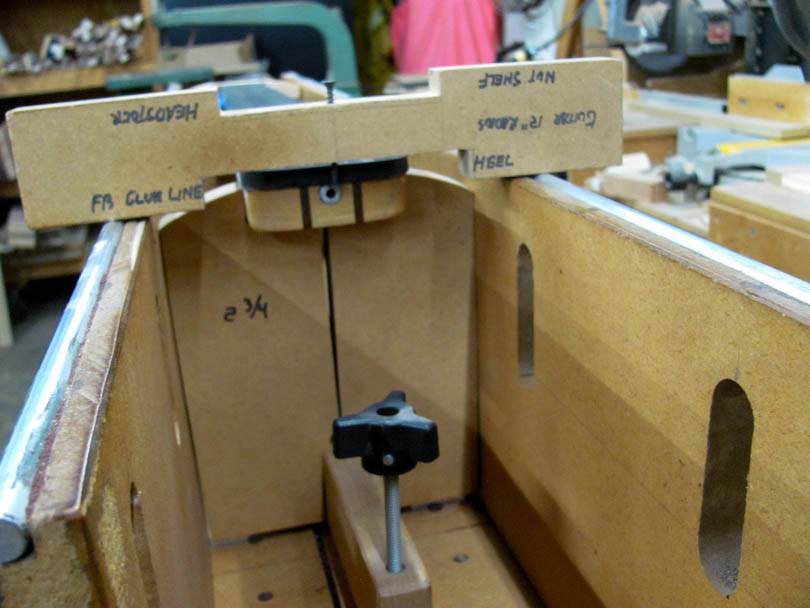
I use this gauge to set the glue line at the correct height above the rails, at both ends, and level it side-to-side.
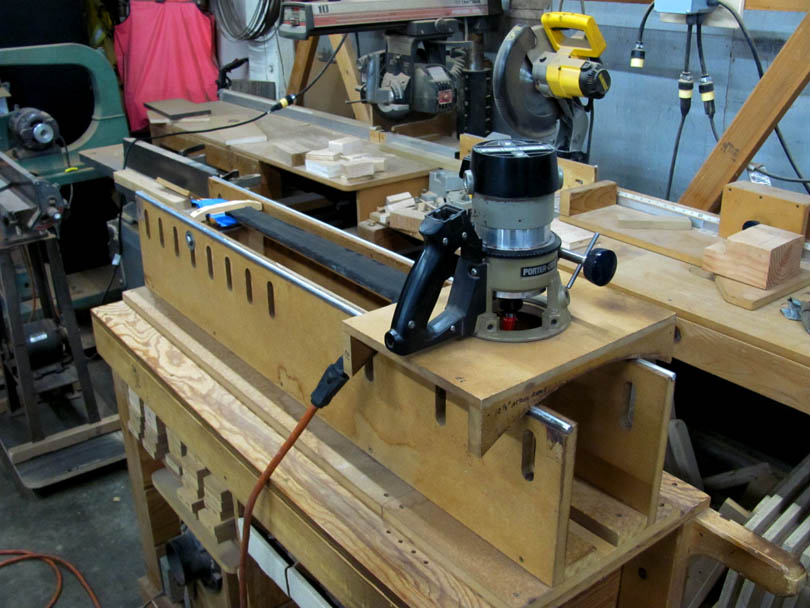
And brought over this router, fitted with a curved-bottom base. This setup will trim the fingerboard down to the final thickness, while putting a 12" radius on it. I move the router down one side and back the other, in light passes, tilting it through the arc, working in toward the middle.
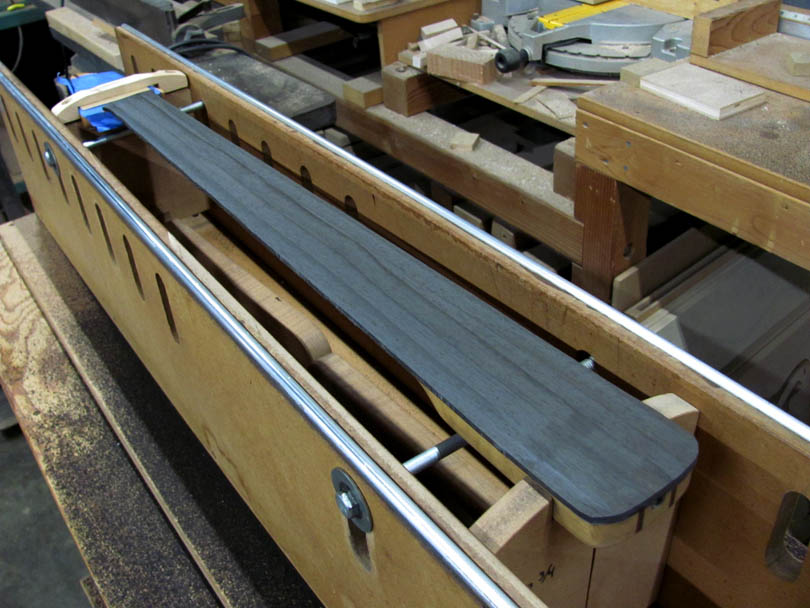
After a couple of passes, I stop and take measurements. Check the thickness at both ends and the side-to-side level alignment. Make slight adjustments, another pass or two.
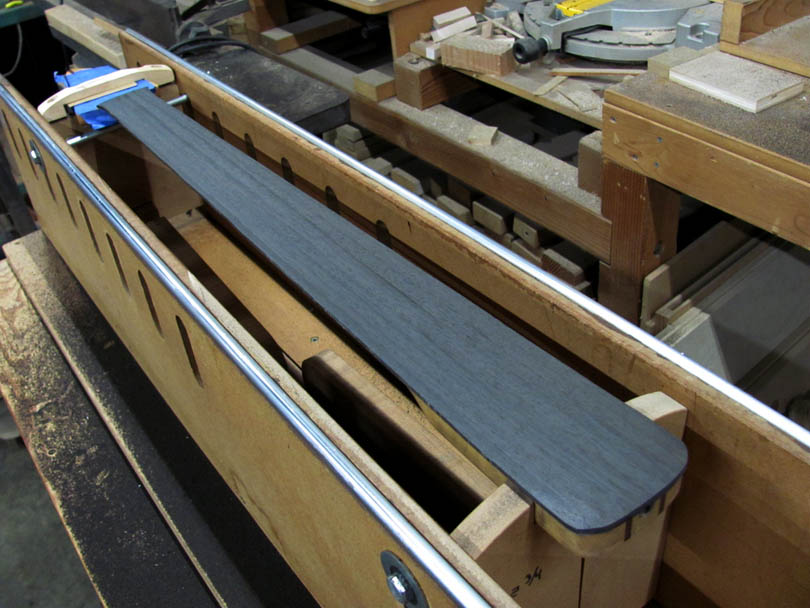
And there it is, at the finished thickness and 12" radius. I took it down to 0.200" thick at the heel, which is what I believe it was from the factory.
Next up: Clean up all the ebony dust! Then it will go over to the slotting saw.
Safety note: After routing or sanding ebony, you should always immediately wash your face. Particularly around your eyes, sides of your nose, and behind your ears. Vacuum off your clothes, wash your hands and arms. Ebony dust is a real irritant.
Here's Alex's Wal neck, out of the clamps.
Right now, the new ebony fingerboard is flat, about 0.320" thick and about 1/16" extra width on either side. I took it over to the edge sander and cleaned off the excess epoxy, but left the fingerboard extra wide.
Back to the big Universal Neck Routing Fixture! I set the neck up in it, in the clamping blocks at the headstock and heel. But now the neck is raised up a little bit above the aluminum rails.
I use this gauge to set the glue line at the correct height above the rails, at both ends, and level it side-to-side.
And brought over this router, fitted with a curved-bottom base. This setup will trim the fingerboard down to the final thickness, while putting a 12" radius on it. I move the router down one side and back the other, in light passes, tilting it through the arc, working in toward the middle.
After a couple of passes, I stop and take measurements. Check the thickness at both ends and the side-to-side level alignment. Make slight adjustments, another pass or two.
And there it is, at the finished thickness and 12" radius. I took it down to 0.200" thick at the heel, which is what I believe it was from the factory.
Next up: Clean up all the ebony dust! Then it will go over to the slotting saw.
Safety note: After routing or sanding ebony, you should always immediately wash your face. Particularly around your eyes, sides of your nose, and behind your ears. Vacuum off your clothes, wash your hands and arms. Ebony dust is a real irritant.
Last edited:

Bruce, a big thank you. This all looks so awesome, and I totally love the process on Alex's neck!
Bruce, a big thank you. This all looks so awesome, and I totally love the process on Alex's neck!
Hey Mike;
I haven't forgotten your neck. After I finish slotting and trimming the fingerboard on Alex's neck, I'll be fretting both necks.

This looks like the opportune time to tell Alex he will be receiving back a fretless Wal. 
This looks like the opportune time to tell Alex he will be receiving back a fretless Wal.
I believe we actually talked about it, but he decided he'd rather have it fretted. Alex did decide to go with an ebony fingerboard and no surface marker dots, which will change the character of the bass somewhat. The ebony will look really cool with that body wood combination, and I'll guarantee it's going to have a genuine Wal sound.
Ugh. I've been going through some Crisis-Level stuff here at the Secret Underground Lab for the last few weeks. I've barely had any time to, you know, work on instruments. But I did get a little time on Saturday night to get back to work on Alex's Wal neck.
It's ready for some slots!
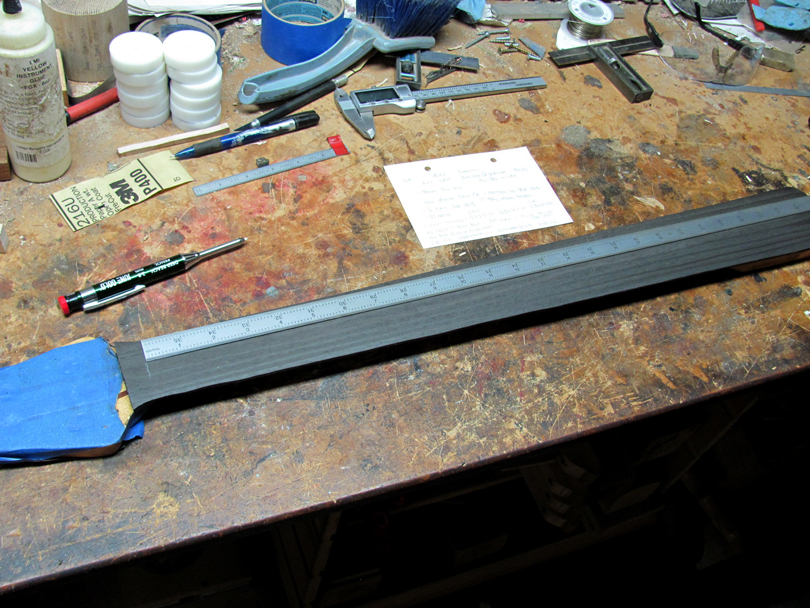
So, here's the neck with the new ebony fingerboard trimmed to thickness and the top surface cut to a 12" radius. The fingerboard is still oversize, hanging over the sides and heel by about 1/8". I checked my notes on the index card, pulled out my 36" machinist's ruler, and marked a white line where the Zero line needs to be, measuring from the heel. Right where it was before. This will be the inboard edge of the nut slot.
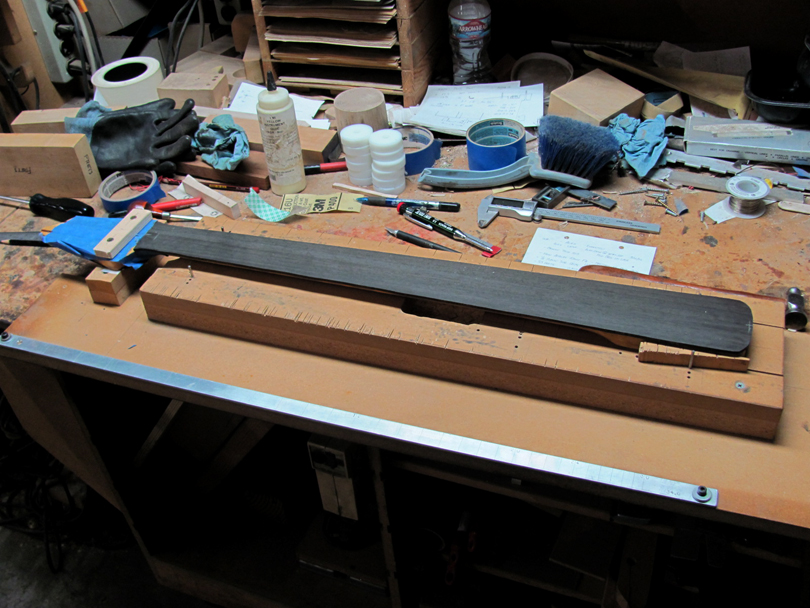
I mounted the neck to the sliding sled for my slotting machine. It's aligned carefully to be parallel to the back edge. The headstock is clamped between wooden blocks, with protective tape, and the heel is locked between two maple wedges and steel pins. I've got the 34" scale ruler clamped down to the front edge of the sled. This is the setup for cutting the fret slots....
But first, I need to cut the nut slot......
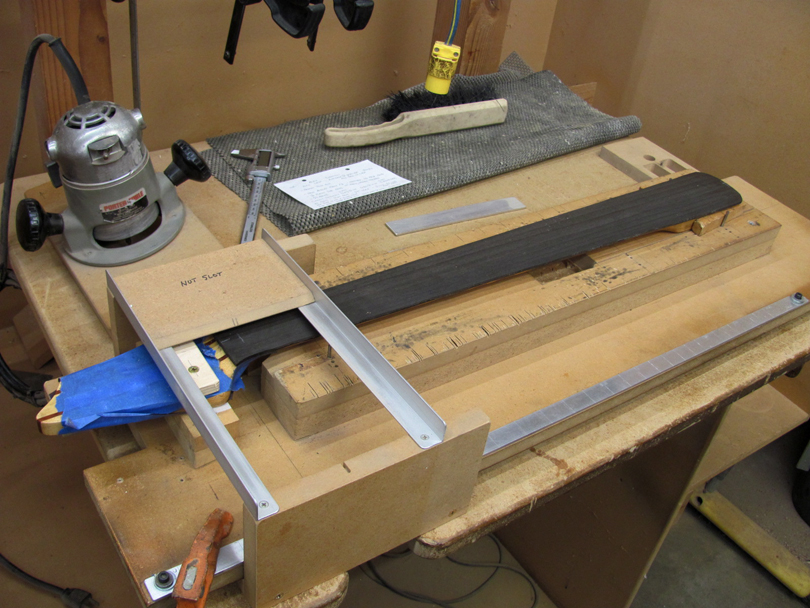
....In this rig. This box-like special fixture slides over the headstock end of the sled. It cuts the straight flat-bottom nut slot on necks that use slot-style nuts. It has two aluminum angle rails and a special router set up for it.
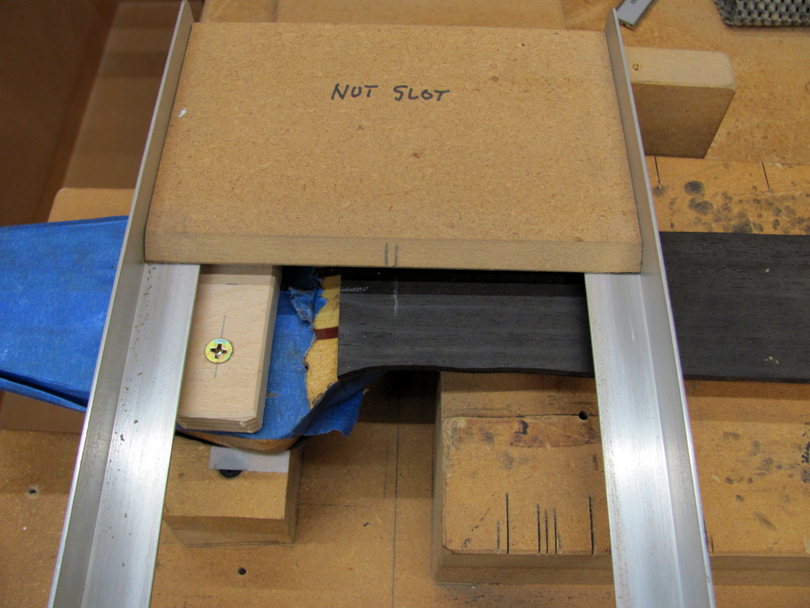
This simple wooden gauge shows me where the router will cut the slot. I nudge the box fixture around to align the right side line with the white line on the fingerboard, then clamp it all down.
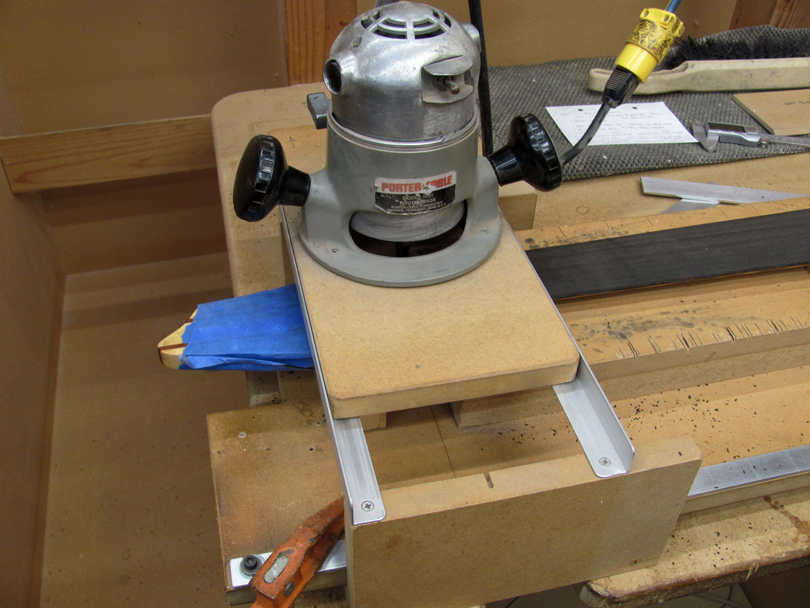
And here's the router. It's an old Porter-Cable that I bought at a garage sale somewhere. It's fitted with an 1/8" bit and this special base that slides snugly in the angles. I set the depth of cut with some other gauges and a flashlight.
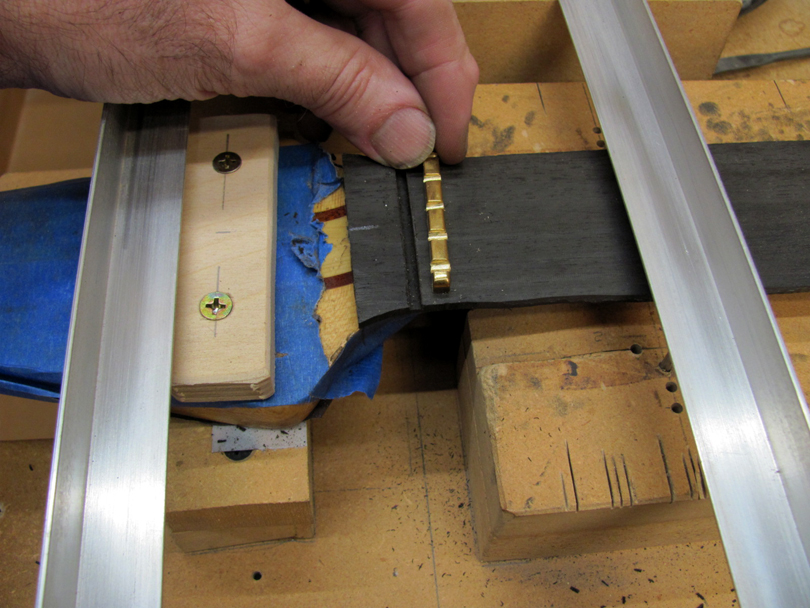
After the first pass, the slot is 0.130" wide x 0.095" deep. I check that the right side is where it should be, on the white line. That's the Wal's brass nut. It measures 0.170" wide, not to Fender specs! Because it's not a Fender. I'll use the nut as a gauge to widen the slot.
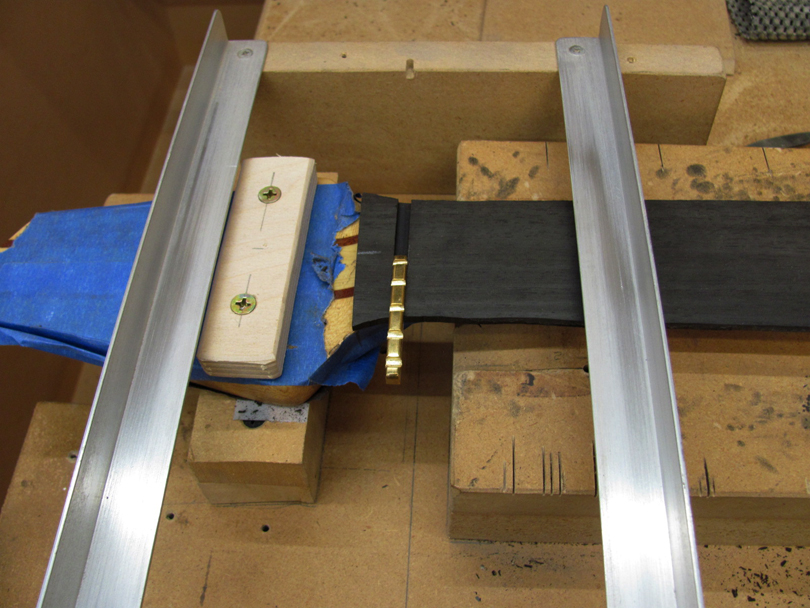
I nudged the box fixture to the left a couple of times, making light router passes, until the brass nut just slides nicely into the slot. Only a few thousandths' clearance. Done.
Tomorrow, the slotting saw!
It's ready for some slots!
So, here's the neck with the new ebony fingerboard trimmed to thickness and the top surface cut to a 12" radius. The fingerboard is still oversize, hanging over the sides and heel by about 1/8". I checked my notes on the index card, pulled out my 36" machinist's ruler, and marked a white line where the Zero line needs to be, measuring from the heel. Right where it was before. This will be the inboard edge of the nut slot.
I mounted the neck to the sliding sled for my slotting machine. It's aligned carefully to be parallel to the back edge. The headstock is clamped between wooden blocks, with protective tape, and the heel is locked between two maple wedges and steel pins. I've got the 34" scale ruler clamped down to the front edge of the sled. This is the setup for cutting the fret slots....
But first, I need to cut the nut slot......
....In this rig. This box-like special fixture slides over the headstock end of the sled. It cuts the straight flat-bottom nut slot on necks that use slot-style nuts. It has two aluminum angle rails and a special router set up for it.
This simple wooden gauge shows me where the router will cut the slot. I nudge the box fixture around to align the right side line with the white line on the fingerboard, then clamp it all down.
And here's the router. It's an old Porter-Cable that I bought at a garage sale somewhere. It's fitted with an 1/8" bit and this special base that slides snugly in the angles. I set the depth of cut with some other gauges and a flashlight.
After the first pass, the slot is 0.130" wide x 0.095" deep. I check that the right side is where it should be, on the white line. That's the Wal's brass nut. It measures 0.170" wide, not to Fender specs! Because it's not a Fender. I'll use the nut as a gauge to widen the slot.
I nudged the box fixture to the left a couple of times, making light router passes, until the brass nut just slides nicely into the slot. Only a few thousandths' clearance. Done.
Tomorrow, the slotting saw!
Last edited:
Is that the original nut Bruce? If so, then I assume you cut the depth a bit shallow to account for its lower height? Again, I assume the nut, or at least the slots, were cut down when the previous leveling was done.
Is that the original nut Bruce? If so, then I assume you cut the depth a bit shallow to account for its lower height? Again, I assume the nut, or at least the slots, were cut down when the previous leveling was done.
Hey Zuma;
Yes, that is the original Wal nut, I believe. I cut the new nut slot to the same depth as the old slot, measured down from the surface at the center. The slot heights should be just about right when it goes back together. I may have to slightly deepen the E and G slots because I cut the new fingerboard to 12" radius, as it was from the factory. Someone had previously resurfaced the old fingerboard to 16" radius.

Hi Bruce, that is actually the nut my luthier made when he re-radiused the board. If you can use it, that's great. Just wanted to be be sure you knew that it isn't the original.
Last edited:
Hi Bruce, that is actually the nut my luthier made when he re-radiused the board. If you can use it, that's great. Just wanted to be be sure you knew that it isn't the original.
Oh okay, I think I remember you telling me that. It looks like it will be fine, with just a light touch up of the E and G slots. If there's a problem, I can make a new one. That's a simple part.
Cutting the fret slots on Alex's Wal neck:
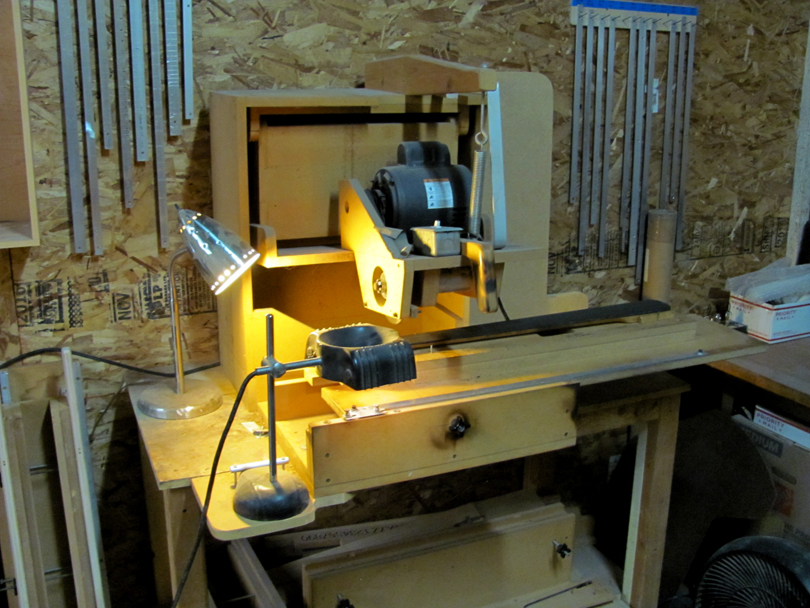
This is my fret slotting saw. I designed and built it in 1993, and it has slotted several thousand necks in those 30 years. I've done a few mods and upgrades to it to increase its capability. In the spring, I'm going to be doing a new round of changes to the carriage and slotting scales.
This saw has some unique capabilities. It follows the fingerboard radius as it cuts, so the slot is equal depth all the way across. This is important when you get into small tight radius fingerboards. I build some of my Scroll Basses at 4" radius. I've even cut slots on electric violins on this machine, holding the whole violin in there.
The other big feature is that it's made to hold the complete neck while sawing the slots. I prefer to radius and slot my fingerboards after they are glued on to the neck. There's enough clearance for most neck-through basses too. I've done some neck rebuilds on exotic neck-through basses, and slotted them here with the fingerboard on the neck.
About 7 years ago, I modified it to make the whole bed/carriage swivel about the center, so I can now also do multi-scale slotting.
Alex's Wal neck is routine: Straight slots, 34" scale, 12" radius, 24 frets. I slipped the sled into the machine and locked it in.
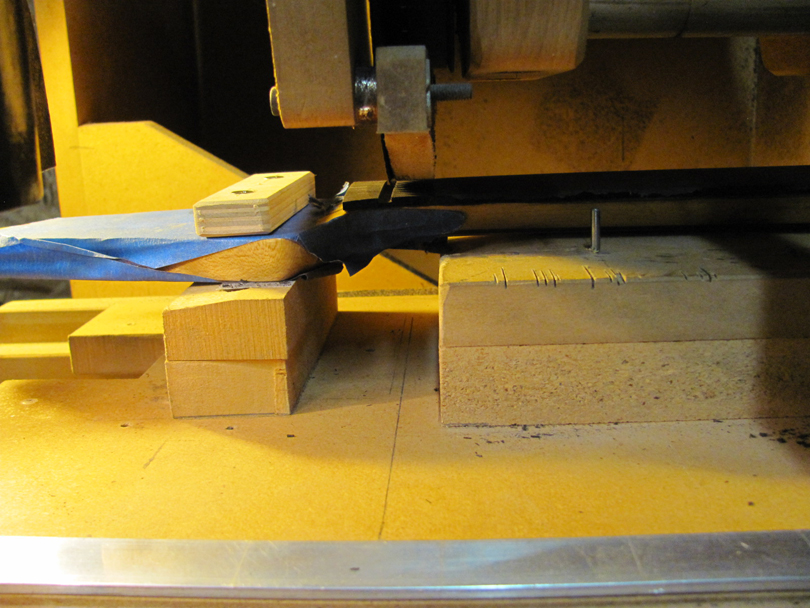
With the saw shut off, I carefully aligned the center of the blade on the right edge of the nut slot. This is the "0" line.
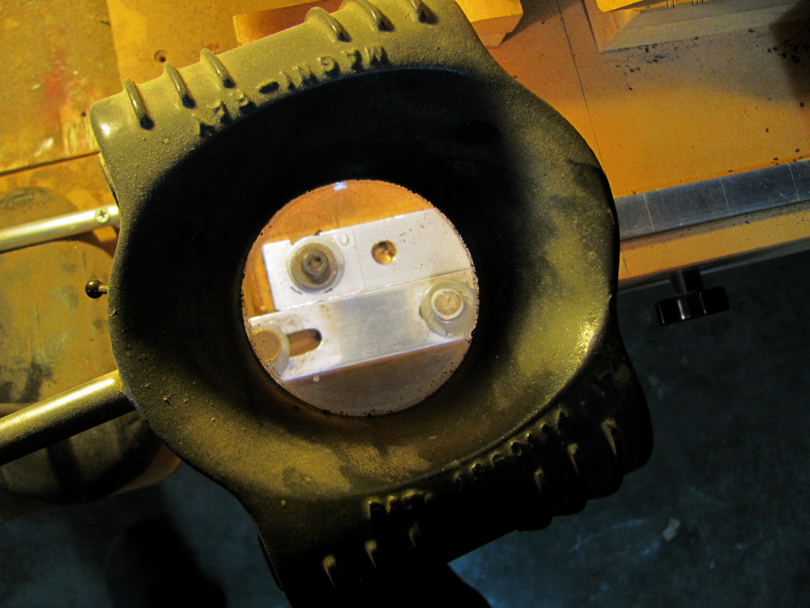
I zeroed the pointer. You can't see it very well in the picture, but two precision scribed lines are lined up. I found this old 1940's lighted magnifier somewhere, and mounted it on this machine. It's perfect. That's how the neck is positioned to cut the slots; sliding the sled to the left and looking through the magnifier to line up with the scribed lines on the scale ruler. That's a 34.00" scale ruler. I make those scale rulers myself here, using a special rig. I've shown that process on a few other threads in Luthier's Corner. Anyway, the machine is zeroed and ready!
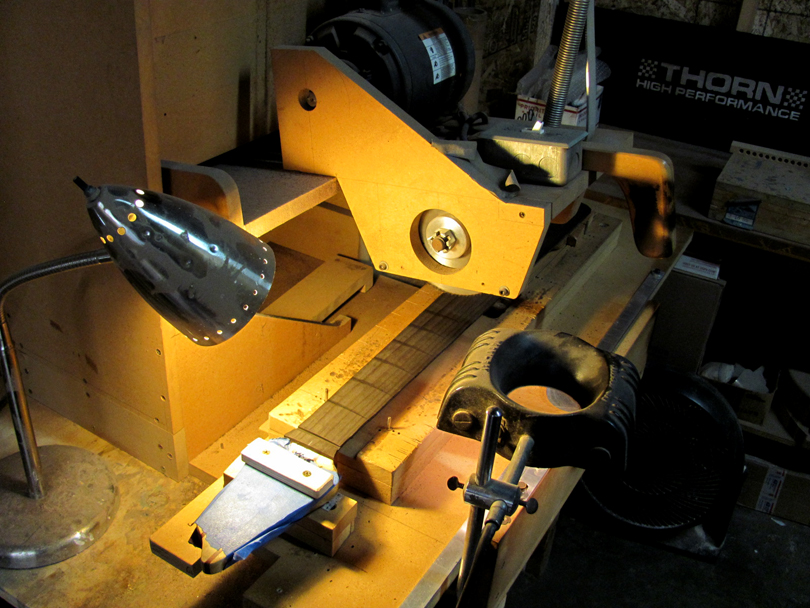
Sawing the slots, advancing the sled to the left. It takes about 15 seconds per slot, including the shift and lock.
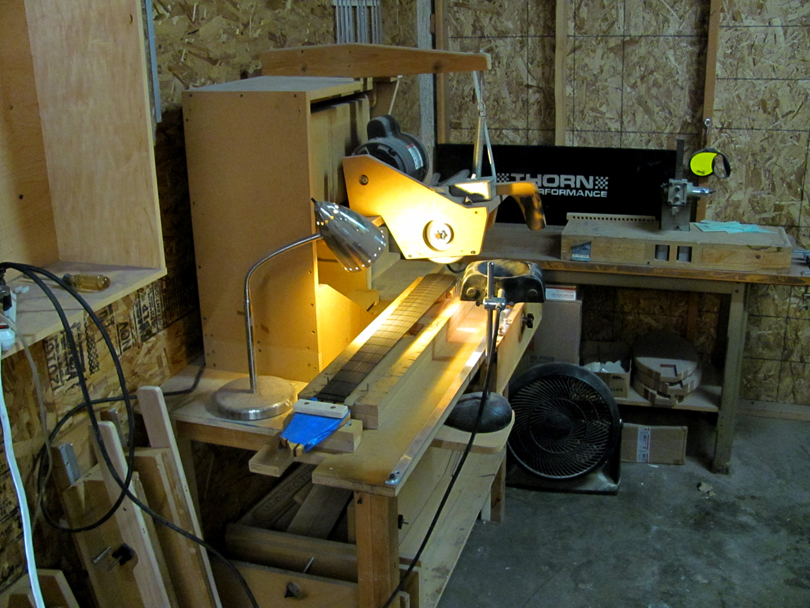
All finished! 24 new slots at 34.00" scale. They are positionally accurate to +/-0.002".
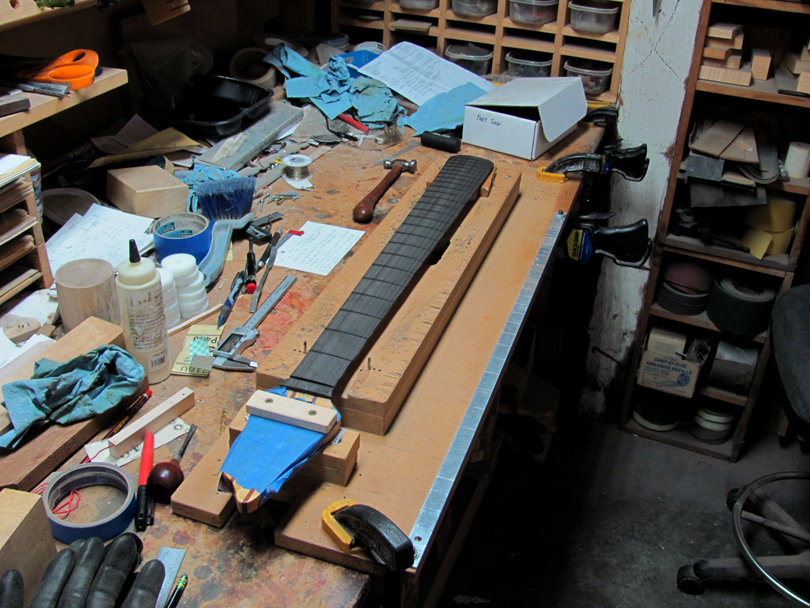
I brought the sled back over into my main shop and clamped it down on the woodworking bench.
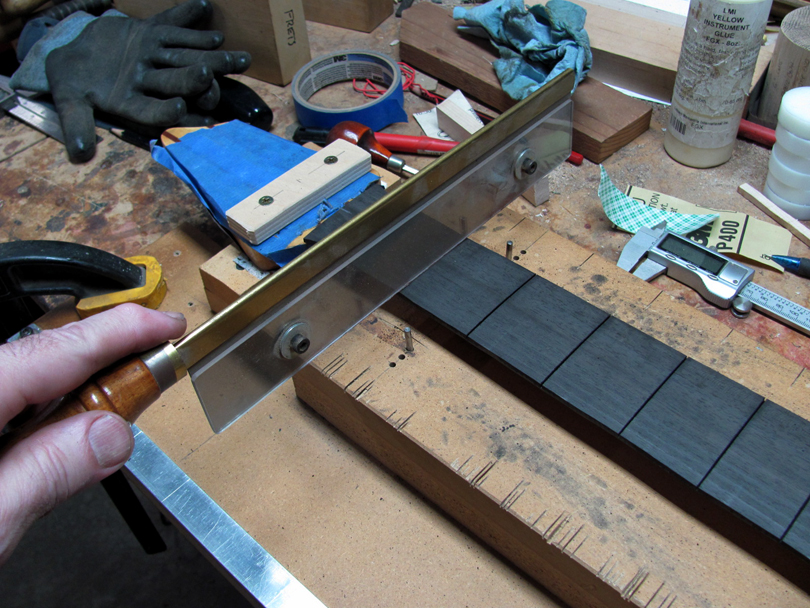
I took a few minutes to slide an LMI fret slotting saw through each slot, just to make sure they are all to full depth. When cutting a tough wood like ebony, sometimes the saw will ride up slightly in the middle of the cut. I always check with the handsaw. No problems here; they all look good.
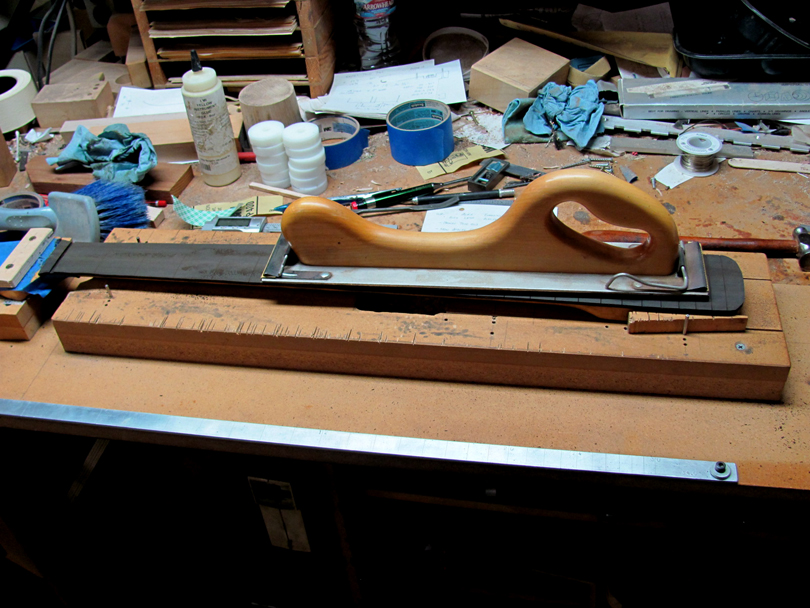
A quick light sanding of the fingerboard surface with a longboard sander and 120 paper. Taking out any small tooling marks from the router.
Next up: Trimming the sides of the fingerboard.
This is my fret slotting saw. I designed and built it in 1993, and it has slotted several thousand necks in those 30 years. I've done a few mods and upgrades to it to increase its capability. In the spring, I'm going to be doing a new round of changes to the carriage and slotting scales.
This saw has some unique capabilities. It follows the fingerboard radius as it cuts, so the slot is equal depth all the way across. This is important when you get into small tight radius fingerboards. I build some of my Scroll Basses at 4" radius. I've even cut slots on electric violins on this machine, holding the whole violin in there.
The other big feature is that it's made to hold the complete neck while sawing the slots. I prefer to radius and slot my fingerboards after they are glued on to the neck. There's enough clearance for most neck-through basses too. I've done some neck rebuilds on exotic neck-through basses, and slotted them here with the fingerboard on the neck.
About 7 years ago, I modified it to make the whole bed/carriage swivel about the center, so I can now also do multi-scale slotting.
Alex's Wal neck is routine: Straight slots, 34" scale, 12" radius, 24 frets. I slipped the sled into the machine and locked it in.
With the saw shut off, I carefully aligned the center of the blade on the right edge of the nut slot. This is the "0" line.
I zeroed the pointer. You can't see it very well in the picture, but two precision scribed lines are lined up. I found this old 1940's lighted magnifier somewhere, and mounted it on this machine. It's perfect. That's how the neck is positioned to cut the slots; sliding the sled to the left and looking through the magnifier to line up with the scribed lines on the scale ruler. That's a 34.00" scale ruler. I make those scale rulers myself here, using a special rig. I've shown that process on a few other threads in Luthier's Corner. Anyway, the machine is zeroed and ready!
Sawing the slots, advancing the sled to the left. It takes about 15 seconds per slot, including the shift and lock.
All finished! 24 new slots at 34.00" scale. They are positionally accurate to +/-0.002".
I brought the sled back over into my main shop and clamped it down on the woodworking bench.
I took a few minutes to slide an LMI fret slotting saw through each slot, just to make sure they are all to full depth. When cutting a tough wood like ebony, sometimes the saw will ride up slightly in the middle of the cut. I always check with the handsaw. No problems here; they all look good.
A quick light sanding of the fingerboard surface with a longboard sander and 120 paper. Taking out any small tooling marks from the router.
Next up: Trimming the sides of the fingerboard.


