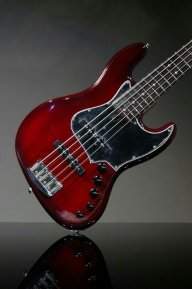
Jio's photo looks like my precision (before I committed to a full repaint.) Depending on the play of light and shadow, the color ranges from a deeper burgundy trending toward purple to a dark almost candy apple red in the light at certain angles.
How I Paint
From what little I've read about the painting processes at Fender throughout the years, they were expedient and practical in their approach to producing high-quality finishes on their instruments. From what I understand, all instrument bodies started out as if they were to be finished totally natural or natural-like (sunburst). All bodies got the yellow dye and the clear catalyzed Fullerplast. After that stage, bodies were selected for finishes which would show the grain or finishes which would be opaque.
Many of Fender's custom colors are selected from what is/was available in the automobile sector. It is a readily-available product, the cost is reasonable, and it has been formulated to be easy to apply and EPA compliant. Of those automotive paints, it looks like most of them come from General Motors and of those GM colors it looks like most are Cadillac colors.
Fender's site has some color swatches which are helpful, though you really can't believe colors from photos, displayed on your monitor, as anything more than 'suggestions' of what the actual paint is like.
Fender's Color Chart: Invalid Link Removed
75 Midnight Wine
75 Midnight Wine Transparent
83 Ice Blue Metallic
From here on out, what I'm saying is my OPINION. It is based on these swatches, Fender's manufacturing 'style' over the years, and my decades of working with paint.
I think that 'Midnight Wine Transparent' is a clear burgundy sprayed directly over Fullerplast, allowing wood grain to show through.
I think that 'Midnight Wine' is the exact same clear burgundy sprayed over 'Ice Blue Metallic'.
The Dupli-Color Dark Toreador Met[allic] I am using is not very translucent and that would be consistent with Dupli-Color being sold into an amateur do-it-yourself market. They would try to match GM's color with as few steps required from the amateur painter as possible. I could have probably sprayed it directly over primer with satisfactory results but my experience with paint is that sometimes very little things count -- contribute to the 'flavor' -- so I went ahead with the Light Blue Met[allic] undercoat.
I tend to polish out the fillers, glazing putty, primer, and paint coats between every stage. A good finish should be fair and smooth. Fairness is the absence of high-amplitude, low frequency waves. Smoothness is the absence of low-amplitude, high frequency roughness. Smoothness is easy to get but fairness takes more dedication. By polishing out the primer coats I can spot unfairness by the smoothness of the reflections. Thin applications of 'Bondo Glazing and Spot Putty' will take care of the shallow waves. The glazing putty is lacquer-based, as is the primer. This creates a very durable bond between the putty and the primer. Glazing putty is not suitable for areas that need more substantial filling like the original large ding I needed to fill. The fill/prime/fill/prime cycle will result in a mottled color pattern until that final primer coat.
For coarse fairing on this size of project, I use 220 - 400 grit Wet-or-Dry paper over a 2x6" flat block. Flat. For light fairing I'll use 400-600 W/D and 1800 MicroMesh using the thick black foam block that comes with MicroMesh kits.
The Light Blue Met went on in three relatively heavy coats, polished out between each coat. One thing with spray painting: orange peel begets worse orange peel. If you don't knock orange peel down before the next coat, it gets worse. A common mistake is to think that subsequent heavy coats will fill in the orange peel but it doesn't work that way. Orange peel is very hard to avoid with these Dupli-Color sprays because if you lay on a coat thick enough to be wet enough to level out, it will run and sag and these sags take forever to dry and need to be faired smooth before the next coat. So you need to go with lighter mist coats which go on partially dry and thus the roughness which is the father of orange peel.
In contrast, the Dark Toreador Met went on in two relatively light coats. Enough film thickness to provide an even color, but thin enough to let some of the light blue have an influence.
The way I paint is not cost effective. At all. It is a lot of manual labor -- hours and hours -- with a lot of paint-drying and waiting between steps. This process started almost 2 months ago but part of that time -- at least a week -- was wasted on the attempt at the spot-repair before I committed to the full respray.
The polishing phases are dirty and difficult. It is critical to keep your abrasives clean (not loaded up with paint scurf or -- horrors! -- wads of paint embedded in the abrasive.) I find denim to be just about perfect for wiping MicroMesh clean but don't use your jeans! You'll eventually sand right through them! As you get into the finer grades of MicroMesh you need to be very careful to avoid scratching the finish! It is best to do it in silence so you can hear the scratching or squealing sound of clogged abrasive. As soon as you hear it, you have to STOP IMMEDIATELY and clean your abrasive. You can also feel it build up during polishing. Wipe the scurf off the bass body at the same time. Your bare hand works best. The finer the abrasive, the more time spent cleaning. At 3200 and up, cleaning can take 2/3 of the total time of the polishing process. Like I say: dirty and difficult. Not cost effective. If I were charging by the hour this would easily top $1000 in labor. Labor of love.
When you are going to be putting on more coats, there is no need to go finer than 3200 MicroMesh. That said, I went down to 6000 on the color coat in preparation for the clear coat. Totally unnecessary. You can see the difference in smoothness (shininess) between the undercoat light blue and the color Dark Toreador in my photos. If I had gone down to 12000 it would look almost clear-coated.
You can get MicroMesh kits from various sources (Stewart-MacDonald.) The kit with the black foam block is good. I actually buy full 9x12" sheets from MicroMesh directly and cut those into 2x3" pieces because this investment turns out to be much cheaper if you use these things as much as I do. A single set of 2x3" pieces (half of StewMac's $50 kit) is easily enough to finish two instruments from start to finish provided you are careful about keeping them from filling up with burnt paint. I did this project with an already well-used set but they were starting to get pretty tired toward the end. I did A LOT of polishing on this project. I use MicroMesh dry. Some people use it wet.
Conclusion
Good paint jobs are hard work. When I'm done, this will look as good, if not better, than the factory paint. But it is hard work and I've had decades of practice. If this is your first rodeo, use a cheap bass! This project is a fairly beat-up MIM precision for which I paid $70. When I sell this bass I will be lucky to get $400 for it. Probably $350. Like I said, not cost effective. Now that I've done this once, my 2nd one should take half the time, but still not worth it except as a hobby.
How I Paint
From what little I've read about the painting processes at Fender throughout the years, they were expedient and practical in their approach to producing high-quality finishes on their instruments. From what I understand, all instrument bodies started out as if they were to be finished totally natural or natural-like (sunburst). All bodies got the yellow dye and the clear catalyzed Fullerplast. After that stage, bodies were selected for finishes which would show the grain or finishes which would be opaque.
Many of Fender's custom colors are selected from what is/was available in the automobile sector. It is a readily-available product, the cost is reasonable, and it has been formulated to be easy to apply and EPA compliant. Of those automotive paints, it looks like most of them come from General Motors and of those GM colors it looks like most are Cadillac colors.
Fender's site has some color swatches which are helpful, though you really can't believe colors from photos, displayed on your monitor, as anything more than 'suggestions' of what the actual paint is like.
Fender's Color Chart: Invalid Link Removed
75 Midnight Wine
75 Midnight Wine Transparent
83 Ice Blue Metallic
From here on out, what I'm saying is my OPINION. It is based on these swatches, Fender's manufacturing 'style' over the years, and my decades of working with paint.
I think that 'Midnight Wine Transparent' is a clear burgundy sprayed directly over Fullerplast, allowing wood grain to show through.
I think that 'Midnight Wine' is the exact same clear burgundy sprayed over 'Ice Blue Metallic'.
The Dupli-Color Dark Toreador Met[allic] I am using is not very translucent and that would be consistent with Dupli-Color being sold into an amateur do-it-yourself market. They would try to match GM's color with as few steps required from the amateur painter as possible. I could have probably sprayed it directly over primer with satisfactory results but my experience with paint is that sometimes very little things count -- contribute to the 'flavor' -- so I went ahead with the Light Blue Met[allic] undercoat.
I tend to polish out the fillers, glazing putty, primer, and paint coats between every stage. A good finish should be fair and smooth. Fairness is the absence of high-amplitude, low frequency waves. Smoothness is the absence of low-amplitude, high frequency roughness. Smoothness is easy to get but fairness takes more dedication. By polishing out the primer coats I can spot unfairness by the smoothness of the reflections. Thin applications of 'Bondo Glazing and Spot Putty' will take care of the shallow waves. The glazing putty is lacquer-based, as is the primer. This creates a very durable bond between the putty and the primer. Glazing putty is not suitable for areas that need more substantial filling like the original large ding I needed to fill. The fill/prime/fill/prime cycle will result in a mottled color pattern until that final primer coat.
For coarse fairing on this size of project, I use 220 - 400 grit Wet-or-Dry paper over a 2x6" flat block. Flat. For light fairing I'll use 400-600 W/D and 1800 MicroMesh using the thick black foam block that comes with MicroMesh kits.
The Light Blue Met went on in three relatively heavy coats, polished out between each coat. One thing with spray painting: orange peel begets worse orange peel. If you don't knock orange peel down before the next coat, it gets worse. A common mistake is to think that subsequent heavy coats will fill in the orange peel but it doesn't work that way. Orange peel is very hard to avoid with these Dupli-Color sprays because if you lay on a coat thick enough to be wet enough to level out, it will run and sag and these sags take forever to dry and need to be faired smooth before the next coat. So you need to go with lighter mist coats which go on partially dry and thus the roughness which is the father of orange peel.
In contrast, the Dark Toreador Met went on in two relatively light coats. Enough film thickness to provide an even color, but thin enough to let some of the light blue have an influence.
The way I paint is not cost effective. At all. It is a lot of manual labor -- hours and hours -- with a lot of paint-drying and waiting between steps. This process started almost 2 months ago but part of that time -- at least a week -- was wasted on the attempt at the spot-repair before I committed to the full respray.
The polishing phases are dirty and difficult. It is critical to keep your abrasives clean (not loaded up with paint scurf or -- horrors! -- wads of paint embedded in the abrasive.) I find denim to be just about perfect for wiping MicroMesh clean but don't use your jeans! You'll eventually sand right through them! As you get into the finer grades of MicroMesh you need to be very careful to avoid scratching the finish! It is best to do it in silence so you can hear the scratching or squealing sound of clogged abrasive. As soon as you hear it, you have to STOP IMMEDIATELY and clean your abrasive. You can also feel it build up during polishing. Wipe the scurf off the bass body at the same time. Your bare hand works best. The finer the abrasive, the more time spent cleaning. At 3200 and up, cleaning can take 2/3 of the total time of the polishing process. Like I say: dirty and difficult. Not cost effective. If I were charging by the hour this would easily top $1000 in labor. Labor of love.
When you are going to be putting on more coats, there is no need to go finer than 3200 MicroMesh. That said, I went down to 6000 on the color coat in preparation for the clear coat. Totally unnecessary. You can see the difference in smoothness (shininess) between the undercoat light blue and the color Dark Toreador in my photos. If I had gone down to 12000 it would look almost clear-coated.
You can get MicroMesh kits from various sources (Stewart-MacDonald.) The kit with the black foam block is good. I actually buy full 9x12" sheets from MicroMesh directly and cut those into 2x3" pieces because this investment turns out to be much cheaper if you use these things as much as I do. A single set of 2x3" pieces (half of StewMac's $50 kit) is easily enough to finish two instruments from start to finish provided you are careful about keeping them from filling up with burnt paint. I did this project with an already well-used set but they were starting to get pretty tired toward the end. I did A LOT of polishing on this project. I use MicroMesh dry. Some people use it wet.
Conclusion
Good paint jobs are hard work. When I'm done, this will look as good, if not better, than the factory paint. But it is hard work and I've had decades of practice. If this is your first rodeo, use a cheap bass! This project is a fairly beat-up MIM precision for which I paid $70. When I sell this bass I will be lucky to get $400 for it. Probably $350. Like I said, not cost effective. Now that I've done this once, my 2nd one should take half the time, but still not worth it except as a hobby.




![IMG_1015[1].JPG](/data/attachments/3016/3016026-d0aa98c46e7ee881bae54979c35825e7.jpg?hash=0KqYxG5-6I)