• TalkBass has been independent since 1998. Add your voice.
    Create a free account to reply to discussions, view embedded media, and browse with fewer display ads.
    Join freeLog in
    Want zero display ads or expanded classifieds tools? Compare plans.

Six string spalted maple, fretless, and first build ... kit

Right after I taped up the front of the neck to do the tung oil sealing on its back, my friend sent me the updated logo. Of course.

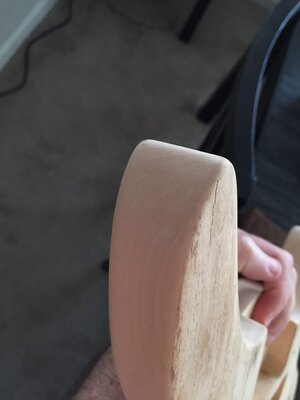
Anyway, tung oil! I love tung oiled necks, and put the first coat down this morning. Here are some macro shots showing details of the first coat. I'm going to let that dry and cure overnight and do a second coat in the morning. I can't remember how many coats I did on my practice bass last fall, but I think three or four will do it.

IMG_0133.JPG IMG_0134.JPG IMG_0132.JPG
I'm confirmed with my wife's uncle to do the routing for the battery box on Sunday. He wanted to know if there was a recommended routing bit size to use with the MDF template I got from BBG for it. Any suggestions, please?
 
  • Like
Reactions: vmabus
I like the 1/2" diameter bits, but you need to make sure the cutting depth is reasonable. If the template is at least 1/2" thick I would start with a template bit that has a cutting depth of no more than 1/2". If the template is less than that then start with a 1/4" depth bit.

Just my $.02. ;)
 
  • Like
Reactions: eightyearsapril
I love the way the neck turned out BTW.
Thanks! I do, too. I put the second coat of tung oil on it this morning, and that might be all it'll need. It felt fantastic after the first coat (with a rub-down with 0000 steel wool, and a wipe with a tack cloth).

This afternoon, I'll take it out on the balcony for daylight pictures.

Once I get the battery box cavity routed this weekend, things will progress quickly with the body. I'm going to buy some fresh Island Water Minwax stain for the top, and then get to work. I'll be sure to use the pre-stain conditioner on it, so I don't repeat the blotchiness I experienced on the neck.
 
image.jpg


I'd say I'm done with the back of the neck. Tomorrow morning I'll brush it with steel wool again and wipe it with a cloth.

I'm doing a test now with one of my stained 2x4s (remember those?) to see how tung oil looks on the blue stain. I had settled, and tested, Tru Oil for the body finishing, but I really like the tung oil, so I'll see if I like it better for the blue stained body.
 
  • Like
Reactions: vmabus
View attachment 607732

I'd say I'm done with the back of the neck. Tomorrow morning I'll brush it with steel wool again and wipe it with a cloth.

I'm doing a test now with one of my stained 2x4s (remember those?) to see how tung oil looks on the blue stain. I had settled, and tested, Tru Oil for the body finishing, but I really like the tung oil, so I'll see if I like it better for the blue stained body.
I LOVE that look! Great job man!
 
Inset the Dunlop strap-lock buttons nearly flush with the upper back horn and flush on the butt-end.
Inspired by @JIO over in his thread, I just tested this, using a 5/8" Forstner bit on one of my test 2x4 scraps. Works well, and should look a lot cleaner.

image.jpg
image.jpg


Tomorrow I'll route the battery box cavity, and things should be full speed ahead after that.
 
  • Like
Reactions: JIO and vmabus
The battery box is finally routed! And, for good measure, the control cavity is nice and clean, giving me plenty of room for the Flexcore pre-amp! :hyper:

image.jpg


My wife's uncle did the work, with some assistance from me, and it took about two hours to route the battery box cavity. He even offered to help lacquer and buff the body for me, should I opt to finish that way. I had planned to use Tru Oil, but his offer is tempting.

Next step is to drill a hole for the pickup coil switch and test installing the pre-amp, and then I can stain the body.

I am so relieved to have this part done.
 
I did a quick test fitting of the Flexcore pre-amp this morning in the cavity, and while I'll have to get creative with wire control, everything will fit. Having a background in IT and server design and building will help with that. However, I don't think I'll be able to drill the hole for the coil switch where I had planned, which is between the bottom two holes in the picture in my last post, above.

What I'm thinking of doing is shifting the top-row of controls (Volume and Blend) over, and putting the coil switch where the blend hole was, originally (bottom-right of the above photo). I'd have to drill a new hole for the Volume knob (which is also push-pull for active/passive) in the upper right of the cavity, and get some new washers for the coil switch, as it required a smaller hole than the one I'm planning to use, now.

Also, I'm not sure about the inlaid straplocks, as the upper horn doesn't have enough wood to inlay its straplock there cleanly. I'll post pictures later, explaining better what I mean, but I wonder if I should bother inlaying the bottom straplock if the other one won't be hidden? I hate to waste a great idea.

Oh, also. My wife's uncle gave me a pack of 10 neodymium magnets for attaching the control cavity and truss rod covers. And a chunk of rosewood that a local tech can hopefully make into a new nut for me. (I've opted against making my own nut now because I didn't want to pay close to $100 for all of the required files, and I would need a better saw and cutting setup, too, to cut the rosewood.)
 
  • Like
Reactions: michaelwayneharwood
I did drill a new hole for the volume knob, so that's done. The only thing between me and staining the body is deciding whether to inlay the strap locks or not.

Here's the upper horn of the body:

image.jpg image.jpg

I am not sure there's enough wood there to support removing a half inch worth so I can sink the strap lock and support the weight of the bass.

Also, it isn't necessary by any means, but doing so would be cool, y'know? :cool:
 
I also bought a 2x4 at Home Depot that I practiced the blue stains on before trying it on the maple sample piece.
View attachment 519559
The "winning" ocean water Minwax stain is on the right 2x4.
That's from all the way back on page two of this thread. The reason I quoted it is because I'm going to use the ink staining technique I tested on this 2x4s (in particular the left piece) for the side of the body, as a transition to the blue front. I'm keeping the back as is, and not doing another stain coat.
 
The further you get with this build the more I drool.... You took a kit bass and made it your own, and it looks damn good! Great work man!
Thanks!
Excited to see what you do with this thing!
Yeah, me too. ;)

I did the black/blue mix of inks in tap water for the body sides, and I'm surprised how blue it came out on the body sides. It's also rather splotchy, despite using the pre-stain conditioner.

I'm not sure if I'm going to keep it or not. I just went back to the 2x4 and put a coat of walnut stain on the inked blue, and I think I like how that looks. So, my plan is now to stain the top :nailbiting: and then decide if I want to keep the blue sides, or cover it with the walnut, to sort of be a transition with the blue and walnut.
 
Some pictures of today's work:

image.jpg image.jpg

On the left, is walnut on top of blue ink on a test 2x4. On the right, the blue ink stained side of the body. Even though I added a lot of black ink to the water, it still came out brilliantly blue. It's actually the shade I want for the top of the body. You can also see a trace of where the ink staining was uneven.

The reason I did the walnut-on-blue test was I wanted to see if they worked well together, and they do. As I said, that's my plan for the side, after I stain the top tomorrow.

My wife's uncle agreed to help me do the lacquer finish on the bass, so I'll be buying some spray lacquer tomorrow, along with a fresh can of the Minwax Island Water stain for the top of the bass. I don't know when we will do the finishing, maybe this weekend if I can stain the top tomorrow and Saturday morning.

I also decided on my next project after this one: I bought a B Stock Douglas 6-string bass today from Rondo Music and I'm going to refinish it with a spray paint after I sand off the current finish on it. Years ago, I had an Ibanez bass with a sparkle green finish, and I found a can of that at Home Depot a bit ago, and have been looking for a use for it.

I may also defret the Douglas and use my leftover green veneers for that project, since I like how it came out on this bass.

If I do a thread for that bass, I suppose the LC isn't the right forum, right?