• TalkBass has been independent since 1998. Add your voice.
    Create a free account to reply to discussions, view embedded media, and browse with fewer display ads.
    Join freeLog in
    Want zero display ads or expanded classifieds tools? Compare plans.

Special Edition Build-off - 4003w new build

Hope I'm not too late to join the buildoff.

I've built a couple 4003 style basses and really like the walnut version with binding, so its time to make that happen. I've got some Ric parts, machine heads, treble bezel, toaster pickup covers, along with some 44 AWG wire, magnets and odds and ends that need to be used. Also have some binding and fret wire from Luthier's Merchantile that's been sitting for a little while. This buildoff has added some motivation, so I'm getting started building that bass. Oh yeah! I've got some maple and walnut lying around too.

I've only built two basses, a guitar and a few ukulele's so this will be good for skill building.

Started yesterday, here's what I've got so far:
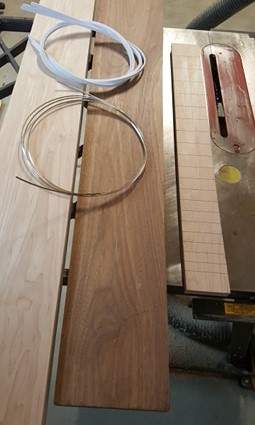
Starting material (2).jpg

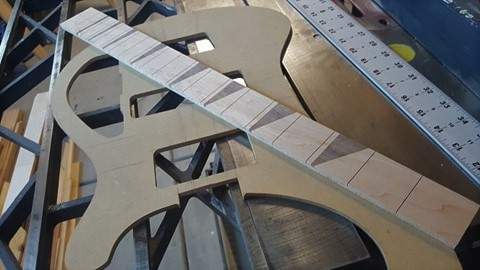
Inlay and routing template (2).jpg
 
That looks like one of the laser cut templates that appeared for sale AFTER I spent many hours scaling photos to draw my own. Ric didn't seem to blink an eye at them being sold openly, guess they pick their battles more carefully these days. Oh, so subbed.
 
  • Like
Reactions: JRA
The template is homebaked, no laser. I made it about 9 years ago at the time of my first build attempt. It is pretty accurate. I measured a buddy's 4003 with a micrometer and drew plans 17 years ago. He let me take the pickguard off. Kids and life interrupted things, I guess. A couple slots on the fretboard were off when measured, so I'll have to make a new one. Another shop ornament!
 
The template is homebaked, no laser. I made it about 9 years ago at the time of my first build attempt. It is pretty accurate. I measured a buddy's 4003 with a micrometer and drew plans 17 years ago. He let me take the pickguard off. Kids and life interrupted things, I guess. A couple slots on the fretboard were off when measured, so I'll have to make a new one. Another shop ornament!
Nice job on the template then, that looks laser-cut accurate. I went through the whole rigamarole of scaling photos, measuring parts, etc. I found accurate template making one of the more difficult parts of the job. They make nice shop-art until I use them again. :D I hardened the MDF edges with CA glue, so they look a little ratty, but worked well.
1tDV9wc.jpg

h2ucBQK.jpg
 
Nice templates!

I just use the template shown for routing the cavities. I have another template for the wings. I just use the bandsaw to cut oversized and then machine sand to the line. No tear out that way and its quicker than routing. I've tried both. I built jigs for cutting the neck blank and headstock angle. I'm sure I spend more time building jigs and templates than building the bass!
 
Last edited:
I used the same dowel spacing on the actual body, I found that REALLY helpful keeping stuff registered, particularly during glue-up, it ain't slipping, and I'm sure it adds to the joint strength, particularly up around the neck pocket where you don't really have much neck beam thickness by the time the pup is routed for. After tearing out a couple bodies, I've pretty much given up on template routing the bodies, I use a Robo-Sander, which is just a sanding sleeve with a pattern following bearing. Slow as hell, but no tearout.
 
CTMullins: I did not know Roger Rossmeisl designed the 4001 bass. Interesting to read about him on the web. Thanks for mentioning him!

Gilmourisgod: I'll use register pins for the body wings, but smaller. They'll be 1/8" dowel and short, just enough to keep the alignment. I think the 4003 has register pins for the fingerboard too.

Cut some more wood today. I had the 8/4 maple with the grain oriented correct and straight with no twists. Cut the first piece for the neck blank and whoa! The boards just bowed as I was cutting. Got a picture of it, 'cause it was bad. Ran the parts across the jointer and got 'em straight/flat again. I always cut bigger than needed just for this reason. I kept track of the direction of the bow and will glue these pieces in opposite bow direction to stablize them going forward. Just amazing how much tension is inside a board and released by cutting it!

Should go quick, once I figure out if I'm doing one on-way truss rod, or two standard rods like the 4003.

bending boards.jpg
jointed boards.jpg
 
Even Ric has finally decided to abandon the two single action rods in favor of one DA rod. The double rods require hogging out a big chunk of wood under the TRC, pretty much the worst possible place to to lose strength. If you go the double rod route, consider adding a volute to regain that lost structure. The original Ric design is kinda bad, short grain and big Truss rod hole. Nope. I ended up with one DA rod and two CF rod stiffeners, which is lighter, and a volute. I was worried the neck would be TOO stiff, but it adjusts like butter on both builds.

Edit:
The original Ric rods had one advantage I'm aware of, they were removable, which turned out to be a good thing, as people routinely trashed the nut end overtightening them, or bent them trying to jam a socket driver into the TRC pocket to adjust them, or They just plain broke. They were advertised as being able to counteract neck twist, but I never saw anybody successfully correct a twist with them, and never saw the need for different neck relief on the E and G sides, which is effectively ADDING a slight twist to the neck. Who thought that was a good idea, and why?
 
Last edited:
  • Like
Reactions: Reedt2000
Most Rickenbacker necks are narrower than even a Fender four-string; well, a Jazz might have a slimmer nut but it has more taper and is wider at the heel. Anyway, that’s a fairly narrow beam to use two rods on. I think the two-rod approach is a good idea in theory, but not necessary in practice, unless you’re building something wide-necked, like a six-string (or more) ERB. And even then, if the wooden structure is free of internal stresses, and is adequately stiff, then a single rod is probably still sufficient. I suspect that most two-rod designs simply present more chance of inducing twist, rather than curing it.

Yeah, I don’t see the point.

For that matter, I don’t see the point of still using the old-style compression rods either. The modern two-way rods do the bending all on their own, and the neck is a passive passenger in that journey. This approach separates the jobs of controlling neck relief and supporting the strings. Two-way rods are easier to install, require a shallower trench, and don’t crush the neck wood when tightened. Seems like progress to me.

My preference:

4000LS_0421.jpg


4000LS-06.jpg
 
Nice headstock! I checked the Ric site and they seem to only sell the dual truss rods and the factory tour on the Notcot site still shows two channels. I'm up in the air on this issue. One, one-way rod would be easy, but the dual rods were pretty easy in my last build. I've added a couple pictures. I'll decide tomorrow.

In keeping with the "build with what you have" theme, I looked in a box of junk and found these pickups and surrounds I built in 2012. I think they are reverse wind and polarity, so hum cancelling and I recall they were about 8K and 9K resistance. The wood is claro walnut. I might adapt the pups for this project. The neck toaster pickups on Rics were 6 magnet guitar pups with the toaster covers. I did a ridiculous amount of research on them at the time.

A few pictures:
Pickups.jpg
dual truss rod.jpg
Prior project.jpg
 
Last edited:
I've got a truss rod I'm considering using, but its a couple inches short of ht elength of the fretboard. Thought I'd see if anyone has any opinion on whether this is long enough. I've had this around for 25 years in with other parts. I think its from Warmoth. I visited their factory when I lived in Olymia WA. Anyway, opinions?

one-way truss rod.jpg
 
  • Like
Reactions: Beej
I'll route a slot for it tomorrow with the nut at the headstock. I think I'll route a small channel at the neck heel so I can push it out, if there's ever a problem. How do you attach binding? I've got some that I've never used and heard differing methods: acetone, PVC cement, and a few others. Just getting some input, before attempting this.
 
I like plain old acetone myself. I tried the overpriced Stewmac binding glue, and realized it's just old fashioned Model Airplane glue at twice the price. It works fine, but leaves residue you have to sand off later. Acetone also has the advantage in that you can dissolve fine shavings of binding in it to the consistency of toothpaste to make a perfectly color matched goop to infill any gaps at miters or along edges. The Stewmac Binding Tape is actually very good. One downside of acetone is that it can dissolve the adhesive on hardware store tape, doesn't seem to do that on the Stewmac tape unless you really slather it on. It's just double thick packing tape, but it works. This guy is pretty free with the acetone, you do have to be careful not to put on so much it melts the binding, but this is the method I used:


There's another variation on this where you tape first and then wick acetone in using capillary action. I tried this too, but then you have to go back and wick everywhere you had the tape, so there's pros and cons. Try both methods on scrap before touching your bass.


A good illustration of the binding goop method, though I did it with binding shavings instead of chips. The finer the shavings, the quicker and more easily it dissolves. Use clean tools for this, any oil or grease ends up in the goop, and with white binding, it spoils it.


The curves around the horns are pretty tight radius. You can bend binding with a heat gun, but go easy, if it gets too hot, the binding distorts and it's toast. Reheating it won't make it flat if you overdo it, you have to yank it off and try again. Pre-bending the binding using the heat gun BEFORE gluing it on is a lot less stressful, the guy in the video has probably done it 100 times, you havent.

One more note, typical Ric body binding is .060" thick plastic, and that's what you want, there's enough meat that any slight binding shelf inconsistencies won't be too noticeable if you have to scrape binding flush with the body, which you will to get it perfectly flush. Good luck! Practice on scrap!
 
I've been busy with other projects, but finally am getting back to work on the bass.

I'm thinking of using a Hipshot Ric replacement bridge. Anybody have any concerns with this bridge?

I had .09 inch X .25 inch binding and used the router and a featherboard to get it down to .07 inch. Its worked pretty well. I plan to start the binding tomorrow.

Some pictures of where the project is at.

progress neck 1 (2).jpg
 
Last edited: