This is how I do most of my necks. I will build up some oil, sand with 600 or so, one last coat of oil, then two coats of paste wax: first one applied with gray scotchbrite and the second applied with old t-shirt material, then buffed vigorously.Try a scotchbrite pad for the matte effect on the neck instead of sandpaper. Get the fine or extra fine. It'll give a more even feel without the scratching from grit in the sandpaper. You can also put a dab of paste wax on the scotchbrite pad and it'll give a nice soft sheen and a real smooth fast feel.

Enjoy the benefits of a premium membership!
Upgrade Account
-
TalkBass has been independent since 1998. Add your voice.
Create a free account to reply to discussions, view embedded media, and browse with fewer display ads.
Join free Log in
Want zero display ads or expanded classifieds tools? Compare plans.
You are using an out of date browser. It may not display this or other websites correctly.
You should upgrade or use an alternative browser.
You should upgrade or use an alternative browser.
Special Edition Build Off - Phony Abalone
- Thread starter Sunk by Sirens
- Start date
More options
Who Replied?

Hopefully someone can help me with this question: will the MTN94 translucent spray paints adhere well to the Deft waterborne acrylic? When I bought the MTN94 paint at the craft store, I was told it was acrylic paint, but the spec sheet says the paint is "modified alkyd":

A follow-up question would be, should I even seal/prime the body before spraying the MTN94 translucent colors? The main reasons I would want to is if the Deft acrylic spray provides a better grip for the MTN94 than bare wood and if it would help the colors pop. But my gut is telling me go without it, bare wood should accept the MTN94 fine, and the exposed grains will bring out a stronger contrast in the color.
A follow-up question would be, should I even seal/prime the body before spraying the MTN94 translucent colors? The main reasons I would want to is if the Deft acrylic spray provides a better grip for the MTN94 than bare wood and if it would help the colors pop. But my gut is telling me go without it, bare wood should accept the MTN94 fine, and the exposed grains will bring out a stronger contrast in the color.

I do the same thing on all my necks but the finish is usually oil based poly. I've done it as a "mod" to a handful of factory finished necks as well, including one with a solid color painted finish. The scotchbrite and wax combo works great on any solid well cured finish and results in a really fast tack-free feel. And it looks good!
I think the best way to answer your finish questions is just to try those products in the order you intend to use them, on some scrap. Then you'll know for sure!
Whenever you finished your board, how far did you go with the CA? Did you just do the topside, or did you apply to the small stretch of fingerboard along the edge of the neck as well? How did you tape that off to get results you liked?And.... if your CA application is sound...
(I do about 30 coats)
It doesn't matter what you use for slot filler...
In my opinion.
But that's only if you can get it flat first.
I wouldn't want to try that with aluminoom.
& Leaving it low will look like poo.
Wood is good... if you can get it.
Card?... as long as it's full and soaked with CA.
...but... yuk...kinda.
It will at least sand down better than metal
I'm trying to get a plan set for my finish, amd I'm thinking about the transition line from CA fingerboard to clearcoated neck. And which I should do first.

Rôckhewer
Commercial User
- Feb 28, 2015
- 2,922
- 9,028
- Disclosures
- Owner/Builder- RockHewer Custom Guitars LLC
I do the CA on the board first.Whenever you finished your board, how far did you go with the CA? Did you just do the topside, or did you apply to the small stretch of fingerboard along the edge of the neck as well? How did you tape that off to get results you liked?
I'm trying to get a plan set for my finish, amd I'm thinking about the transition line from CA fingerboard to clearcoated neck. And which I should do first.
And just on the face of the fb.
The two finishes meet at the corner.
I rarely need to do any touch up between the two.
Just be careful on the corner.
The tape I use when applying CA... is intended for powder coat masking.
I found that CA does NOT stick to it... it adheres well, leaves no residue.
I also use it to tape off fingerboards to crown & polish frets.
It doesn't shred like masking tape.


I do the CA on the board first.
And just on the face of the fb.
The two finishes meet at the corner.
I rarely need to do any touch up between the two.
Just be careful on the corner.
The tape I use when applying CA... is intended for powder coat masking.
I found that CA does NOT stick to it... it adheres well, leaves no residue.
I also use it to tape off fingerboards to crown & polish frets.
It doesn't shred like masking tape.
View attachment 3787951
Nice, Kev.... er... Gretchen... uh... Hmmm.
Who are you, really?


Gretchen? I ain't judging.I do the CA on the board first.
And just on the face of the fb.
The two finishes meet at the corner.
I rarely need to do any touch up between the two.
Just be careful on the corner.
The tape I use when applying CA... is intended for powder coat masking.
I found that CA does NOT stick to it... it adheres well, leaves no residue.
I also use it to tape off fingerboards to crown & polish frets.
It doesn't shred like masking tape.
View attachment 3787951

Rôckhewer
Commercial User
- Feb 28, 2015
- 2,922
- 9,028
- Disclosures
- Owner/Builder- RockHewer Custom Guitars LLC
Nice, Kev.... er... Gretchen... uh... Hmmm.
Who are you, really?
My sweet wife of 22yrs... payer of the bills, holder of the accounts... household boss. My Khalisi.Gretchen? I ain't judging.
Come to think of it.... pretty sure the only accounts I have in MY name are with bass parts vendors.

Attachments

Update, with pics
The cherry veneers from @dwizum arrived last week, and I already put them to use. First step was to cut some veneer to fit in each slot. All of my fret holes needed at least 2. I tried cutting them flush to the fingerboard at first, but they were too flimsy and kept breaking either while cutting, or when I accidentally bumped them. So I made them all about twice as tall as actually needed, and trimmed later:

I quickly learned that it was easier to work with the veneer, especially after I cut it to size, if the grain was horizontal rather than vertical; long streaks of grain good, short bad. This was really important for when I had to shave little bits of the veneer to maximally fill the fret gaps, given their uneven nature:


First step complete; oh and the clipboard is to catch as much debris as possible:

To secure the veneers, and further fill any minimal, leftover gaps and superficial scrapes, I used CA glue. No pics of that process, as speed was required to limit exposure to fumes. All the fans were turned on, and I held my breath as I worked with arms stretched far: I squirted a bead of CA straight from the bottle along both sides of where the veneer met the fingerboard, aiming to get as much as possible down into the slots. Then I squirted a bead in between the veneers to solidify my ply-fret-fills. I let it sit under a fan for ~24hrs, then I did what I wish I did many times over now:
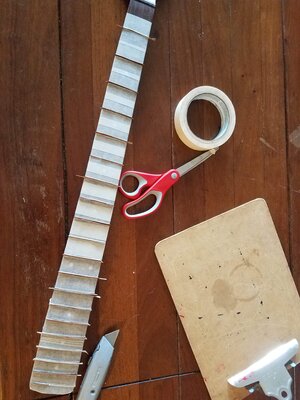
After I taped the fingerboard, I trimmed the edges with a box cutter, using a special technique that allowed me to hold the neck still and apply juuust the right amount of precise pressure:

Next step was to trim the tops, same tool; had to change the blade about halfway through:

Not pictured is me using the blade from my thumb plane and carefully cleaning up what I couldn't get with the box cutter. I removed the blade to make sure I didn't gouge anything while removing as much excess CA glue as possible. All done:

Some clean ply-fret-fills:

The worst ones where some of the veneer frayed and broke away as I trimmed em flush due to poor grain alignment (lots of little vertical grain instead of long horizontal grain) and because I didn't get enough glue between the plys:

I will have to go back and shove little bits of veneer in the large gaps, and just use glue to fill the smaller gaps. I'm much happier with this fill job compared to how it was. Even though it's not super prettt yet, it'll clean up just fine. And I'm confident it won't squish into a bow now.
As for the brick brack sent in return for the veneers, my original plan was to flatten out some aluminum like I planned to use myself, and then fit some sheets of that into an envelope with a square of toilet paper in between each. Well, I forgot I got rid of my cheap, crappy, albeit only iron (which I was gonna use to flatten the aluminum) so unable to make flat sheets, I couldn't send dwizum "gold-plated aluminum" as planned. Instead, I'm sending something else tomorrow. Sorry for the delay in keeping my promise lol
The cherry veneers from @dwizum arrived last week, and I already put them to use. First step was to cut some veneer to fit in each slot. All of my fret holes needed at least 2. I tried cutting them flush to the fingerboard at first, but they were too flimsy and kept breaking either while cutting, or when I accidentally bumped them. So I made them all about twice as tall as actually needed, and trimmed later:
I quickly learned that it was easier to work with the veneer, especially after I cut it to size, if the grain was horizontal rather than vertical; long streaks of grain good, short bad. This was really important for when I had to shave little bits of the veneer to maximally fill the fret gaps, given their uneven nature:
First step complete; oh and the clipboard is to catch as much debris as possible:
To secure the veneers, and further fill any minimal, leftover gaps and superficial scrapes, I used CA glue. No pics of that process, as speed was required to limit exposure to fumes. All the fans were turned on, and I held my breath as I worked with arms stretched far: I squirted a bead of CA straight from the bottle along both sides of where the veneer met the fingerboard, aiming to get as much as possible down into the slots. Then I squirted a bead in between the veneers to solidify my ply-fret-fills. I let it sit under a fan for ~24hrs, then I did what I wish I did many times over now:
After I taped the fingerboard, I trimmed the edges with a box cutter, using a special technique that allowed me to hold the neck still and apply juuust the right amount of precise pressure:
Next step was to trim the tops, same tool; had to change the blade about halfway through:
Not pictured is me using the blade from my thumb plane and carefully cleaning up what I couldn't get with the box cutter. I removed the blade to make sure I didn't gouge anything while removing as much excess CA glue as possible. All done:
Some clean ply-fret-fills:
The worst ones where some of the veneer frayed and broke away as I trimmed em flush due to poor grain alignment (lots of little vertical grain instead of long horizontal grain) and because I didn't get enough glue between the plys:
I will have to go back and shove little bits of veneer in the large gaps, and just use glue to fill the smaller gaps. I'm much happier with this fill job compared to how it was. Even though it's not super prettt yet, it'll clean up just fine. And I'm confident it won't squish into a bow now.
As for the brick brack sent in return for the veneers, my original plan was to flatten out some aluminum like I planned to use myself, and then fit some sheets of that into an envelope with a square of toilet paper in between each. Well, I forgot I got rid of my cheap, crappy, albeit only iron (which I was gonna use to flatten the aluminum) so unable to make flat sheets, I couldn't send dwizum "gold-plated aluminum" as planned. Instead, I'm sending something else tomorrow. Sorry for the delay in keeping my promise lol
Glad it worked out! And no worries on any delays with the return surprise. And yeah, it works a lot better when the grain line runs across the fretboard vs up/down.
CA should work fine for filling the remaining gaps. People (including me) sometimes frown on the idea of using any glues as filler, but CA basically solidifies into acrylic and will be totally fine filling minor gaps like that, in terms of structure and wear. I often use CA for gap filling when parts or glue lines don't turn out perfect. If you're OK with a clear filler, you can use thick CA and "drop fill" the gap, building up coats until it's just above the surface, then sand level. Or if you want to try to match the color of the surrounding wood, you can tightly pack some wood sanding dust in the gap and then put a tiny drop of thin CA on it (a little goes a long way, thin CA wicks right through dust like magic). It'll dry darker than the wood dust's natural color but with practice you can get good color matches like that by mixing dust colors to get a lighter color than the one you're filling (usually I mix some maple dust into dust from the neighboring wood).
CA should work fine for filling the remaining gaps. People (including me) sometimes frown on the idea of using any glues as filler, but CA basically solidifies into acrylic and will be totally fine filling minor gaps like that, in terms of structure and wear. I often use CA for gap filling when parts or glue lines don't turn out perfect. If you're OK with a clear filler, you can use thick CA and "drop fill" the gap, building up coats until it's just above the surface, then sand level. Or if you want to try to match the color of the surrounding wood, you can tightly pack some wood sanding dust in the gap and then put a tiny drop of thin CA on it (a little goes a long way, thin CA wicks right through dust like magic). It'll dry darker than the wood dust's natural color but with practice you can get good color matches like that by mixing dust colors to get a lighter color than the one you're filling (usually I mix some maple dust into dust from the neighboring wood).
Great. Yeah, I might just use some dust instead of a "peg" for even that big hole and drop some CA on it. That should ensure a solid connection.Glad it worked out! And no worries on any delays with the return surprise. And yeah, it works a lot better when the grain line runs across the fretboard vs up/down.
CA should work fine for filling the remaining gaps. People (including me) sometimes frown on the idea of using any glues as filler, but CA basically solidifies into acrylic and will be totally fine filling minor gaps like that, in terms of structure and wear. I often use CA for gap filling when parts or glue lines don't turn out perfect. If you're OK with a clear filler, you can use thick CA and "drop fill" the gap, building up coats until it's just above the surface, then sand level. Or if you want to try to match the color of the surrounding wood, you can tightly pack some wood sanding dust in the gap and then put a tiny drop of thin CA on it (a little goes a long way, thin CA wicks right through dust like magic). It'll dry darker than the wood dust's natural color but with practice you can get good color matches like that by mixing dust colors to get a lighter color than the one you're filling (usually I mix some maple dust into dust from the neighboring wood).
As for color, I absolutely don't care about it here because after I sand it all level with my DIY radius sanding block, I'm spray painting the fingerboard black before I coat it all with CA. I'll do a test beforehand to make sure the CA doesn't do anything weird to the paint. I'm going for an unlined "ebon-ish" fingerboard look.
I also want to do something different on the 12th "fret" though. At first I was thinking of just doing a swirl of the green and purple, but recently I've been working on a logo of sorts. It is inspired by two S's overlapped (for Sunk by Sirens), waves, and the bass clef:

I would do it horizontal, so while playing the S is more upright.

I like the logoGreat. Yeah, I might just use some dust instead of a "peg" for even that big hole and drop some CA on it. That should ensure a solid connection.
As for color, I absolutely don't care about it here because after I sand it all level with my DIY radius sanding block, I'm spray painting the fingerboard black before I coat it all with CA. I'll do a test beforehand to make sure the CA doesn't do anything weird to the paint. I'm going for an unlined "ebon-ish" fingerboard look.
I also want to do something different on the 12th "fret" though. At first I was thinking of just doing a swirl of the green and purple, but recently I've been working on a logo of sorts. It is inspired by two S's overlapped (for Sunk by Sirens), waves, and the bass clef:
View attachment 3804299
I would do it horizontal, so while playing the S is more upright.

Mixing sawdust and glue works great for filler, should make it nearly invisible. Take some sand paper and make a little fine dust, add just enough glue to come up with a putty-ish substance, spackle it in the hole, sand it back after it cures.
I have bad news
I started widening the slots on my nut for the new strings, so I could line up where to drill the new tuner hole. About halfway through I realize it's the wrong nut. I can't find my nut!
Months ago, I went to the local music stores to find a spare nut, just in case I totally messed up my original while widening the slots for these thicker strings, but they didn't have any of the right size. One store had something else I needed, so I bought that instead, and somehow the clerk accidentally put the wrong-sized nut I almost bought into the bag anyway, no charge.
So I have another nut that I got for free, but it is too short:

Its bottom is also radiused, whereas I need a flat bottom nut:

The bottom can be flattened, but I can't lengthen it... And I checked my pile pic; the nut shown earlier in this thread is also this wrong one. I looked everywhere, can't find the original.
UGH! So now I need to find a 1 9/16" wide nut. Or make one, but out of what? I don't think a maple nut will work.
I started widening the slots on my nut for the new strings, so I could line up where to drill the new tuner hole. About halfway through I realize it's the wrong nut. I can't find my nut!
Months ago, I went to the local music stores to find a spare nut, just in case I totally messed up my original while widening the slots for these thicker strings, but they didn't have any of the right size. One store had something else I needed, so I bought that instead, and somehow the clerk accidentally put the wrong-sized nut I almost bought into the bag anyway, no charge.
So I have another nut that I got for free, but it is too short:
Its bottom is also radiused, whereas I need a flat bottom nut:
The bottom can be flattened, but I can't lengthen it... And I checked my pile pic; the nut shown earlier in this thread is also this wrong one. I looked everywhere, can't find the original.
UGH! So now I need to find a 1 9/16" wide nut. Or make one, but out of what? I don't think a maple nut will work.


What materials do you have on hand? Ebony or Rosewood would work. If a Home Depot is open near you they might have Corian countertop samples. It’s a bit on the soft side but will work. If they don’t have that they will have aluminum or brass strips that will work.
Nice. Well I already have some very tight grained maple. I can lop off a little with the jigsaw and size it down into a nut. That could be fun.I have used ebony, hard maple, wenge and chechen to make nuts.

Soak it with thin CA glue and it will harden up some.Nice. Well I already have some very tight grained maple. I can lop off a little with the jigsaw and size it down into a nut. That could be fun.
You read my mind!Soak it with thin CA glue and it will harden up some.


