• TalkBass has been independent since 1998. Add your voice.
    Create a free account to reply to discussions, view embedded media, and browse with fewer display ads.
    Join freeLog in
    Want zero display ads or expanded classifieds tools? Compare plans.

The Rickenbacker Club Part Eight

Status
Not open for further replies.
I don't get endorsements. "Sure, I'm rich and can buy all the instruments I want but I will just stick with your single brand because I will get basses with like 10% extra features, maybe, for free sometimes."
 
After seeing how THIN the finish is on these with my own eyes by looking at the cracked off finish on these damaged 2011 4003s, I am surprised that there are not more problems with it wearing off over time. Nothing like the thick poly coating you see on Fender basses and definitely thinner than the coatings Gibson uses on their guitars.

It does look great though on an undamaged guitar!

The newer CV is a lot softer than it used to be.
I stripped a sizable piece right down to bare wood off the back of the upper horn of my 2010 4003 with the button on a work shirt one day.

I wore a bare spot about an inch long on the upper edge of the body above the bridge of my 1976 4000, but that took about 20 years of rubbing against my forearm.
 
What do I mean? No rocket science here: Running your hands over the binding, you should feel no -- zero -- detectable seam between the binding and the wood, anywhere.

If there is, someone screwed up bad -- end of story, no excuses, especially at this price point.

I didn't even know that was possible.
See, kid? Hang around with me and you'll learn stuff! ;)

It's not only possible, it takes a lot of hand work for it not to happen, especially if the binding rout is off in the production routine.

Binding detailing is a big money pit, and the goal is to cut every corner you can get away with in corporate America. Gibson gets away with murder on this because their customers have guzzled the Kool-Aid to the point of losing whatever critical faculties their limited intelligences may have had before parting with all that money.

If you can find that online slide show about the (truly Dickensian) Terada plant making high-end Gretschs, you'll be amazed at how much hand work is done on the binding detailing alone. It's very interesting.
I've never seen that on a Ric or anything else.

Go to any GC and run your finger around the outside top edges on a row of Les Pauls. QED. Be careful not to cut yourself or bag a splinter.
 
...There's a couple small (2/3mm) dings down to the wood in the back, though. Just want to "stop" them (preventing any further chipping).

What should I use? Automotive touch up black paint ? Clear nail polish ? What do you think?

I had a small headstock ding on my 1993 Fireglo 4003s, and I used a color of red nail polish that reasonably matched it. I didn't obsess over matching the color perfectly, what I chose was good enough. Stuff happens.
 
On my (newly bought) '83 4001, the binding is still intact, no sign of rot/delamination, no detectable seam between binding and top of bass, but a definite seam detectable under the fingers between binding and sides of bass in certain places (inside the cutaways), with a hairline crack in the finish between binding and paint (jetglo) on some parts.

Probably a little shrinking of binding over time, nothing to worry about, I've seen worse on almost all "vintage" (if '83 is to be considered vintage) instrument I've had/seen (Gibson HB guitars for instance, don't even get me started on Gretsches bindings).

There's a couple small (2/3mm) dings down to the wood in the back, though. Just want to "stop" them (preventing any further chipping).

What should I use? Automotive touch up black paint ? Clear nail polish ? What do you think?

I've used black fingernail polish on my Jetglo. You can wetsand it down after it dries and then use something like Scratch-X (not v2.0 apparently) and then wax it smooth. I've done this and it's difficult to even tell it was dinged at all.
 
Wonder how it would look on my "naked tuxedo"?
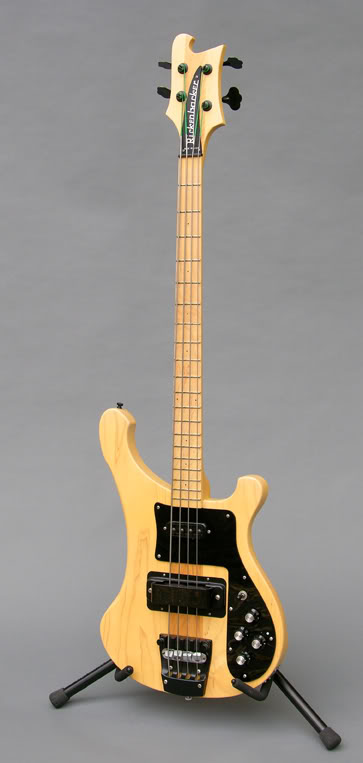
Nakedtuxweb.jpg

Sweet looking base man! So tell me, I have not seen a lot Ricks with maple necks. Is that something that is hard to find?
 
A question I've been meaning to ask, and to which I hope I receive some reliable answers:

How is Rickenbacker's current detailing on the binding? Is it done evenly and precisely like on every cheap import, or is it a sloppy trainwreck like on $3000+ Gibsons?

I have 3 4003 basses (2010, 2011 and a 2013) that I bought new. I also have a 1977 4001 that I bought used in 1979. The 2013 that I bought from Pick of the Ricks had an issue with the binding straight from the factory. I sent it back to the factory for warranty repair twice and it is still not right. They won't take it back again since they said it passed 3 levels of quality control on its way out the door the 3rd time. It now is only a minor issue, but I know it's there so it sucks.

Since it has no effect on the playability or sound, I just try not to worry about it and play the **** out of it.

--jack
 
I got the nut driver today, but unfortunately it is too thick to fit over the truss rod nuts on either bass! :(

P1010599-1.jpg


Any ideas?

Here are some photos of the truss rods on Bass #2 which I unboxed today to compare the truss rods to Bass #3.

The nuts on Bass #2 are not stripped and show no sign of being previously adjusted after they were screwed on the rods at the factory, but I have no idea how I am going to turn these nuts with no way to get the driver onto the end of the nuts!

P1010577-1.jpg


P1010579-1.jpg


P1010578-1.jpg


Some higher quality photos of Bass #2.

I never gave Bass #2 much of a chance since it was the second bass in a row that had the cracked finish and I was so disgusted at the time that I immediately put it back into the case and sealed up the box. I decided to hold onto it all this time though just in case there was a problem with Bass #3.

SO GLAD that I did! Today I took it out of the shipping box and gave it another look. After taking a fresh look at this bass and comparing it to Bass #3, I think overall this is the nicest one of the three, so I am going to be keeping this one. I will be sending this one down to Rickenbacker for a refinish in a month or two. I will be sending Bass #3 back to MF.

I want to set it up and play it for awhile, but the question now, is how the hell am I supposed to adjust the truss rods?

P1010591.jpg


P1010586.jpg


P1010606.jpg


P1010585.jpg


P1010580.jpg


P1010604.jpg
 
Sweet looking base man! So tell me, I have not seen a lot Ricks with maple necks. Is that something that is hard to find?

Kinda. Maple FINGERBOARDS (necks are always maple) were standard fare on the original 4004C Cheyenne (1992-1999) and the 4004L Laredo during that same time period. Later Cheyennes and Laredos have bubinga and now chechen fingerboards. Maple boards were also on the 2020 and 2060 models (1992-1995), and on the aforementioned 4003SPC Blackstar, Redneck, and Tuxedo basses (1987-1990), although they were painted over. My "naked Tuxedo" was once a White-painted Tuxedo, but most white-painted Ricks turn a sickly (to me, anyway) yellow, so I had it stripped and satin cleared by Larry Davis. I'm glad I did.
 
GG7,

I knew you would have this problem. Do you own a belt sander or a bench grinder?? How about friends that do??

You are going to need to uniformly grind off all that extra metal on your truss rod tool. Those damn things are built like tanks and I think it only fit one of my Rickenbackers before my surgery on it.

Personally speaking, I'd modify the tool not the bass but either has been done successfully.

if you have a friend with a belt sander or bench grinder, have him take down the material on the socket portion of the driver by spinning the driver against the abrasive device. Do it a little of the time and slowly so as not to turn the metal blue and make it brittle. Check it often to see how much material needs to be taken off in order to slip the tool over the nut You can somewhat taper the tool by taking more off at the opening than at the base.

A hand held dremel can be used but the results will not be as nice and clean.

Sepp
 
Since before I was a bass player, I've wanted a Ric. I've finally found the means to get one and am going to play it and check it out friday. It's a 2010 fireglo.

Are there things I should watch for, quality wise, or anything similar? What notable differences are there between the playability of the 4003 and a 34" bass with 24 frets?

I just want to go in the discerning consumer and not the guy that's been waiting for his chance to own a Ric.

Thanks
Chad
 
You are seeing the difference between the maple center section and the walnut wings on the headstock.

All three of these I received had a detectable line between the center wood piece and the "wings" on each side. The back of the guitar body has the same lines when you turn the finish at the right angle to a light source. I assumed that this was normal since all three of the ones I had looked the same. You only see the line between the three pieces of wood at certain angles.

Thing is...I don't remember my 72 having detectable lines like this. I am pretty sure that the finish on that bass was thicker than what they are putting on these now. As I mentioned in an earlier post... The finish is so damned thin, it is not surprising that you can see this at the right angle.

What is "Orange Peel" ?
 
GG7,

I knew you would have this problem. Do you own a belt sander or a bench grinder?? How about friends that do??

You are going to need to uniformly grind off all that extra metal on your truss rod tool. Those damn things are built like tanks and I think it only fit one of my Rickenbackers before my surgery on it.

Personally speaking, I'd modify the tool not the bass but either has been done successfully.

if you have a friend with a belt sander or bench grinder, have him take down the material on the socket portion of the driver by spinning the driver against the abrasive device. Do it a little of the time and slowly so as not to turn the metal blue and make it brittle. Check it often to see how much material needs to be taken off in order to slip the tool over the nut You can somewhat taper the tool by taking more off at the opening than at the base.

A hand held dremel can be used but the results will not be as nice and clean.

Sepp

Really? Sheesh! :hmm:

I thought this driver was going to just work out of the package! I have about four 1/4 nut drivers already that I could have ground down like that IF I had a belt sander or a grinder which I don't have either of. :eyebrow:

I am pretty sure our nearest neighbor doesn't have one either. I live up in the Sierra Nevada in middle of nowhere.

Hmmm... Maybe I will just take this down to the city and have them set it up. Would be cheaper than buying a bench grinder! ;)

Why the hell doesn't RIC give you a truss rod wrench like Fender and Gibson do? Unlike RIC, their rods just need a conventional allen wrench to adjust the rod tension. This RIC one is so specialized that if anyone should provide their paying customers with a wrench it should be Rickenbacker! Its not like you can just walk into any hardware store and buy something off the shelf that is going to work! Considering the premium price they charge for these guitars, it seems almost criminal that they not only charge a gouge level price for a nut driver, but it doesn't even fit the truss rod nuts unless you grind it down on a bench grinder first?

Amazing! :rolleyes:

Why does POTR sell this exact same brand of nut driver if it won't work unless you grind it down first? :rollno:
 
All three of these I received had a detectable line between the center wood piece and the "wings" on each side. The back of the guitar body has the same lines when you turn the finish at the right angle to a light source. I assumed that this was normal since all three of the ones I had looked the same. You only see the line between the three pieces of wood at certain angles.

Thing is...I don't remember my 72 having detectable lines like this.
My belief is that this comes from a chemical reaction between the glue and the sealer and/or paint when it's not cured or neutralized properly. A lot of Cor-Tek's production had huge glue lines in their finishes for a while until they worked it out.

Another cause is a difference in hardness of the two pieces of wood, In that these "wings" on the heads are often different woods, this may be an explanation, I dunno.

What is "Orange Peel" ?

Sprayed roughness.

Extreme example:

auto_paint_orange_peel_lg.jpg
 
Status
Not open for further replies.