• TalkBass has been independent since 1998. Add your voice.
    Create a free account to reply to discussions, view embedded media, and browse with fewer display ads.
    Join freeLog in
    Want zero display ads or expanded classifieds tools? Compare plans.

There's another storm brewing!

It's getting closer to finished! thanks.


The Big Glue-up pt. I

Today I did the glue-up of the full-length fretboard. With all the features on this one "fretboard+", this was a little stressful, since it involved getting a bunch of things right all at once, and could mean the whole bass could be trash if it was too wrong.

Re-test fitted the truss rod. Deepened the channel a little in a two places using riffler files, since there had been some sanding to the neck that effectively shallowed the rout by a few thou.

Re-checked the string anchor slot, since, after this, I won't be able to really get in there again.

Trimmed the clamping caul, so that clamps could be used more easily.

Located and/or cut various caul boards, while doing a dry run clamping. Lined any cauls that will be below the glue line with non-stick paper.

Trimmed the FB as small as safely possible.

Scuffed up the back of the FB laminate board.

Here are the parts, ready to go.
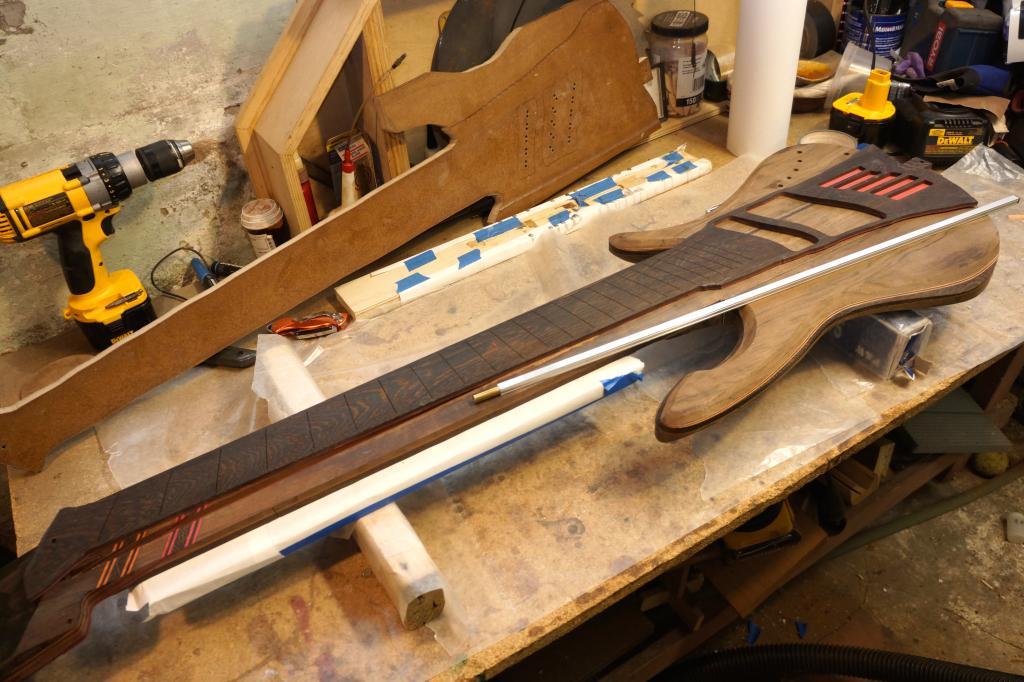
DSC00485_zpsa2029d75.jpg


As I was applying cauls and tightening clamps, I heard a CRACK and immediately knew that I had forgotten one block on the backside, to spread the force over the cavity cover. I removed that clamp, and I could not feel any tangible defect in the cover, so I applied the missing plywood block, and reapplied the clamp. Hopefully the cover just got a crack on its inside surface that will end up covered with copper foil. Time will tell.

Here is the beast in its tethers.
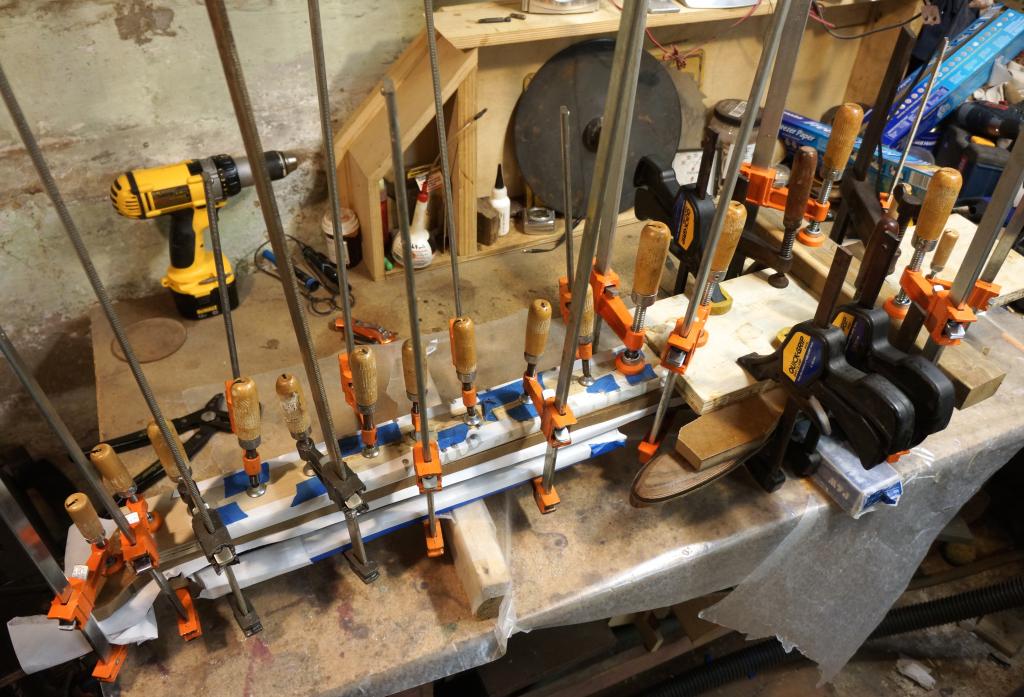
DSC00486_zpse27c286f.jpg


There it will stay until tomorrow. This will receive a full 24 hours in the clamps for the epoxy to reach full cure, since this is a neck we're taking about.


____________________________________________


Celebrated the LAST major glue up of this mega-laminate instrument with an appropriately dark-themed brew.
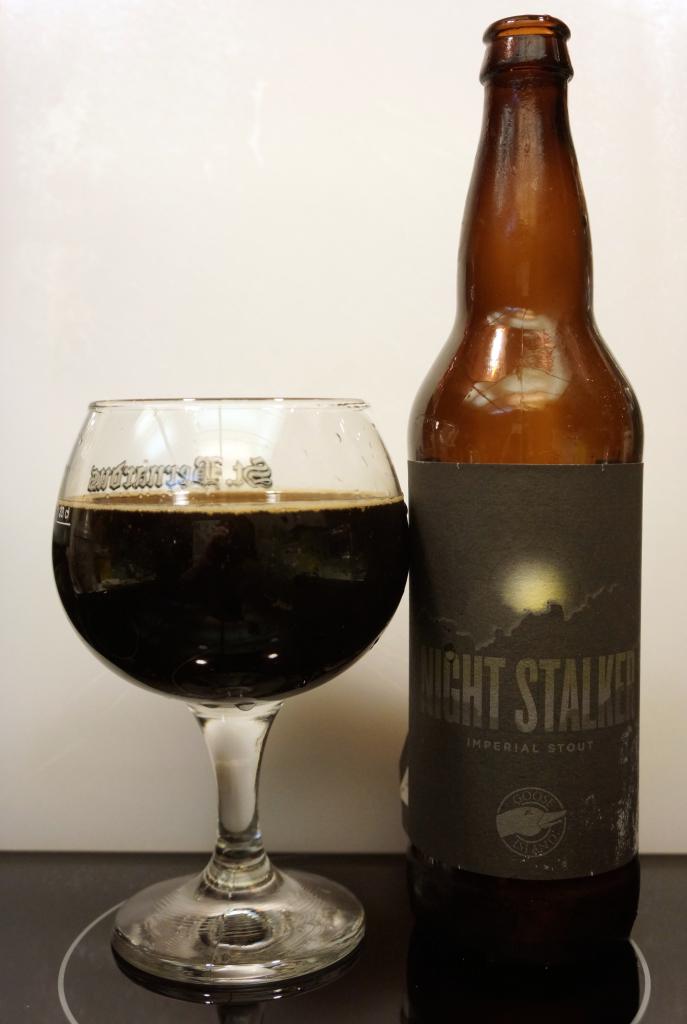
DSC00488_zps45c94e64.jpg

This is the second time I've had this. I bought a second bottle 19 months ago since the first was so good, and it has been cellaring since. All kinds of rich flavors from the outset through the mid to the finish. And repeat. I hope the bass is as rich in tone.
 
Yes, stressful, but you plan, and then you do what you do in a zen fashion.


It's out of the clamps, and the results so far:
- The cover doesn't show any cracks. I will have to look really closely at the whole body, but I didn't see anything as yet.
- In the space where two of the pickups go, the epoxy flowed in over the surface, and so there is a gloss coat. Man, that tropical walnut is going to look nice - it ripples in the light really nicely. A good payoff for working with its stringiness. Might get a pic tomorrow.
- The neck has a slight backbow. It may be small enough to be pulled forward by the strings, but I want it dead flat when I level sand the board. The truss rod is single action, and it should be able to be pulled out and reversed once I open up the headstock access. But I'd rather have the whole thing be "naturally straight," so I've got it clamped in a slight forward bow overnight, just in case there's a little give still left in the epoxy (although it is now a few hours past its rated 24-hour full cure time).
 
Aaand there you go again, reading my mind and implementing it way better than I ever imagined... XD (I've pondered for a long time putting string-through anchoring on the end of a bass instead of the back.) Those little bits of carving here and there are hinting that this will be truly stunning when it's all said and done. Artistic lutherie at its finest, PJ!
 
If the cavity cover has laminations in it, it could have been one of the inner ones, or even the epoxy cracking. Looks good!
lowsound
Thanks. I haven't found any crack whatsoever, so... hopefully I'm good!
I heard you can get anything you want there.
Excepting Alice.
Aaand there you go again, reading my mind and implementing it way better than I ever imagined... XD (I've pondered for a long time putting string-through anchoring on the end of a bass instead of the back.) Those little bits of carving here and there are hinting that this will be truly stunning when it's all said and done. Artistic lutherie at its finest, PJ!
Thanks. I've got a gallery of saved photos that includes tail anchor versions by different people - I just tried do it my own way, and maybe go one better! Hopefully it looks as good as hoped once the tail is all trimmed and shaped.


______________________________________________


Plans

I started to make a list of remaining jobs to be done. Then I realized I'd better put this in a spreadsheet, because the list was getting long, and I was realizing all the first-this-then-that dependencies were getting complex. Then I realized the spreadsheet wasn't cutting it, so I did a project file so I could do a flowchart.

I swear, if I had thought out this way at first about the complexity of making a guitar, I might have never started. This chart only covers from this point forward — after it's in the state you see it here — and on top of that, some of the boxes are rolled up complex tasks, e.g. "make knobs."
DSC00509_zps8608c469.jpg


Doing the chart did help me think a bit about how to proceed, though. I realized a few dependencies that weren't obvious. Also I identified one task that really should be done using the ShopSmith in horizontal boring mode, and a few others that might be candidates for while it's set up that way. Setting it up for that usage is a big deal, because I have to remove the radial arm drill press (or whatever it's called – I think of it as the xenomorph) from its mounting on the ShopSmith frame, and then put it back afterwards.


Jack hole bore

The main task for the setup is boring the jack hole into the side of the body. I originally was going to use an electrosocket mount like in SK1, but I want to keep the diameter as small as possible because to the top and back carving. So, the jack will be mounted directly to the wood.

Setting up for the 3/4" diameter bore — just big enough for the socket wrench for the jack's nut.
DSC00490_zpsbefd9ac3.jpg

I love that tiny machinist's square. It was just right for the job. And the magnets held the bigger square for me.

Set up for the 3/8" thru bore, with the sacrificial wood in place to prevent blowout on the far side.
DSC00494_zpsef1d0bf3.jpg


Complete.
DSC00498_zpseac0370f.jpg


It turned out that that's all I'm going to do in horizontal boring mode. I thought I might do the LED hole, but the machine won't allow for the odd angle I want.


Since the previous post was "Big Glue-up Pt. I," I suppose I should post a pic of the results.
DSC00504_zps16afd47c.jpg

That's the best I could do with it smack under the shoplights. You might be able to see the nice epoxy-coated walnut in the pickup hole areas. Of course that will be routed out, but it's a good harbinger for the eventual finish.


______________________________________________


Sometimes the best Octoberfest beer is an actual German Oktoberfest bier instead of an American "interpretation." Last year I had an expensive one by Six Points at a street fair that I poured out because it was horrible. This one is tasty and sessionable.
DSC00500_zpsd5ab38f1.jpg


  • Like
Reactions: lbridenstine
I would never make suggestions about your builds, but I can give a bit of beer advice:

Oktoberfest is a Munich festival, and only Munich breweries supply the fest beer. Warsteiner is not Bavarian. It is also a Pilsner, where Bavarian beer is Helles lager. The official breweries for Okoberfest are:

Augustiner
Hacker Pschorr
Hofbräu

Löwenbräu
Paulaner
Spaten/Franziskaner

I personally prefer the Paulaner and Augustiner, but I'm not sure if Augustiner even exports out of Bavaria, let alone Germany... I have bought Paulaner Oktoberfest beer in Canada, so maybe hunt for that.
 
Thanks for the bass comments. And re the beer, this one may not be official Oktoberfest, but it does taste like a Helles, not a Pilsner, and it's good. I will keep an eye out for the "real" ones, though. I'm actually not as fond of the Spaten Oktoberfest that we get here.


____________________________


Pickup Shielding

What I mostly did today was reorganize a bit of the basement, throw out some crap, and make some more bass-building space with tools more at the ready. After that I looked at the project chart of doom, realized a few dependencies I had missed, and figured I had enough time to shield the pickupsin order to enable a few other things that require handling them. Better to have them sealed up so they won't get damaged—those open coils are a little scary.

Here are the three subjects.
DSC00511_zps8758e9ea.jpg


Covered in tape for insulation.
DSC00513_zps91cea584.jpg


All nice and coppery.
DSC00515_zps22584035.jpg

Had I known I was going to end up doing this, I might have considered single coils, too.

Taking a test drive in their future homes.
DSC00517_zps6f8aa024.jpg


____________________________


Bonus shot: tonight's full moon, adrift in cirrocumulus, with lunar corona.
DSC00540_zps63fc8b21.jpg
 
Thanks for the bass comments. And re the beer, this one may not be official Oktoberfest, but it does taste like a Helles, not a Pilsner, and it's good. I will keep an eye out for the "real" ones, though. I'm actually not as fond of the Spaten Oktoberfest that we get here.


____________________________


Pickup Shielding

What I mostly did today was reorganize a bit of the basement, throw out some crap, and make some more bass-building space with tools more at the ready. After that I looked at the project chart of doom, realized a few dependencies I had missed, and figured I had enough time to shield the pickupsin order to enable a few other things that require handling them. Better to have them sealed up so they won't get damaged—those open coils are a little scary.

Here are the three subjects.
DSC00511_zps8758e9ea.jpg


Covered in tape for insulation.
DSC00513_zps91cea584.jpg


All nice and coppery.
DSC00515_zps22584035.jpg

Had I known I was going to end up doing this, I might have considered single coils, too.

Taking a test drive in their future homes.
DSC00517_zps6f8aa024.jpg


____________________________


Bonus shot: tonight's full moon, adrift in cirrocumulus, with lunar corona.
DSC00540_zps63fc8b21.jpg
Awesome post all the way around. This thread has been a fun one to follow. I can't wait to see everything all completed.
 
I would never make suggestions about your builds, but I can give a bit of beer advice:

Oktoberfest is a Munich festival, and only Munich breweries supply the fest beer. Warsteiner is not Bavarian. It is also a Pilsner, where Bavarian beer is Helles lager. The official breweries for Okoberfest are:

Augustiner
Hacker Pschorr
Hofbräu

Löwenbräu
Paulaner
Spaten/Franziskaner

I personally prefer the Paulaner and Augustiner, but I'm not sure if Augustiner even exports out of Bavaria, let alone Germany... I have bought Paulaner Oktoberfest beer in Canada, so maybe hunt for that.
I recently visited the Augustiner brewery...well, I ate there...it's fun and the beet is nice in the environment!
 
I guess the pickups are potted at Nordstrand before shipping.
Yes, they are wax potted by Nordstrand. Oddly, one coil of the Big Split also has a thick, hard coating of some sort.

These pickups are way lighter that the Armstrongs I used on the last bass. I think it's partially due to the lack of a large volume of epoxy inside the covers; but the main factors are probably first the pickup design (the Armstrongs were sidewinders) and second the size, as the Armstrongs were longer than needed, long enough for a non-fanned six string.
 
Last edited:
Battery Retention

Someone here, Lisa I think, suggested that since I'm using magnets anyway, I should use magnets to hold the battery in place. I had said I was going to do that, and I removed the "battery pocket" features from the cavity routing; but I hadn't yet decided on the final magnet solution, since I wasn't completely thrilled with any of the possibilities.

Then I figured how I wanted to do it, and it's one of those things that seem obvious, but only after you come up with the idea. Also, once again, it's something that's to much work to do for anything nearing a production instrument, but ok when you're taking your time as I am here. I am inlaying the magnets, so that they will be invisible once the cavity has its copper shielding. The battery will appear to stay in place as if by magic.

The surface to be inlaid is the side wall of the cavity, which is pretty hard to work with tools. For the first two and a half of the four holes, I used these,
DSC00553_zps4dd39c1a.jpg

resulting in this.
DSC00554_zpsc9c44c40.jpg


Those holes are horribly sloppy and oversized, but the aesthetics won't matter since they will be covered in copper. Then I remembered I had recently gotten this functioning relic at a garage sale,
DSC00559_zps582fc9ef.jpg

so the last two holes turned out nicer.
DSC00560_zps82a0eafe.jpg


Then I used these
DSC00639_zps423cff76.jpg

to fill the space, so that there will be a smooth surface for the foil to form over.
DSC00636_zps642ae491.jpg

Using a spritz of accelerator, then a big pool of CA, followed by another spritz worked beautifully, hardening up almost instantaneously.


Tail trimming

I trimmed the excess material at the tail of the bass, removing the remnants of the indexing stub and using a pattern bit to bring the end of the fingerboard in line with the main body. Followed by a bunch of block sanding to smooth the profile. I've got no pics of this, but it will show up in all the pics to come.


Pickup cavities

I also got started on the pickup cavities – just the forstner work. Once again, machining these laminations produces the most awesome chips.
DSC00576_zps4d2764ac.jpg


After some additional chisel work, ready for routing.
DSC00579_zpsc359b0ce.jpg

You can see the where the two pre-drill, pre-shielded pockets were exposed. Next we'll see if the copper survives the router.
 
  • Like
Reactions: lbridenstine


______________________________________________


Sometimes the best Octoberfest beer is an actual German Oktoberfest bier instead of an American "interpretation." Last year I had an expensive one by Six Points at a street fair that I poured out because it was horrible. This one is tasty and sessionable.
DSC00500_zpsd5ab38f1.jpg


Warsteiner ... a King among Beers! (or something close) -- that's what it says on the label, anyway!