• TalkBass has been independent since 1998. Add your voice.
    Create a free account to reply to discussions, view embedded media, and browse with fewer display ads.
    Join freeLog in
    Want zero display ads or expanded classifieds tools? Compare plans.

There's another storm brewing!

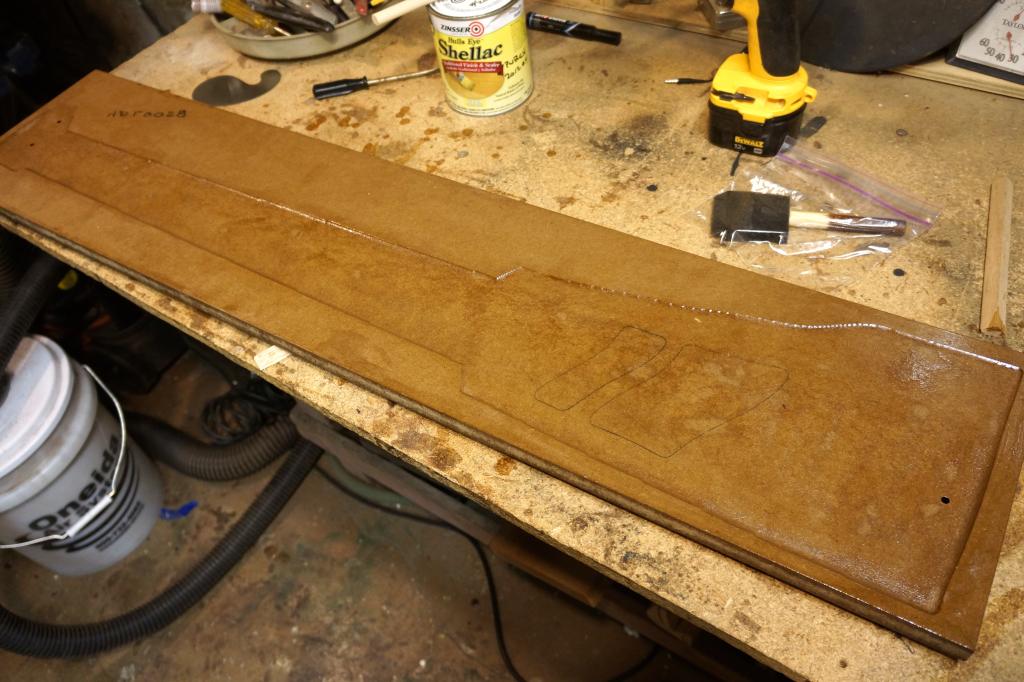
A little progress. Routing the already-radiused pickup shells will require a stable workholding. The clamping caul already had the radii, so might as well use that. However, it has a fuzzy milled-MDF surface, which won't accept mounting tape. So, I have put two coats of shellac on the whole board (can't do just one side or it will warp), then scraped the stiffened fuzz with scrapers. Then here is the last coat of shellac, just on the the formed surface, which may or may not receive a sanding afterwards.
DSC00408_zps55700f0a.jpg
 
After years of 2D AutoCad, my 3D experience is in SolidWorks, then Inventor, then SolidWorks. I'm a big fan of SWX, and definitely not a fan of Inventor, although it has improved.
Just for kicks and giggles: I am starting to work with Creo now. That program is super-cool! I still have yet to do anything in SolidWorks, but I do have an installation license that we purchased at work so I might give that a try as well. I'm actually running Creo in Windows 7 through Parallels, which is Windows software virtualization for Mac. Creo runs surprisingly well through Parallels — you get pretty unrestricted and smooth 3D rendering and such without freezing or anything. I haven't done anything with surface rendering like woods or anything like that, so that'll be my next challenge.
 
The mystery of the lighter-colored pickup shells is solved. It was just sanding dust caught in the earlywood stripes. It blew out with a compressor, and now everything matches.


____________________________________________


Just for kicks and giggles: I am starting to work with Creo now. That program is super-cool! I still have yet to do anything in SolidWorks, but I do have an installation license that we purchased at work so I might give that a try as well. I'm actually running Creo in Windows 7 through Parallels, which is Windows software virtualization for Mac. Creo runs surprisingly well through Parallels — you get pretty unrestricted and smooth 3D rendering and such without freezing or anything. I haven't done anything with surface rendering like woods or anything like that, so that'll be my next challenge.

Yeah, I run SolidWorks in Win7, through Parallels 8.0.x (I haven't upgraded to 9 - they really should have a cheaper deal for 8 owners!) on an iMac. It works well, just having a a few display problems in assemblies - as the mouse passes over, parts may disappear then reappear. I haven't looked on the Parallels forums yet for a solution, because it hasn't really been annoying enough for me to make the effort. I do know from when I was researching Parallels versus Fusion that in the past there were registry hacks you can do to improve things. The one hack I did do was a key that allowed SWX to use the graphics card OpenGL instead of software OpenGL.
I don't have any experience with Creo. Seems to me they were crazy to change the name, when Pro/E had been probably the most respected and recognized brand name in the industry.
 
Another small note - I was talking to my CNC guy, and the test piece is actually maple, not poplar. It has a grayish area, but that might be in in area that would be cut off...so that opens up some possibilities for the future...I really hadn't started thinking about a third bass yet...

BTW the CNC was done by Will at Galloup Guitars. He did a great job on it. Not just the cutting and figuring out all the features on this cut, but figuring out the compound radius with the blend to flat. I had provided only a dead flat model file, and and a spec for the radius.
 
Another small note - I was talking to my CNC guy, and the test piece is actually maple, not poplar. It has a grayish area, but that might be in in area that would be cut off...so that opens up some possibilities for the future...I really hadn't started thinking about a third bass yet...

BTW the CNC was done by Will at Galloup Guitars. He did a great job on it. Not just the cutting and figuring out all the features on this cut, but figuring out the compound radius with the blend to flat. I had provided only a dead flat model file, and and a spec for the radius.

Very cool, I thought it looked like maple. It could be a very nice fretboard for a future build.
 
Yeah, I run SolidWorks in Win7, through Parallels 8.0.x (I haven't upgraded to 9 - they really should have a cheaper deal for 8 owners!) on an iMac. It works well, just having a a few display problems in assemblies - as the mouse passes over, parts may disappear then reappear. I haven't looked on the Parallels forums yet for a solution, because it hasn't really been annoying enough for me to make the effort. I do know from when I was researching Parallels versus Fusion that in the past there were registry hacks you can do to improve things. The one hack I did do was a key that allowed SWX to use the graphics card OpenGL instead of software OpenGL.
I don't have any experience with Creo. Seems to me they were crazy to change the name, when Pro/E had been probably the most respected and recognized brand name in the industry.
Cool. It sounds like you and I have similar setups. I noticed you have some pretty great renders, so I probably will give SWX a shot at some point soon. Creo seems to be pretty badass, though! This is coming from someone who's very inexperienced in this kind of software, so this is really a whole new world and I'm just soaking it all in.
 
BTW the CNC was done by Will at Galloup Guitars. He did a great job on it. Not just the cutting and figuring out all the features on this cut, but figuring out the compound radius with the blend to flat. I had provided only a dead flat model file, and and a spec for the radius.

If you have it modeled up in SW, then you just give the CNC guy the model and he should be able to plug it into something like MasterCam, or SolidCam to get a CNC file. Most CNC shops now days should have that capability in one shape form or another. It's a 30 second operation, so I guess I don't quite understand this statement. Assuming of course you gave him the model.
 
Maple fretboard: Looking at it again, yes it is maple (soft), but it is "junk maple," that is, it's the stuff with grey streaks through it. So, it would have to be carefully matched to a top wood that it works well with, or maybe dyed.

Scoops - yes I gave him the model, but with a flat, unradiused top. I had tried out a constant radius, which didn't work because of the wing flares, so I went back to flat. Then I calculated the radius for the fretboard area, and left it to him to extend that out to the tail, and figure out the flattening out on the flares. I suppose I could have done two profiles and lofted them myself.


_________________________________


So today I figured out the form and steps for making the pickup shells. Had to flowchart the damn things to be sure I had a workable process. Here's a CAD section view.
covers_zps3261b893.jpg

I'm making the shells to be partial-depth, since I can't see a way around having to do routing on them when they have some fairly thin side walls. The pups are already wax-potted, so it's not like I have to provide a full-depth enclosure to enable immersing them in a liquid. I only need enough depth to house the inserts, and to prevent seeing the guts when you look at an angle.

Those threaded inserts are really near the edges, though, and the form of the threads is not very wood-friendly. I spent about two hours trying different woods, and pilot hole sizes, to get something that wouldn't crack out on the end grain too much. I got something workable, but tomorrow I'm going to try again after taking one of the inserts and sharpening the threads first with a file. So, more tomorrow.
 
Those threaded inserts are really near the edges, though, and the form of the threads is not very wood-friendly. I spent about two hours trying different woods, and pilot hole sizes, to get something that wouldn't crack out on the end grain too much. I got something workable, but tomorrow I'm going to try again after taking one of the inserts and sharpening the threads first with a file. So, more tomorrow.

Drill a hole big enough for the insert and super glue or epoxy the insert. No fear of cracking the grain and the inserts will stay in their places for sure. There's no stress for the inserts anyway in pickup height adjustment.
 
Drill a hole big enough for the insert and super glue or epoxy the insert. No fear of cracking the grain and the inserts will stay in their places for sure. There's no stress for the inserts anyway in pickup height adjustment.
Yes, I was hoping to do exactly that -- the problem is that even with a set of drill bits that vary by 1/64" (0.4 mm), one size is tight enough (with only a thin wall remaining!) to crack the wood, and the next size is loose enough to be jiggly, so I'd be concerned about alignment once glued in.

The problem with the inserts is that their threads are square-edged instead of sharp-edged. So if I'm not going to just put up with the cracking, my choices seem to be
  • machine each one by hand-filing sharp edges onto them, and use the smaller hole, which if it works will will result in less stress in the wood, which will not crack
  • machine each one by chucking them up in a drill press and put a file to them to reduce the diameter, and use the smaller hole with epoxy, which if it works will will result in a perfect fit and no stress in the wood so that it doesn't crack
  • use the larger hole, shim them with paper, and epoxy, which if it works will will result in a perfect fit and no stress in the wood so that it doesn't crack, but theta paper has to soak in order for it to work--and I can't have a pool of epoxy at the bottom of the holes.
I've got nine inserts to place, and only ten inserts on hand, so I only get to have one failed experiment that can be thrown away.
 
Last edited:
I think the second option will work just fine. Use some sand paper glued to a block of wood instead of a file. (unless you have a very fine file.) Screw threads have some play in them, so you have a bit of room for error anyway. I would be more worried about how to drill the holes for the inserts exactly enough.

An entirely different option is to make the inserts as small as possible, drill the holes in the covers slightly bigger and then make a jig that you screw the inserts on to (using the holes that the height adjustment screws will go into). You will then have the inserts perfectly spaced and held in place for the gluing process.
 
Pickup Shells

I suppose this could serve as tutorial for making pickup shells...if you happen to making them a$$-backwards, starting with an oddly-shaped non-rectangular shell cover that is already in final form including its radius. In other words, if you're a guitar-building masochist.

Printed out CAD of the shells, including the string paths, in reverse. Mounted these to the backs of the shell covers. Mounted the shell covers to the radiused caul.
DSC00410_zps6348c557.jpg


Placed the pickup polepiece spacers that came with the pups on the covers, as a final confirmation that all is as it should be.
DSC00411_zps467bed70.jpg


Taped the first spacer in place,
DSC00414_zps447da082.jpg

and drilled it. Used a brad point bit, but since mine is undersized, followed it with a conventional bit, which was closer to true size.

Repeat for other two shells.

Freehand routed into the shell covers, to the proper depth. This was a PIA, between working with the dust extraction cone being on the router, the fact that it's a 3-1/4 HP router and not small at all, and mostly the fact that the paper would curl up instead of cutting off, making it very difficult to see where the wood is actually cut. It turned out a bit sloppy, but it doesn't matter, as long as the rout is consistently the right depth, is large enough, and is not so large that it blows out a side, which it didn't.

Finished by sharpening the corners of the pocket with a chisel rather than using a smaller diameter router bit.

Got the covers off the board, removed the paper and tape, and glued them to a thicknessed piece of wood that will serve as the back half of the shell. Presently in the clamps.
DSC00417_zpsd305c9f5.jpg


Before gluing, I tried to insert the pickups, but the holes are still too tight. They will have to be opened up with a file or sandpaper, as I recall other people doing.
 
Starting to get ready to glue up the neck.

This is the part of the otherwise nice Peruvian walnut that I don't like. Stringiness. I just had this peel up from the side of the neck while removing blue tape, and by the time I noticed it (the sliver sticks to the tape while you're peeling, so you don't see it), the hollow left behind was deep enough that it could actually figure into the final neck.
DSC00422_zps3e52d44d.jpg
 
  • Like
Reactions: Splods
Yes, I still have a bit of faster-set hardener around, so time for epoxy, I guess. I wish my bottle of CA weren't so old, it seems to be barely able to set anymore.

The peruvian is actually lighter than a chunk of american black walnut that I have laying around. And definitely more warm/yellowish.
 
Q: Fret tang trimmer

I just got a Klein nibbler tool, which I am going to modify to become the this thread. I've got the general idea of what to do from this thread, but before I put dremel to steel I'd like some confirmation on the form and position of the groove to be cut. Could someone please either post a nice close-up pic of the groove on the tool, or email it too me? Thanks.
pwp at engineer dot com.
 
As an Amazon Associate, TalkBass may receive commissions from qualifying purchases made via links on this site.
  • Like
Reactions: redboy1975
I see things like this and it brakes my heart to think of the people who go around saying that guitars are just tools.

This bass is going to be an extraordinary work of art.
 
I see things like this and it brakes my heart to think of the people who go around saying that guitars are just tools.

This bass is going to be an extraordinary work of art.

Does your heart stop on a dime? :D
I kid, I kid!
Absolutely agreed.
Worse are the people who take a nice instrument and don't take good care of it. Unfortunately there isn't much we can do about it.