
EBCF is some weird tuning.Oops! They were some other strings I'd removed when I put on EBCF's. I put the old strings(half rounds?)in the EB package and labeled it, just couldn't read my own writing.

TalkBass has been independent since 1998. Add your voice.
Create a free account to reply to discussions, view embedded media, and browse with fewer display ads.
Join free Log in
Want zero display ads or expanded classifieds tools? Compare plans.
EBCF is some weird tuning.Oops! They were some other strings I'd removed when I put on EBCF's. I put the old strings(half rounds?)in the EB package and labeled it, just couldn't read my own writing.

now that’s COOL! never occurred to think about the first active implementation...always thought for bass it happened with the Stingray... any cool links you can send over? curious on what it was....effect? EQ? Pre?
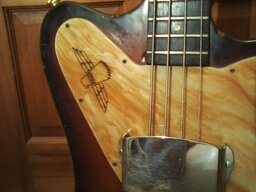
Dissonance.EBCF is some weird tuning.


I always loathed coming up behind s diesel Rabbit or Jetta, but always appreciated the pathetic irony of the names.I rode in a diesel Rabbit with a co-worker up and over the Grapevine (the road through the mountains that separate the L.A. Basin and the Central Valley) and back in 1986. I wanted to get out and push it.

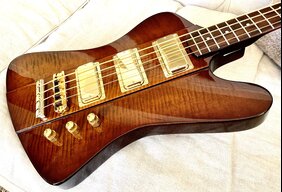
From my dealing with Burns and Watkins basses - I've been introduced to British guitar/amp makers from the early years. A lot of interesting stuff going on...
Consider that Burns was the 1st company to do an active system (early '60s)
View attachment 3974177
now that’s COOL! never occurred to think about the first active implementation...always thought for bass it happened with the Stingray... any cool links you can send over? curious on what it was....effect? EQ? Pre?
If you're worried about the wire mesh wrap from the bridge pup lead grounding out on the neck pot just slip some heat shrink tubing over the lead and hit it with a hot air gun or blow dryer. It won't add much if any thickness to the wire and will insulate it from the volume pot.Topside!
View attachment 3974239
Tight fit..
View attachment 3974240
Looks like I'll have to work out a solution to isolate the pickup wiring from the front Vol pot
Looks like you have about enough room to back the pots further into the control cavity so there's less shaft showing up top. Put a knob on the shaft and adjust the pot height so it just clears the face of the bass by about 1mm, then flip the bass over and double check the back of the pot housing to make sure there's enough clearance for solder joints and caps with the cavity cover in place. Don't forget to allow a smidgen of room for foil shielding in the cavity and on the under side of the cavity cover. If for some reason the pot shafts are too long you may need new pots.Question: should I use pots with shorter shafts, that just barely fit through the body? Or the longer shaft ones that I can adjust for heighth?
View attachment 3974252
View attachment 3974253
Interesting. I was always under the impression that Alembic produced the first active bass. Learn something new around here all the time.
If you're worried about the wire mesh wrap from the bridge pup lead grounding out on the neck pot just slip some heat shrink tubing over the lead and hit it with a hot air gun or blow dryer. It won't add much if any thickness to the wire and will insulate it from the volume pot.
Looks like you have about enough room to back the pots further into the control cavity so there's less shaft showing up top. Put a knob on the shaft and adjust the pot height so it just clears the face of the bass by about 1mm, then flip the bass over and double check the back of the pot housing to make sure there's enough clearance for solder joints and caps with the cavity cover in place. Don't forget to allow a smidgen of room for foil shielding in the cavity and on the under side of the cavity cover. If for some reason the pot shafts are too long you may need new pots.
Watch out using the short shaft pots. If you use them you should make sure you have enough exposed thread on the top side of the bass (with cavity shielding foil in place) to install the thin nut and washer with at least a thread or two exposed above the nut. If you don't have enough threads in contact with those thin nuts the pot can pop loose of the nut and flop back into the control cavity while your knob drags across and messes up the bass finish.


Be very very careful.I think I am going to go with the shorter pots, but I think I may have a solution.
Topside, currently:
View attachment 3974270
Control cavity, currently:
View attachment 3974272
Not sure I like how much that long pot sticks out inside
But, I remembered something! From when I had that '07 Chinese 'bird apart. It had extra wood removed for the pots!
View attachment 3974275
So, I'm thinking this might be my solution for getting a couple more threads up top:
View attachment 3974276
I just have to measure good, and be careful to not go to deep
Be very very careful.
I went that route with my FrankenGoth. Used brand new nice sharp forsner bits in a drill press and it was tough to get a level cut without chunking out the wood. No way I could have done it with a hand drill and blade bit like that. It would have chunked the wood and seriously damaged the bass.
I did it because I was trying to install stacked push pull volume pots for coil splitting. By the time I finished drilling I had a scary thin piece of body wood supporting the pots, that probably over time would have cracked out on me. I ended up slicing some 1/8th inch wafers off of a dowel and gluing them into the newly drilled pot depressions to bring everything back up to stock thickness. Then trashed the idea of double stack pots and went instead with a toggle switch for the coil taps.



I saw the most bizarre VW rabbit a couple of weeks ago. He/she (probably he) had put a stack type exhaust on it. As a result, he obviously couldn't use the driverside rear door and had black oily soot on the side of the car.I rode in a diesel Rabbit with a co-worker up and over the Grapevine (the road through the mountains that separate the L.A. Basin and the Central Valley) and back in 1986. I wanted to get out and push it.


Yes, but don't let the secret handshake and our gang sign out. We don't want everybody flashing that thinking they're cool too.Princess Fingers salute!
View attachment 3974104


Stay away from her!Cold Beer and Hot Crabs

Fun times!
View attachment 3974370
Wait...fun?
View attachment 3974371
Finally!
View attachment 3974372
Very tight fit...
View attachment 3974378
...and we're done!
View attachment 3974373
View attachment 3974374


You can sand out those file marks and then polish it. It’s easy to do installed or not.Off from work tonight (supposed to be my "Wednesday"), which I'm actually glad of - it's currently 109° at 6pm
Decided I would do some work on the GBP. Got the nut finished & ready for gluing. Not the prettiest, but acceptable for my first one
View attachment 3974080


