• TalkBass has been independent since 1998. Add your voice.
    Create a free account to reply to discussions, view embedded media, and browse with fewer display ads.
    Join freeLog in
    Want zero display ads or expanded classifieds tools? Compare plans.

Thunderbird Club

I wasn’t home enough yesterday to post the info for @GBassNorth re the guts of my bolt-ons. I think he got his answers, but I’ll post my info, one post at a time, in case anyone needs specific info. And to save for posterity.

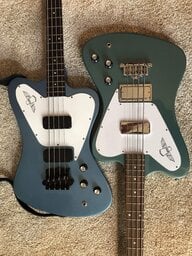
First up is the 2007 “Limited Edition Custom Shop Thunderbird IV” in Pelham Blue. Epi Pelham on this is a very sparkly and different shade than my Gibson NR ‘13. Unsung factory, Korea. It’s a wonderful Tbird. Completely stock as far as I know, including the bridge. Currently running 45-105 Dunlop Superbrights.
View attachment 3991927
I was pretty sure when I opened it up, I was entering virgin territory. The screws were very snug. The cap, which I couldn’t get the number of, is attached at the center lug of the tone pot. I was hesitant to move much as this is a marvelous bass with no issues. Alpha A500 for the tone and B500s for the volumes.
View attachment 3991936
View attachment 3991937 I’m curious about the bare wood around the jack. Any ideas? Replacement?
looks like they paint the cavity before they drill..
 
cool new venue....outdoors is the way these days...pay ain't grand but hey..
upload_2020-9-22_10-15-14.png


upload_2020-9-22_10-16-26.png
 
I’ll send you a song list.....wear a mask...I’ll pick you up at San Jose international and you can sit in for a set? Sunday’s our first one..;)

I'll see if I can get the day off!
 
In the home stretch on the accidental Goth.

Installed a spare stock Goth pickguard and truss cover (bass came without them).
Fretboard darkened up nicely with a thorough 10 minute soaking in fretboard conditioner.
The chrome output jack was replaced with a black one.
The knobs were leveled up so they no longer scrape the body.
The control cavity was rewired to eliminate some nasty grounding hum and popping.
The tone cap was changed from .068uf to .094uf as part of an on going experiment to find the best voicing for this bass.
Additional foam was added under the pickups to further reduce the gap and hopefully increase volume.
The bridge anchors were pulled, gorilla glue was cleaned off the anchors and carefully cleaned out of the holes with a small dremel sanding drum.
Three small hardwood dowels were glued into each anchor hole and the anchors were force fit with a leather mallet back into place.
A new Hipshot Supertone bridge was installed (will not be completely tightened down until glue is thoroughly dry this afternoon).
EB Cobalt Flats installed (in honor of the Princess Fingers Club) but will not be brought up to tension until the bridge is completely tightened down.

All that's left is a basic set up for action and intonation as well as pup height adjustments. All together I have about $240 in the bass, I'm a happy camper! Pics...

IMG_4312.JPG
 
In the home stretch on the accidental Goth.

Installed a spare stock Goth pickguard and truss cover (bass came without them).
Fretboard darkened up nicely with a thorough 10 minute soaking in fretboard conditioner.
The chrome output jack was replaced with a black one.
The knobs were leveled up so they no longer scrape the body.
The control cavity was rewired to eliminate some nasty grounding hum and popping.
The tone cap was changed from .068uf to .094uf as part of an on going experiment to find the best voicing for this bass.
Additional foam was added under the pickups to further reduce the gap and hopefully increase volume.
The bridge anchors were pulled, gorilla glue was cleaned off the anchors and carefully cleaned out of the holes with a small dremel sanding drum.
Three small hardwood dowels were glued into each anchor hole and the anchors were force fit with a leather mallet back into place.
A new Hipshot Supertone bridge was installed (will not be completely tightened down until glue is thoroughly dry this afternoon).
EB Cobalt Flats installed (in honor of the Princess Fingers Club) but will not be brought up to tension until the bridge is completely tightened down.

All that's left is a basic set up for action and intonation as well as pup height adjustments. All together I have about $240 in the bass, I'm a happy camper! Pics...

View attachment 3992830
Did you happen to get a pic of your dowel job? I’d be interested to know how you placed them. Did you use Titebond?
 
Did you happen to get a pic of your dowel job? I’d be interested to know how you placed them. Did you use Titebond?
Unfortunately I didn't take any pics of the patient while she was under the knife. A picture is worth a thousand words, so here's the words...

I got the smallest diameter hardwood dowel I could find at the hardware store, not much bigger around than a toothpick. I cut off three pieces for each hole that matched the depth of the hole. Then I tapered the first quarter inch of each dowel at one end.

I put a large gob of Titebond wood glue on a QTip and smeared the inside of the hole with it, enough to cover all the surfaces but not so much that it would squirt out when I put the anchors in. Then I covered each dowel in glue and stood them point up in the hole spaced equally apart. I used three dowels because I wanted to make sure the anchor remained relatively centered in the hole when I pounded it in. I also made sure to route the grounding wire over the face of one of the dowels and out the top of the hole so I could be positive it was making good contact with the metal insert and the bottom of the flange.

Then, while the glue was still wet I started inserting each anchor by hand so I could be certain it was going in straight and not tilted in any odd direction. Once the anchor was in about a quarter of the way I finished driving it down with a leather mallet so the anchor wouldn't get scuffed up. Before dealing the last blow on the treble side anchor I cut the protruding ground wire at the face of the flange and then finished setting the anchor.

Then I took a QTip to the inside of each anchor and wiped out any excess glue at the bottom of the hole and threaded the bridge bolts by hand (without the bridge) into and out of each anchor several times wiping the bolt threads off each time to make sure the anchor threads weren't fouled up with glue.

I let everything sit for about 30 minutes then installed the bridge hand tight. The glue claims 24 hours to fully cure but for this type of job I'd guess it's closer to about 8 hours. So in another few hours I'll tighten everything up and start the setup.
 
In the home stretch on the accidental Goth.

Installed a spare stock Goth pickguard and truss cover (bass came without them).
Fretboard darkened up nicely with a thorough 10 minute soaking in fretboard conditioner.
The chrome output jack was replaced with a black one.
The knobs were leveled up so they no longer scrape the body.
The control cavity was rewired to eliminate some nasty grounding hum and popping.
The tone cap was changed from .068uf to .094uf as part of an on going experiment to find the best voicing for this bass.
Additional foam was added under the pickups to further reduce the gap and hopefully increase volume.
The bridge anchors were pulled, gorilla glue was cleaned off the anchors and carefully cleaned out of the holes with a small dremel sanding drum.
Three small hardwood dowels were glued into each anchor hole and the anchors were force fit with a leather mallet back into place.
A new Hipshot Supertone bridge was installed (will not be completely tightened down until glue is thoroughly dry this afternoon).
EB Cobalt Flats installed (in honor of the Princess Fingers Club) but will not be brought up to tension until the bridge is completely tightened down.

All that's left is a basic set up for action and intonation as well as pup height adjustments. All together I have about $240 in the bass, I'm a happy camper! Pics...

View attachment 3992830

:thumbsup:

As Vice President of the Princess Fingers Club it's part of my responsibilities to send a box of bandages and some kind of weird smelling ointment the President (PillO), concocted in his basement when someone installs a set of Cobalt Flats. Due to exorbitant shipping cost you won't be receiving anything this time. Play at your own risk!
 
:thumbsup:

As Vice President of the Princess Fingers Club it's part of my responsibilities to send a box of bandages and some kind of weird smelling ointment the President (PillO), concocted in his basement when someone installs a set of Cobalt Flats. Due to exorbitant shipping cost you won't be receiving anything this time. Play at your own risk!
LOL - you guys need to connect with that Sam Ash store selling the VP. They only want $12.50 for shipping an entire bass.
 
Second post in the series re the guts in bolt-ons.

Today is the ‘09 Limited Edition-Custom Shop Silverburst. Unsung factory in Korea. As far as I know, it’s all stock. I believe I’m the third owner. Like the PB I posted yesterday, it’s wearing 45-105 Dunlop Superbrights. The two basses do not sound the same. This one is a bit “clearer” sounding than the PB, which has a bit more growl. Particularly on the D and G strings. The E string is ballsier in this one, it’s kind of hard to describe. Maybe like the low E on a Stieinway? I’m not sure if the PUPs are the same in this one as in the ‘07. I’ve been told these were originally guitar pickups. String height and pickup height are essentially the same.
32E7899D-290F-440F-AEA5-79379E1A9F6D.jpeg

I was able to see the number on the cap. Per the interweb, it looks to be a 0.068uF attached at the center post of the tone pot. So now I’m wondering about the cap in the ‘07 PB; it looks more orange and a bit fatter. Is it swollen? I need to get a dental mirror and go back in to that one.
B86C340C-6CF7-4CF4-8AB4-06DED2262C20.jpeg

The pots are the same, Alpha A500 tone, B500 vols. The wires have been secured with a tie. The paint around the jack is untouched, unlike in the ‘07 PB where it had been removed.
FA70333E-49E1-47B1-8A76-3661286154A5.jpeg

So two Thunderbirds from the same factory, in the Limited Edition - Custom Shop Series, that sound noticeably different. Same strings, pickup height, bridges, amp settings. Both sound great.

I know the answer to the question, what’s the best Thunderbird for metal? MCF’S Silverburst. It just looks the part.
 
Last edited:
In the home stretch on the accidental Goth.

Installed a spare stock Goth pickguard and truss cover (bass came without them).
Fretboard darkened up nicely with a thorough 10 minute soaking in fretboard conditioner.
The chrome output jack was replaced with a black one.
The knobs were leveled up so they no longer scrape the body.
The control cavity was rewired to eliminate some nasty grounding hum and popping.
The tone cap was changed from .068uf to .094uf as part of an on going experiment to find the best voicing for this bass.
Additional foam was added under the pickups to further reduce the gap and hopefully increase volume.
The bridge anchors were pulled, gorilla glue was cleaned off the anchors and carefully cleaned out of the holes with a small dremel sanding drum.
Three small hardwood dowels were glued into each anchor hole and the anchors were force fit with a leather mallet back into place.
A new Hipshot Supertone bridge was installed (will not be completely tightened down until glue is thoroughly dry this afternoon).
EB Cobalt Flats installed (in honor of the Princess Fingers Club) but will not be brought up to tension until the bridge is completely tightened down.

All that's left is a basic set up for action and intonation as well as pup height adjustments. All together I have about $240 in the bass, I'm a happy camper! Pics...

View attachment 3992830
So you’ve got what, about $240 into this? Upgraded bridge. I know you’re not flipper, but that should be valued at about +or- $400.*

Rock it in good health my friend.

*Note: the value of my time is about $250/hour. I never factor that in, no matter how much time I spend on my basses making them great.
 
:thumbsup:

As Vice President of the Princess Fingers Club it's part of my responsibilities to send a box of bandages and some kind of weird smelling ointment the President (PillO), concocted in his basement when someone installs a set of Cobalt Flats. Due to exorbitant shipping cost you won't be receiving anything this time. Play at your own risk!
For the umpteenth time, properly installed Cobalt Flats, per the manufacturer’s instructions, are Charmin soft and smooth.
 
Unfortunately I didn't take any pics of the patient while she was under the knife. A picture is worth a thousand words, so here's the words...

I got the smallest diameter hardwood dowel I could find at the hardware store, not much bigger around than a toothpick. I cut off three pieces for each hole that matched the depth of the hole. Then I tapered the first quarter inch of each dowel at one end.

I put a large gob of Titebond wood glue on a QTip and smeared the inside of the hole with it, enough to cover all the surfaces but not so much that it would squirt out when I put the anchors in. Then I covered each dowel in glue and stood them point up in the hole spaced equally apart. I used three dowels because I wanted to make sure the anchor remained relatively centered in the hole when I pounded it in. I also made sure to route the grounding wire over the face of one of the dowels and out the top of the hole so I could be positive it was making good contact with the metal insert and the bottom of the flange.

Then, while the glue was still wet I started inserting each anchor by hand so I could be certain it was going in straight and not tilted in any odd direction. Once the anchor was in about a quarter of the way I finished driving it down with a leather mallet so the anchor wouldn't get scuffed up. Before dealing the last blow on the treble side anchor I cut the protruding ground wire at the face of the flange and then finished setting the anchor.

Then I took a QTip to the inside of each anchor and wiped out any excess glue at the bottom of the hole and threaded the bridge bolts by hand (without the bridge) into and out of each anchor several times wiping the bolt threads off each time to make sure the anchor threads weren't fouled up with glue.

I let everything sit for about 30 minutes then installed the bridge hand tight. The glue claims 24 hours to fully cure but for this type of job I'd guess it's closer to about 8 hours. So in another few hours I'll tighten everything up and start the setup.
Excellent!!!

Perfect instructions. And Titebond is the only way to go. Safest glue to use on guitars. Holds well, easy cleanup and to remove if needed.

Thank you for the post.