• TalkBass has been independent since 1998. Add your voice.
    Create a free account to reply to discussions, view embedded media, and browse with fewer display ads.
    Join freeLog in
    Want zero display ads or expanded classifieds tools? Compare plans.

What's On Your Workbench?

Knobs are pretty easy compared to what you’re doing with the ornaments and goblet.
Yeah, probably true. I need to glue up some blanks but I haven't prep'd for that yet. They want to be wenge and purpleheart, for sure. But my little table saw here at home died on me and I haven't gone out to the woodshed in a while. Been busy with the racecar on the weekends.
 
  • Like
Reactions: Matt Liebenau
Oooooo........I ordered one of these thingies today....
31n+KCb6DvL._AC_.jpg

It should be here Monday. At that point I'll have everything I need to bevel the ends of my frets then level and crown them. I could probably get all jazzed up about any sort of progress and even mount bridges and tuners (which are already on hand) leaving just the electronics left to do at a later date upon acquisition of said parts and then finishing up my side dots. And then finish of course, which I have yet to really decide on. But that would be a pretty good spot to be in.

On the racecar front, things are winding down there. Engine is back in the car, transmission is in, we fired it up last weekend -

Stick a driveline in it this weekend and a couple other small things and she's about ready to race at this point. Season doesn't start until April 10th, so it's nice to be close to done this early, which should allow for some time to focus on other things too. I mean, there's always "something" to do in the shop with 7 racecars in there now. But if I took a week off nobody would freak out.
 
I've been daydreaming about my next guitar for a while. I think my last design covers the classic rock vibe really well. What I want for this one is the 90's modern/hard rock vibe. My friend for whom I built one of the originals of my last design thinks I could just recycle the same design and have the finish and hardware give it the modern vibe I want - dye the maple with a black wash and a gloss finish, and use black hardware.

I do know I want a black Floyd Rose bridge on it, and I already have the parts for the pickups - white bobbins and black studs.

I've been sketching out some more angular body shapes and nothing is really sticking, so maybe my friend is right and I should use the same shape.
IMG_20201222_170150.jpg
 
I've been daydreaming about my next guitar for a while. I think my last design covers the classic rock vibe really well. What I want for this one is the 90's modern/hard rock vibe. My friend for whom I built one of the originals of my last design thinks I could just recycle the same design and have the finish and hardware give it the modern vibe I want - dye the maple with a black wash and a gloss finish, and use black hardware.

I do know I want a black Floyd Rose bridge on it, and I already have the parts for the pickups - white bobbins and black studs.

I've been sketching out some more angular body shapes and nothing is really sticking, so maybe my friend is right and I should use the same shape.View attachment 4120824

It's a really tough to design a guitar that looks good, is somewhat symmetrical and you like. It takes lots of iterations, redesigns and making a full size drawing to get a feel for how it really looks and "feels". So guitar builders have taken years to do their "dream" guitar.

There is something about your guitar that sort of reminds me of the St. Vincent... kind of mixed with some other ideas. I think it's a great start. Please keep going! What you have so far is looking very promising.

Here is something I designed, somewhat based on the Strandberg and Ormsby Goliath. Some folks think it looks cool and others are too kind to say what they really think!! I've made three of these, but so far my favorite is the one painted bright sun yellow, with all black hardware.

IMG_4719.JPG
 
The St. Vincent was one of the designs I had been looking at when I drew that.

Here's one of the three I've built in the earlier design my friend was referencing:

Finished the guitar a few days ago and took photos today. This was my 20th instrument in 2020. Hopefully that's some kind of special good luck or something.

View attachment 4114867
View attachment 4114881

I do think that would look good "modernized" with a black wash glossy finish and black hardware. But I'm not quite ready to give up on my sketches yet...
 
  • Like
Reactions: John_Nicholas
The first bass I "built" back in 2018. I use the quotes there because it started off as a kit bass, but a ton of hours went into bookmatching and laminating the top, laminating the headstock, dying the fretboard, making various wood covers, and spraying the finish. About the only thing I hadn't done was a fret level, crown and polish, and that was keeping it from playing its best.

The frets were more uneven than I would have expected, probably because I dyed the fretboard with water-based dye, then finished in water-based poly, which must have caused some swelling in the fret slots.

Anyway, I set it up in my neck jig, then went over it along the string paths with a 24" machined level with PSA paper on it, then went parallel to the frets with a 6" Dia-Sharp diamond grit bar, then crowned, then polished with synthetic steel wool. It now plays great with the action nice and low at 1.3 (G) - 1.9 mm (E).

This was the first fret job I had done with SS frets. It took about 4 hours, and resulted in a few blisters, but the final result is worth it. I hadn't realized how shiny those SS frets can get when polished up!

20210110_002658.jpg


EDIT: should have said that the neck jig is basically 2x4s, some threaded inserts, some threaded rod, some coupling nuts, some cap screws and a ratchet strap. Cost about $25 to build. The 24" machined level is just an aluminum box level, cost about $16. The only other specialty tool is the crowning file, and I think that was about $30. Bottom line: you can do a good fret job with minimal expensive tools!
 
Last edited:
That's beautiful Jeff. I'm pretty sure at that point it's no longer a "kit". ;):thumbsup:

So my work bench was on my work bench last night! I took a good hour or so, maybe more, to straighten up so it could be a work bench again!
20210111_080913_HDR.jpg

The lathe and turning stuff had kind of taken over. So I did a massive remodel of the space. Now things have a place, at least for now...
20210111_080928.jpg

And Lucifer is back on the bench...
20210111_080923.jpg

My fret beveling file thingy arrives today, so maybe I can focus on a fret job on this thing. :cool:
 
That's beautiful Jeff. I'm pretty sure at that point it's no longer a "kit". ;):thumbsup:

So my work bench was on my work bench last night! I took a good hour or so, maybe more, to straighten up so it could be a work bench again!
View attachment 4123535
The lathe and turning stuff had kind of taken over. So I did a massive remodel of the space. Now things have a place, at least for now...
View attachment 4123537
And Lucifer is back on the bench...
View attachment 4123536
My fret beveling file thingy arrives today, so maybe I can focus on a fret job on this thing. :cool:

Nice. I've never seen Zebrawood with such wide grain lines. Nice neck.
 
  • Like
Reactions: TerribleTim68
The first bass I "built" back in 2018. I use the quotes there because it started off as a kit bass, but a ton of hours went into bookmatching and laminating the top, laminating the headstock, dying the fretboard, making various wood covers, and spraying the finish. About the only thing I hadn't done was a fret level, crown and polish, and that was keeping it from playing its best.

The frets were more uneven than I would have expected, probably because I dyed the fretboard with water-based dye, then finished in water-based poly, which must have caused some swelling in the fret slots.

Anyway, I set it up in my neck jig, then went over it along the string paths with a 24" machined level with PSA paper on it, then went parallel to the frets with a 6" Dia-Sharp diamond grit bar, then crowned, then polished with synthetic steel wool. It now plays great with the action nice and low at 1.3 (G) - 1.9 mm (E).

This was the first fret job I had done with SS frets. It took about 4 hours, and resulted in a few blisters, but the final result is worth it. I hadn't realized how shiny those SS frets can get when polished up!

View attachment 4122836

EDIT: should have said that the neck jig is basically 2x4s, some threaded inserts, some threaded rod, some coupling nuts, some cap screws and a ratchet strap. Cost about $25 to build. The 24" machined level is just an aluminum box level, cost about $16. The only other specialty tool is the crowning file, and I think that was about $30. Bottom line: you can do a good fret job with minimal expensive tools!


Uh, er, YOU can do a fret job with minimal expensive tools. The rest of us...
Gorgeous bass BTW
 
  • Like
Reactions: Jeff Siddall
That's beautiful Jeff. I'm pretty sure at that point it's no longer a "kit". ;):thumbsup:

Uh, er, YOU can do a fret job with minimal expensive tools. The rest of us...
Gorgeous bass BTW

Thanks!

Before I even decided to build a kit I found this black line spalted maple board of my dreams at a mill in Quebec:
20180222_133402.jpg


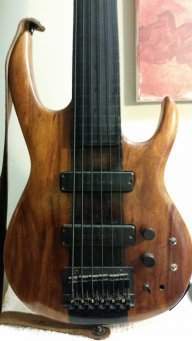
After that I found the kit to put it on. I still consider this a kit bass, but it was pretty awesome right from the start. In fact, I might be the only guy in history to get a one piece walnut body in a kit! It almost made me think twice about laminating the cap, but every time I pick it up I get to admire the walnut on the back so no regrets:
20180310_011800.jpg


Anyway, there are more pictures and a build thread here if anyone wants to see:
Invalid Link Removed
 
Thanks!

Before I even decided to build a kit I found this black line spalted maple board of my dreams at a mill in Quebec:
View attachment 4124254

After that I found the kit to put it on. I still consider this a kit bass, but it was pretty awesome right from the start. In fact, I might be the only guy in history to get a one piece walnut body in a kit! It almost made me think twice about laminating the cap, but every time I pick it up I get to admire the walnut on the back so no regrets:
View attachment 4124258

Anyway, there are more pictures and a build thread here if anyone wants to see:
Invalid Link Removed

WOW!!! That is stunning!

I had no idea this began as a kit guitar. What you have done to this bass is absolutely fabulous!

Adding the cap makes that bass. Leaving the Walnut, although very nice, would have been almost dull in comparison.

Dang....
 
My buddy Marco Cortes and I whipped up a couple of new fascia panel testers for my DIY tube amp last weekend:

PW100B_panels.JPG


The bottom one has some pretty nice quilt figure when viewed from the user's perspective but so far all my photography attempts have been fails. It been fascinating learning about all the variables one has to work with doing laser work like this. I'm going to port back to electronics mode for a while now and finish up final assembly, but I'm thinking I'm probably not done yet with this rabbit hole. :cool: