• TalkBass has been independent since 1998. Add your voice.
    Create a free account to reply to discussions, view embedded media, and browse with fewer display ads.
    Join freeLog in
    Want zero display ads or expanded classifieds tools? Compare plans.

What's On Your Workbench?

Yeah, it's crazy how much the finish will bring out everything you missed. I'm learning that too.
It's been the bane of my finishing existence. It's why I sand bodies up to minimum 320 and also go over them and steam the entire surface to raise everything up multiple times before a first finish coat. I hate finding a long scratch or a little swirl scratch from an RO sander after I think it's all good. :smug:
 
I’ve just come to accept that the first seal coat of clear or the first coat of Autoborne sealer will probably get sanded away to fix “stuff.” One of the guys I used to watch on the YouTubes said that 80% of the project (the actual building) was 20% of the work and the last 20% (finishing and prepping for finish) was 80% of the work. Can’t say I disagree. Finishing is probably the majority of the stress too.
 
My first shot at making a neck pocket template:
IMG_7868.jpeg

Quickly banged it out of a piece of scrap 3/4” plywood. It’s a little sloppy at the heel end but that’s fine. I never intended for this to be the final product; it’s more of a proof-of-procedure type exercise. I’ll do a few more, refining the process as I go, until I can consistently make a well-fitting pocket before I make a final master out of MDF.

Now that I’ve finished the restoration of that old bandsaw, the next step is to start building a library of router templates and the neck pocket, I’ve decided, is where that starts.
 
My first shot at making a neck pocket template:
View attachment 7090344
Quickly banged it out of a piece of scrap 3/4” plywood. It’s a little sloppy at the heel end but that’s fine. I never intended for this to be the final product; it’s more of a proof-of-procedure type exercise. I’ll do a few more, refining the process as I go, until I can consistently make a well-fitting pocket before I make a final master out of MDF.

Now that I’ve finished the restoration of that old bandsaw, the next step is to start building a library of router templates and the neck pocket, I’ve decided, is where that starts.

Yep, that's the classic way of making router templates. Draw it in pencil on a piece of 3/4" plywood or MDF. Bandsaw it close to the line. Then hand file it carefully, check-fitting it on an actual part. The pencil lines are just a guideline. The important thing is the fit on the part. Same process for pickup cavity templates, and almost everything else.

Making router templates is a basic skill that all Luthiers need to learn.
 
Yep, that's the classic way of making router templates. Draw it in pencil on a piece of 3/4" plywood or MDF. Bandsaw it close to the line. Then hand file it carefully, check-fitting it on an actual part. The pencil lines are just a guideline. The important thing is the fit on the part. Same process for pickup cavity templates, and almost everything else.

Making router templates is a basic skill that all Luthiers need to learn.
I’ve made a variety of router templates…. just never a neck pocket. The principal’s the same, regardless; cut on the bandsaw, leave too much material and then take material away incrementally until the doo-dad fits in the doo-dad hole!
 
View attachment 7093247 View attachment 7093248

Just got the West System epoxy delivered. I picked it up on sale as a set, with the slow hardener, resin, and pumps, all for like $90 delivered to my door. It was well packed, and even included a 41 page user manual. Mixing cups are on the way.

My favorite accessories for West Systems:

  • A plastic squeeze bottle with a cap. As soon as you open the Hardener, pour it all into the squeeze bottle. Dispense it from the squeeze bottle and keep it capped, for long shelf life. Do not use the small pump in the Hardener. It has a built-in vent hole; the Hardener will go bad in a few months if left exposed to air.
  • The big pump is fine in the Resin. The Resin will last for years exposed to air.
  • A set of cheapo plastic kitchen measuring spoons. Pick out two that are a 5:1 ratio. I think mine are 5ml and 1ml. Use them to measure and dispense, from the pump in the Resin and the squeeze bottle for the Hardener.
  • Two empty jars or cans. Put a small 3" plastic funnel in each one. After dispensing the epoxy, set the spoons in the funnels and let the excess slowly drain into the jars. No need to clean off the spoons. As long as you don't mix the Resin and Hardener, the spoons will drain clean in a day or two and be ready for the next use. The Hardener drain-off should be tossed out if it's been in the jar for more than a week. The resin drain-off can be re-used.
  • I mix my epoxy in 3 oz disposable plastic cups, with wood mixing sticks (tongue depressors).
 
I agree! a Shiny 3 year old Squier made to look as though it’s a 40 year old that has been through the object of a few years of teenage angst, and many Smokey bars, allowed to get philthy :)

I think I achieved an authentically abused look :)

Paired with the neck it’s really abused/ raw /Resurrected looking !
View attachment 7082315View attachment 7082316
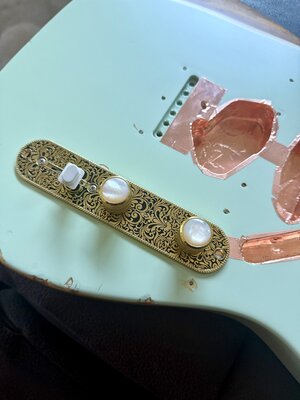
Ok cleared and cured! Satin poly clear on the body. TruOil on the neck, polished headstock, back of neck knocked back with 1500 grit.
Waiting for string ferrules, jack plate, and neck plate in gold.

Finer details:
Brass adjustable nut
Fender Nashville Tele pickup set.
Freeway 7 way pickup selector
250k “ no load “ pots.
Fender tuners with pearl knobs.
Gold pearl capped knobs
Reversed control plate
Gold round string trees
Full copper sheild
 

Attachments

  • IMG_3367.jpeg
    IMG_3367.jpeg
    4.7 MB · Views: 12
  • IMG_3366.jpeg
    IMG_3366.jpeg
    5.7 MB · Views: 12
  • IMG_3365.jpeg
    IMG_3365.jpeg
    4.8 MB · Views: 14
  • IMG_3364.jpeg
    IMG_3364.jpeg
    4.3 MB · Views: 10
  • IMG_3363.jpeg
    IMG_3363.jpeg
    4.9 MB · Views: 11
  • IMG_3362.jpeg
    IMG_3362.jpeg
    5.9 MB · Views: 8
  • IMG_3361.jpeg
    IMG_3361.jpeg
    5.1 MB · Views: 9
  • IMG_3360.jpeg
    IMG_3360.jpeg
    6.6 MB · Views: 12
  • IMG_3359.jpeg
    IMG_3359.jpeg
    6.8 MB · Views: 13
  • IMG_3358.jpeg
    IMG_3358.jpeg
    2.2 MB · Views: 13
  • IMG_3357.jpeg
    IMG_3357.jpeg
    1.5 MB · Views: 13
View attachment 4508776
A sad state of affairs; that’s what’s on my workbench!

When this came to me the unforgivable paint scheme covered the entire body as well as the pickguard and headstock. It’s oil-based house paint. It had also received several unmatched Schaller tuners and a badly corroded Badass II bridge and an EMG p’up.

A dear friend of mine bought it cheap from a friend of his in the late 1980s. He played it, completely as-is, for a few years and then put it in storage for a long time. About 10 years ago he gave it to me because the neck had developed a slight twist, a slight ski jump and the truss rod wasn’t working.

It turns out it’s a’76. Although I’m not 100% certain, I think it was sunburst. It’s become a project I revisit when I don’t have much else going on.

The paint is extremely difficult to remove but, with a combination of chemicals and scrapers I remove a little bit at a time. Eventually I’ll put a clear finish on it, scars and all.

Some shims and a new adjusting nut got the truss rod working, marginally. It’s not great but it works and I really don’t want to try to replace it. The headstock had already been stripped of its logo, sadly. I’ve removed the frets and I’ll sand the board level to remove the ski jump and the twist. I’ll re-decal the headstock and spray a rattle-can finish and re-fret with the biggest-tanged frets I have to give the truss rod a little help in the back-bow department.

Eventually I’ll outfit it with a black guard and hardware and a pickup more befitting it’s vintage and it’ll make a fine player. It’s a work in progress and I’m not really in much of a hurry.

Right now, though, it’s ugly like the back of a bus.
Well, removing the combination of latex house paint and Fender base coat was a misery so I set this project aside for a rainy day. ...for 3 years!

It was pretty rainy today and I had the day off from work. Recently I acquired an El-Cheapo heat gun from my late Father’s tool horde and decided to give it a try.

It was…. easy. I’ve stripped gloppy polyester finishes off of other basses and it was torture every time. Why the hell didn’t I buy a heat gun 25 years ago?!!

IMG_7963.jpeg

IMG_7964.jpeg


I still have the whole back and sides to do - and a ton of sanding - but the whole thing seems a lot less daunting now.
 
Last edited:
Well, removing the combination of latex house paint and Fender base coat was a misery so I set this project aside for a rainy day. ...for 3 years!

It was pretty rainy today and I had the day off from work. Recently I acquired an El-Cheapo heat gun from my late Father’s tool horde and decided to give it a try.

It was…. easy. I’ve stripped gloppy polyester finishes off of other basses and it was torture every time. Why the hell didn’t I buy a heat gun 25 years ago?!!

View attachment 7101715
View attachment 7101716

I still have the whole back and sides to do - and a ton of sanding - but the whole thing seems a lot less daunting now.
I don’t know what are your plans but if it was my project, I would leave this piece of wood natural, the wood grain is just soooooo nice !
 
  • Like
Reactions: Lo-E
I don’t know what are your plans but if it was my project, I would leave this piece of wood natural, the wood grain is just soooooo nice !
That was my plan; a natural, slightly ambered finish. I think it was originally a burst but it’s pretty hard to know given the indignities it’s been through. The neck pocket marks are more or less illegible at this point but I have no reason not to believe that it’s always been paired with the ‘76 neck I received it with and its immense weight supports that hypothesis. I think Fender was buying their ash from a granite quarry in the mid ‘70s.

I’m aiming for what would have been typical for a ’76 in a natural finish, ie: very slight amber, black guard, darker headstock and bog standard Fender hardware. I feel that after this bass’ years of humiliation it’s only fair to return it to something close to stock.

The neck still needs some serious work but I hope to be able to save it.
 
Subtle tribute to an internet-famous long-dead cat?

Of course it only reads correctly

>:(

when the neck is straight up. At least to us old folks who grok ASCII ur-emojis ;^)

This is, of course, one of those places where dots that are actual googly eyes are called for.
 
Last edited:
  • Like
Reactions: Rôckhewer
This was supposed to be Misses Terrible's project. But here we are on Christmas Eve and I'm finishing it up....
20241224_090242.jpg
...This year's ornaments for the grandkids. I made her the template about a month ago. She put it off to the point where anxiety completely took over so I ended up doing them all on my own. Came out pretty good, but apparently I forgot to add the year to the back and since I already applied finish, I'm not messing with it. 🙄

Also trying to finish up the chair for the youngest granddaughter...
20241224_090312.jpg
Again, she put it off until the anxiety became unconquerable. This one was actually started last year. 😮 It'll look like this when done (this is my template)...
20241224_090329_HDR.jpg

And, while I was making a mess of my bench, I went ahead and glued up a few scraps to make knobs for the Tele build...
20241224_090300.jpg
After spending all my free time on the wife's projects, the Tele isn't gonna be done by Christmas like I was hoping. 😒
 
This was supposed to be Misses Terrible's project. But here we are on Christmas Eve and I'm finishing it up....
View attachment 7107150
...This year's ornaments for the grandkids. I made her the template about a month ago. She put it off to the point where anxiety completely took over so I ended up doing them all on my own. Came out pretty good, but apparently I forgot to add the year to the back and since I already applied finish, I'm not messing with it. 🙄

Also trying to finish up the chair for the youngest granddaughter...
View attachment 7107157
Again, she put it off until the anxiety became unconquerable. This one was actually started last year. 😮 It'll look like this when done (this is my template)...
View attachment 7107160

And, while I was making a mess of my bench, I went ahead and glued up a few scraps to make knobs for the Tele build...
View attachment 7107161
After spending all my free time on the wife's projects, the Tele isn't gonna be done by Christmas like I was hoping. 😒


I’m with you. When my wife wants “us” to do something it usually means I do it and she watches and makes mechanically impossible suggestions. “I can nay change the laws of physics Cap’n!” On the other hand she probably shouldn’t be mucking with the power tools either so it’s probably for the best. Looks like some great presents!
 
  • Like
Reactions: TerribleTim68

Latest posts