• TalkBass has been independent since 1998. Add your voice.
    Create a free account to reply to discussions, view embedded media, and browse with fewer display ads.
    Join freeLog in
    Want zero display ads or expanded classifieds tools? Compare plans.
Winter Build Off 2025 - Cleo Fenderson

Between the bitter cold and the other stuff coming across my bench, it's been slow going on this.
But today, I at least made some headway.

Oriented the woods the way I think is gonna look cool:

IMG_9826.jpg


As opposed to "bookmatch," I think the "S" grain would fit this body shape really well.
So I marked and cut some stuff, lined up the layers and drilled some dowel holes in the waste areas to keep things lined up for glue time, then slathered it all in TB3!
And of course, clamps.

IMG_9828.jpg


There's a "caul" of wood on the top and bottom of the "lasagna" of wood I just laid up, as well as a "mid layer" of plastic to keep each wing separate. And the drop cloth is an old shower curtain. It's too cold out there for good drying, so I moved this monster inside and will hopefully have something fun to pull apart tomorrow.

Oh, and I briefly had some time with a 30" scale bass and felt it almost could be "too small." Sounded good, but felt kinda weird. So I may change this to a 32" scale or something along those lines. Not totally sure, but still have plenty of time to change that spec without having to backpedal work I've done so far.

 
Between the bitter cold and the other stuff coming across my bench, it's been slow going on this.
But today, I at least made some headway.

Oriented the woods the way I think is gonna look cool:

View attachment 7138587

As opposed to "bookmatch," I think the "S" grain would fit this body shape really well.
So I marked and cut some stuff, lined up the layers and drilled some dowel holes in the waste areas to keep things lined up for glue time, then slathered it all in TB3!
And of course, clamps.

View attachment 7138589

There's a "caul" of wood on the top and bottom of the "lasagna" of wood I just laid up, as well as a "mid layer" of plastic to keep each wing separate. And the drop cloth is an old shower curtain. It's too cold out there for good drying, so I moved this monster inside and will hopefully have something fun to pull apart tomorrow.

Oh, and I briefly had some time with a 30" scale bass and felt it almost could be "too small." Sounded good, but felt kinda weird. So I may change this to a 32" scale or something along those lines. Not totally sure, but still have plenty of time to change that spec without having to backpedal work I've done so far.

Why the tb3? I've been using that a lot at work lately, it's our go-to for outdoor joinery. I was wondering why I don't generally see it used in loothery, it seems like pretty good stuff, dries very hard and more of a brown colour than tb1.
 
I'm glad you asked...

I started with TB1. And the first few basses I built with it, STILL get glue creeping. I can't stand that and it is such a deal breaker for me, I won't even touch the stuff anymore.

Lo and behold, years back, I was watching a video with a factory tour of F Basses and saw them using TB3 to join the body halves together. I figured if it was good enough for them, it's good enough for me.
And it has been just fine since.

That said, I prefer West Systems epoxy whenever possible, especially if I need to make sure there is absolutely no glue line at all. But that stuff is EXPENSIVE. So it pretty much gets used for fingerboards and smaller applications.
TB3 is for everything else.
 
The blank got glued up the other day and was ready to unclamp today:
IMG_9875.jpg


Had to do a mix of template, trace/transfer, and freehand:

IMG_9876.jpg


Then it was drill, cut, and spindle sander time!

IMG_9878.jpg


IMG_9880.jpg


Quite a bit of detail sanding to go, but I can make it all happen.
This was the fun first step to making this thing really pop. Very much looking forward to doing the contour work.
Still gotta work on the neck though. Probably should have that in place before I start carving this body up.
 
Managed to sneak in a little bit of time to work on this today.
Glued up a neck blank:
IMG_9895.jpg


The walnut middle piece will kind of serve as an homage to the Fender style neck stripe (sorta).

And as my favorite part of these basses is getting some practice making a cool looking scroll area, I started on that a bit as well. Did the Iwazaki file a bit, the rasp a bit, and some other basic files.

IMG_9896.jpg


But it was getting a little tight on the inside portion. And I managed to find a little thin sanding drum to put into the drill... but that wasn't ideal.
So I went to HF and got a die grinder for the compressor. That seems to be a game changer!

IMG_9898.jpg


IMG_9899.jpg


Sure, it has a lot of hand sanding to do. Possibly even may go back for some of the attachments which could sand this area better?
Either way, I'm having some fun!
 
Last edited:
Yesterday saw a lot of filing and sanding. But this is where it landed:

IMG_9919.jpg

IMG_9920.jpg


There is still SO much more to do. But it's shaping up!

Also did the neck blank:

IMG_9918.jpg


So yeah, that's gonna help get me fur-
funny-surprise.gif


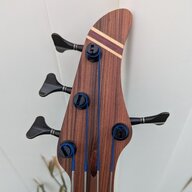
I've decided to make a 5 string to go along with this.
Not a Cleo theme, but just another bass to make my life more involved.

Just proving it was started AFTER Cleo was taking shape, here's some of the "wood pile"

IMG_9913.jpg


Then...

IMG_9914.jpg

IMG_9916.jpg

IMG_9924.jpg


IMG_9928.jpg


The goal with this (aside from fulfilling the duality theme) is to just make this as fast as I can. I had the wood, an EMG 40DC pickup, and tuners here already. Gotta get a bridge.

Building is fun!
 
Today started off GREAT!

Neck pocket on #2:
IMG_9929.jpg


IMG_9932.jpg


More sanding and grinding:


IMG_9930.jpg

IMG_9931.jpg


And I even managed to make the neck for this almost half way to being a neck!

IMG_9933.jpg


Got the purpleheart and TOW supports all glued in:
IMG_9934.jpg


That meant it was time to make the Cleo neck do something similar.
I don't have a template to make this one, so it was being measured, marked, and cut accordingly.
Got all the way to cutting the truss channel...

As I was milling it, things started resisting me a bit, which I attributed to the dust maybe clogging things along the table.
Unfortunately, that wasn't the case.
The bit was climbing out of the collet. Even though I SWEAR it was in there nice and tight, it was creeping upward.
The only indication I got of it came when it started touching my finger.
IMG_9935.jpg


It's always REALLY freaky when a router bit makes contact with a body part. Fortunately, my reflexes are quick and the tip of this isn't razor sharp. So I managed to make it out with only a slight boo boo:

IMG_9936.jpg


I've honestly done more serious damage to myself with less dangerous items than a 30,000 RPM router.
But yeah, that put an end to my productivity today.

PSA for the day:
ALWAYS TIGHTEN YOUR COLLET and DOUBLE CHECK IT.
DON'T put your hands anywhere near the path of a tool like this, even if there is little to no chance it could poke through the other side.
WEAR GLOVES IF YOU CAN.

Tomorrow, I guess I start a new neck blank for Cleo.
 
Today started off GREAT!

Neck pocket on #2:
View attachment 7150141

View attachment 7150142

More sanding and grinding:


View attachment 7150144
View attachment 7150145

And I even managed to make the neck for this almost half way to being a neck!

View attachment 7150146

Got the purpleheart and TOW supports all glued in:
View attachment 7150147

That meant it was time to make the Cleo neck do something similar.
I don't have a template to make this one, so it was being measured, marked, and cut accordingly.
Got all the way to cutting the truss channel...

As I was milling it, things started resisting me a bit, which I attributed to the dust maybe clogging things along the table.
Unfortunately, that wasn't the case.
The bit was climbing out of the collet. Even though I SWEAR it was in there nice and tight, it was creeping upward.
The only indication I got of it came when it started touching my finger.
View attachment 7150150

It's always REALLY freaky when a router bit makes contact with a body part. Fortunately, my reflexes are quick and the tip of this isn't razor sharp. So I managed to make it out with only a slight boo boo:

View attachment 7150151

I've honestly done more serious damage to myself with less dangerous items than a 30,000 RPM router.
But yeah, that put an end to my productivity today.

PSA for the day:
ALWAYS TIGHTEN YOUR COLLET and DOUBLE CHECK IT.
DON'T put your hands anywhere near the path of a tool like this, even if there is little to no chance it could poke through the other side.
WEAR GLOVES IF YOU CAN.

Tomorrow, I guess I start a new neck blank for Cleo.
Sorry about the injury and the neck. Glad it wasn’t more serious.

And, you’ve made quick progress. Tomorrow is another day!
 
  • Like
Reactions: joover
Past couple of days were spotty for work, at best. Finger is healing fine, so that's good. It was just life's interruptions. So here's the quick photo journey:

Granadillo for the FB -
IMG_9944.jpg


Slotted -

IMG_9945.jpg


Heel area cut for the truss wheel -

IMG_9946.jpg


Prepped for glue up (epoxy up?) -

IMG_9950.jpg


... and clamped for curing -

IMG_9952.jpg


That's where it stands as of last night. Bridge showed up in the mail, need to find where I stashed the pickup, but this should be starting to materialize in the next couple days, as I'll basically be snowed/iced in.
 
Looking more like a bass every day!

View attachment 7152678

Kinda debating on pickup placement though. I'd initially wanted to go with the P pickup spot, but that moves it aesthetically to a place I don't like as much as the MM pickup spot.

View attachment 7152679

View attachment 7152680

I guess I'll think more on it as I radius the board.
If it was a 4 string bass, I would put the pickup at the precision bass location to get that bass oomph but as it is a 5 string, the location nearer to the bridge makes sense to me because you will have plenty of low notes anyway and you may want some clarity to avoid that boomy and generic sound.
 
  • Like
Reactions: JFlo and rojo412