• TalkBass has been independent since 1998. Add your voice.
    Create a free account to reply to discussions, view embedded media, and browse with fewer display ads.
    Join freeLog in
    Want zero display ads or expanded classifieds tools? Compare plans.

Winter Build Off 2026 - Simplify and add Lightness (sub-short scale headless)

Phreaky Phriday

Supporting Member
Apr 30, 2022
541
1,093
This is in line with the racing mentality of this year's build.

This one will have a single pickup, only 2 knobs, 28.6" scale, and will almost certainly end up sub-6 lbs. Colin Chapman would hopefully be proud

I used the CAD (cardboard aided design) approach:
  1. sketch out where bridge and electronics go on some posterboard
  2. draw a shape
  3. cut it out and confirm it fits my seated playing position well - iterate/modify until satisfied
  4. make template in MDF
Design considerations on the body
  • it's very easy to make a mdf template with straight lines using a router and a straight flat piece of wood, use straight lines
  • the base of the body is pretty wide to ensure balance is still good after routing out control cavity and behind the bridge (to use tuners without fingers hitting the body wood)
  • minimize wood closer to the neck side, especially on the lower horn (why do lower horns exist?) - weight savings with minimal tradeoffs for balance since this is close to center of gravity


Spec list:
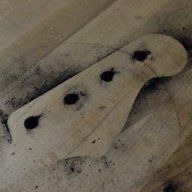
  • 28.6" warmoth maple/rosewood baritone guitar neck (43mm nut)
    • I drilled out the tuner holes to my nearest dowel size and plugged them. will fill in the tear-out
    • have not decided on the shape of headstock nub yet - but it will be compact
  • black limba veneer - for the headstock, to match body
  • headstock string retainer from nova
  • graphtech nut
  • black limba body wood, will plane down to ~38mm thickness using router sled to keep weight down. 3 lbs total body weight should get me below 6 lbs overall
  • dunlop straplocks - recessed at body base and dual-design for upper horn (improve balance on strap a bit)
  • EMG DC pickup, planning to position roughly where a musicman's bridge coil is located (love the tone of this pickup location on 30" scale basses, hopefully is good for 28.6")
  • underhill single filter preamp with treble boost push/pull on volume
  • random piece of rosewood for control cavity cover
  • (not pictured) - will probably add a rosewood thumb rest at some point between pickup and neck
  • nova headless bridge

This should be a pretty quick one, hopefully will start making sawdust later this week. If i'm happy, i will probably use the body template for an upcoming bass6 build.


Potential future changes to plan after initial assembly and playtest:
  • if I feel the need for more control of low end, I'll get a bass EQ module from underhill and add it to current preamp setup (very modular, literally plug and play)
  • if balance is body-heavy ('m guessing it will be), i get to cut off most of where the forearm goes. the weight savings would be welcome, and forearm contours are kinda dumb - better to just not have wood in the way of your forearm
  • i always mess something up, there will be stuff to fix

Plan for the finish:
  • body: dark grain filler, and I will test shellac on cutoffs - have had great luck in the past with tru oil and black limba but shellac is much easier and faster
  • neck: headstock gets whatever the body gets. back of neck will get tru oil and wax

PXL_20260105_144042504.jpg
PXL_20260105_143612146.jpg
 
I used the CAD (cardboard aided design) approach
About 25 years ago I worked under a shop foreman we referred to as Captain Cardboard. In his case it wasn’t meant to be complimentary. He would design machinery by cutting out cardboard pieces and laying them out on a workbench. The problem was this was fairly complex machinery and his engineering prowess was nonexistent. His machines almost never worked.

In your case, though, CAD makes perfect sense. …and it made me laugh!
 
About 25 years ago I worked under a shop foreman we referred to as Captain Cardboard. In his case it wasn’t meant to be complimentary. He would design machinery by cutting out cardboard pieces and laying them out on a workbench. The problem was this was fairly complex machinery and his engineering prowess was nonexistent. His machines almost never worked.

In your case, though, CAD makes perfect sense. …and it made me laugh!
I have ...4 quarters of engineering school from 20 years ago, close to non-existent lol. Thats a bizarre way to lay out machinery!
 
Step 1: cut out body shape

I put the template on the body blank, draw the outline, and roughly cut out with a jig saw. I then use the blue tape & CA glue trick to attach the template and use the router to finish edges.

PXL_20260108_182127158.jpg

Mistake 1- Bad jigsaw technique. I try to cut slightly outside the line, but the angle of the jigsaw was off and i was cutting off significant chunks of the wood that should be part of the body. I caught the mistake in time and was able to shift my template to a different part of the body blank, but this means the knot in body blank is now part of forearm contour area. We can observe below where my original black marker line is and the knotty bit that i wanted to avoid. Not a big deal, should still look great in the end (but who cares what a race car looks like?)

mistake 1.png

Step 2: plane down body blank from 45mm to 38mm (thinner basses weigh less and are more ergonomic to play, strings closer to human body)

I use a router sled for this - always take material off the back because flex in the metal rods means this is not a great way to get a flat surface - and the front needs to be very flat if we want neck pocket to work as intended.

Mistake 2 - (not pictured) - on my final pass to get to ~38mm, one of the rods slipped out and the router sled fell on the body. I routed down material until the entire body was uniform and ended up with ~32mm thickness

potential issues from mistake 2:
  • pickup route depth - this was not an issue, plenty of thickness for the EMG, but smart to think of all potential issues
  • battery box route depth - not an issue, only need 28mm depth for my box (moot point, i ended up putting batter in control cavity)
  • control cavity depth vs. the back of the preamp's pots. I measured these at about 25mm - very tight fit if we want about 5mm of wood for the control cavity and also want to recess the cover
  • neck pocket depth & neck attachment screws - I did the math, there is a good chance the screws would poke out of fingerboard when i use recessed ferrules.
potential solutions for mistake 2:
  • glue on a maple top that is sitting in my wood pile
    • positive: gets thickness correct, probably will look good
    • negative: i wanted to look at black limba, not maple
  • scrap the body and start over with a different piece of wood
I decided to accept the thickness and won't recess neck mounting hardware and control cavity cover. This seems like the right call in retrospect as these are not bothering me much in play testing. I didn't investigate recessing neck mounting hardware with shorter screws because there is already a control cavity cover sticking up

We'll see the big upside of this mistake when we weigh the bass :)

PXL_20260108_194053359.jpg
 
Step 3: route neck pocket

(not pictured) - I place the neck roughly where the pocket goes on the body and run a laser level down the center. I place the bridge where it roughly belongs based on scale length. I move both until i am satisfied and trace the outline of the fine neck location in pencil on the body. I then use the blue tape & CA glue trick to put the template (3D printed by a friend) where it belongs

PXL_20260109_185914582.jpg

Step 4: mount neck

my neck came with mounting holes, which is probably handy if you are trying to attach it to an existing body, but not very helpful if you are making a body from scratch. Easy solution is to photocopy the back of the neck, cut this out, and put it in your routed neck pocket. this gives us the exact place where we want neck screws. I drill these by hand - no need for a drill press to get straight enough holes when you are only going through about 20mm of wood

PXL_20260109_203856451.jpg
 

Attachments

  • PXL_20260109_210744293.jpg
    PXL_20260109_210744293.jpg
    981.9 KB · Views: 22
Step 5: locate bridge and pickups

After mounting the neck, now it is time to figure out where the bridge and pick up. I cover the body in blue tape and use a laser level based on fret markets of neck to get an actual centerline. I mark off scale length and pickup position (hard to see in image below), place the bridge according to scale length (G string should be at scale length to start), and mark off where the screws for bridge should be.

doing this after mounting the neck minimizes the risk of compounded errors causing misalignment, but it is more work than laying everything out at the start. If i was a fancy person with a CNC, my production method would be VERY different

PXL_20260109_210744293.jpg

Step 6: drill for bridge attachment screws and route pickup cavity

I use a Drillmate sort-of-drill-press and a forstner bit to hog out most of the wood before routing pickup. The 4 random looking big holes where bridge goes is where set screws for attaching individual string barrels to the bridge plate stick out the bottom

I decided at this stage to not recess the bridge. my calculations ad measurements suggested I needed to recess by a few mm to get action low enough, but these are not the most scientific measurements and if we are lucky, i was wrong and no not need to recess bridge (in retrospect, i do need to recess, but i have a better idea now of how much recess is needed, so it was smart to wait on this one)

PXL_20260110_175651333.jpg

Step 7: control cavity

One positive of the body-is-too-thin issue is that we don't need to recess the control cavity. This means we can just send it with making the control cavity and don't need to plan out anything or make templates for a cavity, lip, and cover :)

I sketched out a control cavity about 3/4ths of an inch away from edge of body, then hogged out most with the Drillmate and forstner bit. I used some blue tape, CA glue, and wood cutoffs to make a router template.

PXL_20260110_184506341.jpgPXL_20260110_190257683.jpg
 
Step 8: Assemble

Neck - I decided against using a black limba veneer on the headstock nub because I could not figure out a way to clamp the curved section. I am now planning on spray painting it black to hide the filler

Neck - of course the mounting screws that came with the Nova kit for the heackstock locker were too long for the heackstock. easy fix with some #4 x 5/8ths inch screws from home depot

Body - I used a chisel to square off the pickup cavity because the pickup didn't quite fit the corners of the route

Body - forgot to mention in previous post, but i routed a truss rod access channel

Electronics - I ran the EMG volume and tone for initial testing to confirm the pickup works before installing the underhill preamp. I needed to cut the dupont connector ends off of EMG pickup connect cable for the underhill screw terminals and needed to confirm i was not returning it first. We can see that everything fits nicely as expected with the battery. I intentionally left space for another pot in case i decide the preamp needs a bass frequency control at any point in the future

Note on electronics - most of the time, my pots and jack don't end up in a very straight line. this time I drilled the first and last one in the line, then measured the middle and drilled there for the middle pot - came out much better than usual!

PXL_20260112_181532241.jpg
Waygo connecter below, great for initial tests!
PXL_20260112_195431249.jpg
PXL_20260112_200114329.jpg

Step 9: Initial setup and impressions

As we can see in the scale above, this is a very light bass at 4.9 lbs. I would bet that we will have a net weight loss of 0.1-0.2 lbs in the end (roundover route and body contours vs. weight of finish, knobs, control cavity cover, etc.)

The balance is great, no neck dive at all seated or on strap

I performed initial setup - it intonated perfectly (nice work not screwing up bridge location) with a weird saddle position for the G string. I fixed the nut to get 30-40mm action at 1st fret. Action is limited to 2-2.5mm at 12th fret and I will need to recess the bridge to get the target 1.5mm. Truss rod works as intended and relief is good

This bass plays very well with high action and sounds great - Can't wait for this one to be finished!

Step 10: stuff to fix/finish
  • recess bridge 4mm - This should let me set action 1.5mm lower at 12th fret (thinking about triangles and action at 1sat fret)
  • roundover route - I always do this late in the process, this will also help with access to the tuners
  • put on black strap buttons - I had some chrome ones lying around for play testing but do not fit color scheme
  • add a thumbrest between pickup and neck - either a cheap rosewood one from amazon or i will design something in CAD and ask a friend with a 3D printer for a favor
  • actually make a control cavity cover out of pickguard material (currently it is blue painter's tape)
  • finish (ebony grain filler, lots of sanding, and either shellac if it looks good on my test piece or tru oil like my previous black limba bodies)
I'm planning on making some sawdust this week and hopefully will be testing finish by the weekend
 
Electronics - I ran the EMG volume and tone for initial testing to confirm the pickup works before installing the underhill preamp. I needed to cut the dupont connector ends off of EMG pickup connect cable for the underhill screw terminals and needed to confirm i was not returning it first. We can see that everything fits nicely as expected with the battery. I intentionally left space for another pot in case i decide the preamp needs a bass frequency control at any point in the future
The Underhill screw terminal blocks are actually the same spacing as DuPont connectors, so you can clamp them in directly. It might require moving the pins around in the dupont strip. I often solder pickup leads to a dupont header for my test basses, because I'm constantly swapping out preamps and it's more durable than a tinned wire.
 
  • Like
Reactions: T_Bone_TL
The Underhill screw terminal blocks are actually the same spacing as DuPont connectors, so you can clamp them in directly. It might require moving the pins around in the dupont strip. I often solder pickup leads to a dupont header for my test basses, because I'm constantly swapping out preamps and it's more durable than a tinned wire.
I'll keep this in mind for the future, already took the wire clippers to mine :)
 
Step 10: add comfort contours to the body before sanding/finishing

First step was recessing the bridge by a 4mm. Fun mistake - after putting it back together, i realized i only needed to recess 1-2mm and will add a 3mm thick block of wood under the bridge (edit: please be warned that the adjustment set screws on the bridge do not have a long range of travel. be sure you are measuring and calculating with precision). While here, I routed out the area behind the bridge and carved in an angle with the shinto rasp for more tuner clearance

PXL_20260116_160312815.jpgPXL_20260116_163507895.jpgPXL_20260116_163512340.jpg

(not pictured) before carving contours, i played this sucker a lot and marked with a pen what wood needed to be removed. I removed wood using a pull saw and shinto rasp, will clean everything up in the end

back of upper horn, which hits my chest:
PXL_20260116_163909631.jpgPXL_20260116_164144098.jpgPXL_20260116_165232535.jpg


Also the lower horn area that rests on my thigh and near neck pocket between lower horn nub and neck for comfort of fretting hand on high notes (this is kinda silly as i rarely play above the 12th fret)
PXL_20260116_181838571.jpg


We are at 4.8 lbs on the nose now

remaining steps:
  • finish headstock with black spray paint
  • finish back of neck with sandpaper and tru oil
  • level/crown/polish the frets
  • make the 3mm shim for bridge
  • sand and grain fill body itself and cutoff of body blank
  • test shellac on the cutoff, finish with shellac or tru oil based on result
  • cut control cavity cover from pickguard material

It is ~40 degrees in my garage with the current weather, no idea when i will get back to the body but i can work on the neck in the meantime :)
 
Last edited:
I know you've done it already, but a shim in the neck pocket is easier than recessing the bridge.
Given i only need 0.5 to 1 mm if i had shimmed the neck pocket, that would have been a much much smarter idea! I recessed the bridge on all 3 of my headless 6string guitars, so this was more of a standard procedure vs. actually thinking through the engineering on my end lol