• TalkBass has been independent since 1998. Add your voice.
    Create a free account to reply to discussions, view embedded media, and browse with fewer display ads.
    Join freeLog in
    Want zero display ads or expanded classifieds tools? Compare plans.

Wishbass Club pt. 2

Status
Not open for further replies.
Hey Guys Ive been waitin a little more than five months for my custom wishbass. Is this normal?
SG-Jazz; If you go back a few pages there are some posts about build time experiences in case you are interested. Five months seems extreme to me. My custom order only took about 9 weeks. Are you having it fretted? That could delay it since Wish doesn't do his own fret work. I'd be going crazy I think - looks like it's keeping you up too! ...
 
Come on, I know you have some updates, reveal that sexy scroll! I'm gonna name her finally, Sheryl Crow because selling her was my favorite mistake!

Yes, I took some pics yesterday at work, and while player her during lunch, I realized I had wired up the Tonestyler incorrectly. So I rewired her before I went home, and when I got home, I spent my available time, (about an hour) PLAYING her. Oops, no time to post pics.

Maybe tonight I can tear myself away from bass guitars and spend a few minutes posting............. :-)

JBY
 
Hey SG-Jazz.

I've been waiting 9 weeks for mine. The last time that I walked to Wish (probably about 6 weeks ago) he was waiting for more orders to come in before he ordered the wood for the instruments. F*ck, I hope that mine doesn't take 5 months. . . .
 
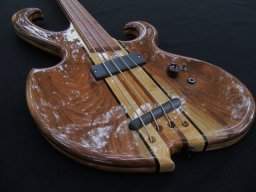
A close examination would reveal that this beauty holds dear to the Wishbass ethos. It's not too smooth, or too refined. The strings now have a free path from the nut to the tuners.

5c2f4d59.jpg


The EMG select has been replaced with a Bartolini deep bass hum canceling jazz pu, and I added a Tonestyler passive Low pass filter. The output jack has been moved to the side. All the usual sanding and filing and about 10 coats of Tung oil. The neck has been significantly smoothed out. I put D'addario rounds on her, and I decided to hold off on installing the fixed bridge. I really liked the action of the corian that came with it, but I wanted more precise intonation adjustment, so I cut the corian to make each string a separate little bridge.

d26929ec.jpg


566dc645.jpg


caa3acce.jpg


5899f9b3.jpg


dee19534.jpg


The knobs in these photos are already gone, replaced with two black speed knobs. I will be posting a youtube review in a couple of days. Suffice to say that it has a very high playability quotient. The Bart has loads more character than the emg select, and the Tonestyler is, well, interesting. It is meant to be a more useful replacement for a standard passive tone rolloff. Considering that in 33 years of playing my Jazz bass, I never touched the tone knob, leaving it always open, because I never liked the sound of any rolloff, the Tonestyler is definitely a move in the right direction. It has 2 kinds of bypass, and 14 different low pass filter frequencies. Right away there are about 6 or 7 I can see myself calling upon, but I suspect the Tonestyler won't show it's true colors until I test it in a band setting. As it allows more mids to pass than a traditional tone pot, I expect it to cut through better in various states of high frequency attenuation.

At some point I want to put a veneer over the cover plate, and I may decide to go with a fixed bridge afterall, but for now I like the sound and feel of the corian. I hope 866 is happy here, cause she's here for the long haul.........

James
 
James; Wow!!! ... Man, it was worth the wait to see this baby! I love the look of the thing of course, but your improvements sound awesome as well - especially the split corian bridge concept. I think I have to check that out for myself. I can go to sleep now, thanks!

Well Rollerberg, what say ye?
 
James; Wow!!! ... Man, it was worth the wait to see this baby! I love the look of the thing of course, but your improvements sound awesome as well - especially the split corian bridge concept. I think I have to check that out for myself. I can go to sleep now, thanks!

Well Rollerberg, what say ye?

O....M.....G!!!! This is a fine example of why I'm a collector and not a seller, I always regret parting with one!

James, she belongs with you, the darn thing just GLOWS now! A lot of people told me at church whenever I brought it out that it was their favorite bass, boy if they could see it now. It really has a mesmerizing top don't you think? If I remember correctly, this Ambrosia Maple was one of the first (and best IMO) that Wish harvested himself and made a short run with.

Well done James, looking very forward to hearing/seeing your YouTube clips!
 
James; A question ... How did you create that neet black background in your photos? That really is classy looking - almost like we are looking at fine jewelry or the like. Very kool ...
That background is a black fabric wall at my work. It is a dubbing stage, so the walls are fabric with insulation behind them.

The photos, as taken originally, showed the texture of the fabric, and some reflection of the light, but some tweaking in iPhoto and I could get the texture and small amount of reflection to disappear. The fabric you can see clearly behind the headstock shot, is the same fabric behind all the photos. The floor is a light grey so I put a throw rug under the bass.

I read a thread somewhere on TB about photo tips, and a photographer recommended buying a big swatch of black velvet fabric to lay your instruments on. He also recommended lots of diffuse light, no flash, and a tripod. I followed all his advice, though I didn't have quite enough light, so some of my shots have a flash. The ones with less red are the flash shots.
 
especially the split corian bridge concept. I think I have to check that out for myself.

Again, not my idea, but a good one I agree. I think I first saw the hacked up corian bridge on an ebay listing. And then again somewhere else.

With fretless, the precise intonation is always achieved with your fingers, so you only need to get the bridge really close to perfect. But frets require that each string have individual precision. This is a way to get that precision, but still retain the Wish philosophy of no metal. (or in this case, with a zero fret, less metal :-)
 
Interesting to see from your photo that the bridge to string points are all in a line - or at least seem to be in the photo - i.e. (and for what it is worth!) did you really need to cut the bridge for this particular string gauge set-up?
 
James: What tool did you use to cut the corian?

Also, Thunderitter - what type of glue did you use when you glued the wood veneer to the aluminum control cavity cover on your Fantasy - a contact cement? (I just bid on a bunch of smaller pieces of miscellaneous veneers so I can start covering some of my cover plates, so I am curious.)

Thanx ...
 
Also, Thunderitter - what type of glue did you use when you glued the wood veneer to the aluminum control cavity cover on your Fantasy - a contact cement? (I just bid on a bunch of smaller pieces of miscellaneous veneers so I can start covering some of my cover plates, so I am curious.)

Thanx ...

I made the cover as a stand-alone. It is affixed to the body using screws.

I wouldn't have thought glueing pieces of veneer to the aluminum is a good idea at all.
 
Interesting to see from your photo that the bridge to string points are all in a line - or at least seem to be in the photo - i.e. (and for what it is worth!) did you really need to cut the bridge for this particular string gauge set-up?
If I understand your question, do you mean, after adjusting the individual bridge pieces, are the in the same place as if I had just angled the one piece bridge? Not exactly, angling the one piece bridge would have gotten the intonation about 95% there. The A and the D would have been off just a little. Which would have driven me CRAZY.
 
James: What tool did you use to cut the corian?

Also, Thunderitter - what type of glue did you use when you glued the wood veneer to the aluminum control cavity cover on your Fantasy - a contact cement? (I just bid on a bunch of smaller pieces of miscellaneous veneers so I can start covering some of my cover plates, so I am curious.)

Thanx ...

A mitre box and a saw.

I have used Gorilla glue. It's strong!
 
I made the cover as a stand-alone. It is affixed to the body using screws.

I wouldn't have thought glueing pieces of veneer to the aluminum is a good idea at all.
Thunderitter; Someone on this forum (probably Part 1) did just that and that's where I got the idea. I just thought it was you. I think the point of veneering the aluminum cover is the strength you retain. I didn't realize you didn't do that - that's great. I'll check it out when the veneer sampler pack arrives! Thanks.
 
Thunderitter; Someone on this forum (probably Part 1) did just that and that's where I got the idea. I just thought it was you. I think the point of veneering the aluminum cover is the strength you retain. I didn't realize you didn't do that - that's great. I'll check it out when the veneer sampler pack arrives! Thanks.

I used a maple piece cut for a headplate. It's in a place that doesn't have any stress so there was no need for reinforcement. IMHO mounting on to the aluminum would have created too thick a cover that would have been ugly. I suppose you could rout an inset for the original plate to mount into but that would be over kill and you'd need to start with a thicker piece of wood - defeating the aim of keeping things slim!

I was able to shape the edges of the cover down so that I only had a very slight edge and not a big step.
 
Status
Not open for further replies.