• TalkBass has been independent since 1998. Add your voice.
    Create a free account to reply to discussions, view embedded media, and browse with fewer display ads.
    Join freeLog in
    Want zero display ads or expanded classifieds tools? Compare plans.

Yet Another P-Bass Build

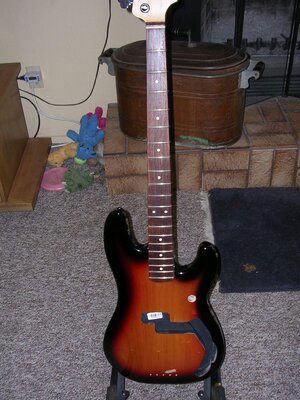
Being that I have a US Fender Highway One neck, an old Fender bass case, and a set of bass strings lying around, I thought I should assemble the parts and replace the 1966 P-Bass that I just sold. I put a sunburst Mexican Fender P-Bass body on hold at Musicians F. and have a wishlist set up with the parts that I need. I will try to use Fender Parts whenever possible, but the idea is to keep the budget under $400. I will get a pickguard, wiring kit, and a few assorted screws, etc from StewMac, but everything else from Musicians Fr. I plan on trying to assemble the parts, including soldering the wiring kit and pickups myself. I will try to do the initial setup, but don't mind paying somebody to do it if I have trouble. I'm not sure about using shielding or buying the pickguard backplate, but would welcome any advice. I will probably just use the bass for playing around home, or a rare jam with friends, no gigs. My amp is an Ashdown Perfect Ten practice amp. Here is a list of parts, but if you know of a better place to shop, or have any good advice, I'm all ears. Thanks in advance!
1. Pure Vintage Bridge
2. Pure Vintage Strap Buttons
3. Original 62 Pick Up
4. Pick Guard
5. Standard Bass Neck Plate
6. Bridge Cover (optional)
7. Pick Up Cover (optional)
8. Thumb Rest
9. Knobs (already have)
10.Body 169.99
11. Screws for pickguard
12. Sponge for pickup adjustment
12. Sheilding (optional)
12. Wiring harness or kit from StewMac
 
The Stratosphere web site is so poorly designed, it is difficult to find the loaded pbass bodies. The search feature is virtually useless as it pulls up tons of pickguards for everything but a pbass. Plus, are they using the cheapest level of parts, like the Fender Squire, or the Mexican or American series. I would rather pay a little more and get exactly what I want.
Does anybody have any experience with Golden Age pickups as sold by StewMac? They're having a nice sale.
 
  • Like
Reactions: 928cat
Everything finally arrived; sunburst Mexican body and bridge from Fender; strap locks, thumb rest, pickguard and screws, and neckplate, all US made, also from Fender. The pickup and wiring kit are from StewMac. I haven't soldered much, but have watched a lot of YouTube videos lately. The real worry spot is drilling the 13 pickguard holes. I looked up info on Talkbass, and it doesn't sound that difficult, but the body is so nice, I don't want to screw up. The US made Highway one neck seems to be pretty snug. I tried to drop it in, but it certainly wouldn't go in easily, if at all. I'll try a little wax. Any other suggestions?
P.S. I realize I might be in the wrong forum as I'm not really making anything, so if any moderators would like to move me to an appropriate forum, I'm good with that.
 
  • Like
Reactions: Pbassmanca
If the neck too snug, do not force it you could crack the neck pocket. If it's really humid try again a few days later when it is dryer. If you have to sand, I have found it easier to sand the neck heel than the pocket. Use some sandpaper glued to a block to keep things flat and true. Also rub a little pencil graphite onto the edge of the pocket. When you begin to ease the neck in, it will transfer to the high spots that are hanging you up and show you where to sand. Just go slow and steady taking a little bit from each side and dont rush or force it. You should be fine.
Save thic pickguard for last, get the neck mounted and strung up over the unscrewed pickguard. Adjust the pickguard position so that the pole pieces and strings are positioned as good as possible.
 
Last edited:
If the neck too snug, do not force it you could crack the neck pocket. If it's really humid try again a few days later when it is dryer. If you have to sand, I have found it easier to sand the neck heel than the pocket. Use some sandpaper glued to a block to keep things flat and true. Also rub a little pencil graphite onto the edge of the pocket. When you begin to ease the neck in, i will transfer to the high spots that are hanging you up and show you where to sand. Just go slow and steady taking a little bit from each side and dont rush or force it. You should be fine.
Save thic pickgaurd for last, get the neck mounted and strung up over the unscrewed pickguard. Adjust the pickguard position so that the pole pieces and strings are positioned as good as possible.


Thanks for the great advice.
 
Day one: Fender USA Highway One Neck installed after careful neck pocket sanding, oiled neck as it had been stored for years. Hope to do some soldering this weekend. DSCN4591.JPG
 

Attachments

  • DSCN4592.JPG
    DSCN4592.JPG
    318.4 KB · Views: 64
  • DSCN4593.JPG
    DSCN4593.JPG
    196.4 KB · Views: 76
  • DSCN4594.JPG
    DSCN4594.JPG
    274.6 KB · Views: 69
  • DSCN4595.JPG
    DSCN4595.JPG
    305.5 KB · Views: 65
Day Two: Installed some easy stuff; bridge with ground wire, strap locks and strings to check bridge alignment. I was hoping to install the pickups and start soldering the pots and input jack to the pickguard, but soon realized how all of that has to align perfectly. Plus, I didn't realize I have to drill holes for the pickups, and one could easily go through the back. I may do a little "eyeball" string intonation work tonight, just so I can practice a little. Tomorrow, I hope to start soldering, practice with the drill, and perhaps get some assembly started.
DSCN4596.JPGDSCN4598.JPG
 
Unexpected delay... StewMac shipped 6mm pots in my wiring kit. I was expecting the advertised 1/4", as I already have a set of knobs. StewMac decided to ship a new wiring kit even though I said I would buy knobs if they shipped them for free. I will start soldering this weekend, and perhaps have everything assembled by Sunday. BTW, I have a wiring kit for a P bass available if anybody needs one. Make an offer, includes shipping (6mm pots).
 
Did my soldering yesterday (Sunday). Turned out all right, as far as I know. I'll do a sound check shortly. Today might be the big day when I drill holes for the pickguard, pickups and possibly the thumb rest. Quick question, the foam pads that came with my pickups have adhesive tape on one side. I assume the adhesive goes on the wood in the pickup cavity, and not on the bottom of the pickup. Anybody know? What order would most people drill the holes, pickup then pickguard, pickguard then pickups, or a couple of pickguard holes to tack it down, then install the pickups?
 
After all of my apprehension about drilling pickguard and (especially), pickup holes, it went pretty well. Rather than using blue tape on the drill bit, I used a grommet from a tennis racquet to prevent drilling too deep. It worked quite well. The pickguard fit snugly around the neck and there was a little play (1/16") at the jack end. By the time I put all of the wiring in the cavity, and the pickups and foam in position, there wasn't a lot of play at all. I marked the pickup screw holes with a tennis awl (I string racquets) and used a pickup cover as a template to get the holes started. I was amazed when I plugged it in my amp and there was sound, a rather good sound with my Ashdown Perfect 10. I used a Golden Age P Bass pickup from StewMac. A big shout of thanks to StewMac for over nighting the knobs which I probably mis-identified as 6mm, and turned out to be 1/4". I made a couple of quick adjustments for string spacing, height and pickup height and it plays pretty well. Next and final step will be attempting a set up.DSCN4599.JPG DSCN4600.JPG
 

Attachments

  • DSCN4602.JPG
    DSCN4602.JPG
    270.9 KB · Views: 77
  • DSCN4604.JPG
    DSCN4604.JPG
    489.8 KB · Views: 61