• TalkBass has been independent since 1998. Add your voice.
    Create a free account to reply to discussions, view embedded media, and browse with fewer display ads.
    Join freeLog in
    Want zero display ads or expanded classifieds tools? Compare plans.

197X Fender Musicmaster "restoration"

Okay. I would definitely not try to clamp it shut. The "proper, restoration way" to fix it is to rip the top apart, square the faces, and reglue, but you're not going to do that. I think the crack is perfectly in keeping with the "look" of the bass, and I'd leave it right where it is while using a syringe or fine applicator tip to get some superglue right where the junction of the crack is. That'll prevent it from spreading further.

You could use epoxy instead of superglue, and I might if I could figure out a way to get it far enough into the crack. Even yellow glue would work, with the same caveat.

You could reinforce it across the surface with splines or butterflies, but that would look very... steampunk. Not sure whether that's what you're going for. But butterflies are the way that kind of crack is "supposed to be repaired," FWIW, in a woodwoking/furniture/cabinet context.
That all makes sense. Thanks for the info. I think I'll invert the bass and get some liquid super glue down in there. If it worsens in the future, I'll consider more drastic actions. But yes, the crack is totally in keeping with the current aesthetic! I'll clearly need a long beard to play this out.
 
Neck and pocket pics. My luthier friend commented on how thin the fretboard is. Is this a '79? See possible date stamp on body.
C979E1CD-2ECA-45C5-ACE4-CC12BE2B929D.jpeg

CA006907-59FB-4F42-AE8D-D37DC687A788.jpeg

CFAFC7DE-D8E6-4117-A05A-74E3626E2859.jpeg
 
  • Like
Reactions: mikewalker
Great bass. Nice project.

FWIW, it's a later 70s model.

I have an Oly White 1976 white guard model, which has been one of my main basses for a long time. Its finish is clear coated nitro over conversion varnish sealer ("Fullerplast"). Some colors were lacquer and some were urethane. IME, the white ones and blue ones were lacquer for sure…and sometimes the black and solid red too. Trans red, Always urethane, IME.

I would go for original Oly White…but no clear coat.
Pic or it didn't happen.
 
Okay. I would definitely not try to clamp it shut. The "proper, restoration way" to fix it is to rip the top apart, square the faces, and reglue, but you're not going to do that. I think the crack is perfectly in keeping with the "look" of the bass, and I'd leave it right where it is while using a syringe or fine applicator tip to get some superglue right where the junction of the crack is. That'll prevent it from spreading further.

You could use epoxy instead of superglue, and I might if I could figure out a way to get it far enough into the crack. Even yellow glue would work, with the same caveat.

You could reinforce it across the surface with splines or butterflies, but that would look very... steampunk. Not sure whether that's what you're going for. But butterflies are the way that kind of crack is "supposed to be repaired," FWIW, in a woodwoking/furniture/cabinet context.
For years i referred to Stew Mac videos but i would ask some luthiers here @ TB as suggested.

Im guessing Superglue is the way to go here as far as just wicking in glue as it really soaks into the grain....i would pass on epoxy or wood glue...wood glue likes to be clamped with even surfaces, which i would not do either.

Ive filled cracks (where the wood is warped) like this on old chairs many times by simply wicking in Superglue.

As for a clear, i use Tru Oil anymore...very easy to work with and as long as the finish is clean and sanded, ive never had an issue with it not adhering...even over old paint or previous finish! Fender did not use Nitro in the 70's as we know, at least not on the bodies....the 72 MM i did had a really decent neck with little fret wear.
 
  • Like
Reactions: GroovyBaby
Neck and pocket pics. My luthier friend commented on how thin the fretboard is. Is this a '79? See possible date stamp on body.
View attachment 4113033
View attachment 4113031
View attachment 4113030

The fretboard looks correct, with the veneer fingerboard... Both of my '78s are about the same. Also be aware if you replace the nut, it is also curved and does not have a flat bottom...

More thoughts on the finish... this era Fender had that super thick clear coating, (almost like they were dipped!!), and this is one of the areas where the finish was pretty vulnerable. Top coats did not adhere very well, and the clear coat did not flex at all with the wood. Temperature changes would wreak havoc with checking and you'd see exactly what you're seeing with this finish. It was more prevalent with black-finished Fenders, as well as the first run of 25th Anniversary Silver Strats... (DO NOT REFIN AN ANNIVERSARY STRAT WITH THIS CHECKING AS THEY ARE RARE )... Didn't happen to ALL of them, (I currently have a black '78 with no finish issues at all), but they're out there.

My first '78 Musicmaster that I had bought new in '79 did the milky-checking thing one morning after the sun shone through the window on it in a cold room... at first, it just looked like little spider webs in the black, after a month, they started to get milky along the lines, then a month or two after that, chunks of top coat start falling off!! I had much more energy back on those days and SANDED it to bare wood... Added some stain, called it good, and it stayed ugly as sin until it was stolen several years later...

I thought your clear-coat was through to the wood in several places when I originally suggested heating and stripping. If that isn't the case, smoothing the clear coat makes it a great base for an easy rattle-can finish. A few years back, I restored this beat up '78 Musicmaster for a friend (it's now mine) and it had some checking, a weird, melting top coat, and numerous big dings on both body and neck... I went the same route as you, except that I fully stripped the top coat. The clear coat was badly checked, but intact, (except where the divots were)... I filled the voids with several thin layers is super glue, building up to the clear coat thickness, the sanded the whole thing evenly. It took the rattle-can white very nicely and is still looking good today!

As always, when I read back on the linked thread, I wish I had taken more "before" shots, because it truly was in sad shape!! It's gone through a few more mods in the past two months, and is on the bench for the final touches...

I'm kind of envious of your new project, because it looks to be a lot of fun!! Take A LOT OF PICTURES!!

-robert
 
Last edited:
The fretboard looks correct, with the veneer fingerboard... Both of my '78s are about the same. Also be aware if you replace the nut, it is also curved and does not have a flat bottom...

More thoughts on the finish... this era Fender had that super thick clear coating, (almost like they were dipped!!), and this is one of the areas where the finish was pretty vulnerable. Top coats did not adhere very well, and the clear coat did not flex at all with the wood. Temperature changes would wreak havoc with checking and you'd see exactly what you're seeing with this finish. It was more prevalent with black-finished Fenders, as well as the first run of 25th Anniversary Silver Strats... (DO NOT REFIN AN ANNIVERSARY STRAT WITH THIS CHECKING AS THEY ARE RARE )... Didn't happen to ALL of them, (I currently have a black '78 with no finish issues at all), but they're out there.

My first '78 Musicmaster that I had bought new in '79 did the milky-checking thing one morning after the sun shone through the window on it in a cold room... at first, it just looked like little spider webs in the black, after a month, they started to get milky along the lines, then a month or two after that, chunks of top coat start falling off!! I had much more energy back on those days and SANDED it to bare wood... Added some stain, called it good, and it stayed ugly as sin until it was stolen several years later...

I thought your clear-coat was through to the wood in several places when I originally suggested heating and stripping. If that isn't the case, smoothing the clear coat makes it a great base for an easy rattle-can finish. A few years back, I restored this beat up '78 Musicmaster for a friend (it's now mine) and it had some checking, a weird, melting top coat, and numerous big dings on both body and neck... I went the same route as you, except that I fully stripped the top coat. The clear coat was badly checked, but intact, (except where the divots were)... I filled the voids with several thin layers is super glue, building up to the clear coat thickness, the sanded the whole thing evenly. It took the rattle-can white very nicely and is still looking good today!

As always, when I read back on the linked thread, I wish I had taken more "before" shots, because it truly was in sad shape!! It's gone through a few more mods in the past two months, and is on the bench for the final touches...

I'm kind of envious of your new project, because it looks to be a lot of fun!! Take A LOT OF PICTURES!!

-robert
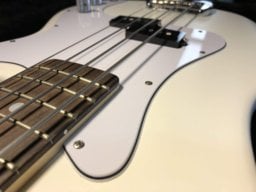
It is fun! Your body refinish looks superb! Even the undercoat on mine is damaged at the base due to the water exposure so to get a newish finish like yours I'd need to strip the undercoat. That would be a lot of work I believe. I've been taking a lot of pictures, I tend to take too many pictures! As such, I'm going with the mad max finish.
 
Story on refret to follow tomorrow. Here are some teaser pictures.

Pulling frets...
2AE63FAC-B04E-405B-B69F-46D8433BF5EC.jpeg

Fretless!
C85FAA6E-61E0-4530-B3DC-2A462B719651.jpeg


New frets clipped to size...
02B9C5F2-1E79-4A33-A6FB-D97AFA682A2B.jpeg


going in...
01E745B8-A15C-40D2-8116-5966E03DCDC8.jpeg


Frets!
E16A7FD2-C760-4CA3-A8C3-9E246AD0C864.jpeg
 

Attachments

  • 84A05C74-4884-4ED7-92D6-916310AD2574.jpeg
    84A05C74-4884-4ED7-92D6-916310AD2574.jpeg
    296.6 KB · Views: 57
  • 0CE2FED6-7273-4AED-A570-9E898A45DCB5.jpeg
    0CE2FED6-7273-4AED-A570-9E898A45DCB5.jpeg
    431.2 KB · Views: 38
  • 73F5126B-B6AB-45F2-909A-1EC3158DDB96.jpeg
    73F5126B-B6AB-45F2-909A-1EC3158DDB96.jpeg
    542.3 KB · Views: 50
  • 11FB1EC1-8DFD-4103-8F7F-30C33B420A6D.jpeg
    11FB1EC1-8DFD-4103-8F7F-30C33B420A6D.jpeg
    453.3 KB · Views: 43
Okay. I would definitely not try to clamp it shut. The "proper, restoration way" to fix it is to rip the top apart, square the faces, and reglue, but you're not going to do that. I think the crack is perfectly in keeping with the "look" of the bass, and I'd leave it right where it is while using a syringe or fine applicator tip to get some superglue right where the junction of the crack is. That'll prevent it from spreading further.

You could use epoxy instead of superglue, and I might if I could figure out a way to get it far enough into the crack. Even yellow glue would work, with the same caveat.

You could reinforce it across the surface with splines or butterflies, but that would look very... steampunk. Not sure whether that's what you're going for. But butterflies are the way that kind of crack is "supposed to be repaired," FWIW, in a woodwoking/furniture/cabinet context.
I had to look up what you meant by the bow tie cleats and found this cool video for anyone interested...

How to Create a Bowtie Inlay to Bridge a Crack | WWGOA

Bow tie cleat would look cool but I'm going to keep it simple for now and get some super glue in there after getting the crack as clean as I can. At least that's the current plan.
 
I had to look up what you meant by the bow tie cleats and found this cool video for anyone interested...

How to Create a Bowtie Inlay to Bridge a Crack | WWGOA

Bow tie cleat would look cool but I'm going to keep it simple for now and get some super glue in there after getting the crack as clean as I can. At least that's the current plan.

Yes, I think a traditional joinery repair would look weird on your Musicmaster. No doubt.

There's a lot of ways you can go, definitely.
 
  • Like
Reactions: GroovyBaby
I agree with Picton, the crack is part of the bass' history. Clamping won't work IMHO. Glue will fill the gap, especially PU wood glue, AKA construction wood glue.

On the front side, cover the crack with painter's tape, lay the bass down flat with the backside up. Put in the glue from the back, it will drool right through the crack. It will swell up, but it won't push open the crack any further. Three layers of pure Danish oil along the crack on the backside will make it easy to remove the glue after drying. Do not wipe off the wet glue, it will become a mess, once dry, it will come off easily with a sharp chisel. After that, sand it down lightly with 400 grit, it will not show after the rest of the body has been done with Danish oil also. Prior clamping rather spoils the idea, because when you loosen the clamp the wood will crack open again. A wooden butterfly (ash) is a good idea, maybe in the rim or on the backside near the end of the crack. A metal clamp in the rim is another option.
 
  • Like
Reactions: GroovyBaby
Interesting that your Bronco neck is thinner than the Musicmaster neck.....thats not the case with my old 72 MM bass (which i gifted) compared to my Bronco, in fact the opposite, though not a huge difference, the Bronco neck is a bit thicker.

That is strange, but it's very noticeable to me, thinner and smoother. When I changed the neck, with no other changes, the tone was brighter too. Even my bandmates noticed the improved sound.

I'm a newbie at working on my basses so someone will say "of course it is" but it was just a successful experiment to me.

I tried to research the specs and both necks are listed as "c" shape so I'm missing something. All I know is I originally liked the maple fretboard for aesthetics but will probably pursue having my 2nd bass maple too.
 
Interesting that your Bronco neck is thinner than the Musicmaster neck.....thats not the case with my old 72 MM bass (which i gifted) compared to my Bronco, in fact the opposite, though not a huge difference, the Bronco neck is a bit thicker.
That is strange, but it's very noticeable to me, thinner and smoother. When I changed the neck, with no other changes, the tone was brighter too. Even my bandmates noticed the improved sound...
I tried to research the specs and both necks are listed as "c" shape so I'm missing something.

Not to hijack this thread, but I just want to add, that my experience as well is like David's, in that my Musicmaster necks are slighty thinner than my Bronco necks. Not much, but noticeable. And the shape of the Mm necks is a slightly more gentle C. The Musicmaster necks had a width of 40.4 to 41.3 mm at nut and a thickness between 52 and 53mm at 12th fret and the Broncos between 41 and 41.3mm at nut and 53.4 and 54.3mm at 12th. I've had 5 Musicmasters (71-76) and 4 Broncos (2000 - 2007). My Badtz-Maru Bronco has more of a U-shaped neck. The difference between all these necks is slight, but you feel it.
I notice the slightly brighter sound with maple necks as well.
 
Last edited:
The Luthier's corner thread had a variety of opinions (shocking, I know) but a number stated that if the water content has already left the body and the damage happened some time ago (both of which I believe to be true) then the crack in the body may be stable. Several also said that adding glue of any sort would not likely hold it together if it was still actively warping (too much force). Given these comments, my decision is to let it ride! I'll monitor the body crack and if it appears to be getting worse, I'll contemplate more drastic action then.

Small neck update regarding the refret (which spellcheck always wants to change to regret, let's hope it isn't right!). The frets pulled out nice and clean. When I went to hammer (with appropriate dead hammer) the new frets, not all would seat. Most did, but some wouldn't bite. I thought I was doing something wrong so I took it over to my luthier friend and he said that basically the wood slots were rather large and there wasn't a lot of wood for the frets to bite in to. I did not enlarge the slots and we both thought the old frets were original.

He helped me drip in some liquid super glue as we clamped each fret in place with the hopes that this would work. It seems to have worked as the frets are better seated and seem to be holding. Time will tell! It was also impossible to get the neck completely flat to fully level the fretboard, though I did take out one high spot with his guidance. The resulting new frets required more leveling than I would have liked. I like the idea of leveling the fret board first so that you can leave as much of the frets untouched as possible but this project required me to do a good bit of fret leveling. I used a sharpie marker on all frets first so I could keep track of which frets were the lowest and I could stop as I started to hit them. I used 320 grit sandpaper spray glued to a level as my leveler and tried my best to match the board radius...

XiP+CPiwT9KCfghW45F8gQ.jpg
 
Last edited:
As you can see above, I taped the board up first. After the overall leveling, I angle cut the frets with a file until they were even with the edge of the fretboard, then did a little more overall leveling. Next came the crowning which I did over two days. I had to take off a bit with the leveling so there was a fair amount of crowning to do. I then spent a lot of time dressing the fret ends and polishing the frets. I can't stand rough fret ends and on a vintage bass, they should feel smooth!
zf2lM5eWRPmQO17UukfhGA.jpg

As I went along, I get much better with crowning. The first couple of frets are a little too pointy, but they others became more round as I learned to get the feel of it.
L+JMqt72ReWOzcghMj0vww.jpg
 

Attachments

  • IKzCe3nlQV2TPFIe+GK8rg.jpg
    IKzCe3nlQV2TPFIe+GK8rg.jpg
    608.9 KB · Views: 37
  • yrgygiyZQdiBJ9BX3dIB%w.jpg
    yrgygiyZQdiBJ9BX3dIB%w.jpg
    1.2 MB · Views: 48
  • RHaaWwqPRACugKsUj0GvVg.jpg
    RHaaWwqPRACugKsUj0GvVg.jpg
    693.5 KB · Views: 29
  • 3wzvyX5TS1KpW8xzxTO%dA.jpg
    3wzvyX5TS1KpW8xzxTO%dA.jpg
    772.3 KB · Views: 33
  • PDw55KKEQgeVuc78UsvKZA.jpg
    PDw55KKEQgeVuc78UsvKZA.jpg
    695.4 KB · Views: 25
Mostly finished...
PDw55KKEQgeVuc78UsvKZA.jpg


3wzvyX5TS1KpW8xzxTO%dA.jpg

You can see the liquid super glue evidence on this one...
0CE2FED6-7273-4AED-A570-9E898A45DCB5.jpeg


11FB1EC1-8DFD-4103-8F7F-30C33B420A6D.jpeg

Those pictures above are not the finished product. I did a lot more fret dressing and some of the pictures above may be out of order (sorry). When I was "done" I still had a little fret sharpness and ended up redoing the angle cut to the frets and doing another round of dressing and polishing. The result is much better.

More posts and pictures to follow.