• TalkBass has been independent since 1998. Add your voice.
    Create a free account to reply to discussions, view embedded media, and browse with fewer display ads.
    Join freeLog in
    Want zero display ads or expanded classifieds tools? Compare plans.

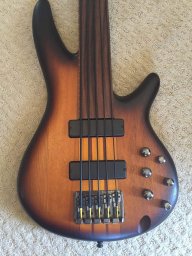
5 string buckeye burl/mahogany neck through

The white balance was off on my camera last night. The color in this one is much more accurate.

tumblr_nom9khmMFV1qi8q1ao1_540.jpg
 
Hmm, I'm wondering if worse comes to worse, if I lay down the tung oil, put the decal on top, then spray a clear just to keep it there?

Hopkins, have you tried it with any non-spray finishes?

Hey Lisa

Now you got me curious, so I found a couple of things:

1580565_2bbd0f30b06ca8db27e414b7cd915166.png
 
Last edited:
  • Like
Reactions: lbridenstine
Hey Lisa

Now you got me curious, so I found a couple of things:

Perfect! Thanks. When I searched, I just kept getting instructions on how to print on the decal paper or it would just say "lacquer spray" or something like that for spraying over it.

The bass is getting so close guys, I can't wait to get it done. This has been a particularly long build and it has made me realize that I would rather design the whole thing myself, not over-complicate it too much, and work on it at a more comfortable pace... and also, avoid epoxy and inlays (although I do love how the epoxy has made the wood on this one look).
 
Lisa-

Are you planning to use the waterborne Varathane over the body? The reason I ask is because I used it to finish the mahogany body on the bass I just finished up - be really careful of sand-throughs with the epoxy layer. Otherwise the amber tones you've pulled out will look like spots of dull tan. I had to go over a bunch of spots with sealing shellac to pop the grain back out before re-sealing because the waterborne won't do it nearly to the same effect.

Lonnybass
 
Perfect! Thanks. When I searched, I just kept getting instructions on how to print on the decal paper or it would just say "lacquer spray" or something like that for spraying over it.

The bass is getting so close guys, I can't wait to get it done. This has been a particularly long build and it has made me realize that I would rather design the whole thing myself, not over-complicate it too much, and work on it at a more comfortable pace... and also, avoid epoxy and inlays (although I do love how the epoxy has made the wood on this one look).

Sure Lisa....

Yeah, I am quite a mahogany freak myself and that african is some mighty fine stuff....

Gorgeous!

Good luck with the next steps!
 
Lisa-

Are you planning to use the waterborne Varathane over the body? The reason I ask is because I used it to finish the mahogany body on the bass I just finished up - be really careful of sand-throughs with the epoxy layer. Otherwise the amber tones you've pulled out will look like spots of dull tan. I had to go over a bunch of spots with sealing shellac to pop the grain back out before re-sealing because the waterborne won't do it nearly to the same effect.

Lonnybass

I'm using EM6000 (water based lacquer). I'm definitely going to make sure to be careful when sanding. I laid down a pretty good layer of epoxy without making it TOO thick, so it should be enough to sand back a little until it's flat, which shouldn't take much. The burl's second coat was easy to sand flat after I had the turquoise mess taken care of, so the mahogany shouldn't be bad. My plan was to get it all covered with epoxy, so the top coat can be thinner and quicker (plus it looks better under the epoxy), since last time I spent way too much time spraying finish and sanding through, spraying again, sanding through again, grain not being filled all the way, spraying more, etc.

Definitely doing wipe-on oil (varnish) on the next few builds.
 
  • Like
Reactions: josiah goldfish
So, I did some things today.

Pickup routes, bridge block route, bridge block thicknessing, string thru holes, ferrule holes, jack hole (not pictured), sanded everything (again!), and routed deeper into the cavity for the ridiculously tall pre-amp and push/pull knob (another terrifying experience that turned out fine).

My drill bit kind of exploded on the middle string thru hole in the bridge block. Whoops. At least it will be covered by the bridge.

I sanded through the epoxy in several spots, so I guess I have to touch those up and let it cure... and sand again... before I can put finish on. Other than that, I just have to drill holes for screws and the bridge ground, and do the decals.

Invalid Link Removed

tumblr_novup7n9YX1qi8q1ao3_1280.jpg


Maybe I'll put a dark veneer over the bridge block (same veneer as under the burl). I'd like to cover up the corners of the route too, since the corners of the block got sanded too far too.

tumblr_novup7n9YX1qi8q1ao1_1280.jpg


I'll coat the bottom of the cavity with epoxy.

tumblr_novup7n9YX1qi8q1ao2_1280.jpg
 
So here's a fun little detail...
I was going to buy a metal output jack cup like I used on my last build...but this time I decided to make one out of the ebony I have been playing with lately....
(from a "branch" that my friend gave me.)
Just used a couple of forstner bits & my disk sander... View attachment 621233 View attachment 621234 View attachment 621235 View attachment 621236 View attachment 621237 View attachment 621238
Lisa, did you see this? Could be a solution...
 
Even a two conductor jack fits pretty tight, and I ended up having to bend in the connector tabs. I can imagine it's worse with a three conductor jack. I think on every build I did where I used copper tape around the inside of the jack hole for shielding, the jack tabs shorted out against the copper tape. I think that's why those long skinny jacks are popular, even thought they break fairly easily and often.
 
Lisa, did you see this? Could be a solution...

That looks really nice. He really wants the gold cup though and the cup fits fine, but I just can't get the jack through to reach the cup. :-/

Even a two conductor jack fits pretty tight, and I ended up having to bend in the connector tabs. I can imagine it's worse with a three conductor jack. I think on every build I did where I used copper tape around the inside of the jack hole for shielding, the jack tabs shorted out against the copper tape. I think that's why those long skinny jacks are popular, even thought they break fairly easily and often.

So it's not just me. What have you done to overcome it?

I've had this issue with my other builds too, but this is the first one that I haven't been able to get in there at all. I'm thinking maybe I'm leaving too much of a wall between the cavity and the outside? But I leave it for the sake of the big round over. Maybe I'll have to route the ledge between the magnets.
 
...
So it's not just me. What have you done to overcome it?

I've had this issue with my other builds too, but this is the first one that I haven't been able to get in there at all. I'm thinking maybe I'm leaving too much of a wall between the cavity and the outside? But I leave it for the sake of the big round over. Maybe I'll have to route the ledge between the magnets.

Two of the builds, I just bent the tabs in and wrapped the jack in electrical tape. It wasn't pretty but it worked. The axe bass I just left out the shielding. I figure it's only a $100 bass - a little noise is expected :p Eventually, I'll have to come up with a more elegant solution - perhaps some kind of oversized jack plate and oversized hole.


This build looks amazing, by the way :)
 
  • Like
Reactions: lbridenstine