• TalkBass has been independent since 1998. Add your voice.
    Create a free account to reply to discussions, view embedded media, and browse with fewer display ads.
    Join freeLog in
    Want zero display ads or expanded classifieds tools? Compare plans.

Any DIY pedal builders on TB? Strut your stuff!

I am completely enamored with PedalPCB. That dude has it goin on.

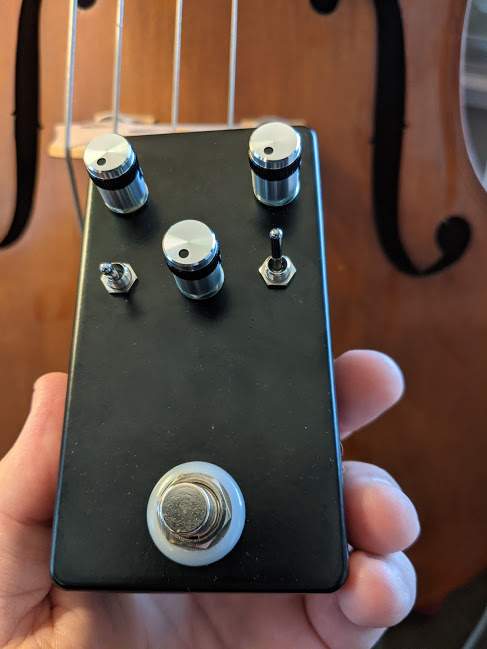
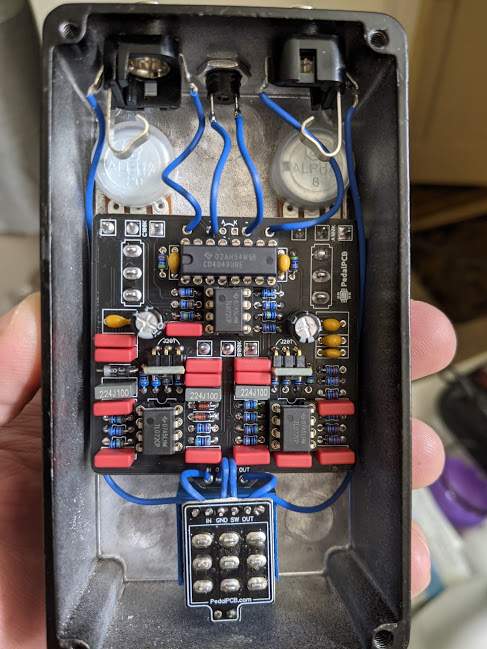
Just finished this B3K clone from them and it sounds fantastic. Every pedal I have built from them has gone together nicely and has been dead silent. The gut shot here was preemptive - I had the protection diode in backwards, which I fixed last night, but I still need to jumper the LED to get my illuminated foot switch working, which I should be able to do tonight. But it sounds fantastic!

Edit: Just wanted to add that this was the first time I have used an illuminated foots witch and I kind of regret it. Not because I don't like the way it looks, but because the hole necessary is way too large. I had to drill the hole out as big as I could (1/2'') and then file the damn thing out for 30 minutes in order to get it fit. I wanted a cleaner look but I'm not sure it was worth the hassle. Plus, I can easily foresee the foot switch breaking considering that the plastic ring which lights up is the main component holding the foot switch to the enclosure.

obsidus.jpg


obguts.jpg
 
Last edited:
I am completely enamored with PedalPCB. That dude has it goin on.

Just finished this B3K clone from them and it sounds fantastic. Every pedal I have built from them has gone together nicely and has been dead silent. The gut shot here was preemptive - I had the protection diode in backwards, which I fixed last night, but I still need to jumper the LED to get my illuminated foot switch working, which I should be able to do tonight. But it sounds fantastic!

Edit: Just wanted to add that this was the first time I have used an illuminated foots witch and I kind of regret it. Not because I don't like the way it looks, but because the hole necessary is way too large. I had to drill the hole out as big as I could (1/2'') and then file the damn thing out for 30 minutes in order to get it fit. I wanted a cleaner look but I'm not sure it was worth the hassle. Plus, I can easily foresee the foot switch breaking considering that the plastic ring which lights up is the main component holding the foot switch to the enclosure.

View attachment 4151919

View attachment 4151921

I've used a few of those illuminated footswitches... I bought a hand reamer and can get from 1/2" out to size in a couple of minutes. Those nylon rings are pretty tough I reckon but I know what you mean...
 
  • Like
Reactions: JoeDaddio
I've used a few of those illuminated footswitches... I bought a hand reamer and can get from 1/2" out to size in a couple of minutes. Those nylon rings are pretty tough I reckon but I know what you mean...

My dad always told me to measure twice and cut once. Apparently I decided to not measure at all and cut 500 times. lol

A reamer would be nice, I may have to add one to the tool box one of these days. I have a set of files I use for blacksmithing but were way too large to use for this enclosure, so I had to resort to using my needle file set, which is why it took such a long time.
 
  • Like
Reactions: cheapbasslovin
Last edited:
As an Amazon Associate, TalkBass may receive commissions from qualifying purchases made via links on this site.
Here's my haul for January. Building dirty fuzz pedals has also turned into an acrylic color study. Paint has also been causing me a lot of trouble last month as every pedal I built has cosmetic imperfections.

1st up,
Roger Mayer Axis Fuzz with sag control and socketed tone section. Built on stripboard using Fuzz Central schematic. Highly recommend leaving out the resistor and cap of the tone section. With them, the sound has a mid focused tone. Without them, there is more distortion and more full-range response.
This fuzz has two good settings. Near the max end of the Drive control is fully saturated roaring distortion/fuzz. Then at low drive settings the sag control makes the overdrive more interesting. Sagging the voltage adds grit for a sand-in-your-teeth crunchy dirt. At max drive, sag just makes it sound weak.

This enclosure almost turned into a disaster, but was rescued. I tried spraying on clear coat on a very cold windy day, held the can too close and the aerosols wrinkled the paint. Gently messaged the paint flat over the next few hours then touched up a few cracks in the paint after it dried and sprayed on a new clear coat layer. Was going to call this finish "silver vein" and it turned out extra vein-ey.

20210116_114119.jpg


20210116_114203.jpg
 
Next is a Big Muff

My 4th big muff build on GGG pcb's. I have a long love/hate relationship with big muffs (long story). Never satisfied, but keep coming back for more. My 1st build was a straight forward green Russian. 2nd build was a 5-knobber built to Supercollider specs. 3rd build was a 4-knobber green Russian/Supercollider hybrid. Sold those off, but then felt like I was missing the fuzziness that only a muff can provide. So here's my 4th go around. Tossed everything I learned before into a blender, added a Rams Head influence and made a few resistor and cap substitutions to shake things up. First time I used mylar greenie caps and socketed the transistors & clipping diodes. Goal was to have a little less green Russian/Supercollider sludge and a little more clarity in a 3-knobber 1590B pedal. I guess I achieved that, but in the end, it still sounds like a big muff.
Key mods are: 10uF tantalum input & output caps and 1N4001 clipping diodes in the second stage (Supercollider influences). Doubled the cap values in the clipping and tone sections. Tweaked emitter-to-ground resistor values to increase gain in the early sections and used Rams Head resistor values to lower gain in the final section.

Enclosure paint didn't turn out as expected. After much trial and error I've determined the satin black primer I've been using is only compatible with high-gloss enamel paints (like on the Hexafuzz). All other flat and satin paints are absorbed into the black and lose their color. Applied two coats of Hooker's Green, but it still looks black unless viewed in bright light at the right angle. "Fuzz" lettering is also uneven and covered by a knob.

20210130_131949.jpg


20210130_131852.jpg
 

Attachments

  • 20210130_131849.jpg
    20210130_131849.jpg
    965.1 KB · Views: 71
Tube Screamer

Populated this pcb back in 2015, but left the drive section unfinished because I couldn't decide on how to mod it and then gave up trying to make a Tubescreamer work with bass. Time to revisit this one and bring it to life. Filled in the drive section using Keeley 808 mods and socketed C3. Experimented with cap values for C3 using .18uF, .22uF & .47uF. Lower values tightened up the low end. I choose .47uF because it gave more bass and more distortion. The extra distortion makes it sound less like a Tubescreamer. Also socketed the clipping diodes and experimented with symmetrical and assymmetrical 1N914 diodes. Assymmetrical had a little more volume and distortion. Symmetrical had a bark that I liked more so I used that.

Really happy with the paint scheme. White primer, veridian green acrylic, a touch of raw umber acrylic, vermilion acrylic lettering, then clear coat. I accidententaly drilled the input jack to the same diameter as a DC jack. Discovered this actually works very well because the jack can be recessed into the enclosure which frees up a little space inside the enclosure.

20210130_121114.jpg


20210130_120928.jpg
 
Those pedals look great. Nice job. Tonight’s project Super Collider. Can’t wait to fire this one up. I usually average 2 to 3 a week. I have a ton of drive pedals. One of my current favorites on my board is the Color Sound Bass Fuzz. The Sola Sound MK lll tone bender is a close second. It actually sounds pretty good on bass when blended with a dry signal. Keep up the great work everybody.
View attachment 4153102
 
One of my current favorites on my board is the Color Sound Bass Fuzz. The Sola Sound MK lll tone bender is a close second.
Tonebender mk.II has been one of my favorite DIY builds. Built one in 2014 on a GGG pcb, using a set of AC125's from SmallBear and modded C3 & C6 to .15uF caps. Thing is a beast, with a king of the jungle roar above all the rest. I've been wanting to build another and just finished it for my final January build.
 
Tonebender mk.II with voltage inverter charge pump and external bias. Hybrid ge/si with pair of AC125's around ~125hfe and a 2n3906 in Q3. Used 0.1uF caps for C3 & C6. Haven't had much time yet to compare this with the all germ version I built years ago, but it is also a beast.
This was my grand finale of blemish box January. Drill template must have shifted because my led and stomp switch are 2mm off center. Tried to center the lettering by starting from the center and working outward but tripped myself up badly. Painted the N in Bender backwards by painting D.E.R then N.E.B. Wiped off the mistake but it still shows. Then I painted a dyslexic BIAS last and didn't notice until the next day.
Love the veridian green and cobalt blue finish enough to overlook these blemishes.

20210202_173627.jpg

20210202_174246.jpg

Voltage inverter daughter board
20210131_104145.jpg
 
Tube Screamer

Populated this pcb back in 2015, but left the drive section unfinished because I couldn't decide on how to mod it and then gave up trying to make a Tubescreamer work with bass. Time to revisit this one and bring it to life. Filled in the drive section using Keeley 808 mods and socketed C3. Experimented with cap values for C3 using .18uF, .22uF & .47uF. Lower values tightened up the low end. I choose .47uF because it gave more bass and more distortion. The extra distortion makes it sound less like a Tubescreamer. Also socketed the clipping diodes and experimented with symmetrical and assymmetrical 1N914 diodes. Assymmetrical had a little more volume and distortion. Symmetrical had a bark that I liked more so I used that.

Really happy with the paint scheme. White primer, veridian green acrylic, a touch of raw umber acrylic, vermilion acrylic lettering, then clear coat. I accidententaly drilled the input jack to the same diameter as a DC jack. Discovered this actually works very well because the jack can be recessed into the enclosure which frees up a little space inside the enclosure.

View attachment 4152781

View attachment 4152783

i half wonder if this is how the overdrive in the Ibanez phat head 7 was brought about... it needed a bit of dry blend from my ls2 but I’d never heard anything like it and it seems such an individual circuit it’s nothing like the now Ibanez tube screamer bass...

Just curious if you can do clips? I never liked tubescreamer on bass for the mid hump / loss of bass feel but the way you describe yours it sounds pretty nice :)
 
@G.Bisson , mate the textured crackly finish on these looks amazing! I love it. Did you spray these? It looks sort of stippled, like it was rolled on...?
Cheap dollar store sponges. Without scrubbing pads. Bigger the pores, the better.
Dab the sponge in a little paint, touch it to scrap paper a few times to remove excess. Then touch the enclosure lightly in a vertical press 'n release motion. Repeat until all areas are covered. Leave to dry overnight. Then do a second color with an even drier sponge and less paint.

Takes me about five nights for each layer of paint to dry.
 
i half wonder if this is how the overdrive in the Ibanez phat head 7 was brought about... it needed a bit of dry blend from my ls2 but I’d never heard anything like it and it seems such an individual circuit it’s nothing like the now Ibanez tube screamer bass...

Just curious if you can do clips? I never liked tubescreamer on bass for the mid hump / loss of bass feel but the way you describe yours it sounds pretty nice :)
The mods make it lose it's tubeacreamer identity. I think this put it closer to Boss SD1. Crossed over from overdrive into distortion territory.
Unfortunately, I'm unable to create clips.
 
  • Like
Reactions: theunknowndude
Roger Mayer Axis Fuzz

Love the finish!

Here are my latest, from left to right:
Hyped Fuzz (PedalPCB): sounds like the OG (FZ-2) to my ears, at least in the only mode I use (full range).
Lo Fran (Moon Electronics): a Frantone Lo Tone. Oh boy oh boy, this one pumps a metric ton of bass, its' almost ridiculous. I like fuzzes to be dark and bass heavy, so normally I have the tone knob on the bass side. Not in this case, unless I just want to dro)))ne.
Böhm/Klingenthal Trickverzerrer: an oddity from the early 70ies, produced in the "DDR", East Germany. Sounds quite unique, I can't really put my finger on it (yet) and say "it's kinda like ...".

P1040292.jpeg
 
Wow! Lots of activity in the thread while I've been busy away for a couple days.


Further to the resistor code conundrum, found this on Rob Robinette's excellent amp site, a copy of Rob Hull's colour calc:

Resistor_Color_Codes.jpg


Definitely +1 on a nice DMM

If you have an Android phone, theres an app called ElectroDoc that has a ton of useful info, calculators, etc. Its a lot easier than googling it every time. View attachment 4148791 View attachment 4148792 View attachment 4148793

Thanks for that.

I've been using Mila's Tools on my iPhone for converting microfarad to nanofarad etc, plus there are other unit conversions that are quite helpful such as imperial to metric etc... very handy. Couldn't find a screenshot of capacitance, so here's the logo to look for on the App store for those interested in getting it...

1200x630bb.png


Very cohesive look to all your pedals, very pleasing aesthetic.

Did you produce the PCB for your Traynor Monoblock yourself?

Inspiring. I was going to build that on Perf, but if a PCB is available, that's preferred.


PedalPCB Chaos Machine nearly there... another one that fits nicely into my favourite larger enclosure (1590Q):

I've never had a 1590Q, but I need some and am a fan of this Hammond size!


GOOD NIGHT SWEET LITTLE PRINCETON
Latest and last installment of adventures in amp-building, well at least for the orphaned Little Princeton.

Last night: Replaced a few more caps for better ones. Did some more tube rolling, including a proper rectifier tube. All tubes made a noticeable tone difference, A/B-ing the caps, likewise — even some of the caps that I thought weren't in the main signal path but are in a circular electrical pathway ie replacing one of the caps to ground off the 6V6 — cleaned the bass up, gave it more definition.

I was pleased with the tone prior to the cap changes/tube rolling last night. We'd done some tube rolling previously and replaced a couple of caps with improvements in sound, but last night really capped it... heh. When your eyesight goes slightly off, perhaps you don't even realise it until you visit your optometrist for an annual checkup or are trying to get your pilot's license or whatever — you don't notice how bad the focus is as it deteriorates so slowly, then BAM! The ol' spice-weasel of optical corrective lenses sharpens everything up. For those of you with 20/20 vision, just take a camera, binoculars, telescope and mess with the focus, you'll see what I mean.

Well that's what it's like for the tone. It's nice and pleasant and sounds good — then you make a few cap changes and put in some good tubes and suddenly all those descriptors you've read about come to life before your very ears: "It was like a wet blanket had been lifted off my tone" blah blah blah etc. The notes rang more clearly, with less cluttering overtones obscuring the note and its pitch... like somebody whispering to you in a crowd and getting about half of what they say, then you go in a private empty room Far From the Madding Crowd and hear not only all the words being said, but every inflection with its sub-textual meanings, inferences and allusions.

When I started pedal-building, didn't know if it would take or if I'd stick with it, so I bought everything cheaply, dipping toes in the solder. I've since upgraded my iron, and I've been looking at Wima and Panasonic caps for a while now, but it's time to make that order. I may have to go over old builds or build some circuits anew based on what I've learned from this amplifying endeavour.

Rather I should say relearn, as I've long known that quality ingredients make a better bread. You can get bread cheaply, with lots of fillers that bloat your stomach, and then you can get bread that fills your stomach and fulfills your soul. You can go out of your way and buy bread from a boutique boulangerie and whether it's worth the high price or not varies from person-to-person. Personally, I can't stand wondrous bread (you wonder why it's legal to call it bread), but nor am I willing to partake in being took for a simple loaf of bread — somewhere in the middle you get a great bread-loaf for your buck. I'd encourage anyone starting out, baking or soldering to get the best possible ingredients they can afford, without getting into sniffing cork fumes.

So the decent bang-for-the-buck caps stayed in the Little Princeton, the mojo-reference tubes were culled and the scrappy vacuums pulled back into service. This little amp was orphaned by its owner due to its various problems, the difficulties passed on to me to rectify. The transformer was dead from the get-go, the chassis was created in a mirror image of what it should be, various other sub-standard parts ... all short-comings replaced or worked around and now Little Orphan Ampy is going back to Daddy Warbuzzcut who will have to find a new rectifier tube at the very least. Once that's sorted, it'll sound good even with the pre and power tubes that are in it. Up to Warbuzzcut whether to spend a bit on some tube upgrades other than the mandatory rectifier (which still works if you put a small block of "tone-wood" on top of it) and make it sound great.

I reinstalled the amp chassis back in its pine box, and bade it farewell.


Heaps of thanks to my Amp-Sifu for patience, pointers and pedagogy — and prompting, pressing, prodding, pushing, propelling me whenever my compelling passion for the project plunged.


Now on to my own amp's repair, the non-pedal build, and Godot knows what else ...

... see what sort of tone I can bake in.
 

Latest posts