• TalkBass has been independent since 1998. Add your voice.
    Create a free account to reply to discussions, view embedded media, and browse with fewer display ads.
    Join freeLog in
    Want zero display ads or expanded classifieds tools? Compare plans.

black & blond P makeover (etc)

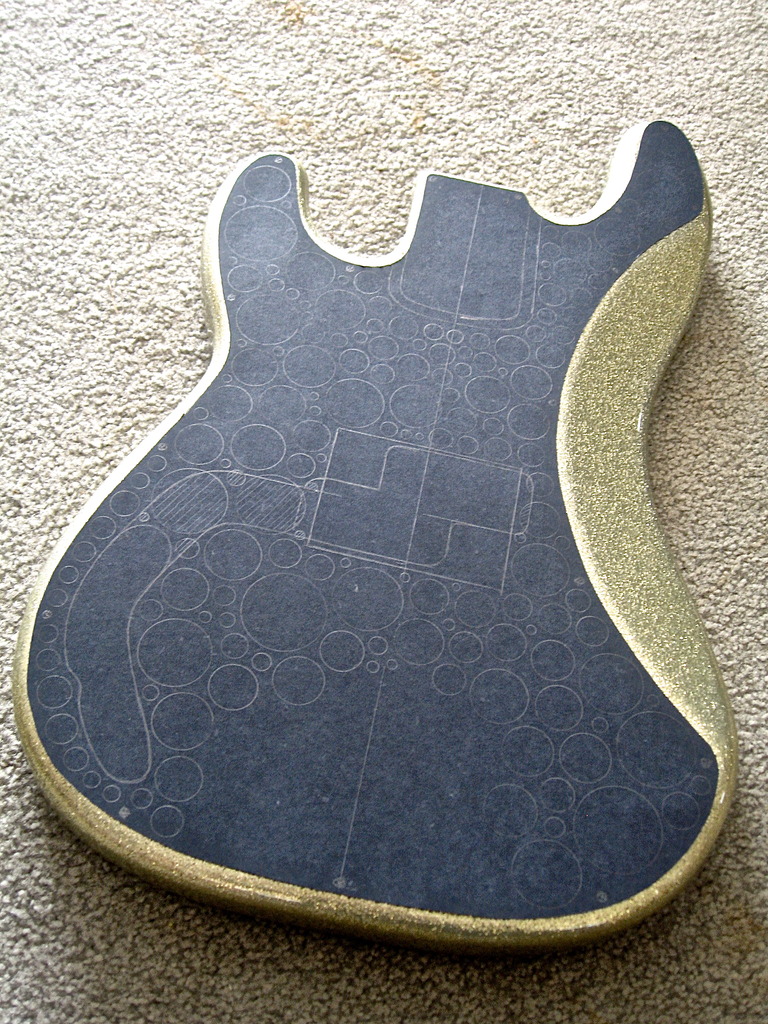
Began circle composing on the black poster-board. I need to wait for the bridge plate to arrive before continuing. I got a gold hm bridge-plate (only) like the one on my Glam P/J for cheap on eBay. Plate only because it will be the reverse w/chrome plated (brass) saddles, which I have. Disclaimer: my pattern of size of hole and location relates only to my artistic eye and willingness to play. ;)

IMG_7800_zpsdntnilph.jpg


Ahhhhhhhh yes......Champagne bubbles!
 
Here we go! This "working over" nicely finished bodies is getting to be a habit with me! Luckily this particular sparkle finish is pretty tough, as is the ash. I started with 4 different sizes of forester bits and will get a few more for variety.

IMG_7806_zpsabzytc0u.jpg


Broke through the back of the control cavity - as stated I want the copper shielded 'guts' showing under the smoked acrylic.

IMG_7802_zpsa1dq7qnl.jpg


I shot this while waiting for the drill battery to charge. These are shallow for positioning and will go to specific depths with a drill-press depending on location. The ones that avoid the 3 areas (neck pocket, pu cavity, bridge) will go down to within 1/4" of braking through the front. Holy Sparkle-Body Batman!

IMG_7807_zpshpunxbd5.jpg
 
Bought a couple more forester bits, drilled a bunch more hole and will resume tomorrow after buying a 1-1/2" bit. (they didn't have one in stock) I started w/the black sketch as a guide but at a certain point just started composing on the fly. (like… hummm, what fits here…) My pilot holes are 3/8" deep and once I rout the 'swimming pool' 1/8" for the acrylic I'll go deeper where I can.

IMG_7808_zpsrh1l6n8b.jpg
 
  • Like
Reactions: BassHappy
I'm diggin the sparkly surfaces around the holes showing through the acrylic.

Unfortunately that will go away. Soooo, in its place I will gild that level (between holes) w/silver leaf to attract light and can even use glitter nail polish to 'seal' it. Once all the holes are fully drilled I'm going to play around w/a few ideas I have for maximum subtle effect. So far it's been pretty fun - like putting together a puzzle that doesn't have a set pattern yet. I determined I could do the entire back like this and where the islands are needed for the bridge, pu cavity and neck ledge - could stay at this level and still have plenty of mass in the body for proper grounding.
 
  • Like
Reactions: BassHappy
Phase 1 accomplished. It now weighs 5lbs/8oz, (down from 6lb/5oz) so nearly a pound lighter already. (yay!) Next I need to create a crisp perimeter router template and rout down 1/8". After that, it's drill-pressville and cutting the smoked acylic cover (Tap Plastic visit). The gold bridge plate and neck needs to get here (frets being installed) and fitted to determine bridge location so I can then cut and bury a brass bridge anchor. All further aesthetic considerations will follow. And that's just the back! The front-side gets some pu routing for a Darkstar pu. (need to get that also)

I am in communications with Roger Wendover at Invalid Link Removed The burl example on their site (that I posted on page 16) is no longer available but he is going to send me pics of other wood that could work. I sent him pics of the neck and body and he liked my concept and wants to help fine tune it with his product. Like people who frequent Luthier Corner here on tb, creative folks in the artisan world are more prone to being open, helpful and inclusive. Good traits all. :thumbsup:

IMG_7810_zps9dhdz0bb.jpg
 
Phase 1 accomplished. It now weighs 5lbs/8oz, (down from 6lb/5oz) so nearly a pound lighter already. (yay!) Next I need to create a crisp perimeter router template and rout down 1/8". After that, it's drill-pressville and cutting the smoked acylic cover (Tap Plastic visit). The gold bridge plate and neck needs to get here (frets being installed) and fitted to determine bridge location so I can then cut and bury a brass bridge anchor. All further aesthetic considerations will follow. And that's just the back! The front-side gets some pu routing for a Darkstar pu. (need to get that also)

I am in communications with Roger Wendover at Invalid Link Removed The burl example on their site (that I posted on page 16) is no longer available but he is going to send me pics of other wood that could work. I sent him pics of the neck and body and he liked my concept and wants to help fine tune it with his product. Like people who frequent Luthier Corner here on tb, creative folks in the artisan world are more prone to being open, helpful and inclusive. Good traits all. :thumbsup:

IMG_7810_zps9dhdz0bb.jpg


2 Thumbs Up Again.jpeg
 
I have seen the mirrored P/J or one like it in the past - the convex mirror EB-O is pretty funny. Both would do cool things under stage-lights. It's funny because the focus of my version is on the reverse side.

The bridge plate arrived along w/gold Dunlop strap buttons I ordered. For $7.49 (free shipping) this gold-plated solid brass bridge plate is perfect. I had a Gotoh hm bridge and used the saddles from it to complete this one. To keep weight down, I'll make 2 thin brass bars for the anchors, like the one I made for the Glam P/J.

The neck just was shipped from Warmoth - here soon :hyper:

IMG_7811_zpstoddz0xw.jpg
 
Last edited:
Hi fellow LC'ers - I moved this thread from its Basses listing so it sticks around on page 1 a little longer! It really should have been here to start with anyway. I'm cookin' on this latest project and so far so good. I marked the outline on a piece of MDF board and will next accurately cut it out on a band saw. (it needs to be tight) I'll first rout the area for the brass anchor, which I've decided will be a thin brass plate instead of 2 bars. Maybe even polish and engrave something on it since it will be seen under the smoked acrylic. Then will rout the 1/8". The neck will be here tomorrow. Stay tuned for further progress...
 
Last edited:
Worked a couple hrs on the routing process. Very tricky this - slow going with a lot of surgical concentration and focus. It's not the first time I've given myself a challenging task, and it probably won't be the last. I cut out the guide, routed for the bridge anchor and started routing my 1/8". Will see if I can finish tomorrow. Drilling the various sized holes first was smarter than I thought because there's less material to rout. The combination of the hard ash and a tough thick finish is also working well so far - the routed edge is clean and tight. No pics today but will after tomorrow. (forgot my camera)
 
Last edited:
Much accomplished today - the neck arrived early in the day and it looks awesome. However, it has these water-spot looking areas on the ebony fb which didn't seem right. I sent an email to Warmoth and they said this is common on Madagascar ebony - natural oils in the wood. I mean - it's not a deal breaker here, it's pretty subtle only appearing under scrutiny in certain light, although you should be able to see it in my pics. It's really beautiful otherwise and the neck profile is super-sweet, not chunky at all (in fact, really thin which I love!) and I can tell already it will be amazing to play. It's funny because my first real bass was a (used) '63 and then '64 T-bird. In the 70's I wanted to buy a Fender, and since the T-bird had a narrow nut, I gravitated to the Jazz bass. J's then had a similar narrow nut, but a thick neck with a thick poly coating.Totally turned me off to Fenders. This neck really feels like my '64 T-bird. The blocks are a swirly pearloid plastic and against the dark wood they look really cool. And w/gold frets - a really, really nice neck!

IMG_7812_zpsoxn3agdl.jpg


IMG_7815_zps6gtznjzt.jpg


IMG_7816_zpsmrq9n5je.jpg


After that - shop time. As much as I started to doubt my sanity taking on such a project - after today I feel I'm over the hump. Finished routing and spent considerable focus drilling 1-1/4" deep channels following my guide holes. 1st priority after that - weigh it. It now weighs 3lbs/15oz (3.95lbs) !!! -YES- A serious weight loss! I weighed the neck and it comes in at 2lbs/7oz (2.49lbs) so with some decidedly not ultralight parts, I think I'm still looking' at my favorite target weight somewhere in the low to mid 8's.

IMG_7821_zpsjyi4ibxh.jpg


Here's a detail shot to show the crispy router edge. I have much fussy fine-tuning to do on the perimeter edge and leveling the interior but like I say, the heavy lifting is done!

IMG_7822_zps5uqxflcr.jpg


Lovin' the gestalt! Pickguard choice will be critical and no plastic will be involved.

IMG_7824_zps3lsiuzm7.jpg


I realized I didn't need to worry about the pu area because it will be routed on the top of the body for the Darkstar pu which is attached by a chrome frame to the pg/body, and hangs in the cavity. So from the front, the pg will hide all the overlapping routes which will be less than aesthetically pleasing.
 
Last edited: