
Enjoy the benefits of a premium membership!
Upgrade Account
-
TalkBass has been independent since 1998. Add your voice.
Create a free account to reply to discussions, view embedded media, and browse with fewer display ads.
Join free Log in
Want zero display ads or expanded classifieds tools? Compare plans.
You are using an out of date browser. It may not display this or other websites correctly.
You should upgrade or use an alternative browser.
You should upgrade or use an alternative browser.
Build Thread: Just a simple 4-string bass.
- Thread starter HaMMerHeD
- Start date
More options
Who Replied?
Looking good! I'm no expert and just finished one like yours but didn't make the neck and mine is a 5 string.

Thanks for the kind words everyone.
I did the tummy cut this afternoon. First I marked and roughed it out with a large rasp:

Then I went roughly to the line with a smaller rasp:

Then I changed to smaller rasps and sandpaper to finish the profile:

It does still need some sanding, but the whole body does, not just the tummy cut.
This body is now ready for finish sanding.
After finish sanding, I'm going to dig all the sand out of that off little blemish on the back and fill it with epoxy+ash dust. Since the finish will be black and red dyed ash, I may dye the filler paste before I apply it.
The finish I am going for is basically the same as on this Invalid Link Removed
Invalid Link Removed
As for the actual finish process, I am entering uncharted territory for me. Here is the basic order of what I am thinking:
(I'm OK with this part)
Finish sand (to 800 grit)
Raise grain (water)
Finish sand again (to 800 grit)
(This is the part I'm uncertain about)
Apply red dye (Transtint "Mahogany red" diluted with denatured alcohol)
Fill pores with black pore filler (Pacer Zpoxy finishing resin with Transtint black dye)
Sand back the black filler
Apply red dye again
(I'm OK with this part too)
Seal/final sand (to 1500 grit)
Spray clear coat (many coats)
Wet sand (to 8000 grit)
Buff + Polish (Meguiar's "Mirror Glaze fine cut cleaner", Rubbing compound, and SwirlX swirl remover)
Any finish masters have any advice? Am I going about it wrong-headed?
I did the tummy cut this afternoon. First I marked and roughed it out with a large rasp:
Then I went roughly to the line with a smaller rasp:
Then I changed to smaller rasps and sandpaper to finish the profile:
It does still need some sanding, but the whole body does, not just the tummy cut.
This body is now ready for finish sanding.
After finish sanding, I'm going to dig all the sand out of that off little blemish on the back and fill it with epoxy+ash dust. Since the finish will be black and red dyed ash, I may dye the filler paste before I apply it.
The finish I am going for is basically the same as on this Invalid Link Removed
Invalid Link Removed
As for the actual finish process, I am entering uncharted territory for me. Here is the basic order of what I am thinking:
(I'm OK with this part)
Finish sand (to 800 grit)
Raise grain (water)
Finish sand again (to 800 grit)
(This is the part I'm uncertain about)
Apply red dye (Transtint "Mahogany red" diluted with denatured alcohol)
Fill pores with black pore filler (Pacer Zpoxy finishing resin with Transtint black dye)
Sand back the black filler
Apply red dye again
(I'm OK with this part too)
Seal/final sand (to 1500 grit)
Spray clear coat (many coats)
Wet sand (to 8000 grit)
Buff + Polish (Meguiar's "Mirror Glaze fine cut cleaner", Rubbing compound, and SwirlX swirl remover)
Any finish masters have any advice? Am I going about it wrong-headed?

The finish I am going for is basically the same as on this Invalid Link Removed
Invalid Link Removed
Can't wait to see that!
I'm going to do a test of something like this for my guitar and see how it looks.
Invalid Link Removed
(This is the part I'm uncertain about)
Apply red dye (Transtint "Mahogany red" diluted with denatured alcohol)
Fill pores with black pore filler (Pacer Zpoxy finishing resin with Transtint black dye)
Sand back the black filler
Apply red dye again
I haven't done too much with dye, so I'm just curious, why are you doing the red before the pore filler? Wouldn't it all get sanded off when you sand back the filler?

You gotta spray some kind of sealer coat between the stain and the pore fill. Sealer coat has to be thin enough to not fill the pores but just barely thick enough to keep the pore filler from fouling the stain.
Also, I've never worked with zpoxy but I think it's better to apply the pore fill in sections and wipe it off before it dries. That way you don't have worry about sanding it off and messing up your stain job.
Also, I've never worked with zpoxy but I think it's better to apply the pore fill in sections and wipe it off before it dries. That way you don't have worry about sanding it off and messing up your stain job.
I haven't done too much with dye, so I'm just curious, why are you doing the red before the pore filler? Wouldn't it all get sanded off when you sand back the filler?
Yes, but I want red under the black, so that in areas where the the filler isn't thick enough to be opaque, instead of the ash color showing through, it'll be red. The second red dye application will dye the sanded areas red again, but won't be very effective at coloring the thinner zpoxy areas.
It may be an unnecessary step, which is why I'm trying it with a test piece first.
You gotta spray some kind of sealer coat between the stain and the pore fill. Sealer coat has to be thin enough to not fill the pores but just barely thick enough to keep the pore filler from fouling the stain.
Also, I've never worked with zpoxy but I think it's better to apply the pore fill in sections and wipe it off before it dries. That way you don't have worry about sanding it off and messing up your stain job.
Hmm. Thanks.
Well, I just read about zpoxy and, like you said, with their filler you need to wait for it to dry and sand it off. At the place where I work we do these type of stain/pore fill contrast finishes all the time but we use a paste type pore fill that is wiped off while still wet. I couldn't imagine having to sand off hardened pore fill without sanding through the stain underneath.
Yes, but I want red under the black, so that in areas where the the filler isn't thick enough to be opaque, instead of the ash color showing through, it'll be red. The second red dye application will dye the sanded areas red again, but won't be very effective at coloring the thinner zpoxy areas.
It may be an unnecessary step, which is why I'm trying it with a test piece first.
Ohhhh, okay. That makes sense.

Well, I just read about zpoxy and, like you said, with their filler you need to wait for it to dry and sand it off. At the place where I work we do these type of stain/pore fill contrast finishes all the time but we use a paste type pore fill that is wiped off while still wet. I couldn't imagine having to sand off hardened pore fill without sanding through the stain underneath.
Well, I'm thinking about just using some timbermate. It seems like an easier solution.
Also I tried a test piece with the mahogany red transtint and it is way too dark. Even diluted and with the excess wiped off, at least on ash it looks just like reddish black.
So I'm going to go get some bright red tomorrow I guess.

Check out my last build thread. http://www.talkbass.com/forum/f57/new-build-980527/index3.html
I did that very thing. You have to dye the bare wood then seal it with something. I used shellac. Then you fill the grain, seal that and go with the clear coats. It's really not that hard, but I think that it looks great.
Good luck, the build looks good so far.
I did that very thing. You have to dye the bare wood then seal it with something. I used shellac. Then you fill the grain, seal that and go with the clear coats. It's really not that hard, but I think that it looks great.
Good luck, the build looks good so far.

Man I just love that headstock design! That is really beautiful, and unique. The body shape is very nice looking too!
Sub'd
Sub'd
Check out my last build thread. http://www.talkbass.com/forum/f57/new-build-980527/index3.html
I did that very thing. You have to dye the bare wood then seal it with something. I used shellac. Then you fill the grain, seal that and go with the clear coats. It's really not that hard, but I think that it looks great.
Good luck, the build looks good so far.
Thanks. I think I'll try that.
Man I just love that headstock design! That is really beautiful, and unique. The body shape is very nice looking too!
Sub'd
Thanks. I worked on it for a long time. I'm pretty happy with it. I have a few permutations that I drag out to fit with various other body styles, but they are all unmistakably related.
After touching up the tummy cut and forearm relief cut, I went ahead and dug the sand out of the void on the back.
So I have this:
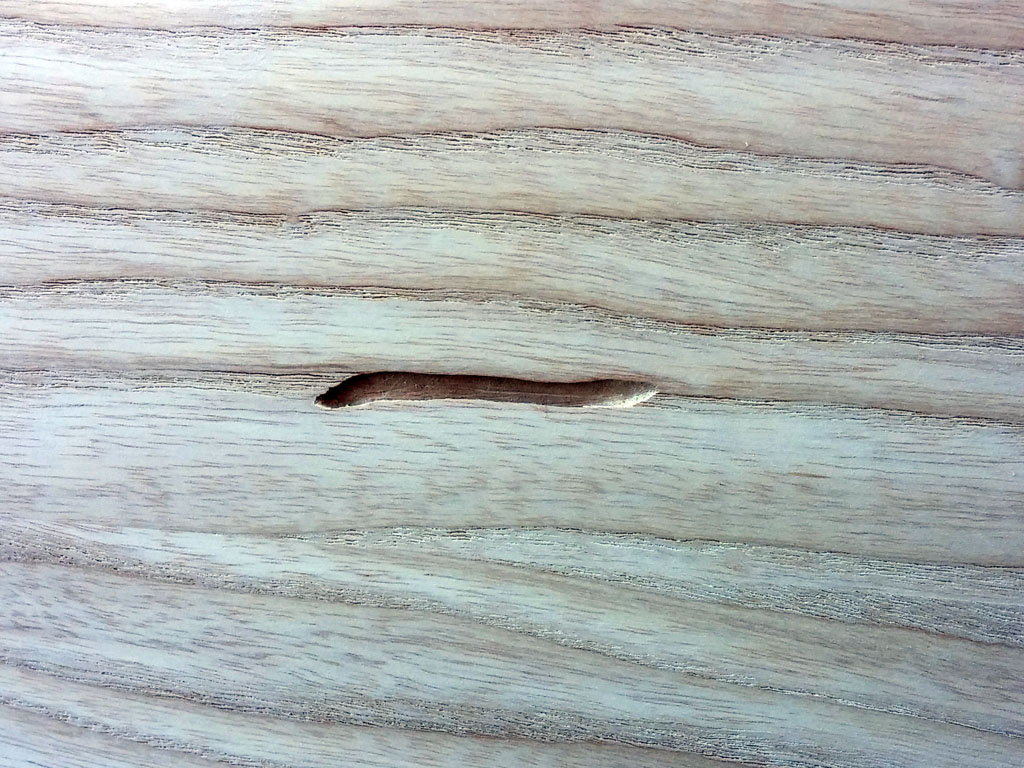
It's about 1.5" long, 3/16" wide, and about 1/8" deep. I'm not sure what the best plan to fill it is. I was thinking ash dust + epoxy + black dye (since it is inside a big grain line and i'm dying the grain black anyway) would be the best way. But now I'm not sure. Any thoughts?
So I have this:
It's about 1.5" long, 3/16" wide, and about 1/8" deep. I'm not sure what the best plan to fill it is. I was thinking ash dust + epoxy + black dye (since it is inside a big grain line and i'm dying the grain black anyway) would be the best way. But now I'm not sure. Any thoughts?
After touching up the tummy cut and forearm relief cut, I went ahead and dug the sand out of the void on the back.
So I have this:

It's about 1.5" long, 3/16" wide, and about 1/8" deep. I'm not sure what the best plan to fill it is. I was thinking ash dust + epoxy + black dye (since it is inside a big grain line and i'm dying the grain black anyway) would be the best way. But now I'm not sure. Any thoughts?
I like your idea. The only other thing I can think of is possibly take the opportunity to put something on the back, like a logo or something. But if you're building it for someone else, I'm not sure how that would fly
So looking at Mayones finish a bit more...I think I'm going about this the wrong way.
What about:
Wet sand to high grit
Thin seal coat (spray shellac or something)
Several thin layers of red paint, wet-sanded and such
Thin seal coat (clear poly or something)
Black pore filler (timbermate or similar, not zpoxy), sanded and such
Clear coats, wet-sanding, buffing, polishing etc.
What about:
Wet sand to high grit
Thin seal coat (spray shellac or something)
Several thin layers of red paint, wet-sanded and such
Thin seal coat (clear poly or something)
Black pore filler (timbermate or similar, not zpoxy), sanded and such
Clear coats, wet-sanding, buffing, polishing etc.
So looking at Mayones finish a bit more...I think I'm going about this the wrong way.
What about:
Wet sand to high grit
Thin seal coat (spray shellac or something)
Several thin layers of red paint, wet-sanded and such
Thin seal coat (clear poly or something)
Black pore filler (timbermate or similar, not zpoxy), sanded and such
Clear coats, wet-sanding, buffing, polishing etc.
Pretty sure there are a few threads around here where people detail that style finish .isn't it Dingwall who uses that finish regularly?
Either way, I'm 99% sure I've seen it in several build threads and it's done with the dark (black?) stain over the whole body- then the non open grain portions are sanded back and the other color is then applied.
Take all that with a grain of salt. I've been wrong many times before.


Pretty sure there are a few threads around here where people detail that style finish… .isn't it Dingwall who uses that finish regularly?
Either way, I'm 99% sure I've seen it in several build threads and it's done with the dark (black?) stain over the whole body- then the non open grain portions are sanded back and the other color is then applied.
Take all that with a grain of salt. I've been wrong many times before.
Yeah, I've seen it too. But there are loads of ways to do it, and I'm not sure what the best route is for my desired look.
Anyway...filled the void in the back:
I mixed up a little bit of epoxy and put some ash dust and 1 drop of Transtint black dye into it and flooded it into the void.
After it cured, I sanded and scraped the excess off:


