• TalkBass has been independent since 1998. Add your voice.
    Create a free account to reply to discussions, view embedded media, and browse with fewer display ads.
    Join freeLog in
    Want zero display ads or expanded classifieds tools? Compare plans.

Building Your Own Custom Truss Rods

Hey Bruce, I had a question about your DASR design.

For the anchor end of the rod, would it work to use a 3/8" brass rod, drilled perpendicular, oriented crossways in the neck, instead of the aluminum block? My thinking was the brass rod could rotate in it's seat, to the desired angle for the droop of the rod, instead of drilling the hole at an angle, in the aluminum block. Does that make sense?

Thanks
 
Hey Bruce, I had a question about your DASR design.

For the anchor end of the rod, would it work to use a 3/8" brass rod, drilled perpendicular, oriented crossways in the neck, instead of the aluminum block? My thinking was the brass rod could rotate in it's seat, to the desired angle for the droop of the rod, instead of drilling the hole at an angle, in the aluminum block. Does that make sense?

Thanks

Hey Bishop;

Hmmm...I understand what you're getting at.....But I see two problems: First, you want to get the end of the rod right up to the surface of the neck; almost touching the underside of the fingerboard. That's important to get the full amount of Droop, If you drill & tap the 10-32 hole in the middle of a horizontal 3/8" round bar, you'll lose about 0.080" of the droop. That's a significant amount.

Also, how would you cut the pocket for the anchor to fit into? A 3/8" ball nose router bit, then filling it up with epoxy?

I've tried a few different designs of anchors over the years and I keep coming back to the simple one: 1/2" dia alum x 1/2" tall, standing vertically. The threaded hole for the rod is up at the very top edge, at the 2 degree angle. When the anchor is up near the nut, I'll use the same design, but 5/8" dia x 3/8" tall. Either way, the part is easy to make, and the pocket in the neck is just a hole drilled with a Forstner bit.

If drilling the 2 degree hole in the anchor is what's bothering you, another option is to put the hole in the anchor straight, and then drill the hole in the neck with the Forstner bit at 2 degrees. That would work too.
 
  • Like
Reactions: Lo-E and BishopJP
Hey Bishop;

Hmmm...I understand what you're getting at.....But I see two problems: First, you want to get the end of the rod right up to the surface of the neck; almost touching the underside of the fingerboard. That's important to get the full amount of Droop, If you drill & tap the 10-32 hole in the middle of a horizontal 3/8" round bar, you'll lose about 0.080" of the droop. That's a significant amount.

Also, how would you cut the pocket for the anchor to fit into? A 3/8" ball nose router bit, then filling it up with epoxy?

I've tried a few different designs of anchors over the years and I keep coming back to the simple one: 1/2" dia alum x 1/2" tall, standing vertically. The threaded hole for the rod is up at the very top edge, at the 2 degree angle. When the anchor is up near the nut, I'll use the same design, but 5/8" dia x 3/8" tall. Either way, the part is easy to make, and the pocket in the neck is just a hole drilled with a Forstner bit.

If drilling the 2 degree hole in the anchor is what's bothering you, another option is to put the hole in the anchor straight, and then drill the hole in the neck with the Forstner bit at 2 degrees. That would work too.
I see... moving the end of the rod .080" means losing almost half the droop or routing the channel deeper, making it more than .5" deep, if I remember correctly.

Yes, I had thought to use a 3/8" ball end mill. I could modify my truss rod jig to have a little "T" at the end.

And, yes, I was concerned about drilling accurately at an angle. My adventures making Bruce Bars has shown me that my skills/techniques/tooling need improvement. I'm not even sure how I would accurately measure a 2 degree angle on my drill press.

I guess if the angle is a little off, it probably isn't the end of the world...
 
Hey Bishop;

Hmmm...I understand what you're getting at.....But I see two problems: First, you want to get the end of the rod right up to the surface of the neck; almost touching the underside of the fingerboard. That's important to get the full amount of Droop, If you drill & tap the 10-32 hole in the middle of a horizontal 3/8" round bar, you'll lose about 0.080" of the droop. That's a significant amount.

Also, how would you cut the pocket for the anchor to fit into? A 3/8" ball nose router bit, then filling it up with epoxy?

I've tried a few different designs of anchors over the years and I keep coming back to the simple one: 1/2" dia alum x 1/2" tall, standing vertically. The threaded hole for the rod is up at the very top edge, at the 2 degree angle. When the anchor is up near the nut, I'll use the same design, but 5/8" dia x 3/8" tall. Either way, the part is easy to make, and the pocket in the neck is just a hole drilled with a Forstner bit.

If drilling the 2 degree hole in the anchor is what's bothering you, another option is to put the hole in the anchor straight, and then drill the hole in the neck with the Forstner bit at 2 degrees. That would work too.
I drill the anchor hole 1mm oversize diameter for that 2deg angle. Epoxy fills it tight to the hole.
 
  • Like
Reactions: BishopJP
You could route your anchor channel to a depth where the rod would be about fingerboard level, place your anchor+rod in the slot and file off the top portion to be flat under the fingerboard? Kinda how those fender saddles look. Or even epoxy it in place and file it flat after? For my anchor angle, I looked at approximately where Bruce's entered and exited almost into the top and just guessed. Almost missed that bit entirely!

1774644544223.png


I see... moving the end of the rod .080" means losing almost half the droop or routing the channel deeper, making it more than .5" deep, if I remember correctly.

Yes, I had thought to use a 3/8" ball end mill. I could modify my truss rod jig to have a little "T" at the end.

And, yes, I was concerned about drilling accurately at an angle. My adventures making Bruce Bars has shown me that my skills/techniques/tooling need improvement. I'm not even sure how I would accurately measure a 2 degree angle on my drill press.

I guess if the angle is a little off, it probably isn't the end of the world...
 
  • Like
Reactions: BishopJP
It's been two years since I started this thread. I've said from the beginning that I wasn't really interested in building these truss rods for other Luthiers, at least not as one-off custom orders. I didn't really have the time, and I figured my price would be too high for most of you.

I openly encouraged anyone else to take this up as a side business, but I don't think anyone has. And only a few of you have been brave enough to make your own.

I'm re-thinking this. These days, it would be easy for me to have the blocks and bars made up by a mail-order company like SendCutSend, a hundred at a time, for $1 each or less. That would take away a lot of my labor. I would only need to cut the rods to length, thread them, and pin the parts together. And I've got good machines for that.

I may be able to offer one-off custom length truss rods for around $40-$50, plus postage.

Would any of you be interested in them for your projects? Is that a workable price?
What about a kit of everything except the rods? The rods are relatively simple, and this would allow customers to buy hardware for multiple truss rods at the same time without committing to the length in advance. Should cut the shipping cost (and risk of damage) too.
 
What about a kit of everything except the rods? The rods are relatively simple, and this would allow customers to buy hardware for multiple truss rods at the same time without committing to the length in advance. Should cut the shipping cost (and risk of damage) too.

Hey Max;

Well, possibly, but I'm not sure that it would help that much. From the comments on this thread, it seems like the biggest hurdle for most folks is threading the rods. If they are willing to buy the threading dies and make up the pilot bushing handle, then making the rest of the parts is easy in comparison.

I did have the thought of selling an adjustable-length kit version of the DADR design. All the parts made up, but the rods are extra long. The LH threads on the upper rod are maybe 4" long. The idea is that you would cut the rods to the length that you want, assemble the parts, and drill & pin the lower rod to the brass blocks. That's all. And maybe I would sell them as sets of 5, or something. So you could use them for any length you needed, assembling them per job.

What do you guys think? Is there any interest in that?
 
Last edited:
Okay, guys, we're getting off topic here. This thread is about building your own truss rods.

If one of you wants to start a thread listing brands and types of truss rods that are available to buy, and evaluating them, that would be a good thing. I'll assist with engineering commentary.
 
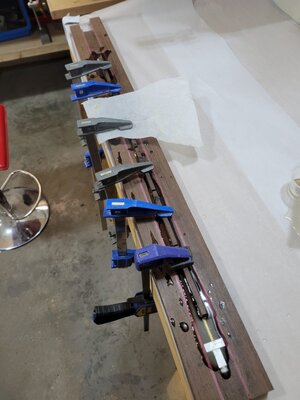
I did these steps a while ago, but I didn't want to share them until I could verify the truss rod actually works. It's my first ever build, and my first time using epoxy. I used beeswax to coat the things that need to move. It turned ok but felt a bit like gravel inside. I think I clamped too tight, and the face of the rotating brass barrel isn't perfectly square/smooth against the anchor. I'll do better neck'sd time. I didn't feel like I really should crank the thing being a big hunk of wenge, so I crossed my fingers and glued the finger board on and carved the neck lol. It turns a little better not fighting the whole stiff block of wood, and shapes the relief where intended.
 

Attachments

  • 20251120_223217_copy_1209x1612.jpg
    20251120_223217_copy_1209x1612.jpg
    718 KB · Views: 12
  • 20251120_230506_copy_1209x1612.jpg
    20251120_230506_copy_1209x1612.jpg
    644.6 KB · Views: 13
  • 20251120_230510_copy_1209x1612.jpg
    20251120_230510_copy_1209x1612.jpg
    681.8 KB · Views: 11
I did these steps a while ago, but I didn't want to share them until I could verify the truss rod actually works. It's my first ever build, and my first time using epoxy. I used beeswax to coat the things that need to move. It turned ok but felt a bit like gravel inside. I think I clamped too tight, and the face of the rotating brass barrel isn't perfectly square/smooth against the anchor. I'll do better neck'sd time. I didn't feel like I really should crank the thing being a big hunk of wenge, so I crossed my fingers and glued the finger board on and carved the neck lol. It turns a little better not fighting the whole stiff block of wood, and shapes the relief where intended.

Good job! You worked through it and got the process figured out.

About the roughness in turning: Yes, it's important that the front face of the brass Barrel and the back face of the Sleeve are square and smooth. When I make those parts in my lathe, I press a small spot-facing bit against those faces for a second to clean them up. If you don't have a lathe, you can do a similar thing in your drill press. Clamp the Barrel in the drill press chuck, facing down, and set a flat file on the table. With it spinning, lightly press the face down onto the file surface for a second or two. You'll be able to feel it as it squares up and smooths out.

Also, when I assemble the head assembly, I put small dabs of automotive Wheel Bearing Grease on those sliding surfaces. A good permanent lubricant.