• TalkBass has been independent since 1998. Add your voice.
    Create a free account to reply to discussions, view embedded media, and browse with fewer display ads.
    Join freeLog in
    Want zero display ads or expanded classifieds tools? Compare plans.

Building Your Own Custom Truss Rods

For a heel adjust WITH carbon fibre TOW backstrap, the truss rod channel is routed curved from the 5th fret up to halfway between the zero and 1st fret. From the 5th fret to the heel the channel is flat, running parallel with the fretboard, and at the depth of the droop. The TOW is then placed in the channel from the heel up to the 5th fret. The truss rod is clamped at the 5th, and the two anchors (the slug at the headstock, and the crossbar at the heel) which are level with the fretboard, force the truss rod into the eliptical shape. When gluing, epoxy fills the channel under the rod between the heel and the 5th fret. A maple filet pushes the truss down for gluing.

For a heel adjust WITHOUT carbon fibre TOW, then the channel is routed eliptically in BOTH directions from the 5th fret.

Yes, that's all correct.
You seem to use a 2 degree angle at both the slug and the anchor. Obviously the curve has a different radius, so does that mean that the angle is not that sensitive? ie 2 degrees is fine for both ends of the rod, and also for different scale lengths? Or do I really need to be drilling the angle accurately depending on the exact radius of each installation?

Heh, you caught some sloppy engineering on my part! When I established that 2 degree angle spec (20 years ago!), I measured it by eye, using a protractor. And in practice, everything seemed to fit together okay in different combinations of scale length, etc. There is enough slop in the diameter of the hole for the anchor to handle any minor error in the angle. I never bothered to refine that angle. My tooling for drilling the hole in the anchor slug is cut for 2 degrees.

You are certainly welcome to refine the angle with CAD if you like.

At the adjusting head end, I recently made up that pin router fixture to rout the pocket for it. The base plate of the fixture is tilted to cut the pocket at that angle, to line up the barrel with the rod. I started out with it set up at 2 degrees, but when I started doing test cuts and checking it, I ended up reducing the angle. I think it's around 1.5 degrees now. The important thing is that it lines up correctly with the parts in place.
 
Ok I decided to give making a DASR a go. Here's the result:

IMG_20251017_202311.jpg

I'm pretty happy with it. I have no experience of metal work at all so there was a bit of a learning curve. If anyone is interested I can do a detailed post on how I made it from the perspective of a complete beginner using just a drill press.

The most difficult thing I found was work holding. How do you clamp all the various small pieces, some of them round, so that things don't start flying around when the drilling starts....I muddled through, but more by luck than anything else

Can I ask @Bruce Johnson or @MPU how you drill the 2mm hole through the bolt and the barrel. Do you do it at the same time? If so how do you hold all the pieces together while you drilling? How do you stop the bolt from spinning?
 
Do you do it at the same time? If so how do you hold all the pieces together while you drilling? How do you stop the bolt from spinning?
Those look great! I would like to hear about your method if you don't mind writing about it. I used a rubber band to keep the pieces together, it mostly worked. I think drilling them at the same time makes sure the pins line up 100%. If I do it again I would probably use a 10mm long pin and file the ends off. My hole was a bit angled and I ran into some issues getting the pin in.
 
I drill it in a vise. My vise has slots for round pieces both horizontal and vertical. No need to hold the bolt, it’s not spinning. If it spins, use some ca or tread lock to hold it while spinning.
Any chance you could take a photo of your vise/advise on what vise would be good for use with a standard drill press?
 
Here's the jig I made for cutting my slot curve. Can you smell the chocolate wenge dust? I ran out of time to finish the straight length of the channel. 3.5" router base, had to buy a longer 2-3/8 bit because of my design choice.
 

Attachments

  • 20251016_223432_copy_1209x1612.jpg
    20251016_223432_copy_1209x1612.jpg
    861 KB · Views: 32
  • 20251016_232633_copy_1209x1612.jpg
    20251016_232633_copy_1209x1612.jpg
    837 KB · Views: 29
  • 20251016_232640_copy_1209x1612.jpg
    20251016_232640_copy_1209x1612.jpg
    583.2 KB · Views: 28
Ok I decided to give making a DASR a go. Here's the result:

View attachment 7346383

I'm pretty happy with it. I have no experience of metal work at all so there was a bit of a learning curve. If anyone is interested I can do a detailed post on how I made it from the perspective of a complete beginner using just a drill press.

The most difficult thing I found was work holding. How do you clamp all the various small pieces, some of them round, so that things don't start flying around when the drilling starts....I muddled through, but more by luck than anything else

Can I ask @Bruce Johnson or @MPU how you drill the 2mm hole through the bolt and the barrel. Do you do it at the same time? If so how do you hold all the pieces together while you drilling? How do you stop the bolt from spinning?

Here are some old pictures of how I drill & pin the DATR Adjusting Head assembly. This is one using the 3/8" round aluminum Sleeve. These days, I mostly make them with the 3/8" square sleeve, as you have done.

IMG_4118B.jpg


There's the parts, and the plastic syringe filled with automotive wheel bearing grease. I put a small dab on each of the faces that slide on each other, then assemble the parts.

IMG_4119B.jpg


Here's how I drill it. The barrel is clamped in one side of a small drill press vise, preferably one with a horizontal groove in one jaw, or steps in both jaws, like this one. If you have one of those common import drill press vises, you can just remove one of the screw-in jaws, to make a step on one side. Something that the barrel can rest on to keep it from tipping.

With it clamped in there like this, center-punch the location on the barrel where you want the hole. About 1/8" back from the face of the barrel, centered side-to-side. Slide the vise around so the spot lines up with the tip of the drill bit, before you start drilling.

While drilling, I hold the head of the bolt, usually with my thumb on the socket head. I'm pressing it lightly inward against the barrel to take up all the clearance between the assembled parts. And keeping it from trying to turn while it's being drilled. These days, I use a small pair of pliers on the head of the bolt to keep it from turning, while pressing lightly sideways.

As you may have already found, drilling a tiny hole through the stainless steel bolt takes a bit of practice and a gentle feel. Drilling stainless requires a light feed pressure to cut smoothly and easily. And it's a fairly narrow window. Too little pressure, and the stainless will heat up and start smoking and "chirping". Keep going like that, and the stainless will work harden, and the drill bit will jam up and probably snap. The funny thing is, too much feed pressure will do the same thing. There's a narrow range of feed pressure between, when the drill bit will cut smoothly and easily, and spirals of stainless will come up out of the hole. The skill involves feeling and watching how the drill bit is cutting, and learning to control that gentle feed pressure to keep it in the right range, the whole way through the part.

IMG_4120B.jpg


After drilling the hole down through, while it's still in the vise, I tap in the 2mm stainless pin, making sure the holes are aligned and the pin goes all the way through.

The pin has been slightly flattened on one end, to make it a friction fit in the hole. The un-flattened end is inserted in the hole, and it is tapped down flush, like a little nail.

The pin is 10mm long, slightly longer than the 3/8" diameter of the brass barrel (if you are building in American size).

IMG_4121B.jpg


As a finish-up operation, I hold the assembly on top of a small anvil, and smack both ends of the pin with a small hammer. This peens and flattens the ends of the pin, so it's permanently in there and can't fall out. Stainless dowel pins are soft enough that you can form and shape them with a hammer.

After the peening, I hold the brass barrel part up against a vertical belt sander with a 180 grit belt, rotating it using a 3/16" allen wrench in the head. I gently grind down the ends of the pin to be flush with the barrel. While doing that, I turn the assembly through a few revolutions to test that turns smoothly and doesn't bind up.

I need to make up one of these DATR heads tomorrow. So I'll more carefully photograph the whole process in more detail, and post it here in another day or two.
 
The most difficult thing I found was work holding. How do you clamp all the various small pieces, some of them round, so that things don't start flying around when the drilling starts....I muddled through, but more by luck than anything else

As others have mentioned vise jaws with v-grooves will help a lot. Also, be aware that clamping off center (from the vise screw) in a vise tend to tilt the jaws slightly. This tilt will cause the clamping pressure to be uneven. If you then try to drill on the end of the work piece furthest away from the vise screw the work piece will just tilt (And probably break a drill bit in the process). It may be helpful to put the work piece against the bottom of the jaws if you don't have stepped jaws. Just remember to put something sacrificial underneath if you are drilling through so that you don't drill into the rails of the vise.
 
be aware that clamping off center (from the vise screw) in a vise tend to tilt the jaws slightly. This tilt will cause the clamping pressure to be uneven. If you then try to drill on the end of the work piece furthest away from the vise screw the work piece will just tilt
This was my biggest struggle. I didn't realize or understand how to clamp properly, so a number of my holes aren't quite perfect. Any other tips for centering or keeping a part level without grooves in the vice? I'm just using a friends shop, so I'm stuck with the tools he has.
 
If you have a cutoff piece of stock that you can place in the other side of the vise as a spacer it will keep the jaw square and help the vise to grip the piece. If you have a piece of bar stock that’s narrower than the piece you’re drilling, you can place it underneath to keep your piece parallel to the bottom of the vise and perpendicular to the drill bit.

Machinists have special flat stock pieces called parallels that are made for this purpose to very tight tolerances but, for this job, you’d be fine with a piece of brass or aluminum bar.
 
To add to what Lo-E is saying above, here's the setup if you only have a vise with smooth jaws:

DSCF0248.JPG


That's a strip of 1/8" x 1 1/2" aluminum resting in the bottom of the vise. The truss rod adjusting head rests right on top of it, and that keeps it from tipping vertically. It could also be a piece of 1/4" plywood, as long as it's reasonably parallel.

Also, notice that I've put a little scrap of the 3/8" brass stock, same as the barrel, between the other side of the jaws. That balances the clamping load, so the clamping jaw can't twist. This particular old vise is sturdy enough that it doesn't really need it, but your standard cheapie drill press vises do.

The stronger vise with the grooved jaws is cooler and faster if you are making a batch of parts. But the setup I'm showing here works fine for a one-off operation.
 
Here's my process for assembling the DATR Adjusting Heads, in full detail:

DSCF0249.JPG


Here's the five parts that make up the DATR Adjusting Head Assembly. The Bolt, the Sleeve, the Cross Bar, the Barrel and the Pin. In upcoming posts, I'll show how I make up those parts with my machines, in batches.

DSCF0250.JPG


The Pins are standard Dowel Pins, in Stainless Steel, 2mm dia x 10mm long. I buy them from McMaster-Carr; $15.59 for a box of 100. I have this little strip of rubber sanding block material with holes drilled in either side. I plug the pins into the holes and use it as a holder for them.

DSCF0251.JPG


I flatten the ends of the pins with my big 3 Ton Arbor Press.....

DSCF0252.JPG


I have a 1/4" hardened dowel pin in the ram of the press, and use a hardened Tool Steel block (an old lathe cutting bit) on the press's table. I smash the ends of the pins between the two hardened surfaces, holding them by the rubber holding block, working down the row on both sides. It doesn't take much tonnage to squash these stainless pins. Don't try this with hardened steel pins!

DSCF0254.JPG


That's what the ends of the pins look like. The squashed end swells out, so the pin will lock into the hole as it's driven in the last bit.

DSCF0255.JPG


If you don't happen to have a nice big Arbor Press, you can do it like this. Hold the pin with pliers and give it a smack or two with a hammer, on the edge of an anvil or other hard surface.

DSCF0256.JPG


I have a plastic industrial syringe, packed full of automotive wheel bearing grease. A little "worm" of grease goes under the head of the bolt......

DSCF0257.JPG


Then slide on the Sleeve, and some more grease on the back surface of it......

DSCF0258.JPG


Slide on the Cross Bar, and some more grease......

DSCF0259.JPG


Then slip the Barrel onto the end of the Bolt. Those are the three places that need to be greased. Right now, the parts are just stuck together by the grease.

In the next post, I'll drill the hole for the Pin and install it.
 
Drilling and installing the pin, which holds the assembly together:

DSCF0260.JPG


This drill press is one of the prizes of my antique machinery collection. It's a 1925 Avery Sensitive Drill, a machine made specifically for drilling tiny holes in steel and hard metals. 100 years old, and it's been drilling holes since my Grandpa was a teenager. And it's still going strong, works beautifully. Just right for this particular job.

I like to show it off, because it's an amazing machine, and a joy to use......But you don't really have to have one of these to make truss rods......

DSCF0261.JPG


For 20+ years, I used this little drill press to drill all the 2mm pin holes in my truss rod parts. It's a Dayton (Grainger's brand) version of the standard little import bench-top drill presses that are sold by the millions. Most of you have one. It doesn't have the delicate feel of the Avey, but it got the job done for me, thousands of times. Since I got the Avey, the little Dayton has a new assignment as my small countersinker. That's a precision 1/4" countersink bit in its chuck.

DSCF0262.JPG


Here's the vise that I have set up in the Avey. It has the horizontal and vertical grooves in the stationary jaw; the moving jaw is flat smooth.

DSCF0263.JPG


I clamp the DATR assembly in it like this, with the Barrel in the groove. A small amount of clearance between the Cross Bar and the vise.

DSCF0264.JPG


I use a small automatic centerpunch to mark the location of the hole on the Barrel. About 1/8" back, centered.

DSCF0265.JPG


With the drill off, I slide the vise around to line up the centerpunch mark with the drill bit. A couple of light touches of the bit into the centerpunch mark to verify it.

DSCF0266.JPG


I grab the head of the Bolt with a pair of small pliers to keep it from turning as the drill starts down into it. I'm also applying a small amount of side pressure toward the vise, to make sure the parts are tight together, with no clearance, as I drill the hole down through the Barrel and Bolt.

Tool note: That's a pair of Battery Pliers, an automotive tool used on battery terminals. They are made to grip a range from 1/4" to 1/2". They are available for cheap, and can always be found in the piles of junk at flea markets. They are a great accessory for a drill press, for gripping small parts while drilling.

DSCF0267.JPG


Drilling the hole. Drilling the brass is easy, but drilling a tiny hole in the stainless Bolt is tricky. It requires a gentle touch and some skill/experience. As I started to explain in a post above, drilling stainless requires a light, but steady downforce pressure to cut smoothly. And a sharp drill bit. And it's a narrow window where it cuts well. Too little pressure and/or a dull drill bit will work harden the metal down inside the hole. The bit will squeal and chatter, and may jam up and break. But too much pressure will have the same effect. The correct pressure is somewhere in between. When drill is cutting right, the stainless will come up out of the hole as long silver spiral chips, rather than small darker brown or blue chips.

That's the point of the Sensitive drill press. The short small quill lever and the gear ratio of the quill allow you to really feel the amount of pressure that you are applying to the drill, and how well it is feeding in, so that you can control it and keep it in the right range. Also, the belt tension on the Avey is finely adjustable. I keep it set to a point where, if the bit jams up, the belt will slip without breaking the bit. Drilling stainless in a normal, larger drill press can be an exercise in frustration, with burned parts and broken drill bits. Been there, done that.

While drilling, I'll "peck" the drill several times. That is, lift the drill up out of the hole to clear out the chips, and set it back down in and resume feeding. If you let the chips build up down in there, they will heat up and jam.

My favorite type of drill bits for tiny holes in stainless are Cobalt Screw Machine Drills. These are the short, high precision bits in Cobalt Steel. They are a little more expensive than standard High Speed Steel bits, but worth it. They cut better and last longer. Solid Carbide Drill Bits are much more expensive, and in my experience, they don't cut stainless as well as the Cobalt bits. The 2mm Cobalt Screw Machine Drill bits that I use cost $3 each at McMasters. I change them about every hundred holes.

One other note about the drilling: As you feel the drill break through the bottom side of the stainless bolt, and into the brass on the bottom of the Barrel, be careful. Back off the feed pressure as it breaks through the bottom of the brass, or it may jam a chip and snap the drill bit.

DSCF0268.JPG


After the hole is drilled, while the parts are still in the vise, I set the pin in the hole and push it down with my finger........

DSCF0269.JPG


Then I take it out of the vise and place it on the edge of the aluminum plate that's the vise's base. A quick hammer tap to push the pin in about flush.....

DSCF0270.JPG


Over on my little anvil, I put a couple of good hammer smacks on each end of the pin, to peen the ends like a rivet.

DSCF0271.JPG


Then a quick touch on my vertical Knife Belt Sander, with a 180 belt, to grind the two "heads" of the pin flush with the Barrel. I'm using a 3/16" T-handle Allen wrench in the head to rotate it as I grind it. Lightly.

DSCF0272.JPG


And there's the finished DATR Adjusting Head Assembly, with the excess grease wiped off. Ready for installation in a neck.

That's how I put them together. Next up, I'll show how I make up the individual parts.
 
I grab the head of the Bolt with a pair of small pliers to keep it from turning as the drill starts down into it. I'm also applying a small amount of side pressure toward the vise,
Or one could push in a nice long-arm Allen wrench resting the long end on the table, or a normal-length Allen wrench with a block to keep it from spinning if it doesn't reach the table... Or just hand-hold it since there's no particular reason for it to spin in this application.

Yes, I get that the battery pliers may be more versatile for other round things, but given it's an Allen head cap screw, just seems the obvious choice here.

Note for those without an anvil (yet;!) The head of a sledgehammer is a fairly acceptable and easy to find small anvil substitute. You can even use a cheap one from the flea market with no handle, or a broken handle. A scrapyard can also hook you up with a section of solid steel shaft that can work better (more weight) for not a lot of money. Not as versatile as an actual anvil, but perfectly good for this purpose.
 
Last edited:
  • Like
Reactions: Lo-E
Or one could push in a nice long-arm Allen wrench resting the long end on the table, or a normal-length Allen wrench with a block to keep it from spinning if it doesn't reach the table... Or just hand-hold it since there's no particular reason for it to spin in this application.
I have to imagine there's going to be some play, no matter how tiny, with an Allen wrench in the socket. A solidly gripping wrench will not allow it to move at all. It'll depend on how much movement is tolerated.
 
Or one could push in a nice long-arm Allen wrench resting the long end on the table, or a normal-length Allen wrench with a block to keep it from spinning if it doesn't reach the table... Or just hand-hold it since there's no particular reason for it to spin in this application.

Yes, I get that the battery pliers may be more versatile for other round things, but given it's an Allen head cap screw, just seems the obvious choice here.

Hey T_Bone;

Sure, an Allen wrench would work too. It doesn't take much force/torque to hold the Bolt still. I'm grabbing it gently with the pliers, not making any marks or anything on the head. I used to just hold it with my fingers, but the pliers are more secure. The bolt will sometimes try to turn slowly as the drill enters into it. And that's a real problem, because the hole will start to go crooked, and can jam up and snap the bit. I've had that happen a few times.
 
  • Like
Reactions: T_Bone_TL
Don’t confuse these with Assault and Battery Pliers, which are bigger and heavier and you usually don’t see them coming until it’s too late.

Oh yeah, I keep one of those around....A pair of 18" Arc-Joint pliers. For those times when something refuses to turn around. If things really get ugly, I have a 36" pipe wrench......
 
  • Like
Reactions: Lo-E
I'm going to add just a few thoughts having completed my first DASR from the point of view of being a complete beginner. Guitars I can make, but my metalworking experience is exactly zero.

Because I'm a complete beginner, nobody should take anything written here as advice! Read what Bruce and the others have written. I won't do a step by step guide, Bruce has already pretty much done that. I'll just included what I found useful to know as a beginner.

First step was to watch this, showing how to drill vertically through the very centre of rod.


I live in Italy so everything is Metric. This a list of what I used:

FOR THE PARTS:
Apart from the rod, all came from Amazon.

Rod - 5mm steel. It just came from my local DIY shop, so I can't be sure exactly what type of steel.
Barrel -10mm brass rod
Space and cross bar - 10mm 6061 aluminium square rod
Pins - 2mm steel rod
Bolt - M6 x 70mm bolts. I found ones that were only part threaded. Cutting off the threaded part of the 70mm bolts left an unthreaded shaft of the right length.
51aamruaVSL._SX522_ (Small).jpg


TOOLS:
Bench Drill Press
Hacksaw with bi'metal blade 24tpi
IMG_20251010_193100 (Small).jpg
Clamp - I bought a cheap one from Amazon, made my Silverline. It's got no vertical or horizontal V channels, which made things a bit more difficult. At some point I'll replace it for one with channels.
Drill bits - I used my standard HSS drill bits, that I use for wood working. They worked fine.
Centre drill bits - I bought a cheap set from Amazon. They worked fine.
61HIggejctL._SX522_ (Small).jpg
File
Digital level
Oil (because I forgot to buy cutting fluid)
Tap & die - I bought from Intense Srl in Italy. M5x0.8 is the thread size.
Screenshot 2025-11-07 105620 (Small).png


First I cut off about 33mm of brass using the hacksaw. Before I started I thought I'd be spending days just sawing the various rods into the right length. In reality the hacksaw with the bi-metal blade was incredibly quick. Steel, brass, aluminium, nothing took more than 30 seconds to saw through. I then used a file to clean up the ends of the brass rod, then put it into my drill press and pushed it down onto a piece of 120 grit stuck to a piece of scrap.
IMG_20251017_091423 (Small).jpg

I then used the technique described in the video at the top to position the clamp directly under the chuck so that I could use the centre drill bit to start the hole. Watch the video, but basically you put the centre drill bit (upside down) loosely in the chuck, slide the clamp so that makes contact with the jaws on the far side, tighten up the clamp so that it grips the centre drill bit, then loosen the chuck so the drill bit is now held tightly in the clamp directly centred below the chuck. You can now put the brass barrel in the chuck and lower it onto the centre drill.
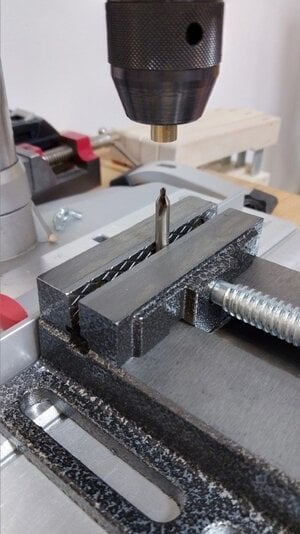
IMG_20251017_091937_HDR (Small).jpg
You get left with a small hole like this;
IMG_20251010_152756 (Small).jpg

I then drilled a 4.2mm hole through the barrel. It's 4.2mm because that's the size hole you need for tapping an M5 thread. I used the same techniques as above, putting the drill bit upside down in the chuck, lowering it down and tightening it into the clamp. The brass rod then goes into the chuck and you can start drilling. I drilled at about 1200RPM, reversing frequently, light-ish pressue and frequently stopping to re-apply oil as the lubricant.

I won't lie, it took me quite a long time to get all of this set up, and a couple of tries to get holes centred and clean. It would have been a lot easier with a vise with horizontal and vertical V slots.


For me these were the techniques that mattered:

1. Drilling in the centre of something using the technique shown in the video.
2. Using a centre drill bit to start the hole. Without it my drill bits wandered.
3. Clamping the drill bit, and putting the work piece into the chuck. I'm told that by doing this the drill bit is automatically finding the centre.
4. For the barrell I drilled half way, then repeated the process starting from the other end. I ended up with a perfectly centred hole all the way through.

All the holes were drilled as above.

For drilling the holes at a 2 degree angle I just did this:
IMG_20251010_191724_HDR (Small).jpg
And for the square rod, this:
IMG_20251017_175053 - Copy (Small).jpg

For tapping the holes I put the tap into the drill press and turned the chuck by hand. Here I've drill several holes making several anchor pieces. One technique that occured to me only late in the day is to tap a hole as soon as you've drilled it. The clamp is already in the right place, so the tap will cut exactly in the centre of the hole.
IMG_20251031_112840_HDR - Copy (Small).jpg

For threading the rod, I made one of Bruce's handles that he describes above. I found it really hard to start the thread though. I could'nt seem to apply enough pressure and turn smoothly at the same time. So I improvised and put the rod in a hand drill and just pushed it againt the die held in my clamp.
IMG_20251031_094524 - Copy (Small).jpg

DO NOT copy this technique. Yes it worked brilliantly, but something tells me the machinists are going to (rightly) shout at me. Not least because it puts a lot of stress on the drill. Doing one truss rod is probably ok, but if I were making them in batches I'm pretty such my drill would melt. I know drill Bruce mentions threading in one go without stopping. I wasn't able to do this, I found I need to reverse every couple of revolutions. I ended up with beautiful threads, no wobble at all.


Once I'd gathered all the parts, it probably took me a full day of experimenting, failing, re-trying till I had my first truss rod. Nothing was particularly difficult, once I'd understood the 4 techniques I describe above. Once they had sunk into my pretty thick head, everything went smoothly.


So overall, I would say that it was a reasonably straightforward process, using tools that most people with a workshop probably already have. Being able to make rods in any size I like is going to be amazing.

The only thing I don't like about them is the mess. I have a small workshop with no room for a decidated metalworking drill press. I worry about the oil used for lubrication getting onto my desk and drill bits etc etc and contaminating my wood, particularly beforfe applying a finsih. So if anyone in Europe wants to make me the parts, I'd still happily pay for them.


With regards to installation, I've made the jig for routing the channel, but haven't actually done an installation yet. Once I have I'll write that up as well.


Thanks Bruce, this is surely one of the best threads ever.
 

Attachments

  • IMG_20251017_104946 (Small).jpg
    IMG_20251017_104946 (Small).jpg
    184.7 KB · Views: 20
  • IMG_20251010_190927_HDR (Small).jpg
    IMG_20251010_190927_HDR (Small).jpg
    183.7 KB · Views: 16
  • IMG_20251010_152756 (1) (Small).jpg
    IMG_20251010_152756 (1) (Small).jpg
    188.6 KB · Views: 18
  • IMG_20251010_122405 (Small).jpg
    IMG_20251010_122405 (Small).jpg
    144 KB · Views: 18

Latest posts