• TalkBass has been independent since 1998. Add your voice.
    Create a free account to reply to discussions, view embedded media, and browse with fewer display ads.
    Join freeLog in
    Want zero display ads or expanded classifieds tools? Compare plans.

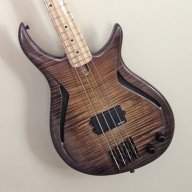
Claro Walnut 5 String

Looks fabulous! Incredibly clean and precise work, I love how it all has come together.

The figuring on that walnut looks very similar in many ways to a redwood burl top I finished over the summer. Just like on your bass, there were a few voids and swirls around the area of the control cavity that made me a little nervous in terms of stability, so I opted to reinforce the inside floor of the cavity with a thin sheet of polycarbonate from Home Depot to give it some extra strength and ensure any loose spots in the burl had something rock-solid to adhere to.

Something to consider if you're at all concerned about the structural rigidity of that walnut!

Lonnybass

Thanks Lonny! I'm not worried. It's solid. Just had a low spot I had to even out.
 
I'm about done with the nitro application. Had a break of a couple days because I had to order more Nitro from LMI. I've done several coats with a level sand in between every 3rd coat. It's hanging at the moment waiting for a couple final coats and I will leave it to cure for 2 weeks. (Cardinal claims a 7 day cure...I give it a little more time to be on the safe side)

The Forstner bit markings in the pickup cavities are bugging me. I drilled the cavities to depth to save my router bit...next time I won't be doing that. I'd rather it look clean, even though its not seen.

742d93b14bd37c5c47ddd92de7c6379d.jpg


Headstock logo is on and waiting for several coats of nitro to build a level surface.

9a62f0ce5812f08e82798c72f07393b1.jpg
 
This is stunning. Subbed for sure!

Thank you!

Not much to add as an update.
The headstock has had a few more coats of clear added. The body is done and hanging out of the way. I'll shoot a couple more coats of clear and level sand the headstock to get everything smooth and even. In the waiting period I am doing some preliminary planning for a Tele inspired guitar build that is next in line. Should be fun.
 
If you need someone to do a final check out you can send it to Cincinnati. I'll make sure it's broken in for you. :)

Thanks for offering Andy. I'll send it out right after the money clears the bank:)
This does beg a question for me though. How much should a new build be played before selling it? It's a stock build for my website that will be sold there or ill try some other places to sell it. I may not have a problem selling it locally...but you never know. I will make sure there are no problems and do a proper set up. Other than play it for 5 minutes and take pictures it's going in a case and getting stored away. I don't want to have any visible signs of wear.
 
VERY nice work on this bass. Don't know how I missed this one so far... Really like that you opted to match the top on the neck between the fingerboard end and the pickup.

GREAT JOB!

Thanks Nomad! This build has gone pretty quickly for me. I set a tight deadline for the construction to see how quickly I could get through it. I spent a couple days building templates and updating some jigs so I think I could do the next one a little faster. The finish is the test of patience...hurry up and wait.
 
This bass has been on break for the last few weeks but I'm back to working on it so I can get it completed before I get any more plates spinning. I get very busy between Thanksgiving and the New Year so its had plenty of time to cure. I've got a couple other builds in progress too so I want to give this more attention before I get any further into the others.

The nitro has cured and leveled easily with a dense foam block and MicroMesh. I use plenty of soapy water in a water bottle during the wet sanding phase. Can't be too careful around the drilled holes though so I squirt the MicroMesh with the water and not the body. I sanded up to 12000 and then used a polishing pad and StewMacs fine polishing compound. I'm definitely going to get a buffer soon. I love the look of polished gloss lacquer but it can get pretty time consuming without a proper buffer.

2a0e3af742ee680df35524d02599d2e1.jpg


6d01d696914471af3674bb43aa5ce5aa.jpg


816e9442b2a9b007c7c964edd96ad5be.jpg


2eef4c8dfbcbc0ce17b16f3fba29a67a.jpg
.

I'm moving on to the neck to polish the headstock and neck cap. I'm hoping to assemble and get this into the neck jig for a set up in the next week or so. Until next time...
 
Thanks Andy and Tewest86! I appreciate the kind words.

Just a quick update of today's work. The headstock was wet sanded and polished in the same manner as the body.

ec6fca5029989f83df21b458ee1db2de.jpg


The back of the neck is being done with Satin Poly. Did two thin coats today just rubbing it in with a clean cotton rag. Sanded with 220 after the first coat. Ill put a few more coats on and lightly sand until I'm satisfied with the look and feel of it.

51c839aa4c670c825f74f90c8698281e.jpg


66f1565e2bcb500a465c9f1c490f3d87.jpg
 
I really like the blunted horns. That's a cool touch.

Thanks...that edge can be a pain. Gotta be careful when sanding. I made sure I had sufficient coverage of those areas when spraying the lacquer. And kept an eye on how much pressure I was applying when sanding them.