MY CUSTOM COLLECTOR'S CABINET
So when you are a player but find yourself with 16 babies to PLAY you need to figure out a way to keep your instruments close at hand - tuned up and ready to go - at all times. I considered all the options, but didn't like any of them. If you hang them on the wall or keep them on stands, they get dusty - and you seem to spend more time wiping them down then you do playing them. You can cover them up but what is the point of that? If you keep them in their cases, they are not handy for immediate use. If you are like me, when inspiration strikes you want to be able to make a quick choice from your palette of available instruments, do a quick tuning check and be off and running. I have several acoustic insturments, so the other issue is keep them properly humidified. Since I could not find what I wanted as far as a storage cabinet goes - I decided to have mine custom built.
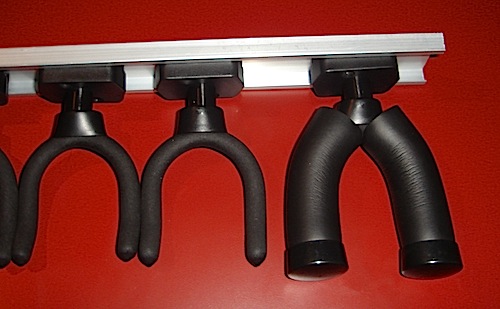
My first rule was - I wanted mine to be adjustable. That way if I swap things around and ever sell a couple or buy a couple - the cabinet would be flexible enough to adjust to it. I decided to use heavy duty tool hangers from Amazon to cradle the neck of the basses. I bought a variety of nylon washers and end caps and used plastic fixtures which slide on a track rail side to side, with a set screw to tighten them down when they are in position. I then bought protective foam tubing to slide over the tool hangers for extra padding and protection. You can see the one on the right has the foam tubes and the end cap in place.
I ended up having the rack rails powder coated black to match the fixtures. The original plan was to use a roll-top tambour door for the cabinet, because my studio space is very limited. I had sent emails to over a dozen cabinet makers in the greater New York area, but due to the tambour door they were not interested in helping me with the project. I finally sent my plans down to Lancaster County, Pennsylvania, to see if any of the fine Amish carpenters would be interested in the project. I finally found one and we got started near the end of 2013. We chose white oak with a Harvest finish. Here is the wood used for the cabinet.
Here is what the cabinet looked like as the build began.
We were summoned to Lancaster County a few weeks ago, as they had the roll-top tambour style door installed, but they found that even with counter-weight the door was simply too heavy. Here is what the cabinet looked like with the tambour door on it.
We loved the look and the idea of the tabour door and it was very hard to reconile and admit that it simply wasn't going to work. Since space is so limited in my studio the Amish carpenter suggested that we do sliding glass doors on the front, which we finally settled on as the best solution.
For the bottom rails, I scored a couple of rounded hand rails from Home Depot which were flattened on one side, which allowed them to sit flat on the bottom of the cabinet. I then had them covered with a thick layer of very soft foam. There is no way I would let any of this foam be directly against the basses, so I settled on royal blue velvet and had a local tailor make custom booties to completely cover the tool hangers and also to cover the bottom rails. I didn't skimp on the fabric - I found cotton, chemical free, untreated european velvet. It wasn't cheap but I only needed a couple of yards. Here is how the cabinet looks with the support beam, track rails and bottom rails in position.
The next step was to finish the cabinet and to get the rails and the glass for the door. Here is how the cabinet looked as they delivered it in my living room.
And here is how it looks with the glass doors in place in my studio with the basses loaded in.
BassHappy
www.innertainment.net