• TalkBass has been independent since 1998. Add your voice.
    Create a free account to reply to discussions, view embedded media, and browse with fewer display ads.
    Join freeLog in
    Want zero display ads or expanded classifieds tools? Compare plans.

First Build: SC5 Headless

Bookmatched tops! :hyper:
Everything was wiped down with mineral spirits before I snapped the pics.

Ziricote
IMG_0464.gif


Flame Maple
IMG_0467.gif


Cherry
IMG_0469.gif


Walnut
IMG_0468.gif


Ash
IMG_0470.gif


And for the Habaneros ...
Chechen
IMG_0472.gif


IMG_0474.gif


IMG_0473.gif


IMG_0471.gif


Now, where to find a good deal on a drum sander ...
 
I feel a NTD coming!
Just scored a Ryobi 16" drum sander for $300. Might also pick up an oscillating spindle sander at the same place for $30. That should help move this build along :smile:

Any recommendations on what # grit paper to pick up for the drum sander? I've heard that going too fine can be a problem with some woods.
 
These are seriously looking good! You've got me all excited for when they'll be finished, even though it'll probably be a while. The flame maple is my favourite, could you PM me with what you think your total cost will be by the end of this?

Thanks! I like the flame maple too. I have another piece out of the same board that I can use for another top some day. I might actually go pick up a few more. The place I got it was only charging $20 or $30 for similar pieces.

I think the Ziricote might be my favorite though. The detail along the center didn't show up very well in the picture. It's a pretty unique piece. I'm kind of partial to the first Chechen top too. I think that one is really going to pop when it gets finished.

If you mean the price that I would be asking if I was to sell one after it's finished, I haven't really thought about it. I've got a long way to go before I can even think about selling one of these.

What I can say is that I'm looking at about $900 just in materials (Hipshot Bridge $400, Nordstrand pickups $200, EMG preamp $100, mics. other hardware $100, wood $100) for each bass. The only other cost would be my time and until I'm actually finished I really don't know what I would value that at.

Right now I'm just happy moving things along at my snails pace. Although, much like you, I can't wait to see how they are going to turn out. :cool:
 
Everything has been thickness sanded flat. I'm wondering though, how fine a grit would you guys use on the faces you are going to glue together when joining a top and a body blank? I've up to 150G. There are lines left from the sander, but is that ok for two surfaces that get glued together, or should I go up to 180 or 220?

I also noticed a few spots in the ziricote top that need a little attention. I'll have to give it the old sawdust mixed with epoxy trick.
 
Wow, these builds are amazing! I love how clean your work is.

I know this comment is about a month late, but at R-V, we were told that the most stable layout for neck laminates is to have the grain perpendicular to the carving surface: reversing the layout you had. Something like this:
_______
///|||\\\

But at the end of the day, I don't think it makes a huge difference, as long as the grain patterns are equal and opposite.


You'll be more than okay with 150 grit scratches on your glue surfaces. Actually, the coarser the grit, the more "bite" you will have. If you sand a mirror finish onto something, there is a lot less gluing surface because you've taken off all of the tiny ridges left by the sandpaper.

I really look forward to seeing these finished!! :bassist:
 
Thanks for the info J Lund. I don't think I will have any problems with the neck blanks either (I've seen necks built with similar construction), but it's something I'll keep in mind if I build any more.

Top and back glue ups should start tonight. I've decided to add a Jatoba veneer between the tops, backs and body cores. I've always like the way those thin veneers help to highlight the contrast between the body and tops. I'm using Jatoba because I think it will help tie the neck in with the body since all of the necks have a Jatoba center laminate. I was also able to find a pretty good deal on a piece (2' x 8' for $45) that should be able to do all of the bodies I'm working on if I use it efficiently.

Last night and this morning was spent fixing the soft spots on the Ziricote top. I used my spindle sander to make a bunch of Ziricite dust from a cut off piece of the top. Then I cleaned the back side of the top with mineral spirits to get rid of anything that was sitting on the surface. I gradually heated the surface up with a head gun to help dry off the mineral spirits and warm the top to aid in applying the epoxy. Then i mixed up some clear epoxy, added in the Ziricote dust (enough that it was a semi thick slurry) and spread it across the entire surface with an old bank card. I worked the slurry in all directions so that I pushed it into any inconsistencies in the surface. After about 5 minutes of working it in, I went back and scrapped off as much as I could. I repeated the same process for the top side of the top this morning. After everything has cured I'll run the top through the drum sander on both sides to remove any extra epoxy from the surface. Sorry, no pics.
 
I'm not sure if I listed the wood combinations for the bodies, but they have changed a little. Due to the thickness of the tops and bodies, I couldn't use some of the combinations I thought I could. So, this is what I'm going to end up with:

SC5
- Ash x2
- Maple
- Ziricote top on Ash (with Jatoba veneer)
- Walnut top on Ash that has Walnut and Yucatan Rosewood laminates in the center
- Ash top on Walnut (with Jatoba veneer)
- Flame Maple top on Walnut
- Cherry top on Cherry (with Jatoba veneer)

Habanero
- Chechen top and back on maple (with Jatoba veneer) x2

I'm not sure about the Cheery/Cherry combination. Unfortunately because of the thicknesses that pairing just makes sense. I think the Jatoba veneer will help make it look a little better. I could just get some more contrasting wood to use, but since I already have enough on hand for 10 bodies I've decided to just use up what I already have before buying anything else.
 
So it turns out the 2'x8' veneer is paper backed. I decided not to use it and picked up some raw wood veneer instead. This stuff isn't wide enough to just use one piece. Any advice on splicing veneer? I think I remember seeing a Roscoe Guitars video where it looked like they were simply taping the seam. Is that standard practice?
 
I found a great video on youtube that explained how to joint veneer using a straight board and sandpaper. It was actually pretty easy once I gave up on trying to simply cut a straight edge with a knife.


So ... here is the first body glue up after being trimmed. The Ziricote top has not been wetted down this time. The veneer I used was pretty thin, but I think you can still make it out on the side pic. It should make a pretty nice accent line.

IMG_0478.gif

IMG_0479.gif

IMG_0480.gif


No pics again (sorry). This was my first time gluing a top to a body AND working with veneer. It turned out to be a lot trickier than I thought so I didn't stop to take pics in fear that my glue might start to cure before I got everything clamped. As I more comfortable I'll try and snap a few pics along the way.

I'm going to continue gluing up the tops over the weekend. Hopefully by Wednesday of next week I'll have them all finished up to the same point.
 
I glued another top up this morning and had time to take some pics. This one was a little easier since I didn't include a veneer.

I start by tracing the shape of the bass out on the top. I use the old washer trick to make the tracing a little bigger than the actual body. This on is around 0.30" bigger all the way around.

IMG_0481.gif


Then I cut out the top, following the line I just traced.

IMG_0482.gif


The tape marks the center line of the top. It makes is easier for me to line things up and I find it more accurate than a pencil line.

Next I trace the outline of the top onto the body blank.

IMG_0483.gif


Now it's time to start arranging things. I start with a 10" x 20" x 2-1/4" think laminated piece of plywood. That gives me something that is flat and stiff to clamp with. I have two small pieces of wood under it to hold it up enough that I can fit my clamps under it when it's time for gluing.

IMG_0484.gif


Add a piece of wax paper to prevent glue from spilling onto the plywood.

IMG_0485.gif


Then I put the body down on the wax paper and start spreading the glue (slow curing 2-part epoxy). I make sure that all of the area inside the top outline is covered and that there aren't any large pools of glue.

IMG_0486.gif


Then I apply glue to the top.

IMG_0487.gif


Once both surfaces are coated, I put them together, line the top up so it's center is inline with the center on the body and put another sheet of wax paper over it.

IMG_0488.gif


On goes another piece of laminated plywood. This one is cut out to the same shape as the top.

IMG_0489.gif


Then we start clamping! I start tightening them up slowly. It probably takes 5 minutes fr me to get them all on fairly tight and then another 10 minutes of going back and checking one them to tighten them a little more. Every time I tighten them, I have a look at the centers to make sure they stay aligned. I really should start using toothpicks or something just to make sure things can't move around.

IMG_0491.gif


And just like the cooking shows ... after a long commercial break, this is what you get!

IMG_0492.gif


This is the Cherry/Cherry body that I did last night. I take the clamps off after waiting at least 8 hours just to make sure the epoxy has cured enough that things aren't going to move around. Here it is after trimming.

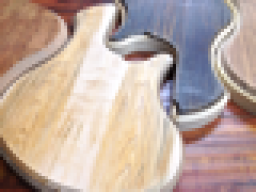
IMG_0493.gif
 
It's looking awesome! One question: what is your reason for you using epoxy instead of something like Titebond I or poly glue, etc? The longer work time would be nice when working with multiple laminates.

You are correct. I wanted a longer work time because I knew I wouldn't be able to do this step very quickly. I also like that it is transparent when it goes on. It makes it easier for me to line things up before clamping.

It looks like I'm going to need a few more clamps. The glue lines on my tops are visible in some places. I'm guessing that means I don't have enough pressure on the top to squeeze the excess glue out. It's either that or I'm seeing the "low" spots from only using 150g to sand everything before gluing. I'm going to stop laminating tops until I get the ones that already have tops through the router so I can see what the final product looks like.

