• TalkBass has been independent since 1998. Add your voice.
    Create a free account to reply to discussions, view embedded media, and browse with fewer display ads.
    Join freeLog in
    Want zero display ads or expanded classifieds tools? Compare plans.

First Build: SC5 Headless

This would be sweet!

Or, how about a single Nordstrand DC5 pickup wired to a two-way switch ( both coils in series/both coils in parallel) then straight to the output jack?

That's another option. I'd probably go with the one that would give me the most variation since we're only talking about one pickup. I'm also toying with putting an Aguilar OBP-1 in there. Bass and treble boost only, no volume with a three way switch for active/mute/passive. I'm not so worried about the fretless, but I don't know how well I'd like a single pickup on a fretted. I've only owned a few basses that had a single pickup.
 
That's another option. I'd probably go with the one that would give me the most variation since we're only talking about one pickup. I'm also toying with putting an Aguilar OBP-1 in there. Bass and treble boost only, no volume with a three way switch for active/mute/passive. I'm not so worried about the fretless, but I don't know how well I'd like a single pickup on a fretted. I've only owned a few basses that had a single pickup.

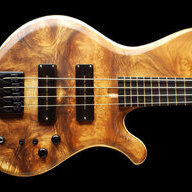
I like how Jerzy Drozd places two split single coil pickups close together:

Invalid Link Removed
 
Just found this thread! If you need someone to demo one when you finish them ;)

In all seriousness though, I love the look of those basses! especially the ziricote topped one (Finish it last! Do all the others first, find out what you like, and make it perfect!)

Subb'd
 
Second boo-boo happened yesterday.

I cut out the control cavity on one of the ash bodies. I use a fostner bit to remove most of the wood and then cleaned up things with my router. Somehow I got my measurements wrong and went a little too deep. After I cleaned up the bottom with my router (so that I had about 1/4" of material left for the controls) I noticed that you could still see little marks from the pointed tip on the fostner bit. None of them went all the way though, but I didn't like them there, even if they were getting covered up with copper shielding. So, I mixed up some epoxy and poured it into the cavity. I used a heat gun to get most of the bubbles out. When I get home tonight I can run over it with the router again to get it back down to the right depth (I only have about 0.04" to take off) and the bottom will be nice and flat.

I also ended up with a few spots of oil on the back of the body. The only thing I can think of is that my drill press was working a little harder than usual, so it might have gotten hot enough to heat up the oil on it causing it to drip onto the chuck. It was weird. This is the first time it's done that. The marks should sand off easily though. I'm glad it happened on an ash body and not one of the ones with fancy tops though.
 
octaedro7 said:
If you, with your talent, are chickening out, that leave me hopeless... :crying:

Come on, I'll give it a try on my first build, you have like 5 basses to try :p

Actually I have 10. I'd like to have them all turn out good though!

I'm doing the electronics cavities on all 10 right now. It takes way longer than you would think. Its really not that exciting either, so no pics.
 
Long overdue update ...

All of the electronic cavities are routed. I'm in the process of working on a few more jigs that I'll need to finish rough shaping things before I attach the necks to the bodies.

Here are a few of the neck pieces that I'm getting ready.

Neck blanks and fingerboards. And why yes, a one piece quarter sawn Wenge neck blank did join the group! :)
IMG_0525.gif


But wait .. what are these pieces of figured Ash and Jatoba veneer doing here? Stay tuned ...
IMG_0526.gif
 
Here is the first fingerboard getting its laminates. Each fingerboard will have an Ash and Jatoba veneer under them. I didn't originally plan to add the veneers, but the fingerboards ended up being a little thinner than I thought. Only the ebony fingerboard is thick enough that it doesn't need the pieces of veneer.

Glue up
IMG_0527.gif


Here you can see what's going on. I have a thick aluminum extrusion that is straight as an arrow with a 1" piece of Wenge. Then I have the pieces of veneer, the fingerboard and a 2" thick plywood laminate (again, nice and flat).
IMG_0528-1.gif


And here is something different. I got the idea to taper the body (it's thicker at the bridge end than the neck end) to help angle the neck back to make the reach for the first few positions a little more comfortable. Most taper the neck or the neck pocket to get the same effect. There is a 1 degree taper on the body (1.7" down to 1.4"). I'm sure I'm not the first person to do it, but I don't remember having seen it done before.

The jig is simply a bigger version of what others use for cleaning up their scarf joints.
IMG_0529.gif


IMG_0530.gif


IMG_0531.gif


At this point the body weighs 4.4 lbs. That's heavier than I was hoping for considering that the body is on the small side. I may reduce the thickness on the body to bring the weight down a little.
 
Approx 6mm (1/4") is the norm most of the time. Of course its worth having the pots you intend to use in stock to make sure they fit through.

I have been enjoying watching these builds! Really like the body style.

That's what I thought. Most of mine are at 0.28" right now, but taking them down a little isn't a big deal. I have two others that are at 0.18". I thought that might be a little thin. I think I'll pour a little epoxy in the bottom to thicken them up a bit.

I hear you about having the pots in stock. That would be a big help. Unfortunately, I don't. That goes for all of the hardware! Sooner or later I'll have to order the parts I need to make sure everything fits as planned. :hiding:
 
Got a little more work done today. Here is the first body with the fingerboard that I'll be using on it.
IMG_0532.gif


Here you can kind of see the veneer laminates under the fingerboard.
IMG_0533.gif


Here is the back with the Jatoba electronics cover.
IMG_0534.gif


And just for the heck of it, here's a shot of one of the cavities that I made a little too deep. I'm building up layers of epoxy to bring it back to where it should be.
IMG_0535.gif


Other than some sanding on the body, this one is on hold until I get my truss rods in. I should have been able to order them by now, but unfortunately PayPal isn't playing nice. :rollno: