
Enjoy the benefits of a premium membership!
Upgrade Account
-
TalkBass has been independent since 1998. Add your voice.
Create a free account to reply to discussions, view embedded media, and browse with fewer display ads.
Join free Log in
Want zero display ads or expanded classifieds tools? Compare plans.
You are using an out of date browser. It may not display this or other websites correctly.
You should upgrade or use an alternative browser.
You should upgrade or use an alternative browser.
More options
Who Replied?
I've heard that a good Epoxy can be used to fill in the gaps.I tape sandpaper to the body of the bass to set the feet. I can't seem to get them flush with the surface of the bass, though. Is there a technique?View attachment 2837739


Is there a technique?
Can we just skip the ignoring Talkbass advice part and go directly to you doing it the way you think is best?

Maybe some sort of hand file?Can we just skip the ignoring Talkbass advice part and go directly to you doing it the way you think is best?
I think luthiers generally use sharp knives to cut away the unwanted wood.Maybe some sort of hand file?
Good luck
If it is a plywood top fitting the bridge feet well is not too much important. You might loose a very little bit of volume and probably also sound quality, but hardly noticeable, specially on a cheap Chinese bass. If you fit the feet roughly that would be OK for your instrument.
If you still want to do it well the knife is better than the sandpaper because with the sandpaper it is hard to keep the bridge perpendicular to the top all the time during sanding and as a result the feet might get rounded which is not much better than a roughly fitted bridge.
Tape some plastic foil to the top of the bass, draw with a lipstick on it, put the bridge at the desired position, move it a little bit to transfer the lipstick to the bridge contact points, remove some wood where the lipstick transferred to the wood as long as there are uncolored parts and do it again. You are finished when the complete foot is red. Close to the end you might prefer scaping with the knife instead of cutting.
If you still want to do it well the knife is better than the sandpaper because with the sandpaper it is hard to keep the bridge perpendicular to the top all the time during sanding and as a result the feet might get rounded which is not much better than a roughly fitted bridge.
Tape some plastic foil to the top of the bass, draw with a lipstick on it, put the bridge at the desired position, move it a little bit to transfer the lipstick to the bridge contact points, remove some wood where the lipstick transferred to the wood as long as there are uncolored parts and do it again. You are finished when the complete foot is red. Close to the end you might prefer scaping with the knife instead of cutting.
If it is a plywood top fitting the bridge feet well is not too much important. You might loose a very little bit of volume and probably also sound quality, but hardly noticeable, specially on a cheap Chinese bass. If you fit the feet roughly that would be OK for your instrument.
If you still want to do it well the knife is better than the sandpaper because with the sandpaper it is hard to keep the bridge perpendicular to the top all the time during sanding and as a result the feet might get rounded which is not much better than a roughly fitted bridge.
Tape some plastic foil to the top of the bass, draw with a lipstick on it, put the bridge at the desired position, move it a little bit to transfer the lipstick to the bridge contact points, remove some wood where the lipstick transferred to the wood as long as there are uncolored parts and do it again. You are finished when the complete foot is red. Close to the end you might prefer scaping with the knife instead of cutting.
Thanks for that. I Am basically happy with the sound, so I think I will leave it alone for now.
- Aug 1, 2005
- 3,546
- 1,421
- Disclosures
- Private Inventor - Bass Capos
The sandpaper method is indeed frowned upon by proper luthiers, but it seems to work for some. Your picture shows a pretty poor fit, however. Can you get any thin cork? There are a few players out there who swear by a cork layer under the feet, and this would compensate for a poor fit. It should be thin, however, like 1mm. You can get it from woodwind suppliers. I don't know what you can get where where you are though, although there are plenty of woodwind instruments in your part of the world, just not clarinets and saxophones. If you can't get thin cork sheet, maybe try leather?
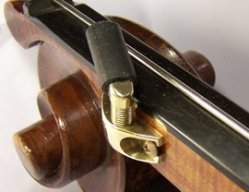
I just saw this device on the Gollihur website:
Upright Bass Bridge Foot Fitter Tool (for Contouring Bass Bridge Feet) at Gollihur Music - Double Bass, Upright Bass, String Bass Specialists
Upright Bass Bridge Foot Fitter Tool (for Contouring Bass Bridge Feet) at Gollihur Music - Double Bass, Upright Bass, String Bass Specialists
- Aug 1, 2005
- 3,546
- 1,421
- Disclosures
- Private Inventor - Bass Capos
I just saw this device on the Gollihur website:
Upright Bass Bridge Foot Fitter Tool (for Contouring Bass Bridge Feet) at Gollihur Music - Double Bass, Upright Bass, String Bass Specialists
Last edited:

Greg Clinkingbeard
Commercial User
Nothing wrong with sandpaper so far. I often use it to get the general shape and to remove the irregularities from the band saw.
Then I mark the top with China marker and use a scraper, much like the lipstick method already mentioned. I make sure the corners and edges fit and put a slight hollow in the feet.
Then I mark the top with China marker and use a scraper, much like the lipstick method already mentioned. I make sure the corners and edges fit and put a slight hollow in the feet.
Greg- just curious- why the slight hollow in the feet?Nothing wrong with sandpaper so far. I often use it to get the general shape and to remove the irregularities from the band saw.
Then I mark the top with China marker and use a scraper, much like the lipstick method already mentioned. I make sure the corners and edges fit and put a slight hollow in the feet.
Greg Clinkingbeard
Commercial User
I scrape no more than .3mm out of the center of the foot and make sure the edges fit perfectly. Under tension they sink into the varnish and fit.Greg- just curious- why the slight hollow in the feet?

Why are you changing the bridge? The following is my way of fitting the feet of a new bridge.
Do you still have the old bridge? Trace the curves of the feet onto the new bridge with a pencil. Also trace the rest of the old outline as a rough guide to show how much excess wood can be trimmed off the sides and top later, the curve of the old top and the notches for the strings (assuming that the old bridge was well fitted). These steps are important if the shape of the belly has distorted or the fingerboard is not aligned properly.
With the bridge on its back and allowing some extra wood for mistakes and the final fitting then trim wood off the bottom of the new feet with straight vertical cuts by a tenon saw. Stand the bridge in its correct position between the nicks in the F holes. With a small thin block of wood under a pencil go around each foot of the bridge to accurately transfer the curve of the belly to the feet. Whether you then sand, scrape, whittle, plane, band saw or grind wood away you curve the feet to the best possible fit while keeping the back of the bridge vertical to the belly.
I prefer to use a very sharp luthier's knife, first to whittle then finally to scrape in order to obtain a "chalk fit". I rub blackboard chalk onto the feet, stand the bridge in position,press the feet down with each hand then move the bridge feet sideways each way a little. The chalk rubs off the high points that are then carefully trimmed down before re-chalking and repeating the process. A good chalk fit is when all (or in my case, most) of the chalk is rubbed off.
With the feet fitting nicely and the bridge standing in position I use a straight edge to help draw the curve of the fingerboard on the front of the bridge to help with planning string notches and heights, final trimming and finishing the rest of the bridge. I also sight down the fingerboard from the scroll to check everything as I go.
Spanky123, you may have to resort to the small thin block of wood (or piece of cardboard) and pencil then chalk fit for best results. I have tried sandpaper myself, finding it slow and hard to control the "rock and roll".
Do you still have the old bridge? Trace the curves of the feet onto the new bridge with a pencil. Also trace the rest of the old outline as a rough guide to show how much excess wood can be trimmed off the sides and top later, the curve of the old top and the notches for the strings (assuming that the old bridge was well fitted). These steps are important if the shape of the belly has distorted or the fingerboard is not aligned properly.
With the bridge on its back and allowing some extra wood for mistakes and the final fitting then trim wood off the bottom of the new feet with straight vertical cuts by a tenon saw. Stand the bridge in its correct position between the nicks in the F holes. With a small thin block of wood under a pencil go around each foot of the bridge to accurately transfer the curve of the belly to the feet. Whether you then sand, scrape, whittle, plane, band saw or grind wood away you curve the feet to the best possible fit while keeping the back of the bridge vertical to the belly.
I prefer to use a very sharp luthier's knife, first to whittle then finally to scrape in order to obtain a "chalk fit". I rub blackboard chalk onto the feet, stand the bridge in position,press the feet down with each hand then move the bridge feet sideways each way a little. The chalk rubs off the high points that are then carefully trimmed down before re-chalking and repeating the process. A good chalk fit is when all (or in my case, most) of the chalk is rubbed off.
With the feet fitting nicely and the bridge standing in position I use a straight edge to help draw the curve of the fingerboard on the front of the bridge to help with planning string notches and heights, final trimming and finishing the rest of the bridge. I also sight down the fingerboard from the scroll to check everything as I go.
Spanky123, you may have to resort to the small thin block of wood (or piece of cardboard) and pencil then chalk fit for best results. I have tried sandpaper myself, finding it slow and hard to control the "rock and roll".
Thanks for the tip!I scrape no more than .3mm out of the center of the foot and make sure the edges fit perfectly. Under tension they sink into the varnish and fit.

If you put sandpaper on the belly of the bass, you are effectively increasing the diameter of it. When you remove the sandpaper, the curve of the bridge feet will be too large to fit tightly to the top. That's why the proper technique is to mark and scrape to fit, and why yours don't fit after using sandpaper.
Be aware also that the bass top flexes under pressure, changing the shape. That is another reason why the chalk fit by knife method is used by the pro's.
Thanks for the comments. I don't think I have the skill for the chalk and knife method, and because I only have one bridge to play with, I am going to leave well enough alone.
Someone mentioned cork and leather. Has anyone else tried this? Are other materials possible?
Someone mentioned cork and leather. Has anyone else tried this? Are other materials possible?

Anything “cushioning” the fit of bridge to plate will also dampen the sound.


