
Enjoy the benefits of a premium membership!
Upgrade Account
-
TalkBass has been independent since 1998. Add your voice.
Create a free account to reply to discussions, view embedded media, and browse with fewer display ads.
Join free Log in
Want zero display ads or expanded classifieds tools? Compare plans.
You are using an out of date browser. It may not display this or other websites correctly.
You should upgrade or use an alternative browser.
You should upgrade or use an alternative browser.
my EBMM stingray begins its diet today
- Thread starter johnk_10
- Start date
More options
Who Replied?

- Feb 16, 2008
- 21,240
- 23,638
- Disclosures
- John K Custom Basses
awesome job, John!
+1 to Top Posts by JohnK!
did I miss it? what's the name of the supplier?
for the wood, i got it from a guy that bought a bunch of swamp ash (he said that he bought 1300 feet of it) from the same wood supplier that the fender custom shop uses. i didn't get the supplier's name from him but i probably could ask him if you'd like me to.

That is a beauty, John. I'm thinking Leo would totally approve.
I bet Mr. Sterling Ball wouldn't, though.
I shudder to even think about the dreadful the EBMM forums...
That looks really great! I wish I had your skills, John, I have an '87 G&L L2000 that could stand to lose a couple of pounds.
Fantastic work. I've done a fair bit of wood working, and I can tell you've put a HUGE amount of time in on this project.
I think I'd just take some steroids, hit the gym, and play the heavy bass. LOL!
I think I'd just take some steroids, hit the gym, and play the heavy bass. LOL!
- Feb 16, 2008
- 21,240
- 23,638
- Disclosures
- John K Custom Basses
thanks.
yeah it was a fair bit of work. so far, i'd say i've spent about 6-7 hours on it. i figure that it'll take around another hour to wet sand and buff it, and about 30 minutes to assemble it again.
yeah it was a fair bit of work. so far, i'd say i've spent about 6-7 hours on it. i figure that it'll take around another hour to wet sand and buff it, and about 30 minutes to assemble it again.

beautiful is THE word: my sincere compliments for a bass that now is really unique on the planet!! Now, thinking about the possible utilisation of "the other" body...


for the wood, i got it from a guy that bought a bunch of swamp ash (he said that he bought 1300 feet of it) from the same wood supplier that the fender custom shop uses. i didn't get the supplier's name from him but i probably could ask him if you'd like me to.
yep! interested! thanks.
- Feb 16, 2008
- 21,240
- 23,638
- Disclosures
- John K Custom Basses

It looks that glossy before wetsanding? wow. You must have some good technique and settings on that spray gun. Mine is always orangepeely before any kind of sanding.
You mentioned baking the nitro before for faster curing. what do you use?
I usually leave mine in the hot garage for a week, with the windows cracked for ventilation. Then I stick it on the porch in direct sun. I have learned to wait a week of curing before exposing it to direct sunlight because it would gas off too quickly and bubble the top layer of the nitro.
thanks
You mentioned baking the nitro before for faster curing. what do you use?
I usually leave mine in the hot garage for a week, with the windows cracked for ventilation. Then I stick it on the porch in direct sun. I have learned to wait a week of curing before exposing it to direct sunlight because it would gas off too quickly and bubble the top layer of the nitro.
thanks
- Feb 16, 2008
- 21,240
- 23,638
- Disclosures
- John K Custom Basses
It looks that glossy before wetsanding? wow. You must have some good technique and settings on that spray gun. Mine is always orangepeely before any kind of sanding.
You mentioned baking the nitro before for faster curing. what do you use?
I usually leave mine in the hot garage for a week, with the windows cracked for ventilation. Then I stick it on the porch in direct sun. I have learned to wait a week of curing before exposing it to direct sunlight because it would gas off too quickly and bubble the top layer of the nitro.
thanks
the trick is mostly in the prep. i sand the body smooth, seal it with nitro sealer, sand it, seal it again, then start building up gloss coats. after about 6 coats, i block it with 320, then 400 wet. then i shoot 2-4 more coats with a little bit of retarder mixed in the top coats. the retarder slows down the drying process, eliminates overspray, blushing and minimizes any orange peel. i like it to look like it's already rubbed out after the final coat.
after 2 days, i block it wet with 1500 grit wet, then buff it. then i let it bake/cure for a week. you'll see the finish shrink a little bit and a very small amount of grain relief will return. after a week, i block it wet with 2000 grit, buff it on a buffing wheel with Menzerna fine compound. this gets it to an almost perfect gloss. then i hand rub it with meguiar's no. 2, followed by no. 7 glaze, and it looks like glass after that. if i don't bake it to speed up the curing process, i final buff/rub it after two weeks.
as far as my baking process, i just hang it in my bathroom with a small convection heater for about 6 hours a day at 95-100 degrees for the first few days, then if it's sunny, i hang it outside. if not, back in the 'bake room' she goes. at night i let it cool and start the process over again the next day.

- Feb 16, 2008
- 21,240
- 23,638
- Disclosures
- John K Custom Basses
i'm getting the electronics prepared to put in the bass in the next few days.
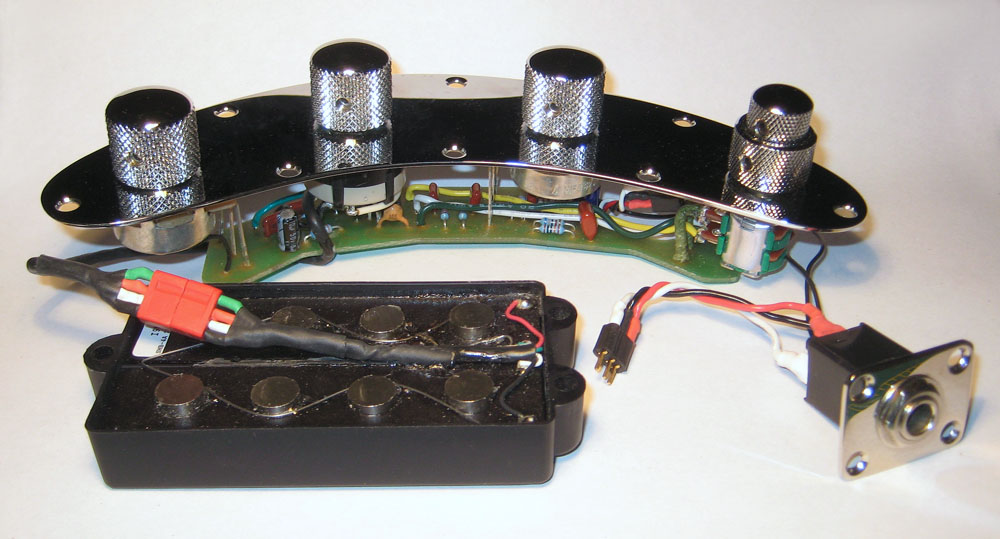
i mentioned that i was going to be adding a series/parallel (stock setting)/split switch for the pickup and didn't want to drill any holes in the control plate to do it, so this is what i ended up doing.
here's two pics of the stock control plate assembly:
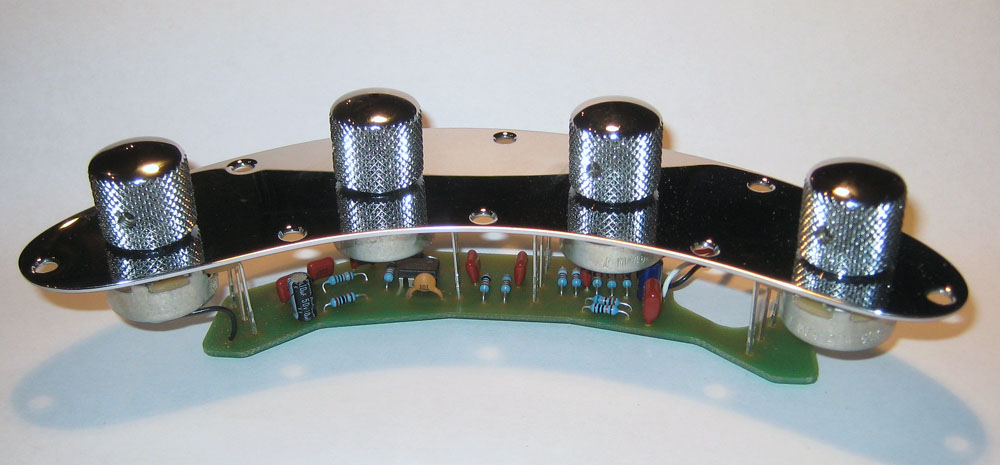
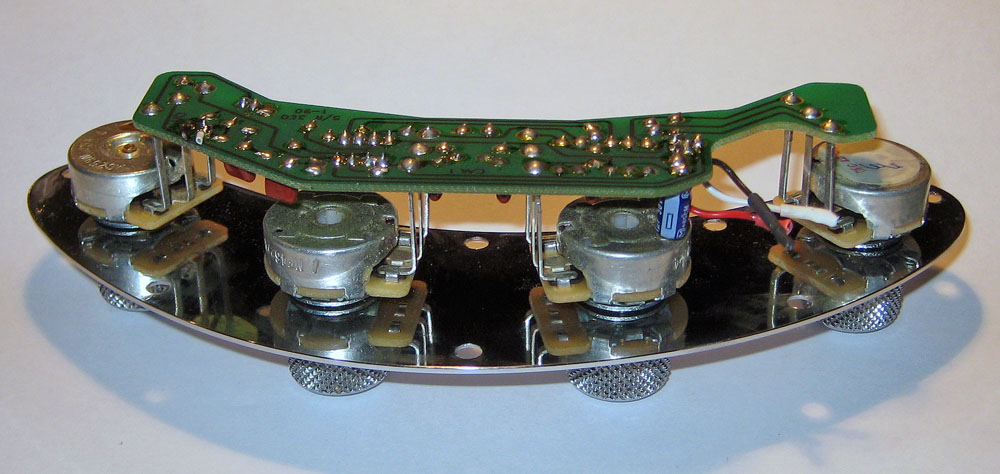
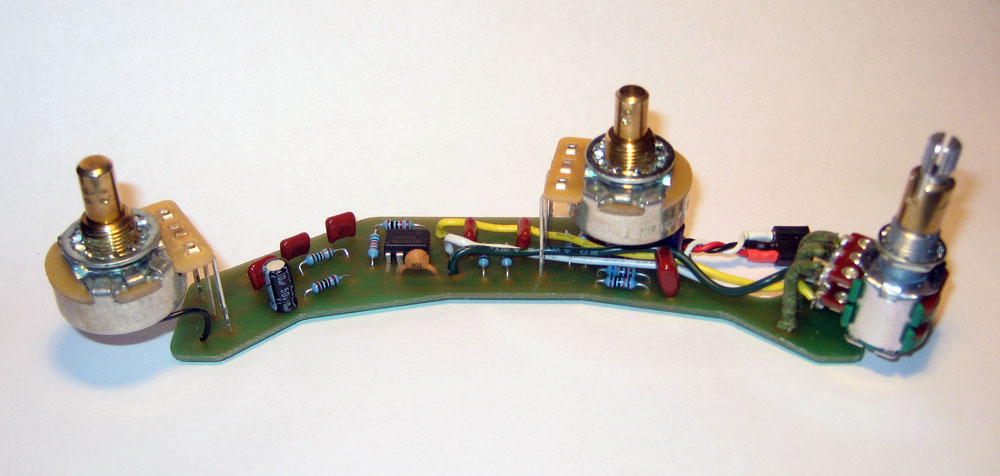
first i added a three prong micro plug to connect it to the output jack, then i removed the treble and bass pots from the pcb and added a stacked 50K pot (w/center detents) to replace them. i bought the pot from bestbassgear.com:
http://www.bestbassgear.com/pots.htm
i just used heavy solid core wire for the upper pot (which controls the ring) to connect the bass control, and ran wires for the treble control to the lower lugs (upper stacked knob).
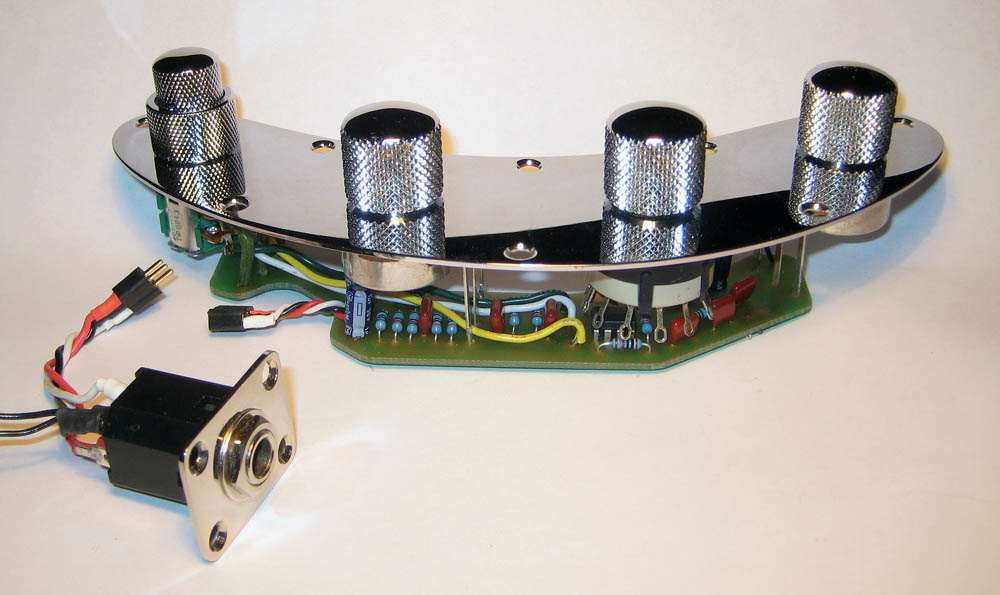
then, i checked the clearance for the 3 way switch. i had to the cut its legs shorter, but it was a great fit:
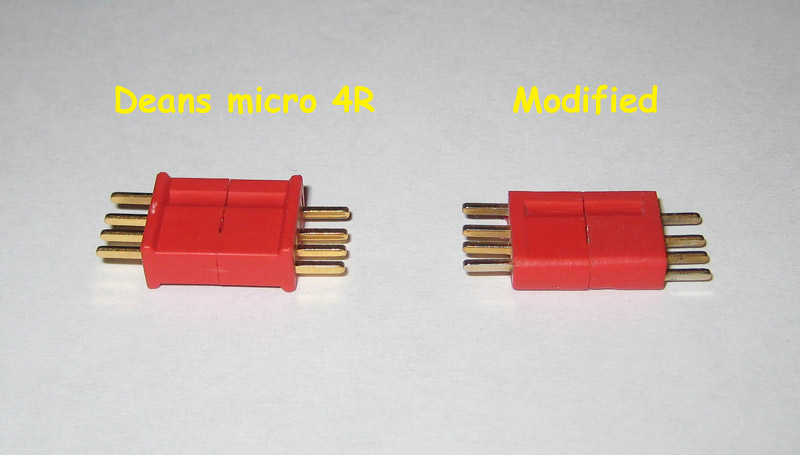
i used a micro 4 pin connector for the pickup that i made even smaller for clearance in the pickup cavity, and to thread it thru the hole. it's a Dean's connector that is used for RC airplanes. this makes changing or installing the pickup super easy:
and here's a Duncan pickup with the male part of the connector installed on it:
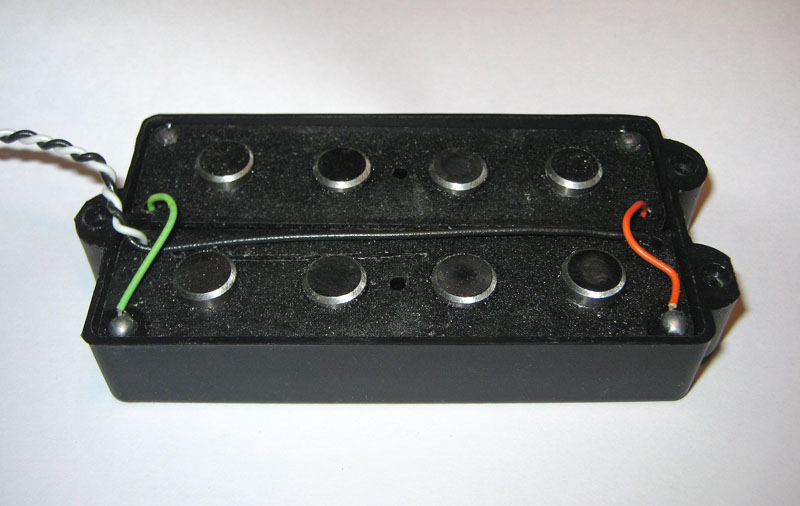
here's a pic the MM SR's stock pickup:
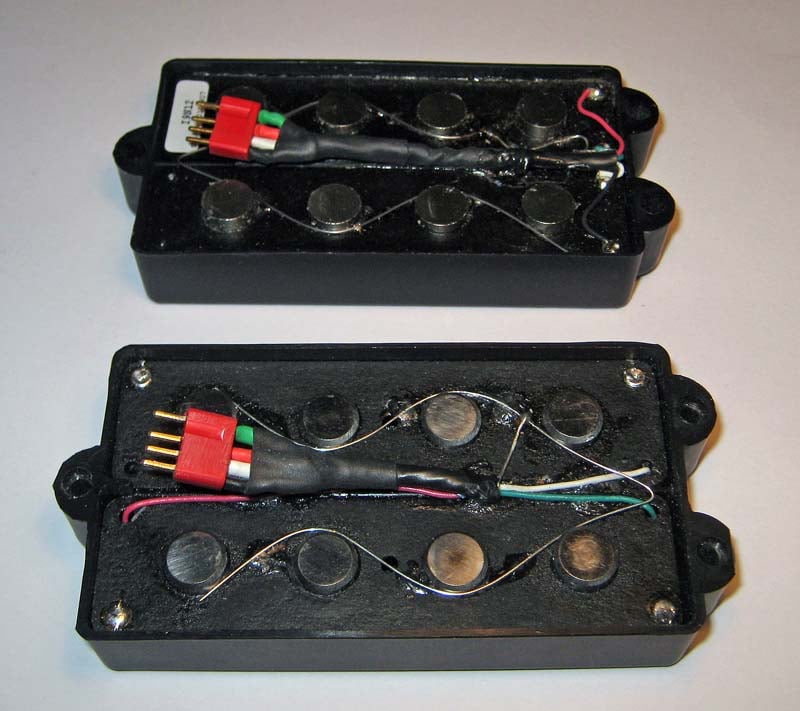
and here's a pic of it after getting a 4 lead harness installed on it (it's the lower one in this pic):
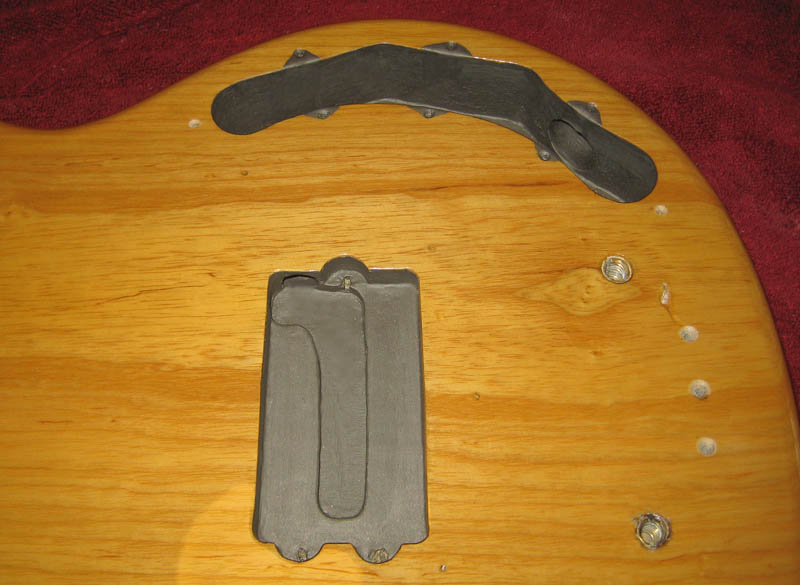
the body's cavities were painted with nickel print highly conductive paint. i painted around the control plate's holes so no ground wire was necessary. i also painted the pickup's wire hole to connect with the cavity so no ground wire was necessary there either:
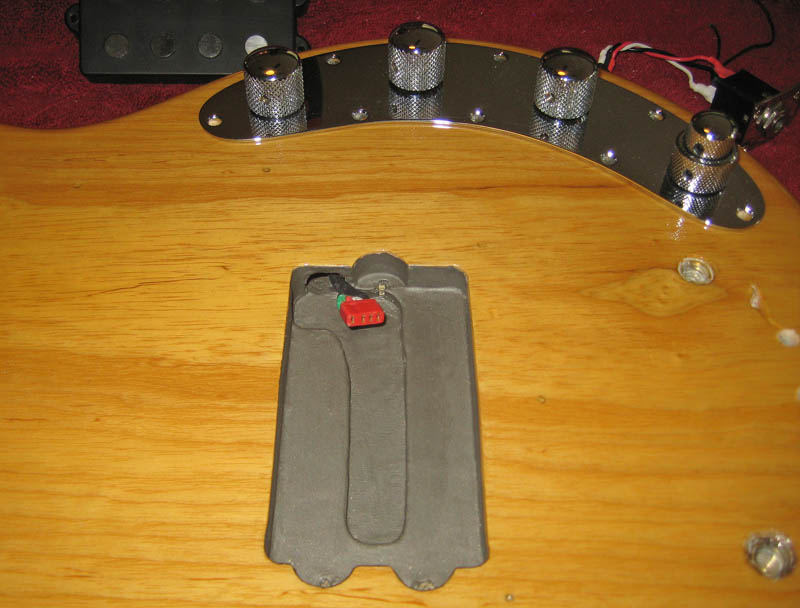
and here's a pic of the connector coming from the control plate:
now i can hardly wait to get this puppy put back together!
i want to add that John from bestbassgear.com was great to deal with. i ordered the stacked pot and stacked knobs from him on a monday and paid $20.14 just for the two day shipping on them. he didn't get a chance to ship it until wednesday, so he still shipped it via 2-day, but refunded the entire shipping fee. now that's customer service! i highly recommend him, especially for this hard to find 50K/50K linear pot with center detents.
with the 4 pin polarized solderless connector on the pickup, i can swap between the stock one and the duncan in about 3 minutes with no soldering, and i don't even have to remove the control plate. just loosen the strings, unscrew the 3 mounting screws and pop the other one in.
i mentioned that i was going to be adding a series/parallel (stock setting)/split switch for the pickup and didn't want to drill any holes in the control plate to do it, so this is what i ended up doing.
here's two pics of the stock control plate assembly:
first i added a three prong micro plug to connect it to the output jack, then i removed the treble and bass pots from the pcb and added a stacked 50K pot (w/center detents) to replace them. i bought the pot from bestbassgear.com:
http://www.bestbassgear.com/pots.htm
i just used heavy solid core wire for the upper pot (which controls the ring) to connect the bass control, and ran wires for the treble control to the lower lugs (upper stacked knob).
then, i checked the clearance for the 3 way switch. i had to the cut its legs shorter, but it was a great fit:
i used a micro 4 pin connector for the pickup that i made even smaller for clearance in the pickup cavity, and to thread it thru the hole. it's a Dean's connector that is used for RC airplanes. this makes changing or installing the pickup super easy:
and here's a Duncan pickup with the male part of the connector installed on it:
here's a pic the MM SR's stock pickup:
and here's a pic of it after getting a 4 lead harness installed on it (it's the lower one in this pic):
the body's cavities were painted with nickel print highly conductive paint. i painted around the control plate's holes so no ground wire was necessary. i also painted the pickup's wire hole to connect with the cavity so no ground wire was necessary there either:
and here's a pic of the connector coming from the control plate:
now i can hardly wait to get this puppy put back together!
i want to add that John from bestbassgear.com was great to deal with. i ordered the stacked pot and stacked knobs from him on a monday and paid $20.14 just for the two day shipping on them. he didn't get a chance to ship it until wednesday, so he still shipped it via 2-day, but refunded the entire shipping fee. now that's customer service! i highly recommend him, especially for this hard to find 50K/50K linear pot with center detents.
with the 4 pin polarized solderless connector on the pickup, i can swap between the stock one and the duncan in about 3 minutes with no soldering, and i don't even have to remove the control plate. just loosen the strings, unscrew the 3 mounting screws and pop the other one in.


This bass becomes more awesome every day...... Great work JohnK!
Where did You get the shielding paint? I am thinking of using the paint instead of tape in the future, but I have yet to use any of it.
Where did You get the shielding paint? I am thinking of using the paint instead of tape in the future, but I have yet to use any of it.
i want to add that John from bestbassgear.com was great to deal with.
bestbassgear is awesome, I have dealt with both the owner and his wife, and they are good people!
the trick is mostly in the prep. i sand the body smooth, seal it with nitro sealer, sand it, seal it again, then start building up gloss coats. after about 6 coats, i block it with 320, then 400 wet. then i shoot 2-4 more coats with a little bit of retarder mixed in the top coats. the retarder slows down the drying process, eliminates overspray, blushing and minimizes any orange peel. i like it to look like it's already rubbed out after the final coat.
after 2 days, i block it wet with 1500 grit wet, then buff it. then i let it bake/cure for a week. you'll see the finish shrink a little bit and a very small amount of grain relief will return. after a week, i block it wet with 2000 grit, buff it on a buffing wheel with Menzerna fine compound. this gets it to an almost perfect gloss. then i hand rub it with meguiar's no. 2, followed by no. 7 glaze, and it looks like glass after that. if i don't bake it to speed up the curing process, i final buff/rub it after two weeks.
as far as my baking process, i just hang it in my bathroom with a small convection heater for about 6 hours a day at 95-100 degrees for the first few days, then if it's sunny, i hang it outside. if not, back in the 'bake room' she goes. at night i let it cool and start the process over again the next day.
Thanks for the explanation. In NOLA, the nitro stays soft for weeks due to the humidity, I can wait 3 weeks and still leave fingerprints in the top clear coat. In El Paso, TX, the nitro is hard within a couple of days, and ready to be wet sanded in a week.


