• TalkBass has been independent since 1998. Add your voice.
    Create a free account to reply to discussions, view embedded media, and browse with fewer display ads.
    Join freeLog in
    Want zero display ads or expanded classifieds tools? Compare plans.

Official TUNE Club

And @gebass6, lmk how you make out getting Your unlined neck.
Love to c pics, and very curious about costs. (I like the idea)
Thanks.
Bruce Johnson,the luthier who's doing it,quotes $160.00 to $200.00.
Which is what I expected!
That is what I paid to have a bass defretted eleven years ago.
Reasonable.

From what I've seen,the old fingerboard is heated until the glue melts and is slowly "peeled" off using a straight edge between the fingerboard and the neck.
I didn't know this was even possible until a year ago.
 
Last edited:
  • Like
Reactions: tryinalearnDan
Hi guys,

I'm Robert from the Netherlands. Please add me to the tune club. Recently got two tune basses. A bassmaniac natural and another blue one that i don't know what it is. Plays lovely and I like the look and feel of it.
Both are korean i assume since they have serials.
Anybody knows this one ?
S70227-195531.jpg
 
Hi guys,

I'm Robert from the Netherlands. Please add me to the tune club. Recently got two tune basses. A bassmaniac natural and another blue one that i don't know what it is. Plays lovely and I like the look and feel of it.
Both are korean i assume since they have serials.
Anybody knows this one ?View attachment 1067723
Congratulations.
(I'll leave it to some more knowledgeable members to identify), but looks really good!
 
Hi guys,

I'm Robert from the Netherlands. Please add me to the tune club. Recently got two tune basses. A bassmaniac natural and another blue one that i don't know what it is. Plays lovely and I like the look and feel of it.
Both are korean i assume since they have serials.
Anybody knows this one ?View attachment 1067723
I'm pretty sure that's a TWX42.
Don't quote me on that.
 
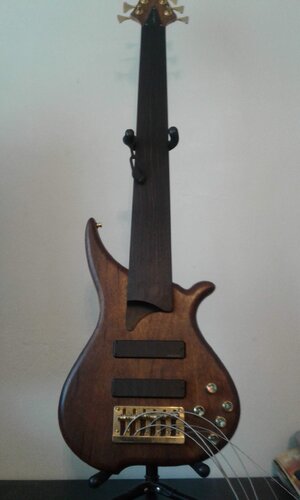
For your reference, the new fingerboard on gebass6's fretless neck is Macassar ebony, bought from Luthier's Mercantile. That's about a $40 piece of wood.

I usually don't remove the old fingerboard with heat. I machine it off using a router in a special large fixture. That gives me a much truer, flatter surface to fit the new fingerboard to. The old fingerboard is a pile of sawdust now.

This neck had a slight twist, so I set it up in the fixture using shims to correct for it. I routed off the old fingerboard gently, in passes of about 0.025" at a time, to get a true flat surface. Because of the slight twist, thin slivers of the old fingerboard were left on opposite corners. I didn't cut away any maple.

I glued the new fingerboard on with West Systems epoxy. Then it went back in the large fixture where I used a router with a curved base to cut the radius of the board and bring it down to the exact same thickness at the 1st and heel as it was originally.

The sides of the fingerboard were trimmed flush by hand with files. The side dots are 0.090" white styrene plastic from the hobby shop. The curved end at the heel was shaped using a die grinder and curved files, matching a paper template I made before cutting off the old board.

That's how it's done if you are curious. This would have been a tricky and laborious job for someone without my special neck holding fixture rig. That's why I offered to do the job. Tune necks are difficult to hold on to and clamp down, because of their radical back shape. I have a large collection of custom made holding blocks for my fixture, from 20+ years of using it. I was able to easily clamp this neck by the headstock and the heel, supporting it in the center, while I routed off the old fingerboard.

The whole job took me 5 hours 15 minutes.
 
For your reference, the new fingerboard on gebass6's fretless neck is Macassar ebony, bought from Luthier's Mercantile. That's about a $40 piece of wood.

I usually don't remove the old fingerboard with heat. I machine it off using a router in a special large fixture. That gives me a much truer, flatter surface to fit the new fingerboard to. The old fingerboard is a pile of sawdust now.

This neck had a slight twist, so I set it up in the fixture using shims to correct for it. I routed off the old fingerboard gently, in passes of about 0.025" at a time, to get a true flat surface. Because of the slight twist, thin slivers of the old fingerboard were left on opposite corners. I didn't cut away any maple.

I glued the new fingerboard on with West Systems epoxy. Then it went back in the large fixture where I used a router with a curved base to cut the radius of the board and bring it down to the exact same thickness at the 1st and heel as it was originally.

The sides of the fingerboard were trimmed flush by hand with files. The side dots are 0.090" white styrene plastic from the hobby shop. The curved end at the heel was shaped using a die grinder and curved files, matching a paper template I made before cutting off the old board.

That's how it's done if you are curious. This would have been a tricky and laborious job for someone without my special neck holding fixture rig. That's why I offered to do the job. Tune necks are difficult to hold on to and clamp down, because of their radical back shape. I have a large collection of custom made holding blocks for my fixture, from 20+ years of using it. I was able to easily clamp this neck by the headstock and the heel, supporting it in the center, while I routed off the old fingerboard.

The whole job took me 5 hours 15 minutes.

Great result.
Thanks for taking the time to explain the process.

Looks great @gebass6. Enjoy.
 
  • Like
Reactions: Watchootognbout