• TalkBass has been independent since 1998. Add your voice.
    Create a free account to reply to discussions, view embedded media, and browse with fewer display ads.
    Join freeLog in
    Want zero display ads or expanded classifieds tools? Compare plans.

Rattle Can Refinish Club

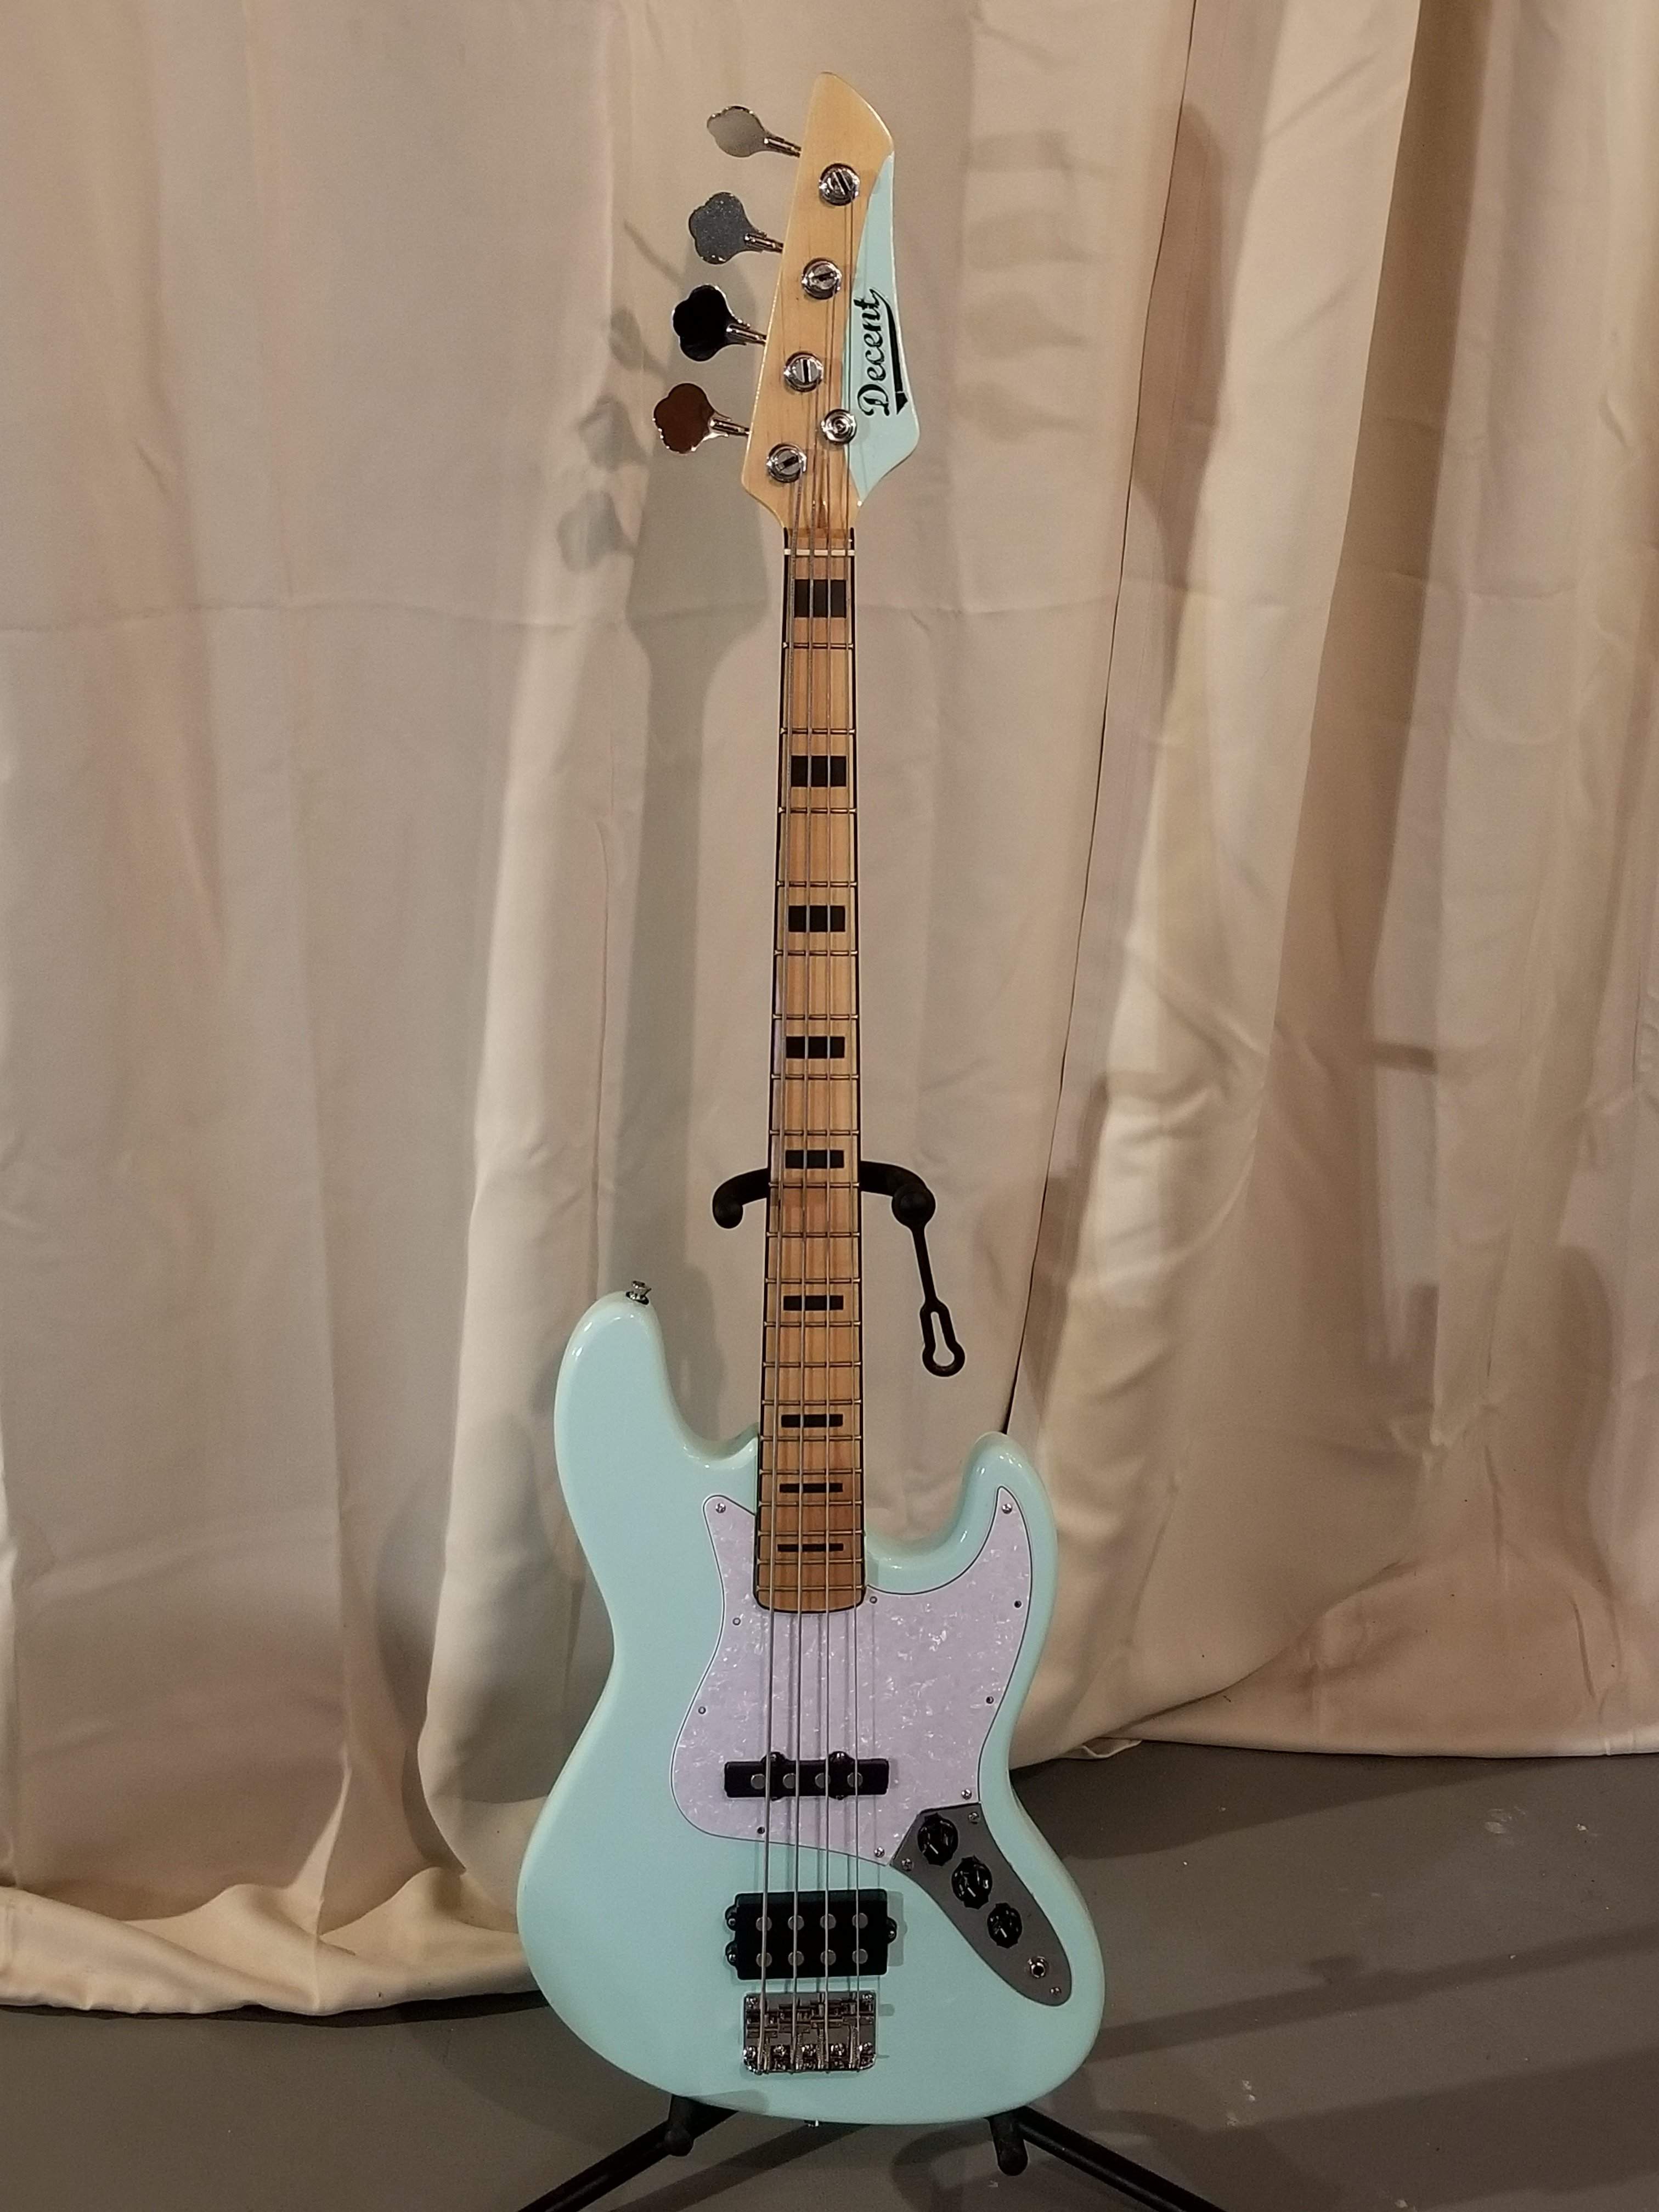
Hey all, so I recently completed by quick and dirty refin project. This bass is a 10+ year old Sx Ursa model, and until very recently it was 3 tone sunburst with a black pickguard. The stock finish was actually very nice but I'm not a huge fan of sunburts, and I've always wanted a pastel green bass, and so here she is.
bass pic.jpg


The process was pretty simple, scuff the existing finish with steel wool, then 3 coats Rustoleum 2x paint + primer in ocean mist color, followed by a couple quick coats of Rustoleum clear gloss. I swapped the black pickguard with a pearloid one from Amazon, and I ended up filing the neck joint and pickup hole a little bit, but that was it. I also sanded the headstock and added my own custom decal. Total cost was around $30, and total time spent was probably an hour or two. Fun project, I'm already working on my next one.
 
Hey all, so I recently completed by quick and dirty refin project. This bass is a 10+ year old Sx Ursa model, and until very recently it was 3 tone sunburst with a black pickguard. The stock finish was actually very nice but I'm not a huge fan of sunburts, and I've always wanted a pastel green bass, and so here she is.

View attachment 3945701

The process was pretty simple, scuff the existing finish with steel wool, then 3 coats Rustoleum 2x paint + primer in ocean mist color, followed by a couple quick coats of Rustoleum clear gloss. I swapped the black pickguard with a pearloid one from Amazon, and I ended up filing the neck joint and pickup hole a little bit, but that was it. I also sanded the headstock and added my own custom decal. Total cost was around $30, and total time spent was probably an hour or two. Fun project, I'm already working on my next one.

Wow...It sure looks good from your picture...Nice smooth finish?

Love the color! :hyper:
 
  • Like
Reactions: Fat Freddy
Looks great! Which steel wool grit did you use? Might need to try your recipe sometime!

Hey all, so I recently completed by quick and dirty refin project. This bass is a 10+ year old Sx Ursa model, and until very recently it was 3 tone sunburst with a black pickguard. The stock finish was actually very nice but I'm not a huge fan of sunburts, and I've always wanted a pastel green bass, and so here she is.

View attachment 3945701

The process was pretty simple, scuff the existing finish with steel wool, then 3 coats Rustoleum 2x paint + primer in ocean mist color, followed by a couple quick coats of Rustoleum clear gloss. I swapped the black pickguard with a pearloid one from Amazon, and I ended up filing the neck joint and pickup hole a little bit, but that was it. I also sanded the headstock and added my own custom decal. Total cost was around $30, and total time spent was probably an hour or two. Fun project, I'm already working on my next one.
 
  • Like
Reactions: Fat Freddy
A grey scotchbrite will do the same job as steel wool, but doesn't leave microscopic particles of rusting steel all over everything. If you use steel wool, blow it all off hard with compressed air, or better yet, don't use it at all. Scotchbrite has corresponding grits, the grey ones about 600 grit, the white ones around 1000. Nice color BTW, just recently did a P-Bass in seafoam green.
 
I took the advice here, kept repeated the fill/spray process.

I got the body feeling pretty smooth to the touch (800 grit), but I notice a bunch of little scratches. Should I keep sanding or filling/spraying until they're all gone or am I ok to shoot color?

20200820_130937.jpg
20200820_130913.jpg


Thanks!
 
I took the advice here, kept repeated the fill/spray process.

I got the body feeling pretty smooth to the touch (800 grit), but I notice a bunch of little scratches. Should I keep sanding or filling/spraying until they're all gone or am I ok to shoot color?

View attachment 3952138 View attachment 3952139

Thanks!
Your coverage looks good but the better your surface is, the easier it is to have a smooth final product.
 
  • Like
Reactions: C Stone
Hey all, so I recently completed by quick and dirty refin project. This bass is a 10+ year old Sx Ursa model, and until very recently it was 3 tone sunburst with a black pickguard. The stock finish was actually very nice but I'm not a huge fan of sunburts, and I've always wanted a pastel green bass, and so here she is.

View attachment 3945701

The process was pretty simple, scuff the existing finish with steel wool, then 3 coats Rustoleum 2x paint + primer in ocean mist color, followed by a couple quick coats of Rustoleum clear gloss. I swapped the black pickguard with a pearloid one from Amazon, and I ended up filing the neck joint and pickup hole a little bit, but that was it. I also sanded the headstock and added my own custom decal. Total cost was around $30, and total time spent was probably an hour or two. Fun project, I'm already working on my next one.
I'm currently working on a headstock and body with hopes of ending up with a finish that looks as nice as yours. So far I've had a fair bit o' trouble getting the Rustoleum 2x looking smooth. I also picked the Ocean Mist as I thought it was the closest to Surf Green. :thumbsup:
 
I thought I did an OK job with my primer so I shot color today. It seems like the end result will be pretty mediocre if I keep going with clear.

Those streaks aren't a camera trick, they're visible at every angle. Interestingly, you can see the old bridge holes despite the filling, sanding and probably too many coats of primer.

What did I do wrong/how can I fix it now?

My working conditions aren't ideal. I can only shoot outside.

Thanks!!
20200912_175331.jpg
 
I thought I did an OK job with my primer so I shot color today. It seems like the end result will be pretty mediocre if I keep going with clear.

Those streaks aren't a camera trick, they're visible at every angle. Interestingly, you can see the old bridge holes despite the filling, sanding and probably too many coats of primer.

What did I do wrong/how can I fix it now?

My working conditions aren't ideal. I can only shoot outside.

Thanks!!
View attachment 3981353
Looks like you need a wet sand to smooth and try color again...However!...Outside there is always a wind air movement variable that I believe causes a problem..and other things
Perhaps build a tent to spray it in? or a box?

Loose advice from someone that has never been completely satisfied with end results..:bored:
Remember it is the cut and polish that makes or breaks in the end
 
  • Like
Reactions: primussucks9126
Looks like you need a wet sand to smooth and try color again...However!...Outside there is always a wind air movement variable that I believe causes a problem..and other things
Perhaps build a tent to spray it in? or a box?

Loose advice from someone that has never been completely satisfied with end results..:bored:
Remember it is the cut and polish that makes or breaks in the end
Thank you!

Can I sand metallic paint? I was reading that's no bueno.

This is my first time getting this far into the process. The imperfections will mostly be covered by the bridge and pickguard, so it isn't the worst thing in the world. I'm just frustrated because I spent A LOT of time sanding and spraying coats of primer. I guess i'm a poor judge of when the surface is level.

Does anyone think this will somehow be less noticeable under the clear coat once it's all polished?
 
  • Like
Reactions: murphy
Question for all you rattle can aficionados: do you ever get a can where the paint comes out in blobs partially? You’ll be going along just fine and then find there’s a couple blobs of wet paint on the surface?
Is there a way to fix cans like that? Or does that only happen to me?
On my recent project I got five cans of clear, one of them did the blob spray (three were fine, and one had a different problem). I contacted the manufacturer and they said in twenty years of making rattle cans they never had a problem like that.... appreciate y’all’s feedback on this!
 
Maybe this will help...I really only experience the "blobs" when rattle can is nearly empty, for me I avoid using maybe the last 1/5 of the can, also shake it well and If possible set the can where the sun can hit for a little while to warm it up.

To make sure your tip doesn't gummed up after spraying hold can and spray upside down until the moment the mist gets clear. (Everytime)

Also before I start a pass on whatever I am painting I give it a quick spray away to make sure nozzle is cleared then start the pass, start spraying before the object and spray a lttle past the object or body or whatever your hitting. Good luck!
 
Thank you!

Can I sand metallic paint? I was reading that's no bueno.

This is my first time getting this far into the process. The imperfections will mostly be covered by the bridge and pickguard, so it isn't the worst thing in the world. I'm just frustrated because I spent A LOT of time sanding and spraying coats of primer. I guess i'm a poor judge of when the surface is level.

Does anyone think this will somehow be less noticeable under the clear coat once it's all polished?
You heard right sanding the metallic paint is no bueno unless you plan to spray it again.
Meaning: You can sand your colored base coats but with metalallic you want that to be your final (before clear) and NO it wont be less noticable under clear,
Good luck!
 
Last edited:
  • Like
Reactions: murphy
I thought I did an OK job with my primer so I shot color today. It seems like the end result will be pretty mediocre if I keep going with clear.

Those streaks aren't a camera trick, they're visible at every angle. Interestingly, you can see the old bridge holes despite the filling, sanding and probably too many coats of primer.

What did I do wrong/how can I fix it now?

My working conditions aren't ideal. I can only shoot outside.

Thanks!!
View attachment 3981353
Trippy how the old patched bridge holes came through after color coat. I looked at your primed pic and looks good to me on your coverage.
 
  • Like
Reactions: murphy
Re-ranch Orange . It's a clear orange to capture that old "Gretch orange". The more coats you add the darker or deeper the orange. This was about 2 cans of orange followed by 4 cans of Watco clear laquer rattle cans.
tech specs: warmoth alder P body, fretless neck wenge fingerboard, Bartolini P/J and NTMB preamp.
 

Attachments

  • image.jpeg
    image.jpeg
    354.8 KB · Views: 96
  • image.jpeg
    image.jpeg
    578.2 KB · Views: 104
  • image.jpeg
    image.jpeg
    311.6 KB · Views: 97
  • image.jpeg
    image.jpeg
    571.5 KB · Views: 94
Question for all you rattle can aficionados: do you ever get a can where the paint comes out in blobs partially? You’ll be going along just fine and then find there’s a couple blobs of wet paint on the surface?
Is there a way to fix cans like that? Or does that only happen to me?
On my recent project I got five cans of clear, one of them did the blob spray (three were fine, and one had a different problem). I contacted the manufacturer and they said in twenty years of making rattle cans they never had a problem like that.... appreciate y’all’s feedback on this!
It's defective. Return it and get another spray can if you still able to.

When I bought paint for my refin project, I bought 2 cans of the same color of Rustoleum. I tested one on a scrap piece of wood and it came out sputtering. Tried the 2nd can and it sprayed smoothly. Sometimes you just get a dud.

Also, as mentioned in a previous post, when the paint is near the bottom of the can it will sputter out. It's best to use a different can than to take a chance on screwing up a decent finish.
 
ever get a can where the paint comes out in blobs partially?
Rustoleum. I tested one on a scrap piece of wood and it came out sputtering.
I think Rustoleum has given me the most spray issues over the years. Splattering blobs or shooting little specks that look dry, like sawdust.
Though, when it works, me likey.
 
  • Like
Reactions: Doctor Morbius