• TalkBass has been independent since 1998. Add your voice.
    Create a free account to reply to discussions, view embedded media, and browse with fewer display ads.
    Join freeLog in
    Want zero display ads or expanded classifieds tools? Compare plans.

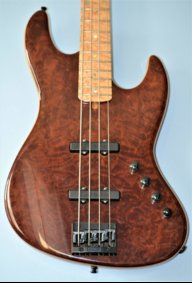
Restoration: Roadstar (II) to hell

Great restoration project!

I know this is a little late in your case, but I would suggest another method for cleaning up the corrosion pits in the bridge. First of all, don't use Bondo. It doesn't do well in small indentations. Ask your local auto body man. However, there is this stuff called Plastic Metal, I believe. It comes in a tube like tooth paste. It seems to do well in small cavities and is very workable. However, in this case, I like what you've done with the bridge already.

Carry on, sir!
 
there is this stuff called Plastic Metal, I believe. It comes in a tube like tooth paste.

Believe it or not, I just discovered exactly the stuff you're talking about down the DIY store - will definitely give it a go on the next build... might try moulding something funky out of it...

Anyho-
Now that my stuff has arrived on the right side of the ocean I can really start playing around.

Knew I had a spare set of big gold machineheads somewhere which I've decided to use to add some unnecessary detailing (to match the headstock coin/frets/screws).
Not sure which combination looks best so if anyone has a preference, speak up:

P4250740.jpg


Also, if anyone knows a purveyor of nice knobs (ideally black with some gold highlights), do let me know.

First coat of lacquer drying nicely.
 
I'd wait until you can put them into the headstock, then base the decision from there. It's easy enough to swap the hardware up there, so if it were me, I'd see what they look like in a real setting.

Although personally, unless I was mixing up bridge hardware colors, too, I'd just stick with black.
 
I'd wait until you can put them into the headstock, then base the decision from there. It's easy enough to swap the hardware up there, so if it were me, I'd see what they look like in a real setting.

Although personally, unless I was mixing up bridge hardware colors, too, I'd just stick with black.

+1 on all counts.

I always thought the black/gold hardware mixing looks like a grab bag of whatever someone had on hand. Though weirdly I like black hardware and stainless screws (which probably wouldn't work with the gold coin).

My vote is painted headstock, black Ibby logo, all black hardware, coin between the tuners.

Great color choice, great paint job, great work so far, this bass is going to be killer when done!
 
I'd wait until you can put them into the headstock, then base the decision from there. It's easy enough to swap the hardware up there, so if it were me, I'd see what they look like in a real setting.

Although personally, unless I was mixing up bridge hardware colors, too, I'd just stick with black.

Ach, you're probably right - I'll wait until the headstock is painted up.

I'm fairly sure my judgement is currently biased by the results I got with the trussrod cover:

P4260749.jpg


Was originally all black, until I realised it was made of brass. Cue some careful sanding + a shot of lacquer and it looks great!

Anyway, time to prep the headstock...
 
  • Like
Reactions: DubHunter
Yeah, that's a whole new ballgame!
Though I still wanna see on headstock shots, the black nut with just the gold ring would be quite nice.
However, the gold nut and ring would be really hot, too...

Still, the plate: MARVELOUS!
 
Believe it or not, I just discovered exactly the stuff you're talking about down the DIY store - will definitely give it a go on the next build... might try moulding something funky out of it...

Anyho-
Now that my stuff has arrived on the right side of the ocean I can really start playing around.

Knew I had a spare set of big gold machineheads somewhere which I've decided to use to add some unnecessary detailing (to match the headstock coin/frets/screws).
Not sure which combination looks best so if anyone has a preference, speak up:

P4250740.jpg


Also, if anyone knows a purveyor of nice knobs (ideally black with some gold highlights), do let me know.

First coat of lacquer drying nicely.


If you are going for a blue-ish painted headstock I would go for C to isolate the gold from the paint with some black.

Having that said, option A or B will match the truss rod cover better since the outer border is gold with a black center
 
That might be the coolest truss rod cover ever. That changes everything. I'll change my vote to B. I still think if the washer and nut don't match, it won't look right. The posts and heads will still be black, so you'll get the contrast without it looking too busy.

Now.. if you could scare up some polished brass saddles for that bridge, kind of like this...

[Invalid or Expired Link Removed]


...now that would :bassist:
 
Had a bit of a setback with the finish as I got a fly in the ointment.
Literally.
A fraking fly.
In the lacquer.
A big one.

... y'know how I was being a little bit smug and leaving the finish alone until it was dry a few pages back? Well that went straight out the window.
Must have sounded like 'Gordon Ramsay on Nature'.

Anyho, nothing that can't be remedied, but I'll hold off on the photos 'till I've sorted it ;)


Now.. if you could scare up some polished brass saddles for that bridge, kind of like this...

That's given me an idea....
 
Damn bugs! I hate bugs. They ruin everything. Picnics, outdoor activities and now bass finishes. :( Hope you can sort it out without too much extra work. I've read this entire thread with glee. Loving all the pics! You're doing awesome work, man! One of the coolest restoration/build threads I've seen in awhile. Best of luck with the remainder of the build! Keep them pics comin'!
 

Latest posts