• TalkBass has been independent since 1998. Add your voice.
    Create a free account to reply to discussions, view embedded media, and browse with fewer display ads.
    Join freeLog in
    Want zero display ads or expanded classifieds tools? Compare plans.

Rickenbacker 4005 Copy

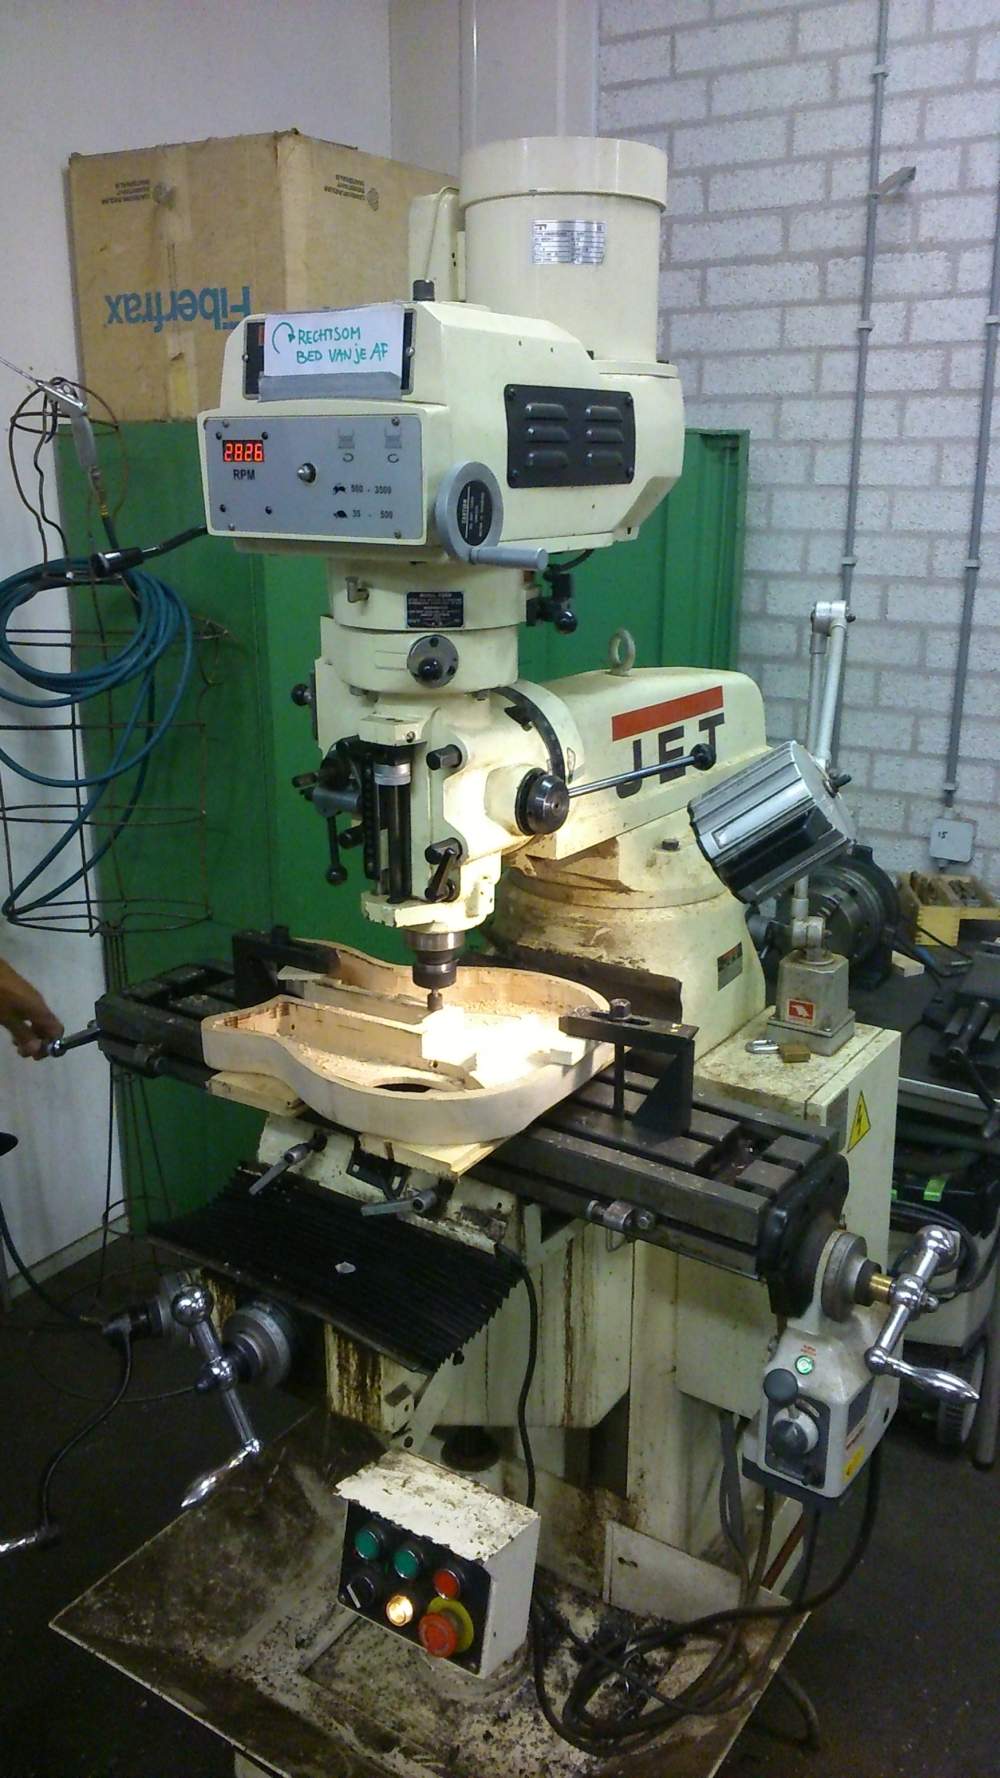
Done some fine woodworking at thee local art academy :-)
DSC_0360.JPG


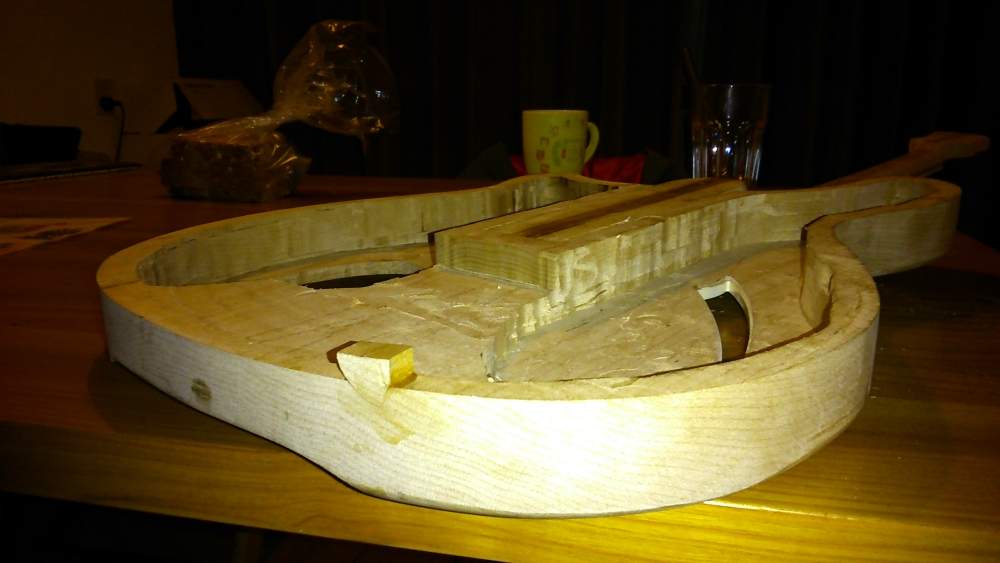
So the body is now flush with the back of the neck (except for the part that I knocked out with the JET-router and glued back in..). So now it's about time to glue on the back, and start looking for a router to rout out the grooves for the purfling and binding!
DSC_0364.JPG
 
The triangular inlays are from here:
guitarsupplies - dot - nl (sorry, not yet allowed to post links, you'll have to browse the site to find them).
This is also where I bought the fretboard: made from rosewood, see the tab "Hals onderdelen" > Fretboard standaard > bass.
Good luck & succes!
Thanks Adorex. Why can't you post links, is there some kind of technical glitch on the forum? Anyway, here they are for anyone else interested. Nice!
http://guitarsupplies.nl/index.php?...tion=article&group_id=10000064&aid=85&lang=nl
 
Hi,
I couldn't post a link because that's only possible for people who have more than 10 posts (anti-spam measure I guess). Anyhow, for those who wonder: the checkerboard binding is from here:
Invalid Link Removed
(and : yes, I am now past the 10 posts..)
 
Last edited:
Adorex
Just the Shellex checkerboard binding at 14.28 euro and 25.00 euro for shipping puts it at $49.52 delivered to the USA for one strip, and it doesn't look quite long enough to wrap a 4001. Ouch! by my calcs. I'll need 56.25" of binding, more than a single strip from Shellex. Did you end up with one or two pieces? How did black and white plastic get so expensive? At that price i might be better off with the Winfield Vintage source, also crazy overpriced, but I talked to the owner (nice guy BTW), and he suggested ripping one piece in half height-wise on a bandsaw and just gluing in a thinner piece of the checkerboard rough cut side up, since all you see is the top. The saw marks would get scraped or sanded away as they are leveled with the top. Hmmmmm.... I strongly suspect that the "Rickenbacker Effect" is at work here, wherein anything associated, however distantly, with Rickenbacker is hideously overpriced. Sigh...
http://www.winfieldvintage.com/parts/binding.html
 
The checkerboard binding IS very expensive, but I don't think it's high enough to cut it in two, so I’m not sure if cutting it in two is really an option, unless you are very handy with long strips of plastic…
All in all: if I’d be building a Fender Precision replica it wouldn’t pay to buy parts this expensive, but at €9000,- for a used 4005 the total costs are very likely to stay below the price for a ready-built one….

The guy that helped me with taking the 8mm off of the body made fun of me and said it would have been a better idea to take the 8mm off BEFORE routing out the body, so better think before you act!

@neeko: you will have to make the tailpiece yourself if you want anything that closely resembles the original, because Rickenbacker, Winfield, RickResource and all the others won’t sell you the R-tailpiece (only the bracket that holds it) if you don’t trade in your old one (which you don’t have).
So you must make one yourself, buy a look-a-like at a shop like Winfield or try to find one at Ebay (there’s one for sale right now, ‘only’ €200,- and six-string!!).
Making one yourself IS getting to be kind of a tradition on this thread, and a nice way to give it a little personal touch ;-)
 
Last edited:
I should just quit my whining and suck it up on the exhorbitant binding prices. When you have only two or three companies making something, they charge what the market will bear, I suppose. How are you going to cut the binding channels? Stewmac binding router bits maybe?
 
Hey Gillanisgod :)-)),
I have to rout 2 channels : one for the binding (width = 1,5 mm) and one for the purfling (width = 2mm). The one for the binding will be deeper than the purfling-channel. So I will have to make 2 cuts: first the upper one with a width of 3,5 mm, and a lower one of 1,5 mm.
router.jpg


I haven't been able to find the right set of bits, and I'm not really sure if the full set of StewMac will suffice: they are just a little bit wider than I need (or I haven't measured correctly, that is equally plausible..). I'll have to consult with my local tool-shop before. Other option is to take a standard-bit and block somehow that the bit will go too far into the body.

Full stewmac-set:
[Invalid or Expired Link Removed]
 

Attachments

  • router.jpg
    router.jpg
    6 KB · Views: 101
Last edited:
Adorex
Nice diagram. I'll be in the same boat. The Stewmac bits look great, but oh so pricey! I will try to cobble some kind of jig together and test it on scrap. If I can't make it work I may have to bite the bullet on a set of bits, hard to justify for a one off ho-made project. Anybody seen a good cheap jig for binding channels?
 
Yesterday I finally got a call from my friend that I could pick up his glue-clamps, so I could finally glue the front and back together. In one of the pictures you can see the square hole in which the neck will be set. Last picture shows the bass with neck in place: I can't help but thinking that it looks a bit square and 'boxy': maybe I should make the edge a bit 'rounder'? Anybody any suggestions?
DSC_0455.JPG
DSC_0456.JPG
DSC_0469.JPG
DSC_0470.JPG
 
  • Like
Reactions: Splods
Yesterday I finally figured out how to make the groove for the binding in a proper cheap-skate way : I disassembled a cheap chinese router-bit with ballbearing and calculated what circumference the proper ballbearing would have to be. I then asked a friend of mine, who happens to work at a metal-shop, to make two ' tubes' with that circumference, and with exactly the right hole in the middle to fit on the router-bit. Point is that it is not a ballbearing, so it will leave some marks on the wood, but I reckon I can fix that with some sanding.
Reasons to choose for this solution:
1) I think paying a lot of money for a router-bit that I will only use once is a waste of money.
2) StewMac sells router-bits that have an american size axis, that will not (properly) fit my european router. I would then have to spend even more money on an adapter to make the US-size bit fit my EU-router. In the best case that would be unneccesarily expensive, in the worst case expensive and ending up with a bit that does not fit well in my router.
3) fiddlling about and making your own tools and solution is nice......

Left: the torx and the old ballbearing that came off the router-bit. Middle: the router-bit without bearing of tube. Right: two tubes of different thicknesses made exactly the right size.

busjes.JPG
The results is very good I must say: the binding is exactly flush:
DSC_0565.JPG

Disadvantage is that I will have to do some more sanding on the guitar to remove the scratches the routerbit has left. You can very clearly see the scratch that one tube has made in the wood, but in my opinion this is quite easy to correct, so I'm happy with the result.
So the next job is now to sand the purfling and binding (their shape is not exactly square, so I will have to sand to make them fit better) and glue them in the grooves. Hopefully that won't take as long as figuring out how to rout out the binding-groove has... ;-)
 
Last edited:
  • Like
Reactions: Anthonyfranklin9000
Didn't mean to get all warm and fuzzy on the typo of your Forum name! Adored? I'm wondering if this would be safer/easier on a router table with some kind of an adjustable rub guide? The downside is if it chips out I won't see it until it's too late. I don't know anyone who could machine bearing guide like that for me, so I'll try the jig idea first before (probably) sucking it up and buying the Stewmac binding bits. My son wants me to make him a Rickenfaker too, so at least I'd get two guitars out of it. BTW, what are you using for glue? I've seen some Youtube videos using acetone, which looks like the route I'll take.
 
Didn't mean to get all warm and fuzzy on the typo of your Forum name! Adored? I'm wondering if this would be safer/easier on a router table with some kind of an adjustable rub guide? The downside is if it chips out I won't see it until it's too late. I don't know anyone who could machine bearing guide like that for me, so I'll try the jig idea first before (probably) sucking it up and buying the Stewmac binding bits. My son wants me to make him a Rickenfaker too, so at least I'd get two guitars out of it. BTW, what are you using for glue? I've seen some Youtube videos using acetone, which looks like the route I'll take.

Hoi,
adorex is my old ' artist' name ("Adorex Goldshower" ), stems from adore, ado (" the curtain with the gold thread") rex (king) and odorex (cheap deo). Kind of a cheap, creepy german porn star name and completely different from what you made of it ;-)
And here's some answers:
1) yes, it would be easier on a router table, but that means that you would actually have to OWN one. I don't: I fix all the stuff on a crappy selfmade table in the bikeshed. I really didn't think it would be a feasible idea to build a construction that would hold the router and keep the proper distance when routing the body.
2) I don't know where you live, but I could send you the router bits (if you're in the EU > 8 mm bit). A friend of mine also wants to use them so I really want them back (or he'll just have to hurry..).... Other option : buy cheap chinese bits and go to a local metal shop or actually any factory that would be capable of working with metal and promise them a crate of beer if they make the "ball bearings" for you. I think a lot of guys want to earn that crate in the boss's time!
And to be frank: my friend didn't do it for free: I had to promise him to make him an apfelstrudel in januar....
3) for wood on wood I use Titebond (sold at the Amsterdam Fine wood shop in the A'dam harbour), I bought that because it apparently is (one of) the best. For cellulose on wood I used simple acetone: it solves the binding and makes it stick to the wood. Don't know if it's any good, but up to now it hasn't fallen off :) Alternatives are superglue (secondenlijm) and plastic cement. I like things as simple as possible so I think I will glue the double binding with plain acetone.
 
Here's a first try at pre-shaping the bindings: the black-white binding broke when I fitted it around the corner, so even now I will have to use the iron to soften it a little and bend it around the corners.
Off course only after I cleaned out the routing channel with sandpaper...
DSC_0563(1).jpg
When I tested glueing two bindings with acetone on a test-piece the stickiness wasn't very good: I just might switch to using superglue...
 
Last edited:
And the result: totally awesome and near perfect (only one very minor flaw at the neck):
IMG-20141222-WA0000.jpeg
The binding is not long enough to fit completely around the body, so I will have to glue the binding in two pieces. Last piece I will hopefully glue around this period...
 
Looks pretty sweet Adorex. I thought acetone was supposed to be best for celluloid because it "welds" it together?
Yes, it really does. It melts the celluloid to a kind of gooey stuff, which then slowly changes back to celluloid. That makes it easy to correct mistakes, but you will have to fill up the gaps and sand off all the excess celluloid. The first result is very dirty, messy and full of spots, but after one cleanup the result is very good, and if you are carefull it is not very hard to get a good result (for a perfect result: have a pro do it :-).
Up to now I find it nice to work with, but very flameable. All the errors are quite easy to correct.