
Enjoy the benefits of a premium membership!
Upgrade Account
-
TalkBass has been independent since 1998. Add your voice.
Create a free account to reply to discussions, view embedded media, and browse with fewer display ads.
Join free Log in
Want zero display ads or expanded classifieds tools? Compare plans.
You are using an out of date browser. It may not display this or other websites correctly.
You should upgrade or use an alternative browser.
You should upgrade or use an alternative browser.
Rickenbacker 4005 Copy
- Thread starter Betyouaint
- Start date
More options
Who Replied?
Hopkins
Commercial User
just an FYI .... Rickenbacker is notoriously weird company, aside from customer service people who act like theyre doing you a favor by talking to you , If they see even a one off build infringing on their design in the public eye you will get a cease and desist letter ,this happened to someone I know who did a Ric 360 on their own ..
I dont think they have a legal leg to stand on unless the builder is selling the instruments.
For all of you who are willing to try this at home (I do!), this might be of help. It's a PDF on A4-format of the 4005: print out on A4 (don't know what happens if you print on letter-format..), tape it together and you have a (almost) true size picture to cut out and use for your own copy (or hang above your bed after coloring  ). Saves you a lot of hassle with sizes, shape and location of hardware and holes.
I think the format is just a little smaller than the real one (51.5 instead of 53 centimeters, but I'm not sure if that is the real length). Or try to make your own on www.blockposters.com.
). Saves you a lot of hassle with sizes, shape and location of hardware and holes. I think the format is just a little smaller than the real one (51.5 instead of 53 centimeters, but I'm not sure if that is the real length). Or try to make your own on www.blockposters.com.
Attachments

Hello mick.. Im a big ric fan have had wanted one since seeing Townsend an weller rocking them, anyway its took me about 6 months searching an nearly bought a chinese copy and other day a shaftsbury and last night i finally came across this guitar. Invalid Link Removed.
very 325 like. now i want to get this looking like a ric. For one i aint got 3 jetglow grand . Now iv put a bid in for a real R tail piece on ebay for 80 quid, but im sure it will go. will the original R tail piece fit that guitar ?? iv never really had a good look at a real ric an no very little on the real sizes an stuff. iv seen the trap tail piece but it looks to cheap an flimsy. If i cant get the real R one would you be willing to make me a replica with your skills. iv been reading your bass build all day an was totally blown away with your craftmans ship. if i got the correct sizes i could make a 3d model of the original tail peice an maybe get it cnc'd. Also how do you think i would tackle the head stock. as its the wrong shape. i was thinking rub it down then glue an clamp more wood onto the end then rework it to the proper shape. Then i just need some pups, knobs an truss rod cover then it will sit in my living room with its Lichtenstein art work ill airbrush on, a work of art. an hope she plays well to. sorry to rant a little but my head is full of questions an you seem to have proven you know your stuff. Well done on the bass she is lovley. i look forward to your advice an help. yours Tony J !
very 325 like. now i want to get this looking like a ric. For one i aint got 3 jetglow grand . Now iv put a bid in for a real R tail piece on ebay for 80 quid, but im sure it will go. will the original R tail piece fit that guitar ?? iv never really had a good look at a real ric an no very little on the real sizes an stuff. iv seen the trap tail piece but it looks to cheap an flimsy. If i cant get the real R one would you be willing to make me a replica with your skills. iv been reading your bass build all day an was totally blown away with your craftmans ship. if i got the correct sizes i could make a 3d model of the original tail peice an maybe get it cnc'd. Also how do you think i would tackle the head stock. as its the wrong shape. i was thinking rub it down then glue an clamp more wood onto the end then rework it to the proper shape. Then i just need some pups, knobs an truss rod cover then it will sit in my living room with its Lichtenstein art work ill airbrush on, a work of art. an hope she plays well to. sorry to rant a little but my head is full of questions an you seem to have proven you know your stuff. Well done on the bass she is lovley. i look forward to your advice an help. yours Tony J !

Hoi,
don't know if this thread is still alive, but .... Dear BetYouAint, how in the world did you get these bindings in the soundhole in the proper shape (and then especially in the pointy corner in the back)? Did you use a mould to pre-shape it with after heating up, or did you use acetone to soften the binding?
I've tried it with heating the binding up, but it broke twice and caught fire once :-(
Kind regards,
Hilco (also building a 4005-copy..) - thee Netherlands
don't know if this thread is still alive, but .... Dear BetYouAint, how in the world did you get these bindings in the soundhole in the proper shape (and then especially in the pointy corner in the back)? Did you use a mould to pre-shape it with after heating up, or did you use acetone to soften the binding?
I've tried it with heating the binding up, but it broke twice and caught fire once :-(
Kind regards,
Hilco (also building a 4005-copy..) - thee Netherlands
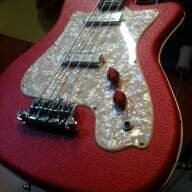
Hoi,
don't know if this thread is still alive, but .... Dear BetYouAint, how in the world did you get these bindings in the soundhole in the proper shape (and then especially in the pointy corner in the back)? Did you use a mould to pre-shape it with after heating up, or did you use acetone to soften the binding?
I've tried it with heating the binding up, but it broke twice and caught fire once :-(
Kind regards,
Hilco (also building a 4005-copy..) - thee Netherlands
Hi Hilco, cool to see that some TBers still have a go recreating this bass !
I've have just started mine too ( for my personnal use only of course...) and this thread was very helpful. I really admire BetYouAint's work. Great job !
Could you share pics of yours ? I'm really curious to see it and share about the building.
I cannot help you yet about the soundhole binding, as I'm really far from this step. But I work with help of a luthier. I'll ask him some advice
Hoi Neeko,
here some pics of my progress: first some pics of the body and neck, so you can get an idea of the progress i've made. The binding-problem i've solved by making a mould to pre-shape the binding. Important is not to make the soundhole too pointy, because you will never be able to bend the binding in to a too pointy shape. I've bent it with an iron (the one used for ironing clothing) and boiling water to soften the binding further when it was in the mould (couldn't really use the iron then .
.
After glueing the binding in the body (picture with tape on binding & guitar), some space in the corners will remain: you can fill that up by solving some binding (celluloid I think it was made of) in acetone: you will then get a yoghurt-like substance that you can use to fill the gap up. The last picture shows the result as it is now: not perfect but very close IMHO.
If you look closely you can still see the place where the ends of the binding meet.
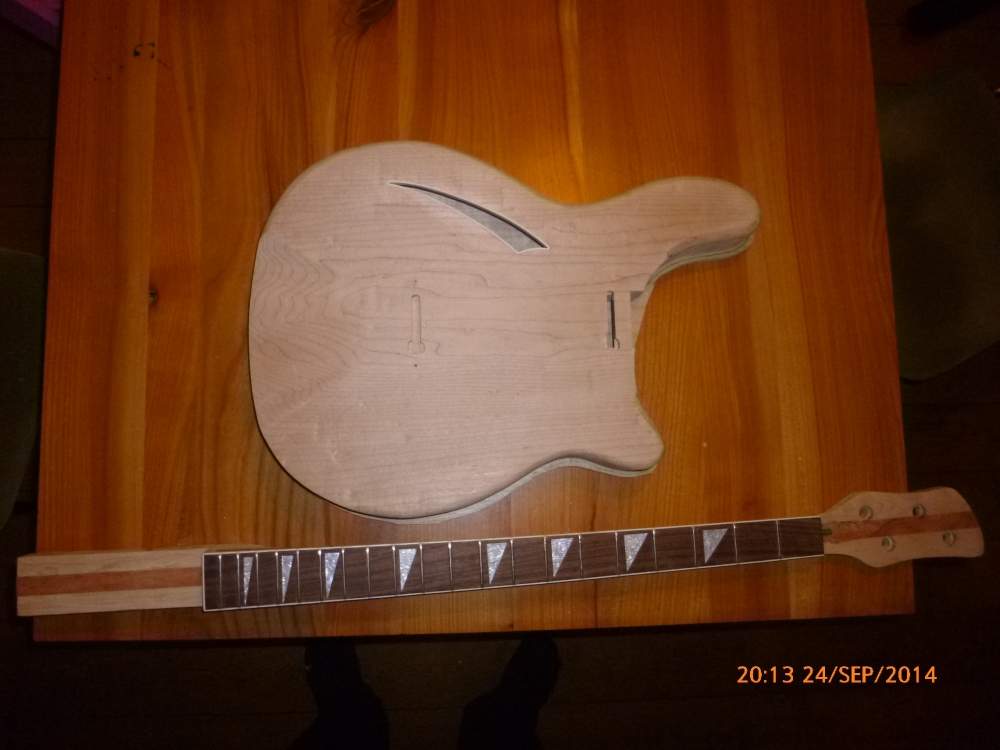
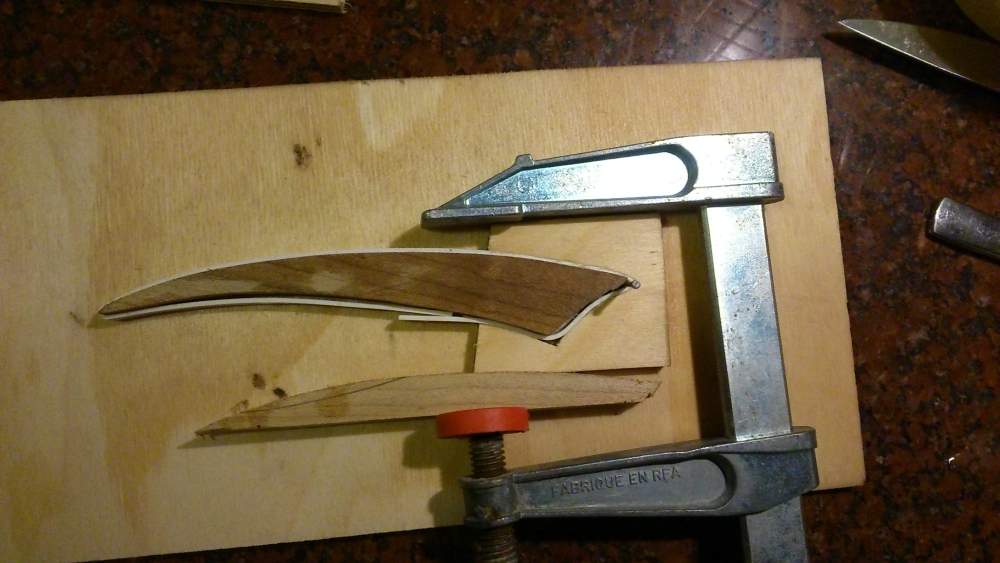
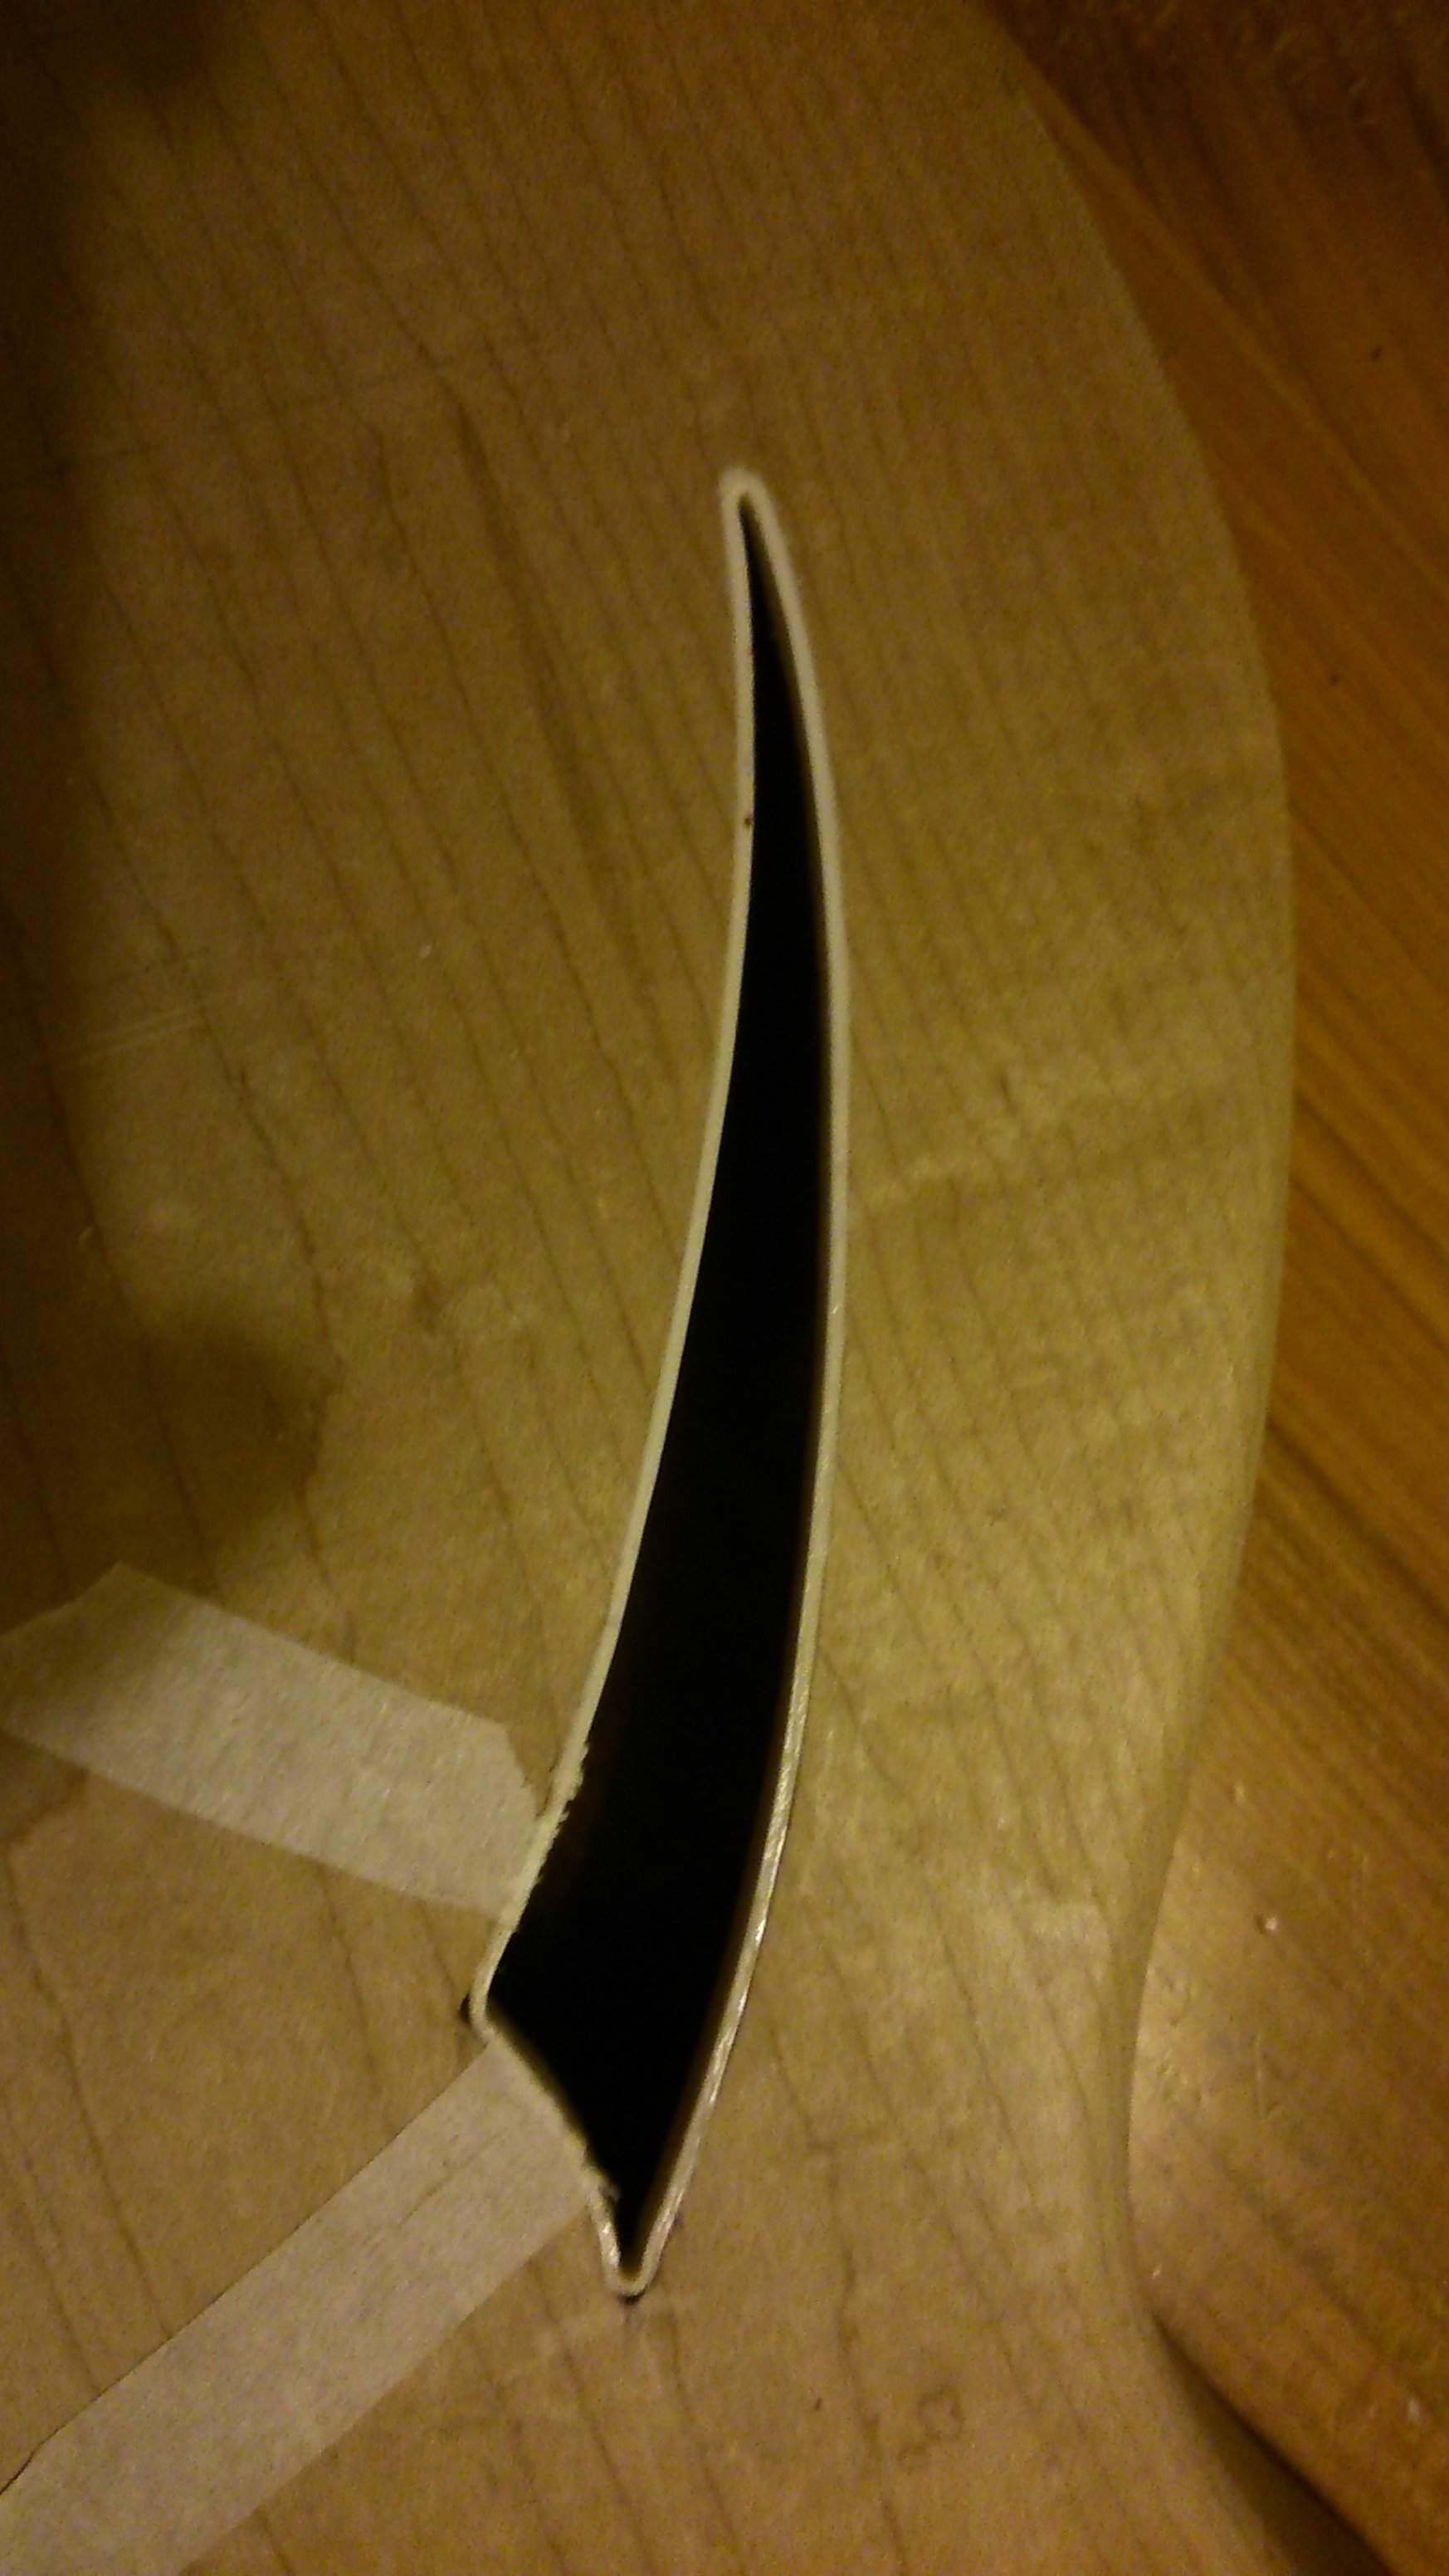
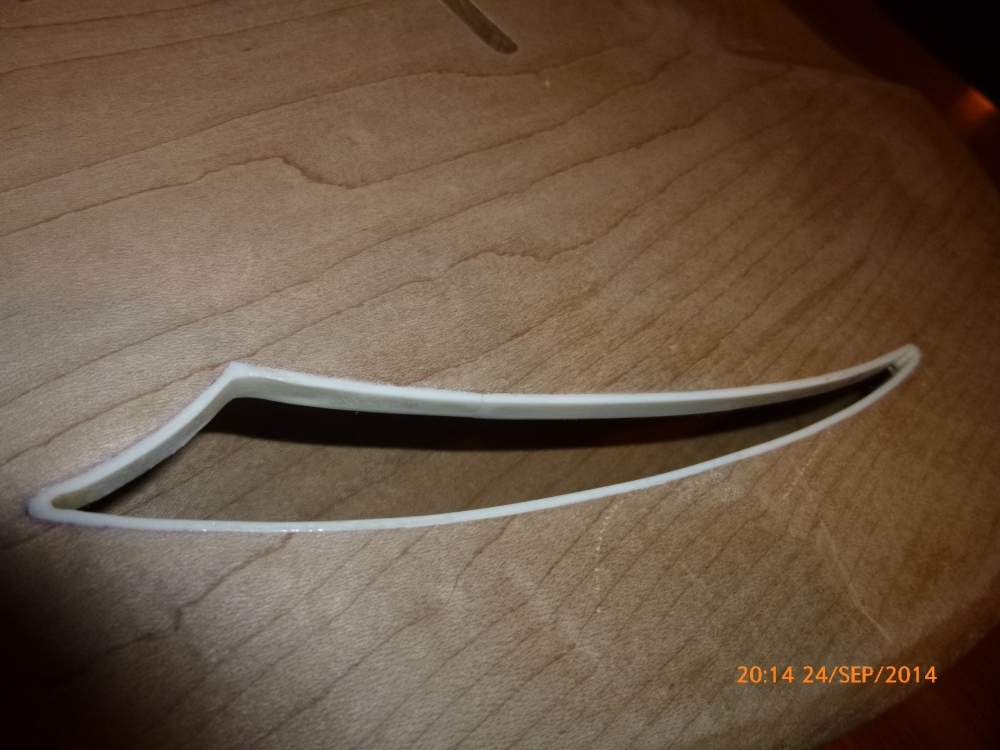
here some pics of my progress: first some pics of the body and neck, so you can get an idea of the progress i've made. The binding-problem i've solved by making a mould to pre-shape the binding. Important is not to make the soundhole too pointy, because you will never be able to bend the binding in to a too pointy shape. I've bent it with an iron (the one used for ironing clothing) and boiling water to soften the binding further when it was in the mould (couldn't really use the iron then
.After glueing the binding in the body (picture with tape on binding & guitar), some space in the corners will remain: you can fill that up by solving some binding (celluloid I think it was made of) in acetone: you will then get a yoghurt-like substance that you can use to fill the gap up. The last picture shows the result as it is now: not perfect but very close IMHO.
If you look closely you can still see the place where the ends of the binding meet.
Attachments
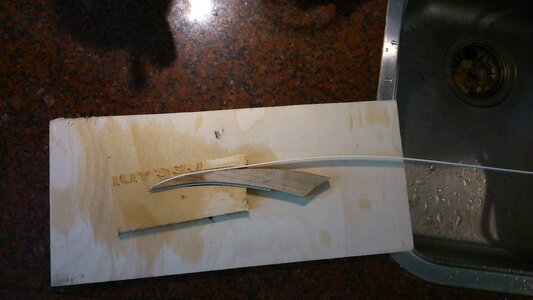
Excuse my messy pictures and attachment: in the attached picture you can see the first shaping of the binding. Also: i've chosen not to use the original head (the wavy shape) but copied the headstock of my rick 430-guitar: the schaller tuners fit onto that head.
The neck is two-tone: not my initial intention, but I had to fix the neck after I routed complete through the neck when making the groove for the trussrod. It actually looks very good I think. Also I chose not to use bezels for the elements: I will screw the elements directly onto the wood with only rubber feet under the small screws that hold the element together. That is why the rectangular slots for the element are so small: only the magnets drop into the body, the wires will go through small holes I drilled down from there.
The neck is two-tone: not my initial intention, but I had to fix the neck after I routed complete through the neck when making the groove for the trussrod. It actually looks very good I think. Also I chose not to use bezels for the elements: I will screw the elements directly onto the wood with only rubber feet under the small screws that hold the element together. That is why the rectangular slots for the element are so small: only the magnets drop into the body, the wires will go through small holes I drilled down from there.
Last edited:
Here some more pictures of the current state of my project: first the rear-side so you can see how the neck fits in the body. Then a picture of the layout of the tuners: a close fit but it fits.
The magnets of the elements drop into the slots that I've made. The slots have a larger hole below since the wire of the element is wrapped around the lowest magnet: hence the larger part of the slot. As last the bass partly assembled: I don't have the bracket and string-holder, and have not yet made the hole for the outputplug and knobs because I don't have a pickguard yet.
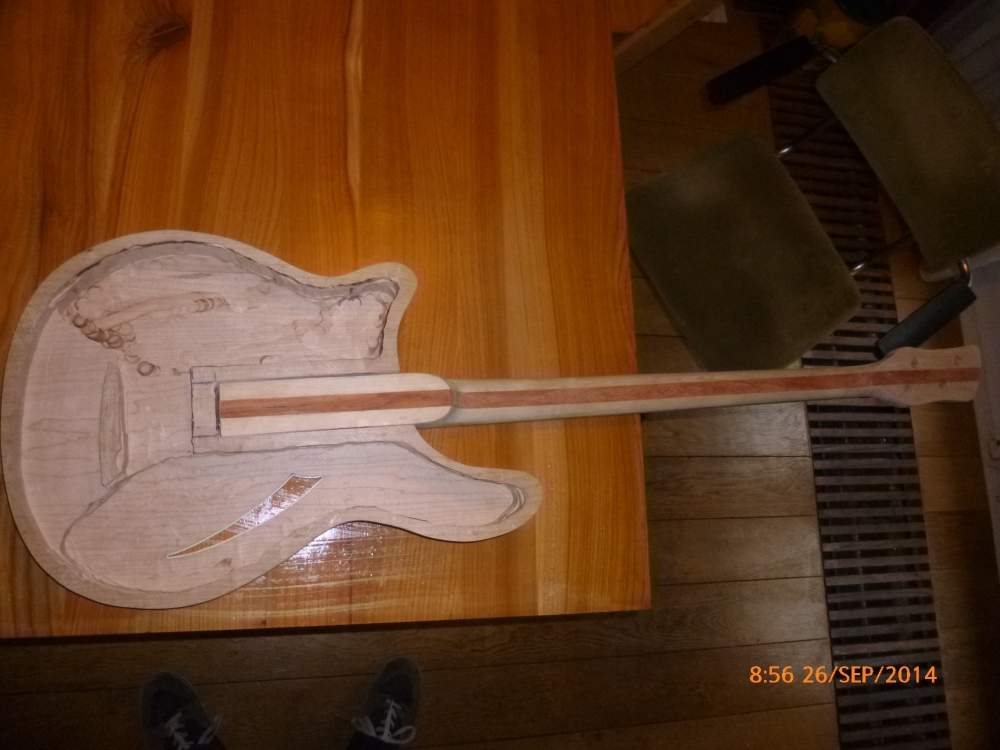
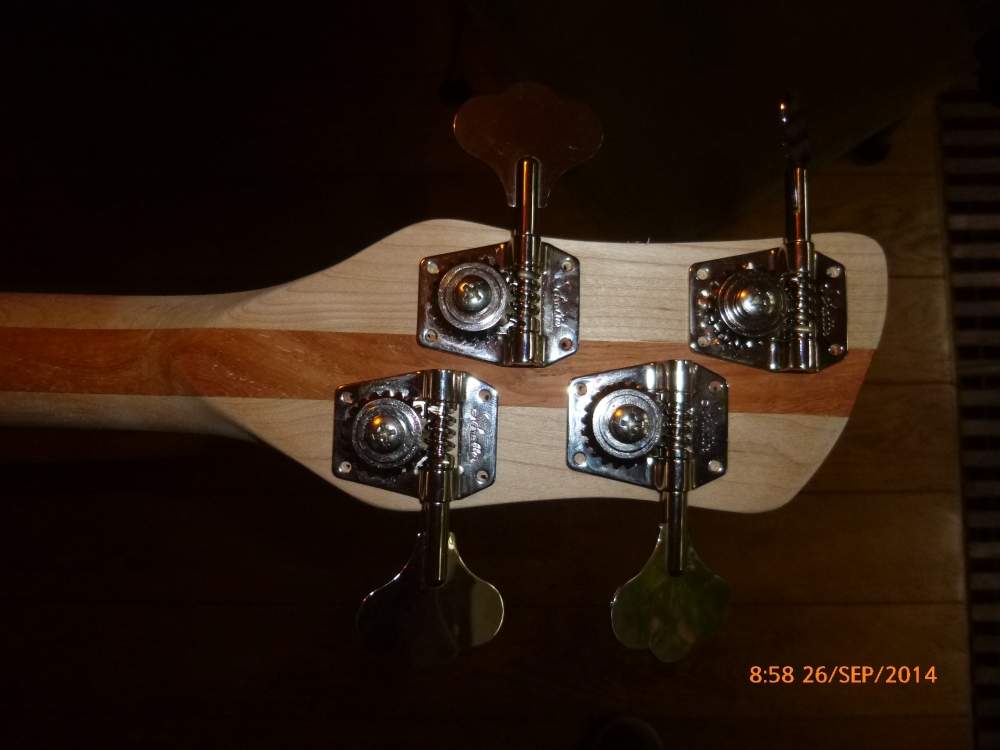
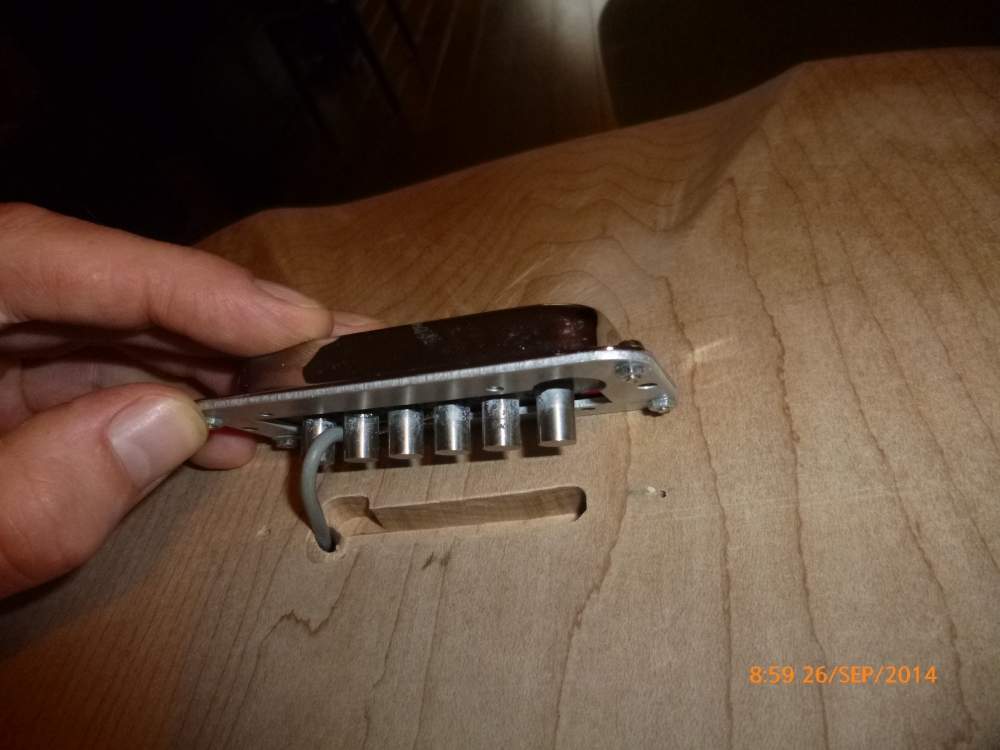
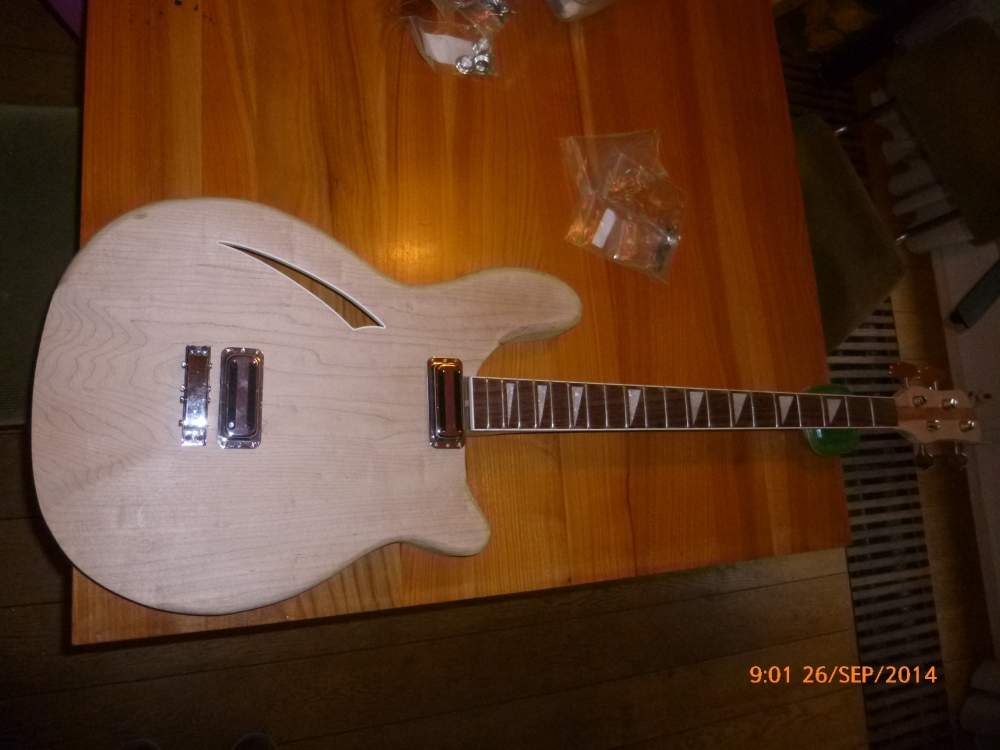
The magnets of the elements drop into the slots that I've made. The slots have a larger hole below since the wire of the element is wrapped around the lowest magnet: hence the larger part of the slot. As last the bass partly assembled: I don't have the bracket and string-holder, and have not yet made the hole for the outputplug and knobs because I don't have a pickguard yet.
Yes, ehhh.... well, I bought a six-string bridge because 4-string bridges in this shape are unavailiable. But I saw a post at winfield where they made a conversion from 6 to 4 strings: I'm planning to do the same conversion for my six-string bridge..That's looking great. Are you using a 6 string bridge?
Last edited:

Adorex
Amazing project! I am glued to this thread. Where did you get the triangular block inlays? I've been looking for a set for my Hossenfeffer bass build. These are the closest thing I've found:
[Invalid or Expired Link Removed]
Also, what fingerboard material is that? it looks great. Chechem? Bubinga?
Amazing project! I am glued to this thread. Where did you get the triangular block inlays? I've been looking for a set for my Hossenfeffer bass build. These are the closest thing I've found:
[Invalid or Expired Link Removed]
Also, what fingerboard material is that? it looks great. Chechem? Bubinga?
The triangular inlays are from here:
guitarsupplies - dot - nl (sorry, not yet allowed to post links, you'll have to browse the site to find them).
This is also where I bought the fretboard: made from rosewood, see the tab "Hals onderdelen" > Fretboard standaard > bass.
Good luck & succes!
guitarsupplies - dot - nl (sorry, not yet allowed to post links, you'll have to browse the site to find them).
This is also where I bought the fretboard: made from rosewood, see the tab "Hals onderdelen" > Fretboard standaard > bass.
Good luck & succes!
Great job Hilco !
some questions :
how did you get a correct template for the body ? I personally drawed it from pictures I found on the web, according to the scale (from bridge to 12th fret), I've managed to get something close to the real one I guess (I've never had a real 4005 in my hands). How thick is your body ?
I just had to reduce the width of the body (2 cm) because the the piece of Maple I got was too small, but so beautiful...

As I have a 1974 4001, no problem for the neck profile...By the way, this neck is really great and confortable.
I plan to add a third PU on the PB position to get it more versatile.
What about your body finish ? Mapleglo or somethingelse-glo ? Mine will be MG of course !
some questions :
how did you get a correct template for the body ? I personally drawed it from pictures I found on the web, according to the scale (from bridge to 12th fret), I've managed to get something close to the real one I guess (I've never had a real 4005 in my hands). How thick is your body ?
I just had to reduce the width of the body (2 cm) because the the piece of Maple I got was too small, but so beautiful...
As I have a 1974 4001, no problem for the neck profile...By the way, this neck is really great and confortable.
I plan to add a third PU on the PB position to get it more versatile.
What about your body finish ? Mapleglo or somethingelse-glo ? Mine will be MG of course !
Hoi Neeko,
You can find my template for the body in my post above (october 11, 2012): it’s a print of the body in (about..) the right size. Don’t know if it’s really the right size, but it’s the best I have… I cut that out and copied it onto the wood. I keep another copy at hand for the location of the elements, etc.
The bodythickness is 5 cm: pure coincidence because that’s the thickness of the wooden plank they sold me. I will make it a bit less thick (I have to take off 8 mm) because the neck is a bit thinner. In that way the neck and body will be exactly flush. Alternative is to add some wood to the back of the neck to fill up the space between the back of the neck and the backplate.
The backplate that I will glue on is about 11 mm, so total thickness will be 42 & 11 = 53 mm.
I will put on checkerboard purfling (2mm) and a white binding (10 mm in height and 1,5 in depth).
I’ll try to get a sunburst red for paint, because I really like sunburst and it will show the two-tone neck. And I have a mapleglo guitar and black bass: sunburst is still missing from my collection ;-)
You can find my template for the body in my post above (october 11, 2012): it’s a print of the body in (about..) the right size. Don’t know if it’s really the right size, but it’s the best I have… I cut that out and copied it onto the wood. I keep another copy at hand for the location of the elements, etc.
The bodythickness is 5 cm: pure coincidence because that’s the thickness of the wooden plank they sold me. I will make it a bit less thick (I have to take off 8 mm) because the neck is a bit thinner. In that way the neck and body will be exactly flush. Alternative is to add some wood to the back of the neck to fill up the space between the back of the neck and the backplate.
The backplate that I will glue on is about 11 mm, so total thickness will be 42 & 11 = 53 mm.
I will put on checkerboard purfling (2mm) and a white binding (10 mm in height and 1,5 in depth).
I’ll try to get a sunburst red for paint, because I really like sunburst and it will show the two-tone neck. And I have a mapleglo guitar and black bass: sunburst is still missing from my collection ;-)
Last edited:
More progress today: I cut out the hole for the knobs and started with the H(ilckenbacker)-tailpiece. The bracket will arrive sometime next week, so it's about time I started with the tailpiece. The tailpiece material is a thick slab of aluminium (5 mm) that I got for free from the local metal market. I hope the 5 mm will fit the bracket... So again: not really a concious choice but just what I could get my hands on by coincidence. I can always replace it later with a steel one.
I hope to take off the 8mm of the body coming tuesday (with some help from my connection at the art academy's workshop), then I can glue the backplate to the front and start with figuring out how to rout out the groove that will hold the binding and purfling ...
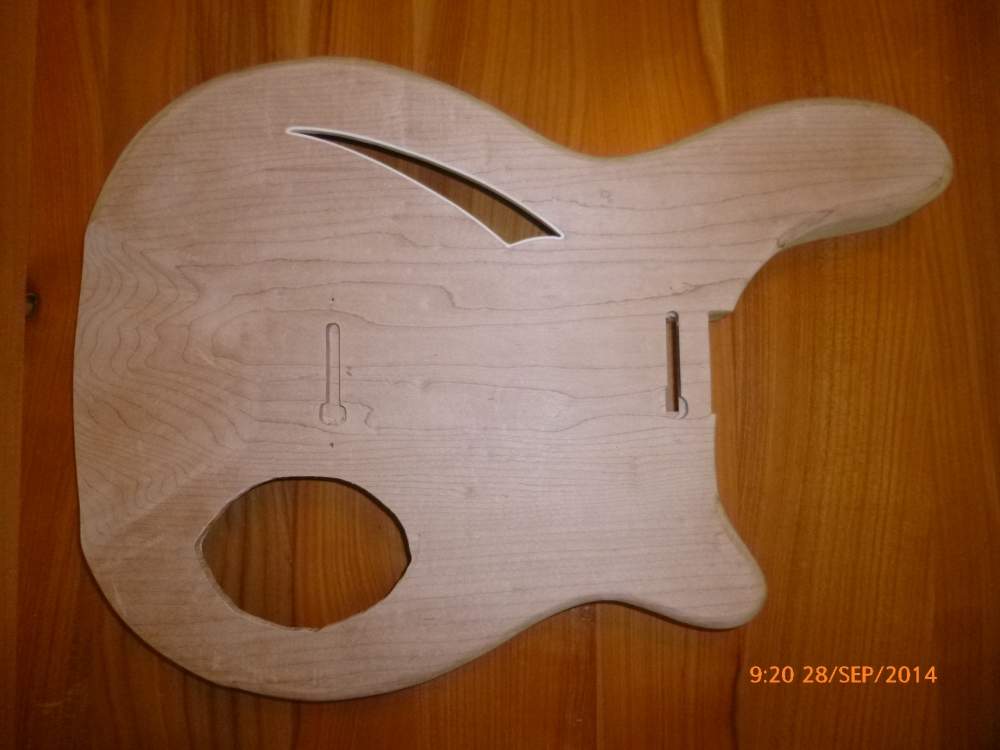
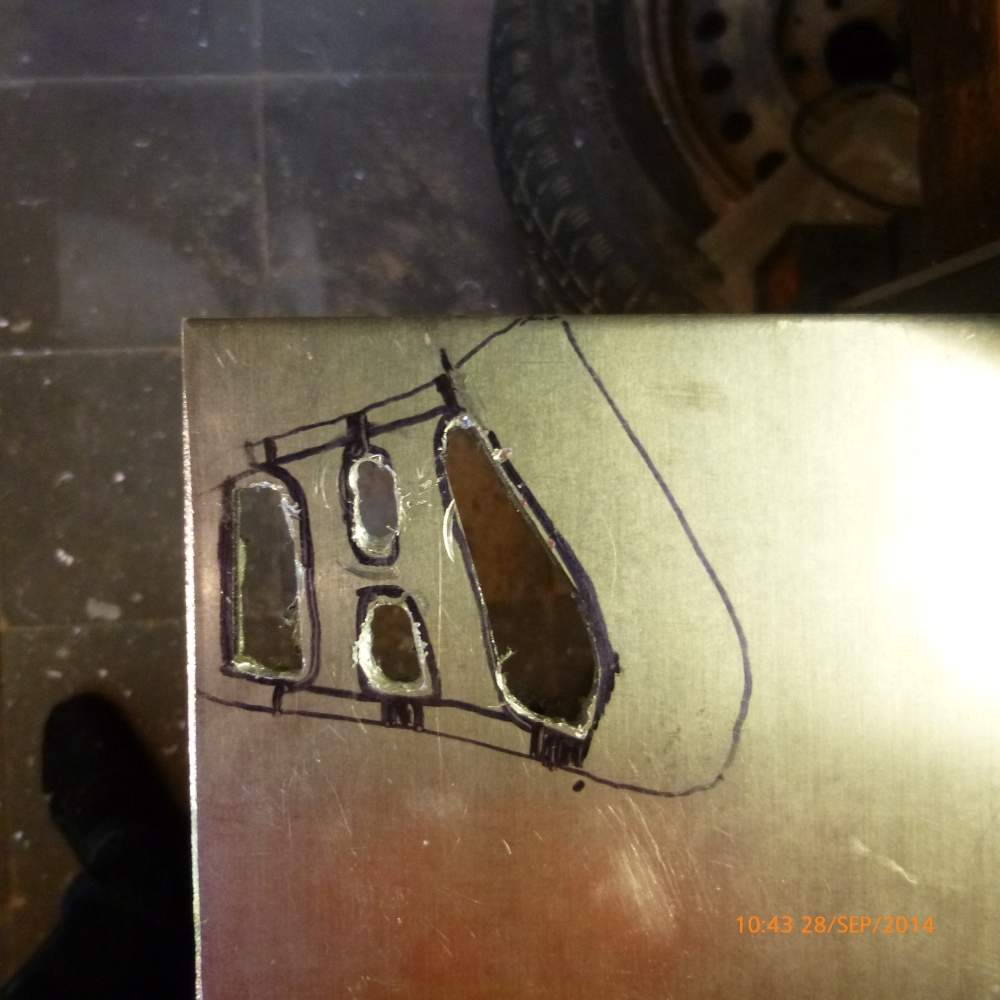
I hope to take off the 8mm of the body coming tuesday (with some help from my connection at the art academy's workshop), then I can glue the backplate to the front and start with figuring out how to rout out the groove that will hold the binding and purfling ...
Last edited:
@neeko: I would also opt for mapleglo if I had a piece of wood with such a beautifull pattern on it! I think it will look beautifull when finished!
The shape of your soundhole (the corner) is very pointy: keep in mind that you will not be able to bend the binding in that shape. I would advise to first pre-shape your binding to see how pointy you can make it, and then decide on how 'sharp' the corners of your soundhole should become. In that way you don't have to fill up too much space in the pointy corner.
The shape of your soundhole (the corner) is very pointy: keep in mind that you will not be able to bend the binding in that shape. I would advise to first pre-shape your binding to see how pointy you can make it, and then decide on how 'sharp' the corners of your soundhole should become. In that way you don't have to fill up too much space in the pointy corner.
Last edited:
Hi Hilco,Hoi Neeko,
You can find my template for the body in my post above (october 11, 2012): it’s a print of the body in (about..) the right size. Don’t know if it’s really the right size, but it’s the best I have… I cut that out and copied it onto the wood. I keep another copy at hand for the location of the elements, etc.
The bodythickness is 5 cm: pure coincidence because that’s the thickness of the wooden plank they sold me. I will make it a bit less thick (I have to take off 8 mm) because the neck is a bit thinner. In that way the neck and body will be exactly flush. Alternative is to add some wood to the back of the neck to fill up the space between the back of the neck and the backplate.
The backplate that I will glue on is about 11 mm, so total thickness will be 42 & 11 = 53 mm.
I will put on checkerboard purfling (2mm) and a white binding (10 mm in height and 1,5 in depth).
I’ll try to get a sunburst red for paint, because I really like sunburst and it will show the two-tone neck. And I have a mapleglo guitar and black bass: sunburst is still missing from my collection ;-)
thanks for your answers,
In fact, I used the template you posted too (i just realized that it was you...) to validate the measurements I did from pictures I grabbed here and there on the web...Your template looks OK (about 38 cm/15" wide, mine will be 36 cm). I think the body is thinner on the real one. But, nevermind, you' re right about taking in account the neck thickness for the assembly.
I would have choose the Fireglo finish too if I didn't have got this flamed maple plank.
Great job for the tailpiece. I don't feel making it myself (Winfield?)
Once again, congratulations for your job !
I can't wait working on mine again, but time is missing these days (job, family, gigs, etc...). I have to wait some weeks now until I can plan days-off :-(
Looking forwards for some news...
salut !


