• TalkBass has been independent since 1998. Add your voice.
    Create a free account to reply to discussions, view embedded media, and browse with fewer display ads.
    Join freeLog in
    Want zero display ads or expanded classifieds tools? Compare plans.

Rickenbacker 4005 Copy

And here the complete result: yesterday I glued the remaining part of the binding (because one strip of binding wasn't enough to fit completely around the guitar).
Thanks to Daan Kupfer for helping me get this great result!
The checkerboard-binding fits really well, all I have to do now is finish the white outerbinding: there is a small gap where the ends meet. And sand, sand, sand, sand.....
IMG-20141225-WA0000.jpeg
 
Last edited:
Binding looks great! I assume the body will be solid color paint? Have you decided how to mask or scrape the binding?
Hoi,
I'm still in doubt about the body color. I would really like to do sunburst but I'm a bit afraid to mess up the whole guitar with that. Good alternative would be transparent red.
I think it is best to avoid having to do a lot of scraping so I want to mask the binding, and only scrape where/if neccesary..
 
Last edited:
Hi Gilmourisgod,
I don't know yet if I will mask the binding, I read somewhere that automotive pinstripe-tape would be very suitable for use here. I'll let you know when I'm that far.
But for now I've been sanding and polishing... and right before I wanted to start painting I decided that the ' boxy' look that I've been talking about is caused by the rounding of the edges that are eh... too steep. Compare the pictures below (mine versus an original): the sides of the original are much rounder. The cause is that I routed the edges with just the bit that came with the cheap chinese set of bits instead of having thought of the radius of the edge.
So I went searching for a router-bit (a cheap one off course ;-) with a bigger radius, and found it at www.ecotools.nl . Only €10,-!! Today I got it in the mail (ok, in Daniel's mail...), so I hope to be able to use it somewhere this week. I think the current radius is 9.0 mm, the new one I ordered has a radius of 15 mm, which will be more like the original 4005. I'll post more pics when I make more progress...
 

Attachments

  • DSC_0672.JPG
    DSC_0672.JPG
    210 KB · Views: 191
  • original.jpg
    original.jpg
    60.3 KB · Views: 247
Last edited:
  • Like
Reactions: neeko
Adorex.
Bass looks great so far. Its an unusual design to begin with, having the "sharp" binding edge tight to your body and rounded edge facing out, but then Rickenbacker always did favor looks over ergonomics. That looks like at least a 3/4" roundover, maybe even bigger.
 
Here an update: first of all the router bits. The first one had a radius of 9.5 mm (small bit), the new one has a radius of 15 mm (yellow bit). I think Rickenbacker used an even bigger radius (20? 25?) but these are only for sale in pro-shops and at high prices (the ones I found were around €100,-). A radius of 15 mm will suffice for me.
Next 4 pics of the body-detail before and after and an overview before and after. If you compare it with the original I think you will agree that the radius should be much bigger.
@Betyouaint: do you care to comment about what radius your's has?

And now.... more sanding... again!
 

Attachments

  • Frezen.JPG
    Frezen.JPG
    252.4 KB · Views: 199
  • voor detail.JPG
    voor detail.JPG
    249.4 KB · Views: 173
  • Na detail.JPG
    Na detail.JPG
    214.4 KB · Views: 188
  • voor met hals.JPG
    voor met hals.JPG
    238.2 KB · Views: 229
  • Na met hals.JPG
    Na met hals.JPG
    239.1 KB · Views: 197
Last edited:
  • Like
Reactions: Splods
I went out shopping for the paint last week, and to my surprise the paintshop had an option that does not require spraying, so masking the binding is not even necesary .
For the colour I got a small bag of water-soluable paint-powder, which only binds on wood (not on plastic, so not on the binding). This is it: Invalid Link Removed
As for the finishing they suggested a basic white-spirit-based lacquer, the same as is being used on wooden floors. Very shiny, very strong and when applied in multiple layer it will provide for a very nice glow.
Off course I was rather sceptic, but after having tried it on a testpiece the results were actually very good. It is not yet very smooth because it will need some more sanding and more layers of lacquer but it looks good to me. So: no sunburst but a transparent-red!
I'm sick now, as soon as I get better I' ll paint the guitar and apply the lacquer.
DSC_0009.JPG
 
Adorex,
So that's like a powdered aniline dye? Not having the dye bond to plastic will save you on the scraping. Tough luck for me, I was hoping to learn how to scrape binding by seeing your technique!
Hi Gilmour,
on youtube you can find a lot of video's of how to glue and scrape off binding, even in the Rick-factory itself (see the video of the
Rickenbacker Factory Tour: Model 330 Guitar & Model Bass Construction).
 
Some great work here since I last visited. Good to see others travelling this road.

I don't recall how I did the binding for the f-hole. I think I may have used heat on the binding to help form the basic shape but I don't remember using a form to shape around.

I love the chequer binding and seriously considered it in my build but wasn't brave enough to take on the added level of complexity.

Since I was last here, I rewired the pots as I somehow got a bunch of stuff backwards so the vols and the treble control worked in reverse...!!! Only took me 2 years to fix it.

I recently got access to a 3D printer and made a new truss rod cover. Out with the 2D print, in with the 3D...

3dtruss03.jpg


3dtruss02.jpg


3dtruss01.jpg


See you all in another 2 years.
 
Hi betyouaint ! Cool to see you back here ! How is you mickenbacker ? Do you still play it ? I'm working (very) slowly on mine and that's why I'm not very active on this thread these days. Thank you again for sharing your experience through this thread. I don't think I would have started my 4005 without you.
 
Yep... still playing between the day job and the family. Always hoped to play it live someday but I fear my gigging days are over. It seems the more I practice these days, the worse I get. I did include the Mickenbacker on a number of recordings I did over the last few years and as it works so well acoustically, I tend to use it for unplugged practice. My 4003 has taken a back seat in that regards.

As I was swapping out the cover, I also did some work on the action. I fitted some flat-wounds a while back and never adjusted. The neck bow was fairly extreme and I had to flatten things out again. I also did some work on the nut as the G and E were a little high.
 
  • Like
Reactions: neeko
Some great work here since I last visited. Good to see others travelling this road.

I don't recall how I did the binding for the f-hole. I think I may have used heat on the binding to help form the basic shape but I don't remember using a form to shape around.

I love the chequer binding and seriously considered it in my build but wasn't brave enough to take on the added level of complexity.

Since I was last here, I rewired the pots as I somehow got a bunch of stuff backwards so the vols and the treble control worked in reverse...!!! Only took me 2 years to fix it.

I recently got access to a 3D printer and made a new truss rod cover. Out with the 2D print, in with the 3D...

3dtruss03.jpg


3dtruss02.jpg


3dtruss01.jpg


See you all in another 2 years.
Betyouaint
A brother in arms! I'm building (excruciatingly slowly) a 4001 clone. I haven't seen your thread, care to post a link? I'd like to see someone else who successfully got through one of these. My build is still in early stages, nice to see a few builders transgressing the Unwritten Law. Adorex is doing a killer job on his bass!
The Hossenfeffer Bass Build | TalkBass.com

Edit:
Found your 4005 build thread. Jumpin' Jehosephat, that is incredible work! I have actually seen this thread before but lost track of it, have to re-read the whole thing. A 4005 build may be in my future, they are just too retro-cool.
 
  • Like
Reactions: blindrabbit
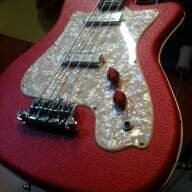
Here's some progress on the paintjob: the waterbased stainer was definitely NOT a good idea: in some places it just wouldn't cover the body, so the results kept on being quite messy. It took a lot of repairing and repainting (waterbased, so it dissolves again when painting again) to get a result that I could live with. The edges of the guitar are still quite messy and there are some dark paint-spots... well, I'll just have to think that that makes it more vintage :-(
At the moment I'm applying the laquer (just plain floorpaint, very glossy), up to about layer 6 now for both sides so the showroomshine is starting to come. I decided to put the guitar flat (instead of hanging it on the ceiling) to avoid dripping... 2 more layers for the back, and then reverse it and apply the finishing 2 layers for the front....
DSC_0027.JPG
 
  • Like
Reactions: neeko