• TalkBass has been independent since 1998. Add your voice.
    Create a free account to reply to discussions, view embedded media, and browse with fewer display ads.
    Join freeLog in
    Want zero display ads or expanded classifieds tools? Compare plans.

Router Planing Fixtures

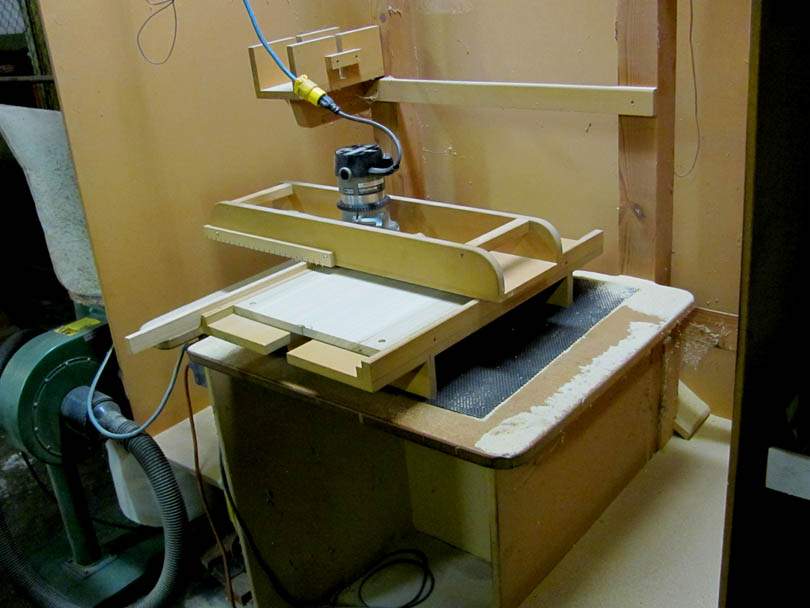
Do you remember this fixture, from the first page of this thread?
IMG_4702B.jpg


Well, I'm getting started building a whole new one. Same basic idea, but bigger, more rigid, faster, more adaptable to other router planing jobs.

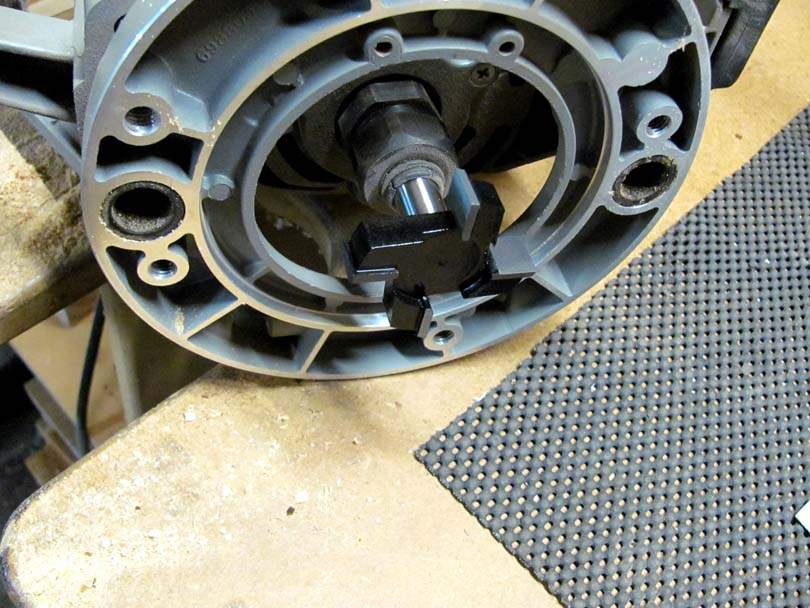
A key element in the upgrade is this router bit. It's 2" diameter, 4 blade, specially made for doing surface planing operations in CNC routers. About $25.
IMG_7655B.jpg


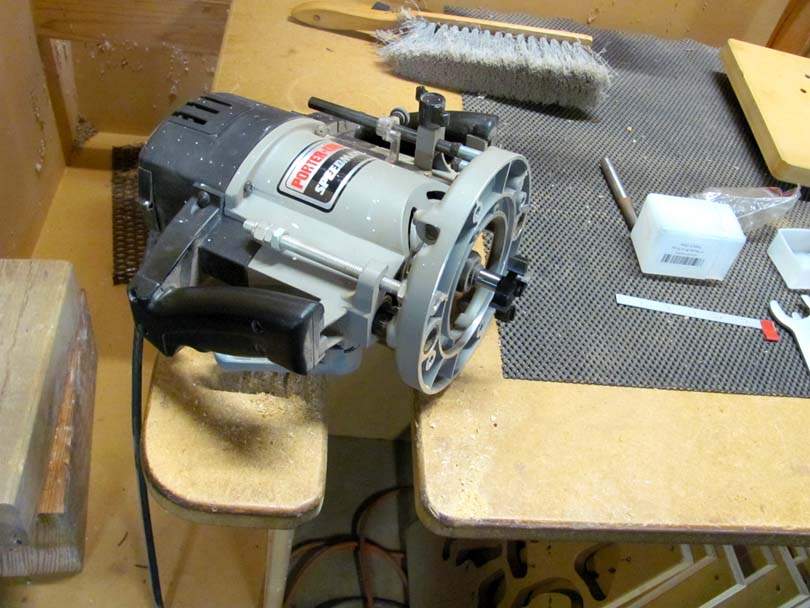
To spin that sucker, I need a powerful router that can go down to slower speed. On my back shelf, collecting dust, was this big Porter Cable plunge router. 3 1/4 Horsepower, and it can switch down to 10,000 rpm. I bought it new back in the '90's, and didn't really like it much for normal collar routing. But I think it'll make a perfect powerplant for the new Super Router Planing Fixture.
IMG_7654B.jpg


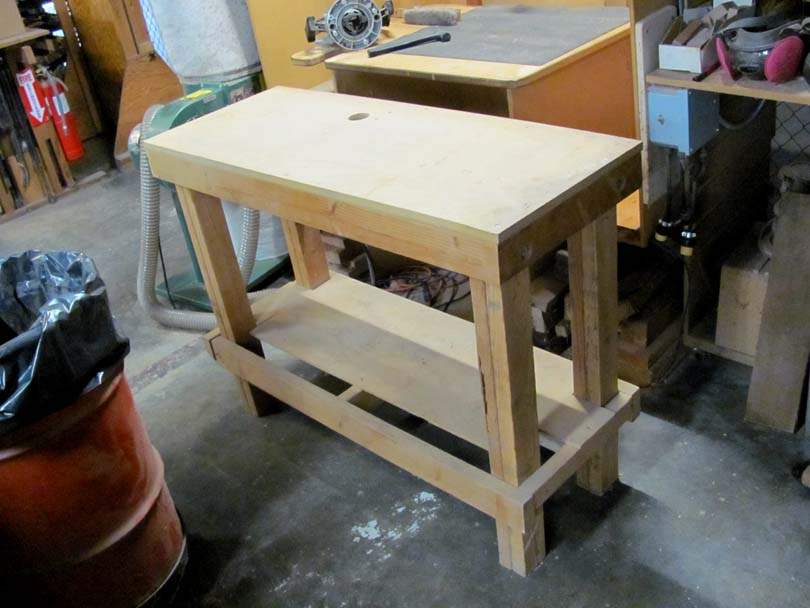
I'd been thinking about building this fixture as a bench, keeping it set up as a machine ready for use any time. Then last week, Cliff was clearing out some excess stuff from his shop down the hall, and said he had this extra workbench he didn't need....Perfect! It's nice and sturdy and just the right size.
IMG_7656B.jpg


I'll be building this up over the next few days. The aluminum bars for the side rails are supposed to be coming in tomorrow. I'll be building a whole new router bridge base from some 1" thick MDF that I found. Some other new ideas to make this operation more efficient.....
 
Hi Bruce,
I'll be interested in following your workup of this new design.

The bit looks something like the Infinity brand bit that I linked in post #282 on page 15 of this topic, at least in size. The Infinity is the bit that Nick Offerman uses to flatten his natural slab tables with, although it's more expensive than the bit you show. I'm a big fan of bits that are designed to minimize the possibility of "uncontrolled cut", so I'll be anxious to see what this one does for you.

A big part of the appeal here is the low price, so I'm sure that factored into your decision to use it. There appears to be a lot of unsupported carbide, but maybe I tend to error too much on the conservative side.

As always, thanks for everything you do and what you contribute; it's appreciated greatly! :)
 
  • Like
Reactions: MovinTarget
Hi Bruce,
I'll be interested in following your workup of this new design.

The bit looks something like the Infinity brand bit that I linked in post #282 on page 15 of this topic, at least in size. The Infinity is the bit that Nick Offerman uses to flatten his natural slab tables with, although it's more expensive than the bit you show. I'm a big fan of bits that are designed to minimize the possibility of "uncontrolled cut", so I'll be anxious to see what this one does for you.

A big part of the appeal here is the low price, so I'm sure that factored into your decision to use it. There appears to be a lot of unsupported carbide, but maybe I tend to error too much on the conservative side.

As always, thanks for everything you do and what you contribute; it's appreciated greatly! :)

I am curious as well.

I may stick to smaller bits as I'm nervous I wouldn't have such a wide bit coming in level... I can see myself doing that and one of the advantages of a smaller bit is the impact of having a slight angle (like one rail being ever so slightly taller than the other) would be the minimal and most likely covered in subsequent passes.

But I'm pretty new to this so that might be just me...
 
A big part of the appeal here is the low price, so I'm sure that factored into your decision to use it. There appears to be a lot of unsupported carbide, but maybe I tend to error too much on the conservative side.

So far so good for me. I'm sure if I hit a nail or something it might not end well, but no issues so far with the boards I have done.

I am curious as well.

I may stick to smaller bits as I'm nervous I wouldn't have such a wide bit coming in level... I can see myself doing that and one of the advantages of a smaller bit is the impact of having a slight angle (like one rail being ever so slightly taller than the other) would be the minimal and most likely covered in subsequent passes.

But I'm pretty new to this so that might be just me...

I wondered about that too, and maybe I just got lucky first time on my design, but I haven't had any issues with the cuts being level. This post has an example board I did with my setup using the same kind of bit:

Router Planing Fixtures
 
  • Like
Reactions: MovinTarget
About the 2" router bit:

This is the one I bought:

https://www.amazon.com/CNC-Router-B...d_rd_i=B07VCZVKL7&psc=1&ref_=pd_bap_d_rp_46_t

It's currently listed at $20. Yeah, the low price was a big factor in choosing this one. Obviously, there's some risk in that. But it appears to be well made and accurately ground. And the geometry of the cutting blades is specifically made for surfacing large areas.

I originally bought this bit thinking I would do my planing operations in the Big Green Pin Router (see the Pin Router thread). But, after gaining experience with the pin router, I realized that using it to surface my body blank boards wouldn't really have any time or efficiency advantages over my current fixture and bridge router. It might actually be slower and take more physical horsepower to slide a big fixture back and forth. Also, the pin router is so efficient at doing plunge routing of pockets with a 1/2" bit, that I want to keep it constantly set up for that.

That's what led me to decide that I really needed to stay with doing the board surfacing in the big router fixture. But make it better. Larger diameter bit turning at slower speed; fewer passes to cover the area. Better, smoother rails so the bridge slides easily. The bridge holding the router will be heavier and more rigid. But I won't have to lift it up; The rails are long enough that I can park the bridge at either end. I'm also going to enclose the bridge/router and try to get decent dust/chip collection hooked up to it. Save cleanup time. I'm taking this basic router fixture idea and turning it into a production machine.

I got some more work done on it last night. I trimmed the table top and cut the main side rails from 1" MDF. The aluminum bars are supposed to be arriving today. 3/8" x 1 1/2" 6061 bar stock, 4' long, from OnlineMetals.com.
 
As an Amazon Associate, TalkBass may receive commissions from qualifying purchases made via links on this site.
Bruce, this looks very interesting and I can't wait to see the completed jig!

The bit I was looking at is from the same manufacturer, but is three times the cost of the one you linked.
CNC Spoilboard Surfacing Router Bit, 1/2" Shank 2" Cutting Diameter, Insert Carbide Slab Flattening Router Bit Planing Bit Wood Planer Bit by NITOMAK: Amazon.com: Industrial & Scientific

Sure the cost is higher, but it has changeable and replaceable Carbide Inserts. So in my warped mind it will last 4 times as long? :D Plus you can buy new Carbide Inserts, keeping the bit for a long time and not have to dispose of the complete bit.

What is your plan for mounting the aluminum to the MDF??
 
As an Amazon Associate, TalkBass may receive commissions from qualifying purchases made via links on this site.
  • Like
Reactions: MovinTarget
Aw man, what about

Hang on, that's in the works too! I've got a whole row of major machine projects lined up for this spring and summer. Some involve fixing up acquired machines and getting them operational. Others are improved versions of fixtures. And a few new machines built from scratch. This Super Router Planer Fixture is a simple project. I hope to have it up and running in a few days. The Neck Shaping Machine is a more complicated project. I've got the design all figured out, and I've started gathering up the materials for it. It may take a month or two.
 
As an Amazon Associate, TalkBass may receive commissions from qualifying purchases made via links on this site.
  • Like
Reactions: MovinTarget
Bruce, this looks very interesting and I can't wait to see the completed jig!

The bit I was looking at is from the same manufacturer, but is three times the cost of the one you linked.
CNC Spoilboard Surfacing Router Bit, 1/2" Shank 2" Cutting Diameter, Insert Carbide Slab Flattening Router Bit Planing Bit Wood Planer Bit by NITOMAK: Amazon.com: Industrial & Scientific

Sure the cost is higher, but it has changeable and replaceable Carbide Inserts. So in my warped mind it will last 4 times as long? :D Plus you can buy new Carbide Inserts, keeping the bit for a long time and not have to dispose of the complete bit.

What is your plan for mounting the aluminum to the MDF??

I noticed the same thing. When the router sled leveling subject first came around I lamented that there were no carbide insert based spoilboard bits available at that time. Now it looks like several brands are now made.

I had been purchasing inserts from Arizona Carbide and even contacted them to suggest that they have a spoilboard head manufactured to match their inserts.

In the Nick Offerman article he mentioned that he usually had to hone the carbide bits after flattening a single large natural edge slab. The carbide inserts would solve that by rotating the cutters 90 degrees.
 
As an Amazon Associate, TalkBass may receive commissions from qualifying purchases made via links on this site.
This came up in my list of recommended products on Amazon. It's a "portable" router sled used to level stuff that is just about 60 inches wide.

Personally, I'm not sure it's worth the price or would be as accurate as your router sled. Only sharing it here as another example of a different approach to a leveling sled...

https://www.amazon.com/Stone-Coat-C...989e5&pd_rd_wg=l1Gas&pd_rd_i=B07VMHH722&psc=1

I use their resin products and I know there are people that swear by their stuff. Having said that, it is designed for things like leveling wood for pouring, not really for bringing a piece of would to a near-finished surface.

If you were going to be adding multiple "thick" layers of something over your wood, and sanding in between, sure...
 
As an Amazon Associate, TalkBass may receive commissions from qualifying purchases made via links on this site.
Sure the cost is higher, but it has changeable and replaceable Carbide Inserts. So in my warped mind it will last 4 times as long? :D Plus you can buy new Carbide Inserts, keeping the bit for a long time and not have to dispose of the complete bit.


Sure, carbide insert tooling is the way to go, if you are running the machine all day in a factory. But carbide insert tooling isn't cheap. The inserts alone are $5-$7 each.

The wear on the carbide edges is directly related to the cutting load (heat generated) and the number of hours of running time. In my case, I might be using this machine an hour a month, at light load. At that rate, this bit will probably last 5 or 10 years. I don't think the carbide insert tooling would ever pay off economically, for me.

What is your plan for mounting the aluminum to the MDF??

Machine screws. I'll be drilling and tapping holes in the aluminum bar stock, and attaching it to the MDF with screws. I used the tablesaw to cut rabbits in the MDF side strips that the aluminum bars sit in.
 
About surface finish:

In my case, I'm not trying to get a super smooth surface on these body blanks. I want them to be flat, unstressed, but I don't mind some fine circular scratches. The inner sides of my body blanks get epoxied together. The outer surfaces get coated with epoxy as grain filler and sanded.
 
About surface finish:

In my case, I'm not trying to get a super smooth surface on these body blanks. I want them to be flat, unstressed, but I don't mind some fine circular scratches. The inner sides of my body blanks get epoxied together. The outer surfaces get coated with epoxy as grain filler and sanded.
Bruce,
What are you using for epoxy grain filler these days? Just straight up West System, or ZPoxy? The LMI guy recommends the ZPoxy PT-40 Finishing Resin:
Amazon.com: Pacer Technology (Zap) Z-Poxy Finishing Resin Adhesives, 12 oz: Toys & Games

What bit are you using for the outer finish surfaces? Same 4-blade one?
 
As an Amazon Associate, TalkBass may receive commissions from qualifying purchases made via links on this site.
Bruce,
What are you using for epoxy grain filler these days? Just straight up West System, or ZPoxy? The LMI guy recommends the ZPoxy PT-40 Finishing Resin:

Good 'ol West Systems 105/206. I've been filling grain with it since the mid-1990's. I've got basses that are 23 years old, ash bodies, filled with West Systems, and no signs of sinking in the grain. That's good enough for me.

What bit are you using for the outer finish surfaces? Same 4-blade one?

That's the plan. I've always router-surfaced the inside and outside surfaces of the Tops and Backs. After epoxying them together, I may do a quick hard-block sanding with 180 to make sure there are no high spots. Then start slapping on the West Systems to fill the grain.
 
Sure, carbide insert tooling is the way to go, if you are running the machine all day in a factory. But carbide insert tooling isn't cheap. The inserts alone are $5-$7 each.

The wear on the carbide edges is directly related to the cutting load (heat generated) and the number of hours of running time. In my case, I might be using this machine an hour a month, at light load. At that rate, this bit will probably last 5 or 10 years. I don't think the carbide insert tooling would ever pay off economically, for me.


Machine screws. I'll be drilling and tapping holes in the aluminum bar stock, and attaching it to the MDF with screws. I used the tablesaw to cut rabbits in the MDF side strips that the aluminum bars sit in.

Dang... always the voice of reason!! Using your calculations there is no way I'd need the more expensive bit. You just saved me a bunch of money!

Thank you!
 
  • Like
Reactions: MovinTarget
Also, something that's important to know about carbide-tipped router bits:

In continuous factory use, carbide edges last for hundreds or thousands of hours of heavy use before they get dull. We hobbyists use our bits for maybe a few hours per month.

When you are using a carbide router bit and it starts cutting poorly and smoking, 99.2% of the time the carbide edge is still fine and sharp. It's just become coated with a lip of hardened varnish. When that varnish lip builds up enough on the back relief, it heats up and smokes against the wood, and prevents the edge from reaching the wood. The router bit stops cutting.

But it doesn't need to be sharpened, it just needs to have the varnish cleaned off! Many perfectly good router bits get tossed in a drawer and replaced because it's thought that they are dull and it would be too expensive to have them resharpened.

I've written several long posts here on TB showing how to clean the varnish off of a router bit in a few minutes, while it's still in the router. And it'll cut like new. After you clean off the varnish, you can touch up the edge with a diamond hone, but it rarely is necessary. Unless you actually have a few hundred hours of use on the bit.
 
I got most of the base of the new Super Router Planing Fixture built up. It's mostly built from some scraps of 1" MDF that was abandoned by one of the other guys here. Pretty simple construction.

The side rails are rabbited on the table saw, and fitted with 4' long bars of 3/8" x 1 1/2" 6061 aluminum bar stock. The bars are drilled & tapped with some 10-32 holes, and bolted to the side rails with socket head cap screws. The aluminum bars aren't absolutely necessary. The edges of MDF strips work well for most of these sliding fixtures. But I wanted to build this one up as a permanent machine for many years of heavy use. The aluminum bars were $17 each from OnlineMetals, cut to length and delivered to my door.

IMG_7661B.jpg


IMG_7662B.jpg


That pattern of holes in the center plates are 1/4-20 T-nuts, set in from the bottom. Now, I can make up a collection of different boards and fixtures that will quickly bolt down into the bed. The first one I'll build will hold the walnut tops & backs for my Scroll Bass bodies. Then Keith will build one that will clamp down his guitar bodies. And one to hold blank body slabs. Whatever jobs come up. These holding fixtures will all interchange in minutes. I designed the depth of the bed to hold up to a 2" thick block on top of a 3/4" MDF fixture plate.

Now I need to build the new router mount and bridge base.



