

Enjoy the benefits of a premium membership!
Upgrade Account
-
TalkBass has been independent since 1998. Add your voice.
Create a free account to reply to discussions, view embedded media, and browse with fewer display ads.
Join free Log in
Want zero display ads or expanded classifieds tools? Compare plans.
You are using an out of date browser. It may not display this or other websites correctly.
You should upgrade or use an alternative browser.
You should upgrade or use an alternative browser.
Router Planing Fixtures
- Thread starter Bruce Johnson
- Start date
More options
Who Replied?

Old thread, but I finally got around to building one of these jigs. Thanks for all the ideas!
I made this out of 3/4" MDF and 1 1/2" aluminum angle. I bought the aluminum so that I'd have perfectly flat and straight rails. Unfortunately, the aluminum wasn't straight and I had to fix that by putting them side to side and sanding them. If I would have known this would have happened, I would have just made my own rails out of MDF or wood. I bought the aluminum from McMaster-Carr and I picked them up in person. This was not shipping damage but an actual high spot in the aluminum from the manufacturing process.
View attachment 5466524
By laying another piece of 3/4" MDF in the channel, I can make boards even thinner. I used some scrap wood (1/4" thick) to hold down the wood I'd be working on. A rough curve cut into those scraps, then held down by a clamp, will grab most size pieces I'll be working on. This wont hold the wood flat, but it will hold it from moving around.
View attachment 5466525
The sled is way wider than it needs to be. Originally I was going to make the base wider, but I needed to "steal" some MDF to lay in the channel as I didn't have enough. I'm leaving the sled that wide as I may be able to use it that way with another base I might make in the future.
It is only a trim router, but I just bought it before even thinking of this application so that's what I had to work with. Go slow and take small bites and it seams to work just fine. View attachment 5466529
I am using a Freud 1 1/4" dia Mortising bit with a 1/4" shaft (shaft size dictated by the router.) The two blocks of wood on the bottom keep the bit from running into the aluminum. To use this sled for another application, I would just remove those blocks and most likely install them at another location as needed.
View attachment 5466540
Nice fixture work, RW!
I use extruded aluminum angles (and tubes and bars) a lot in making fixtures. They are quick and convenient for making rails for MDF parts to slide. They are easy enough to saw and drill, and not too expensive. They are usually pretty straight, but you need to check them. Sometimes they will have a small lump or warp.
The best tool for straightening the edge out is a big flat file. Lay it down on top of the aluminum and slide it down the length of it, like a plane. Easier and faster than a sanding block.
One other suggestion: Using an 1 1/4" bit on that router in that fixture is a little scary to me. A bit that large in diameter will have a serious kick if it digs in. It could get away from you and slam into the aluminum rail. Which could knock the router out of your hands. Be careful. I'd recommend a 3/4" dia bit, to reduce the potential kick.

Does anyone have any experience with these Astra coated bits? It seems like maybe a good idea at least for body outlines maybe cavities also. The website says made in USA. Expensive but could be worth it.
*AstraHP Coated* Bits&Bits 540-CM500 - 1/2" Spiral Compression Bit - 2" LOC - BitsBits.com
*AstraHP Coated* Bits&Bits 540-CM500 - 1/2" Spiral Compression Bit - 2" LOC - BitsBits.com

I see a TON of them from several woodworker channels I watch on YouTube. They seem to be really good, but expensive. Everyone claims they last a very long time before getting dull, and they run a lot cooler.Does anyone have any experience with these Astra coated bits? It seems like maybe a good idea at least for body outlines maybe cavities also. The website says made in USA. Expensive but could be worth it.
*AstraHP Coated* Bits&Bits 540-CM500 - 1/2" Spiral Compression Bit - 2" LOC - BitsBits.com
There's also some discount codes out there too, check Jay Bates' videos.
It's been a minute but I wanted to share that the vacuum board + router planing fixture combo is alive an well! I'm working on a new build that will use a neck with a squared heel and I muffed routing out the pocket with a table router...
Since it's all squared and I'm dealing with only the core section of the body (no wings yet), I was able to plane off the sides of the pocket and I can just glue on new wood to create that squared pocket, saving the piece.
The fun part was making the rails tall enough to work with the piece on it's side:
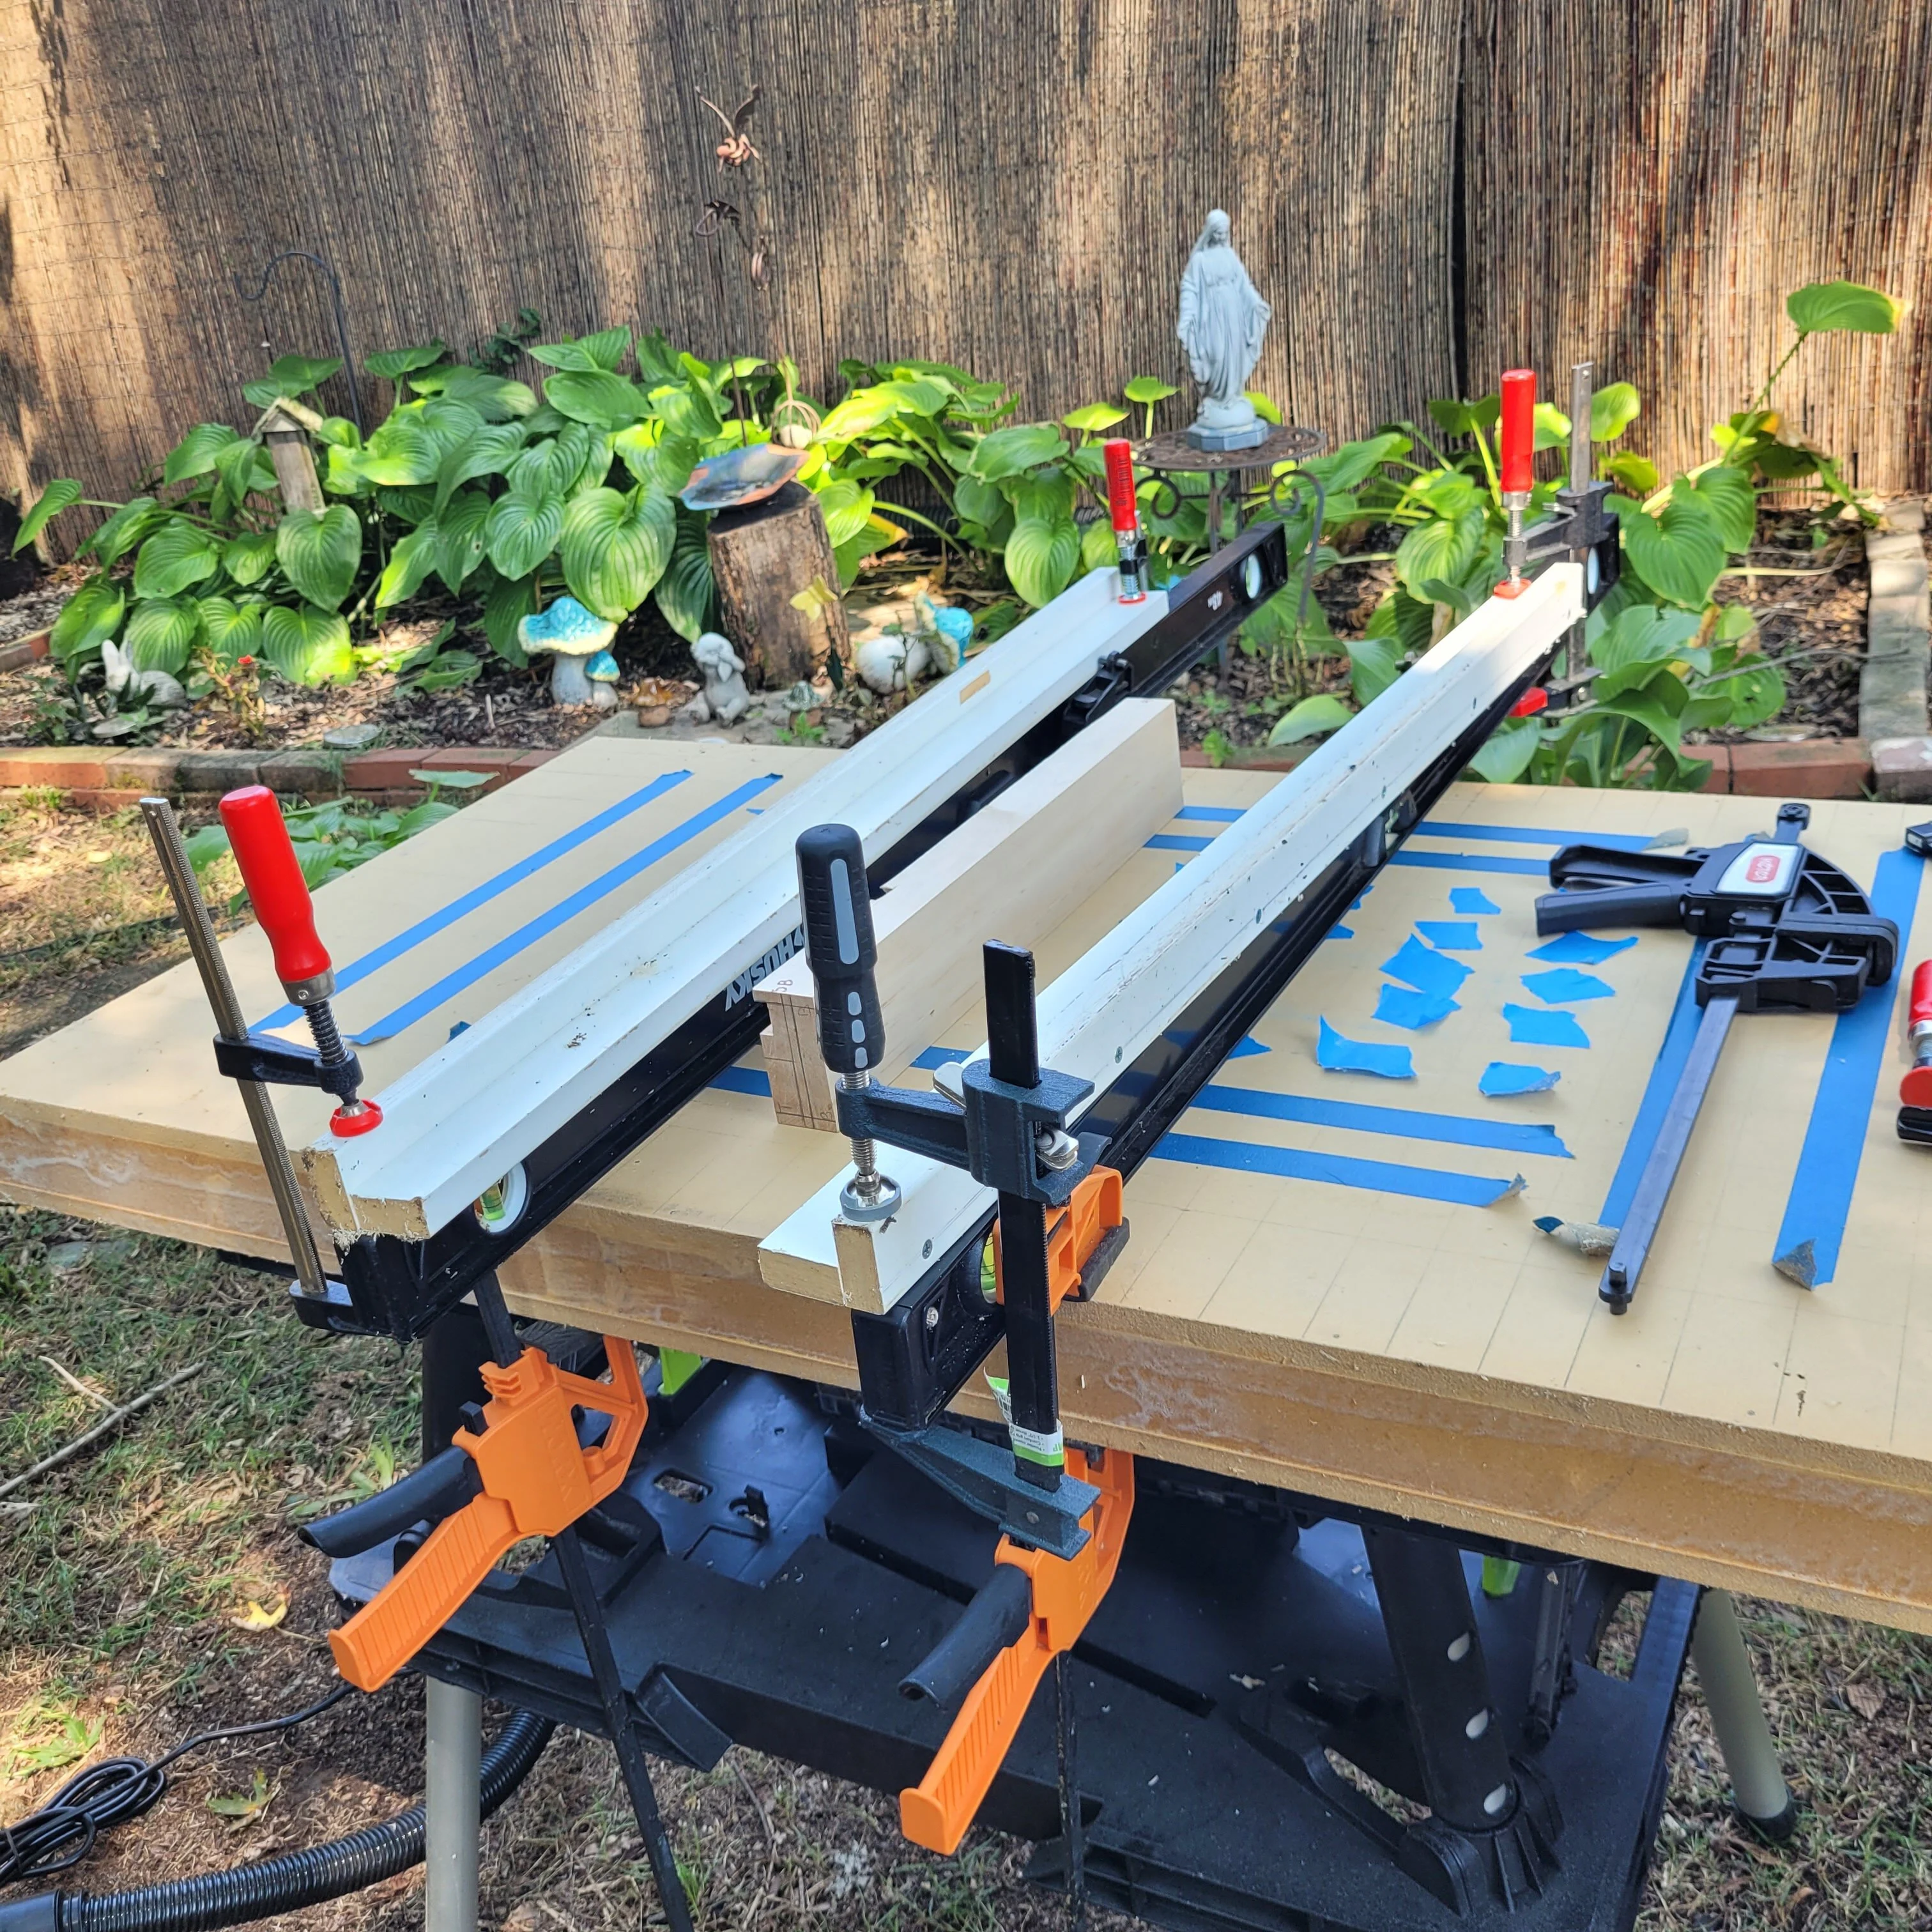
Worked like a charm!
Since it's all squared and I'm dealing with only the core section of the body (no wings yet), I was able to plane off the sides of the pocket and I can just glue on new wood to create that squared pocket, saving the piece.
The fun part was making the rails tall enough to work with the piece on it's side:
Worked like a charm!
Last edited:

Here's some history........ Genuine vintage router planing fixtures!
I'm doing some cleaning up and moving shelving around here in the Lab. Buried deep in a corner, I found these old fixtures. I built them in 1994, as part of the SWR WorkingMan Bass project. I've told the story of that project on some other threads. These, I believe, are my first real Router Planing fixtures. Wow, 31 years ago.......
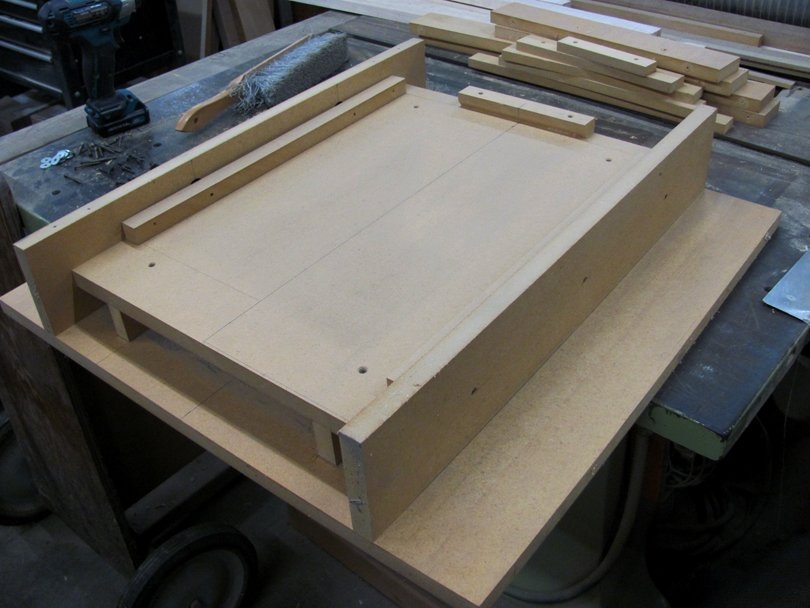
This is the main fixture for router planing the body blanks. They were two-piece laminates of 8/4 ash, full rectangular. They were clamped into this fixture, and routed flat and to thickness with a PC router on a wide bridge base. Front side, then flipped over to the back side. Classic router planing fixture design, with the two parallel side rails. All made from 3/4" medium weight MDF.

There are stop blocks of MDF to clamp on the sides of the blank. The left side stop block moves like a vise jaw and is tightened by the two clamp screws.

A nice simple fixture, and it worked well during the project. We made about 20 bodies with it.
But, I can't keep storing it endlessly. So, I've taken it all apart now, recycling the materials. All the MDF boards go into the general stock, to be made into new fixtures. All the hardware goes back into stock, even the screws.
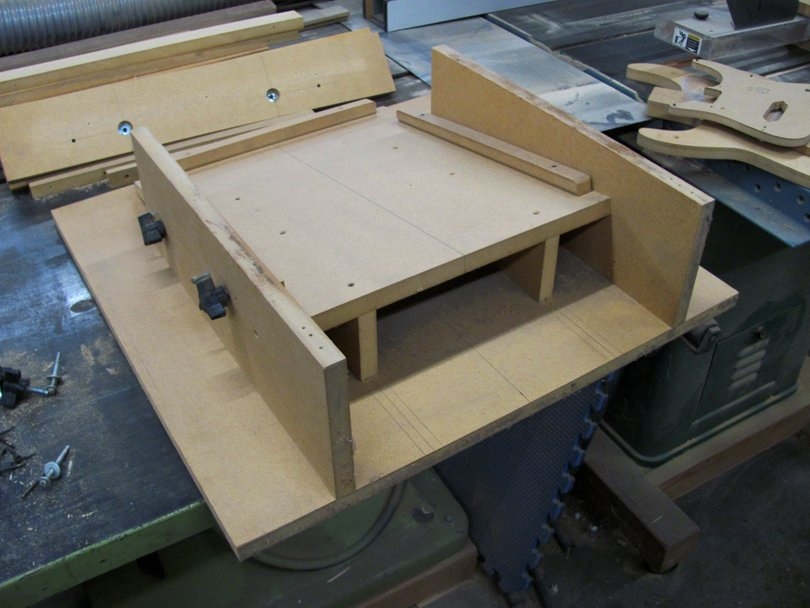
Here's another similar fixture, which holds the body blank at an angle. The neck plate and body area of the SWR bass was on an angle, and this fixture was used to cut that surface, while the body blank was still rectangular..
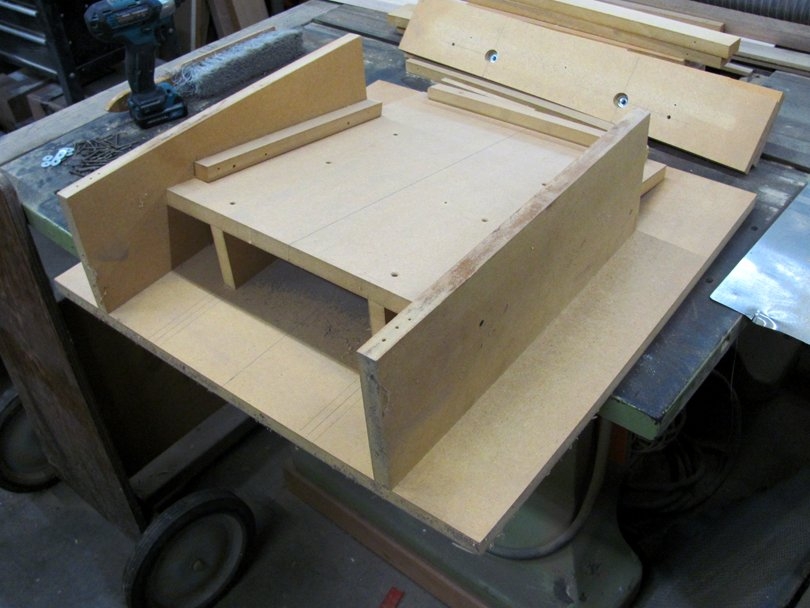
Same general design, two parallel side plates for the router base to slide on. The left side block clamps with the knobs.
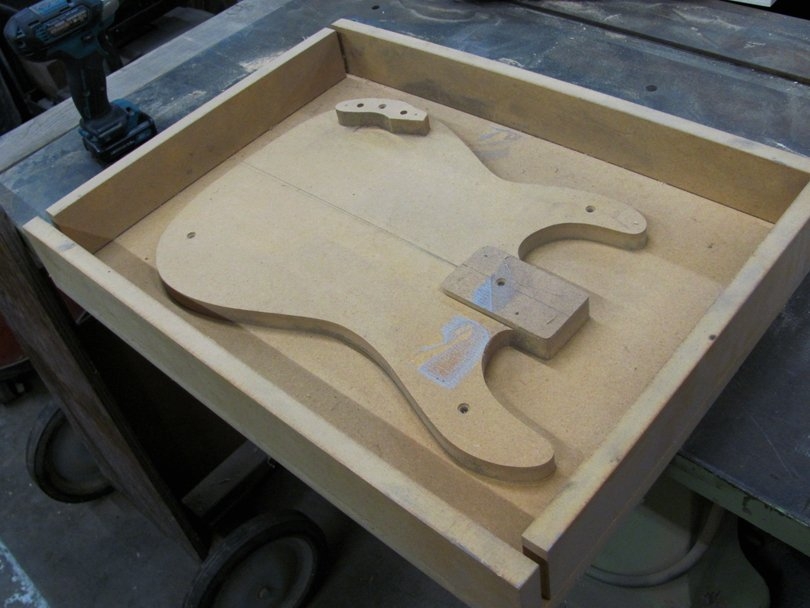
This fixture routed the straight perimeter of the body. The blank had previously had the neck pocket and control cavity routed, and had been bandsawn to the perimeter, slightly oversize. Then it plugged face-down onto this fixture, locating on the neck pocket and control cavity blocks. The router was mounted on a wide flat base that slid around on those side fence rails. It was a 1/2" x 2" straight router bit with a bearing at the bottom. The bearing rode around on that MDF template to cut the perimeter.
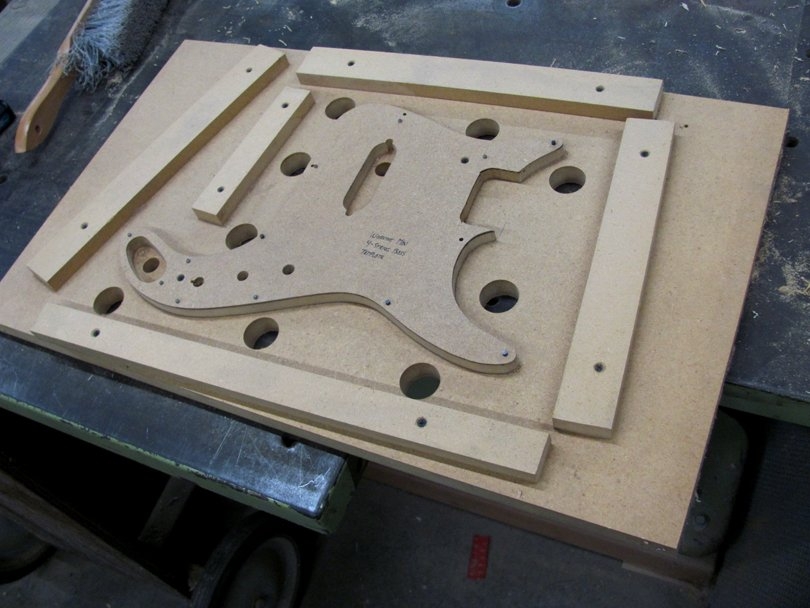
This is the fixture for making the pickguard. The blank is drilled and bandsawn to rough size, then plugged onto those little dowel pins at the screw hole locations. The router was on a wide base that slid around on those fence wall strips. The first step was to go around with a straight bit, cutting the perimeter and openings. Then around again with an angle bit with a bearing on the bottom to bevel the perimeter.
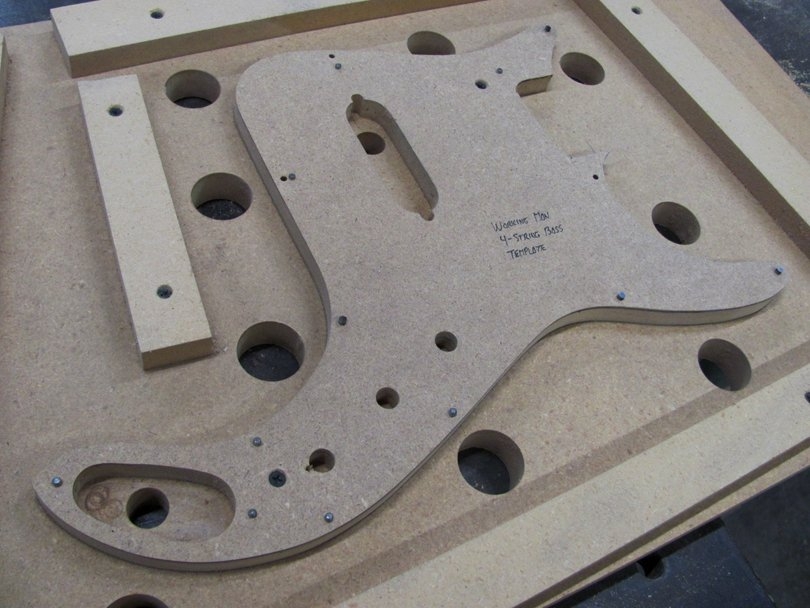
I disassembled and salvaged this fixture, but I saved the template.
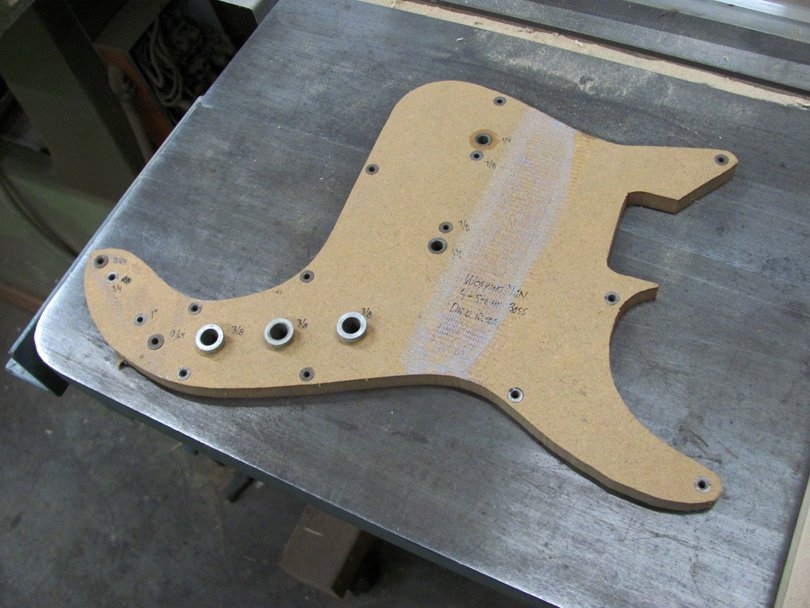
And here's the matching drill guide for the pickguard. MDF with steel drill guide bushings. It was clamped down onto the sheet of pickguard material, the outline traced with a silver Sharpie, and all the holes drilled with a hand drill. Fast and simple and accurate.
I've also saved this, but I pressed out the drill guide bushings and put them back in stock. They are expensive, like $8-$15 each.
Anyway, I'm showing you these as examples of production tooling for a small shop. Fixtures like this are not difficult to make.
I'm doing some cleaning up and moving shelving around here in the Lab. Buried deep in a corner, I found these old fixtures. I built them in 1994, as part of the SWR WorkingMan Bass project. I've told the story of that project on some other threads. These, I believe, are my first real Router Planing fixtures. Wow, 31 years ago.......
This is the main fixture for router planing the body blanks. They were two-piece laminates of 8/4 ash, full rectangular. They were clamped into this fixture, and routed flat and to thickness with a PC router on a wide bridge base. Front side, then flipped over to the back side. Classic router planing fixture design, with the two parallel side rails. All made from 3/4" medium weight MDF.
There are stop blocks of MDF to clamp on the sides of the blank. The left side stop block moves like a vise jaw and is tightened by the two clamp screws.
A nice simple fixture, and it worked well during the project. We made about 20 bodies with it.
But, I can't keep storing it endlessly. So, I've taken it all apart now, recycling the materials. All the MDF boards go into the general stock, to be made into new fixtures. All the hardware goes back into stock, even the screws.
Here's another similar fixture, which holds the body blank at an angle. The neck plate and body area of the SWR bass was on an angle, and this fixture was used to cut that surface, while the body blank was still rectangular..
Same general design, two parallel side plates for the router base to slide on. The left side block clamps with the knobs.
This fixture routed the straight perimeter of the body. The blank had previously had the neck pocket and control cavity routed, and had been bandsawn to the perimeter, slightly oversize. Then it plugged face-down onto this fixture, locating on the neck pocket and control cavity blocks. The router was mounted on a wide flat base that slid around on those side fence rails. It was a 1/2" x 2" straight router bit with a bearing at the bottom. The bearing rode around on that MDF template to cut the perimeter.
This is the fixture for making the pickguard. The blank is drilled and bandsawn to rough size, then plugged onto those little dowel pins at the screw hole locations. The router was on a wide base that slid around on those fence wall strips. The first step was to go around with a straight bit, cutting the perimeter and openings. Then around again with an angle bit with a bearing on the bottom to bevel the perimeter.
I disassembled and salvaged this fixture, but I saved the template.
And here's the matching drill guide for the pickguard. MDF with steel drill guide bushings. It was clamped down onto the sheet of pickguard material, the outline traced with a silver Sharpie, and all the holes drilled with a hand drill. Fast and simple and accurate.
I've also saved this, but I pressed out the drill guide bushings and put them back in stock. They are expensive, like $8-$15 each.
Anyway, I'm showing you these as examples of production tooling for a small shop. Fixtures like this are not difficult to make.
I finally got something done. I've been planning a fixture for small parts, like pickup rings and covers, bridge plates, tail pieces etc. I have a few use scenarios planned for my 2026 buildoff entry.
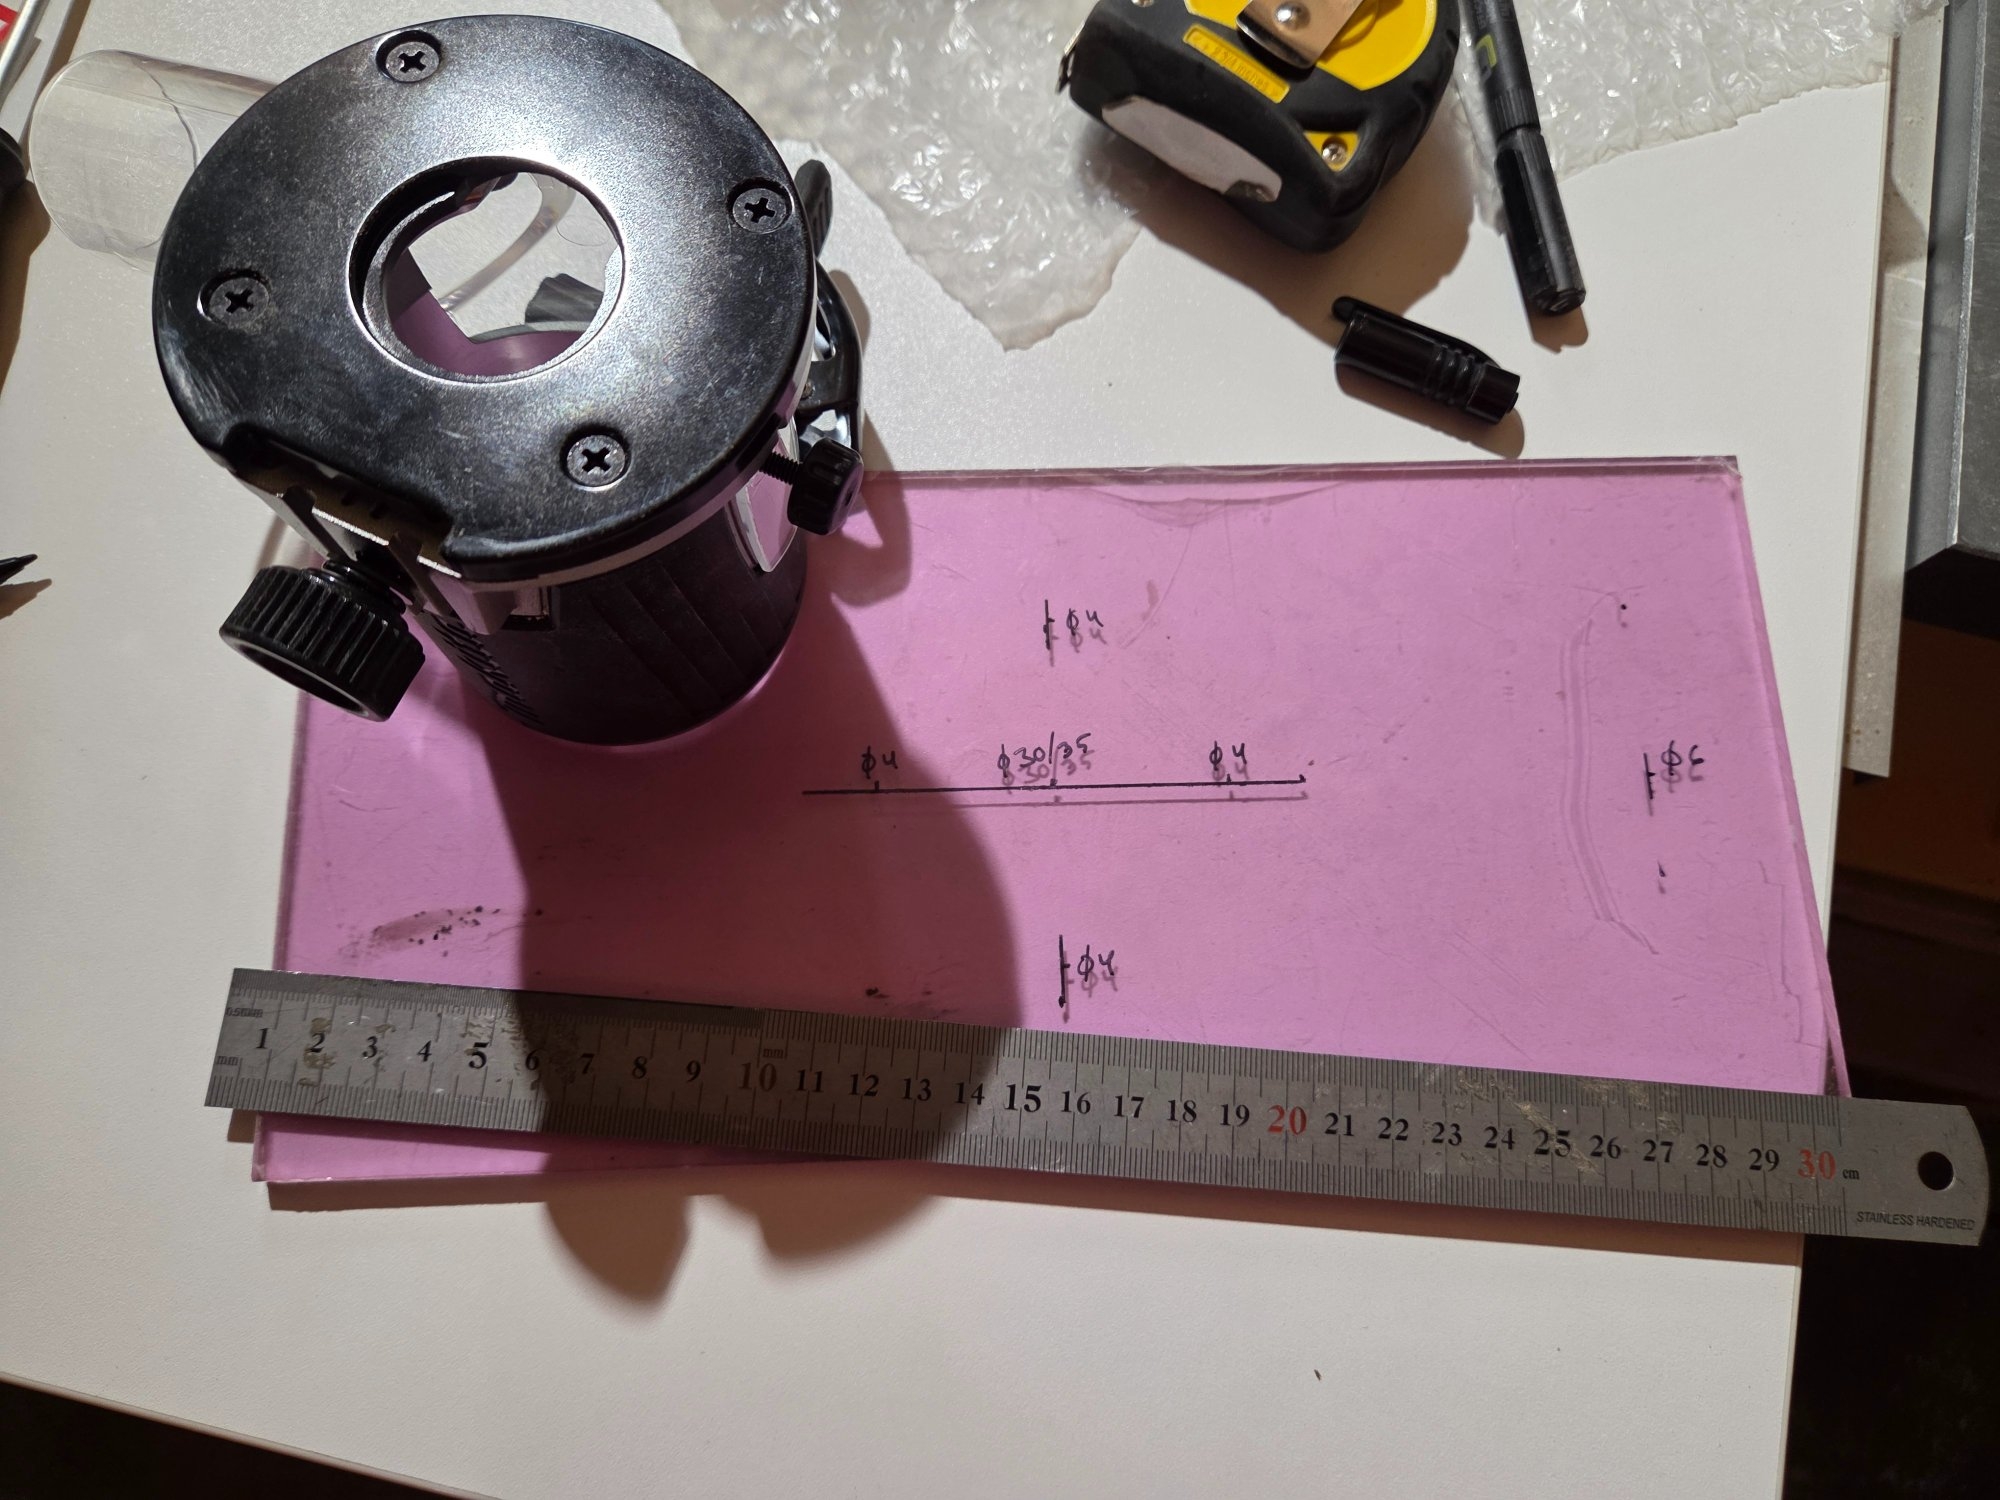
First part was making the sled. I have a Makita trim router, which should be about the right size for this. I used the standard trimmer base. I made the base from plexiglass. Not acrylic I found out, but some styrene-acrylic hybrid.
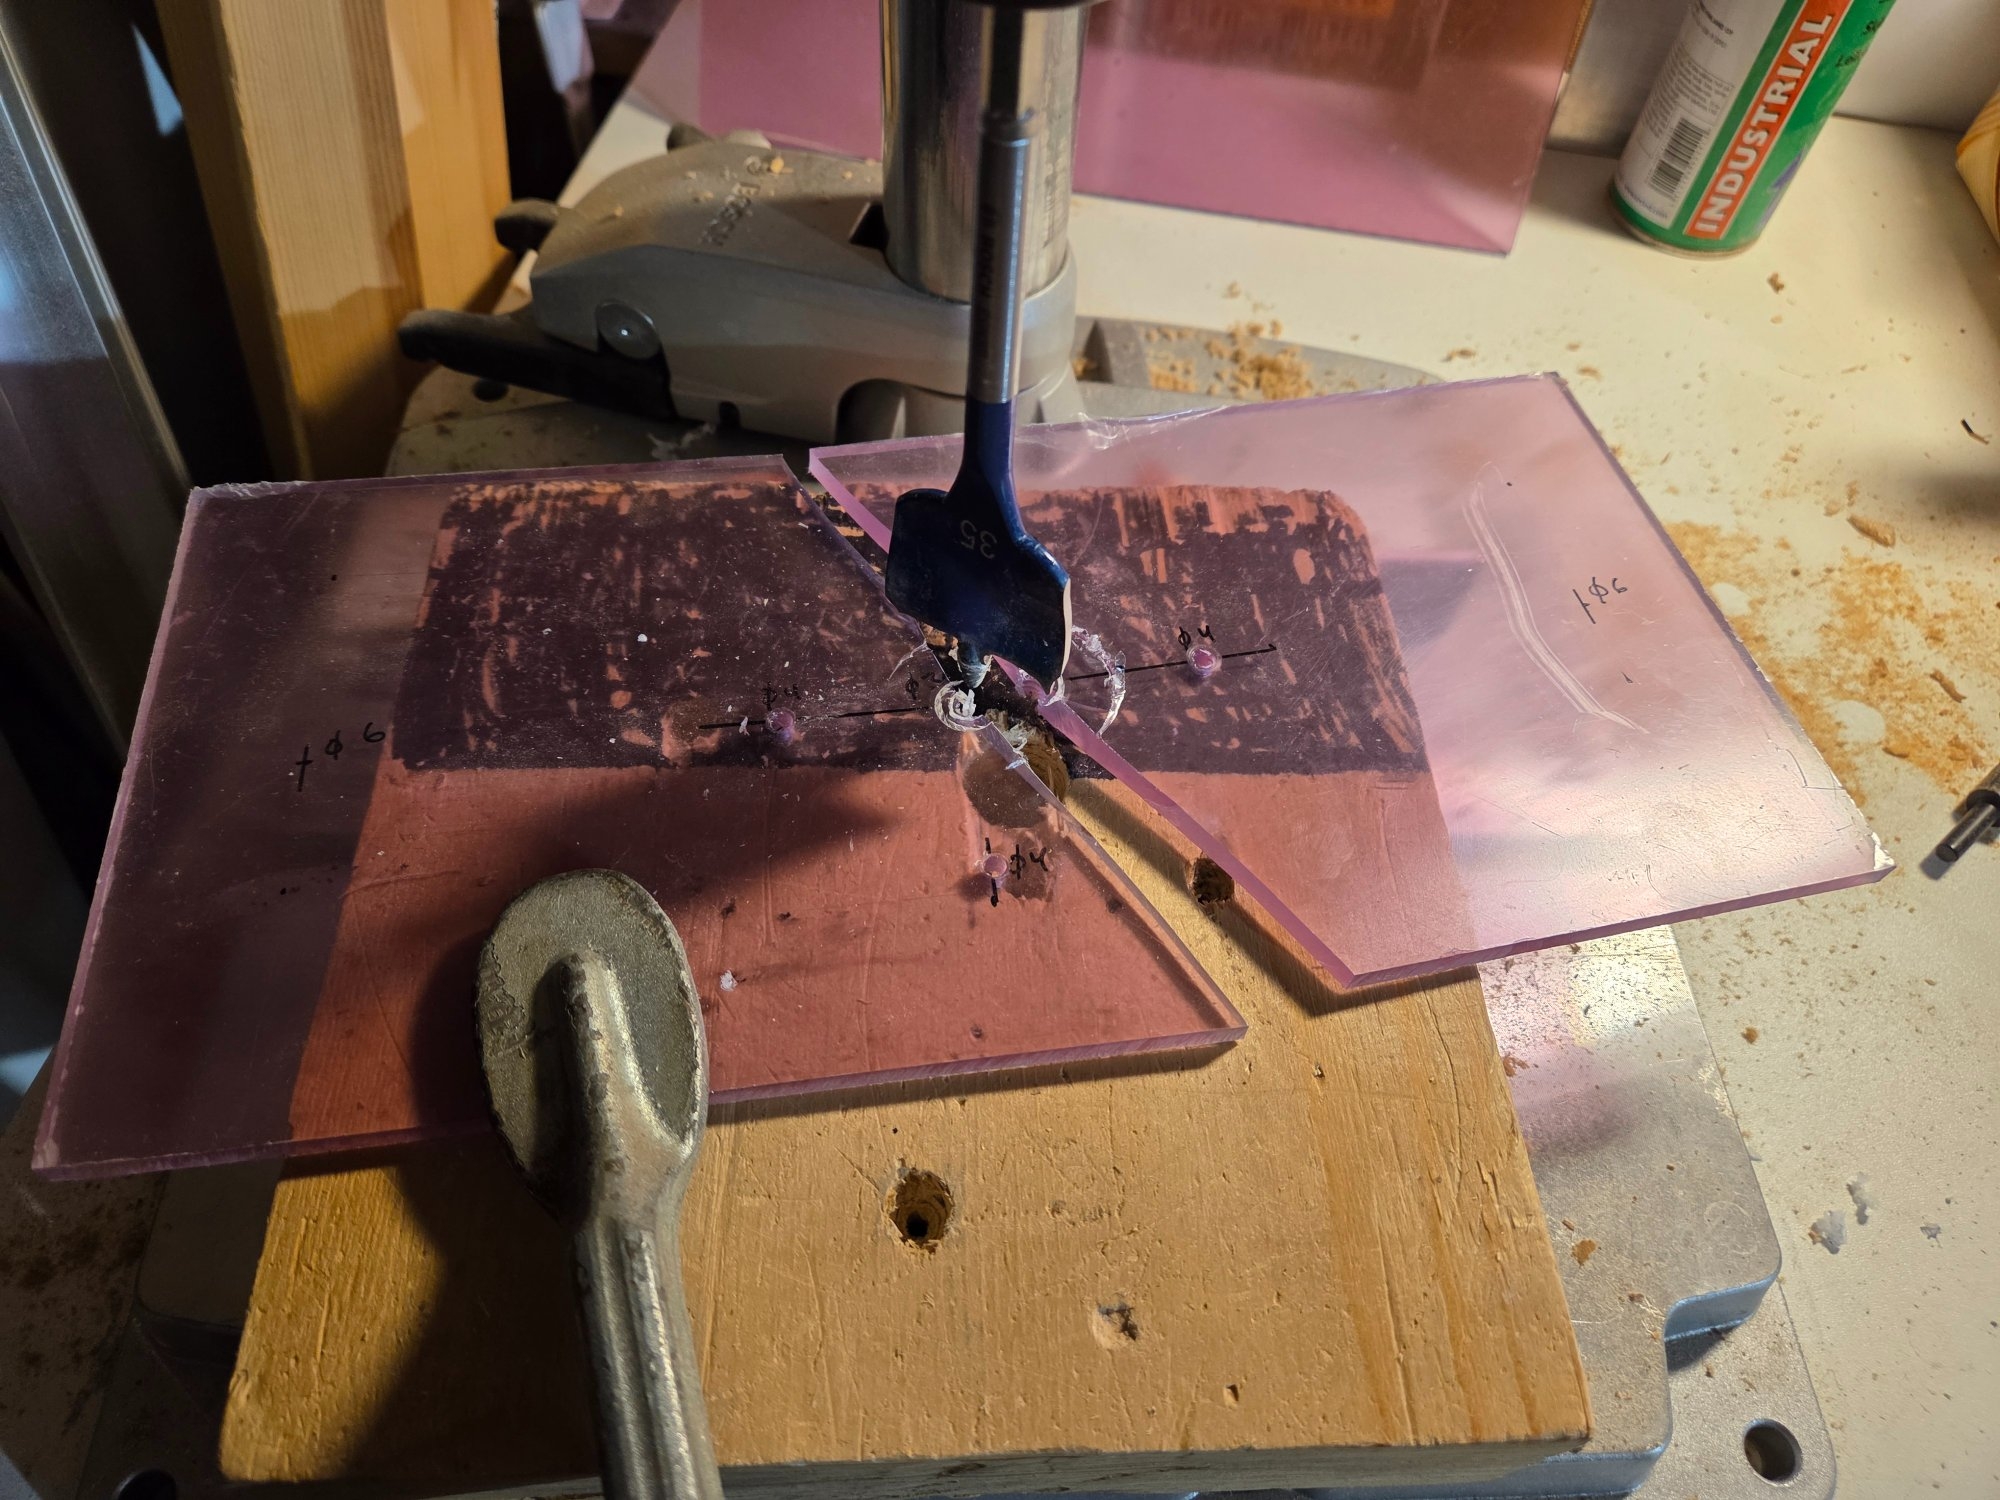
Of course the plexiglass couldn't take the conical thread on that drill bit. It split it in half faster than I could see what was happening. So I called it a day and bought a properly sized hole saw.
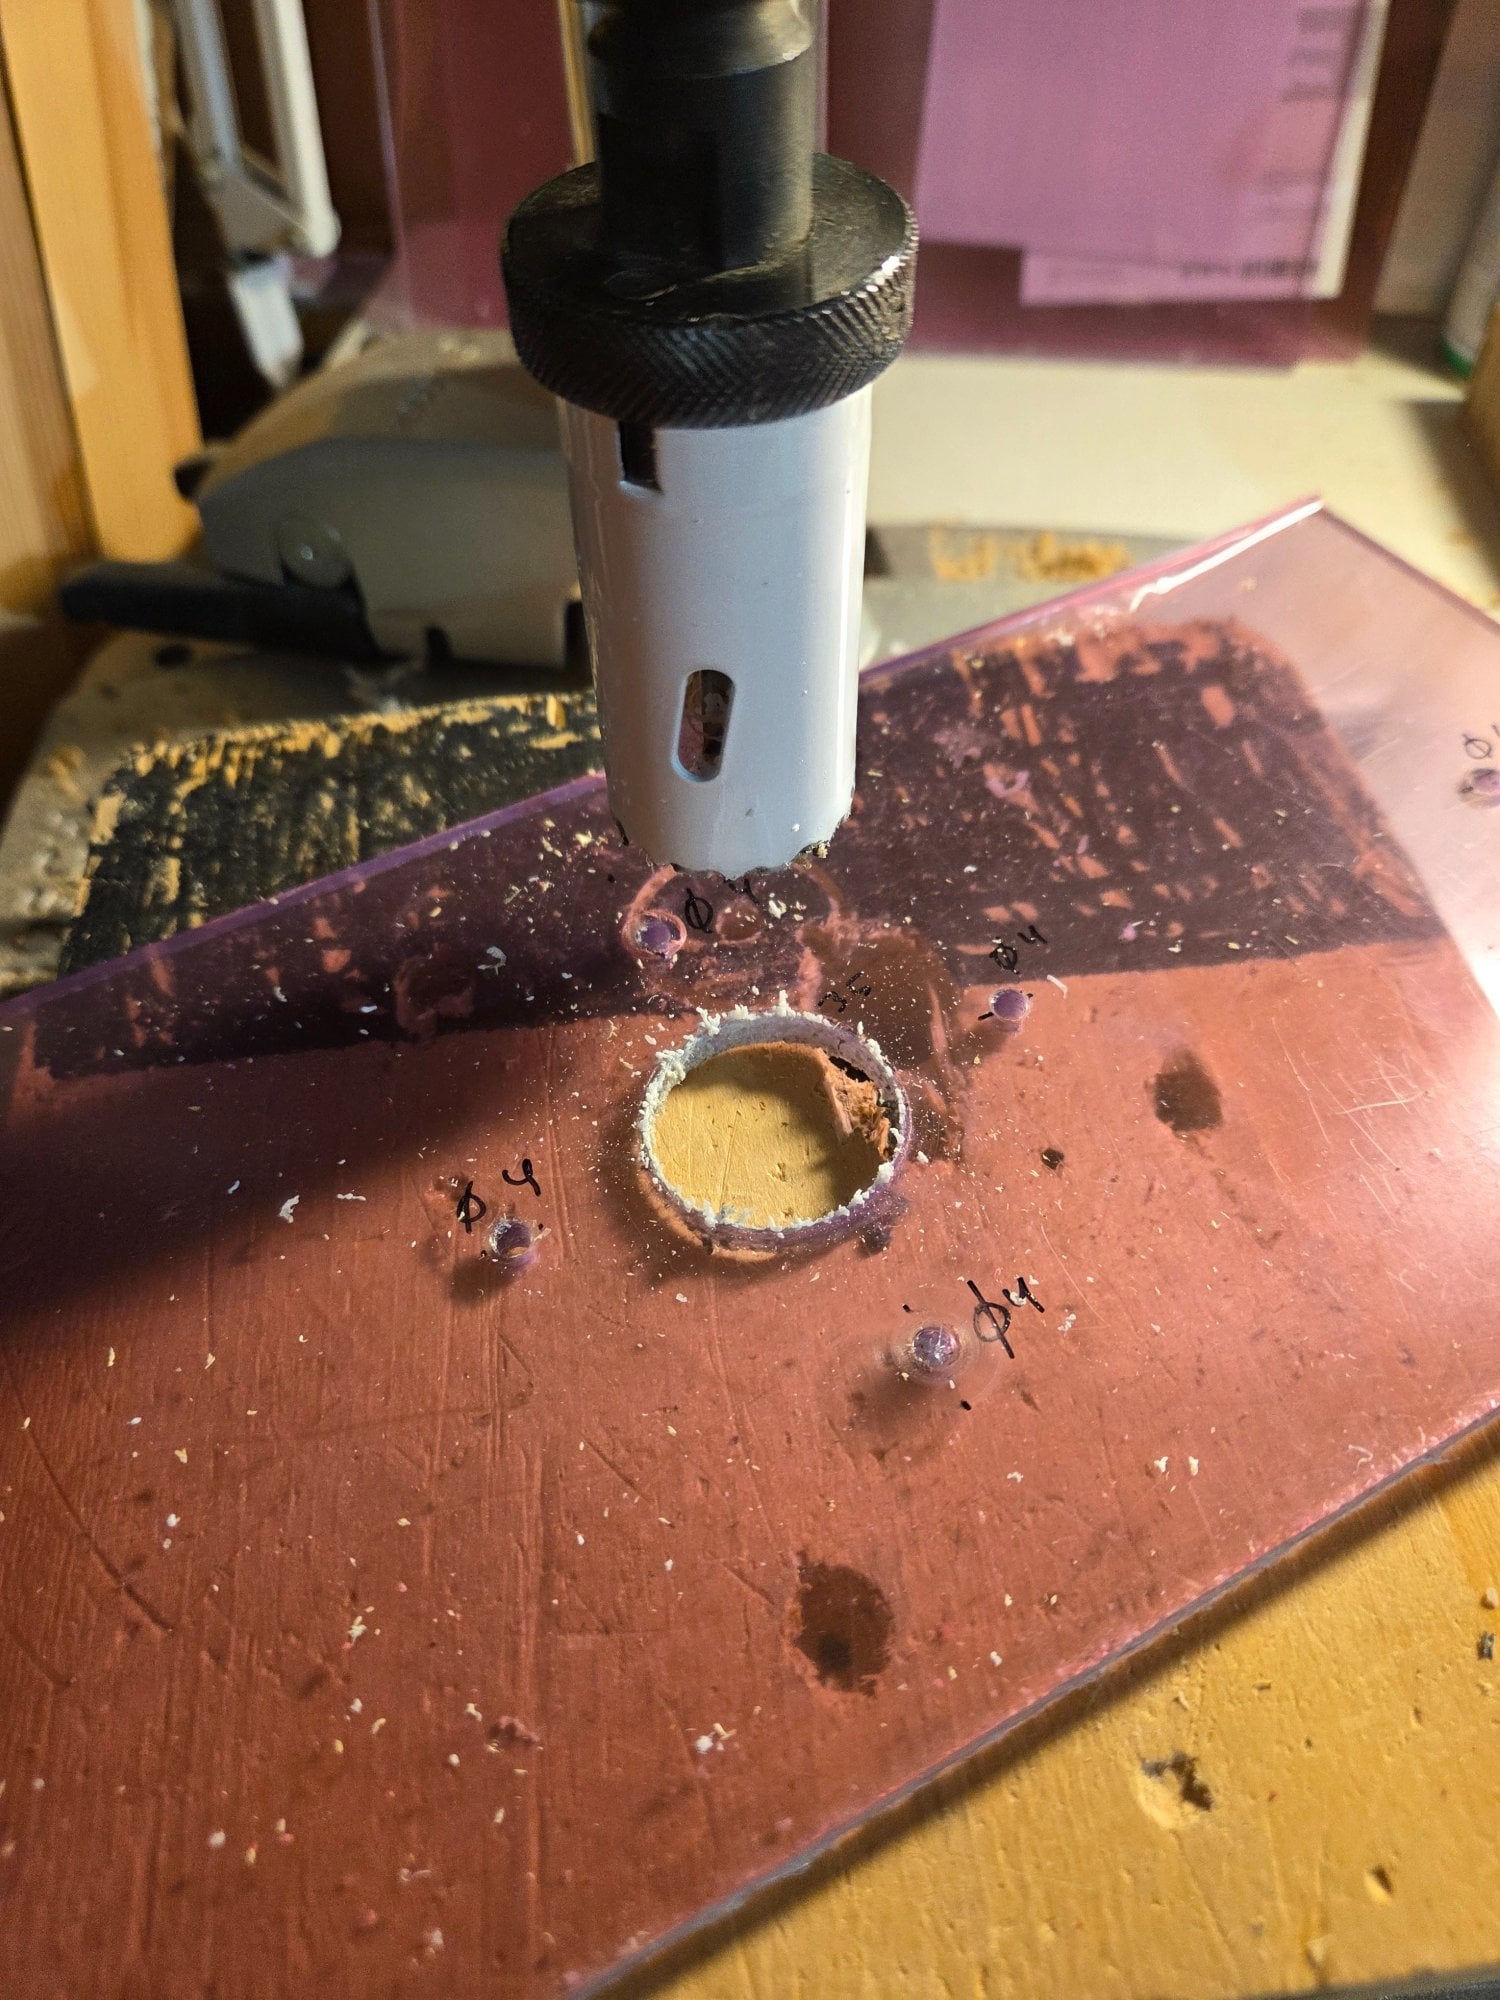
This worked nicely. Unfortunately that wasn't the only thing to go south. Next I found out that the screw holes on the Makita base where not centered and symmetrical. I just assumed they were, measured, marked and drilled. Of course none of the holes fit. So I needed to find a position where the new holes would be far enough from the old ones. And drill again.
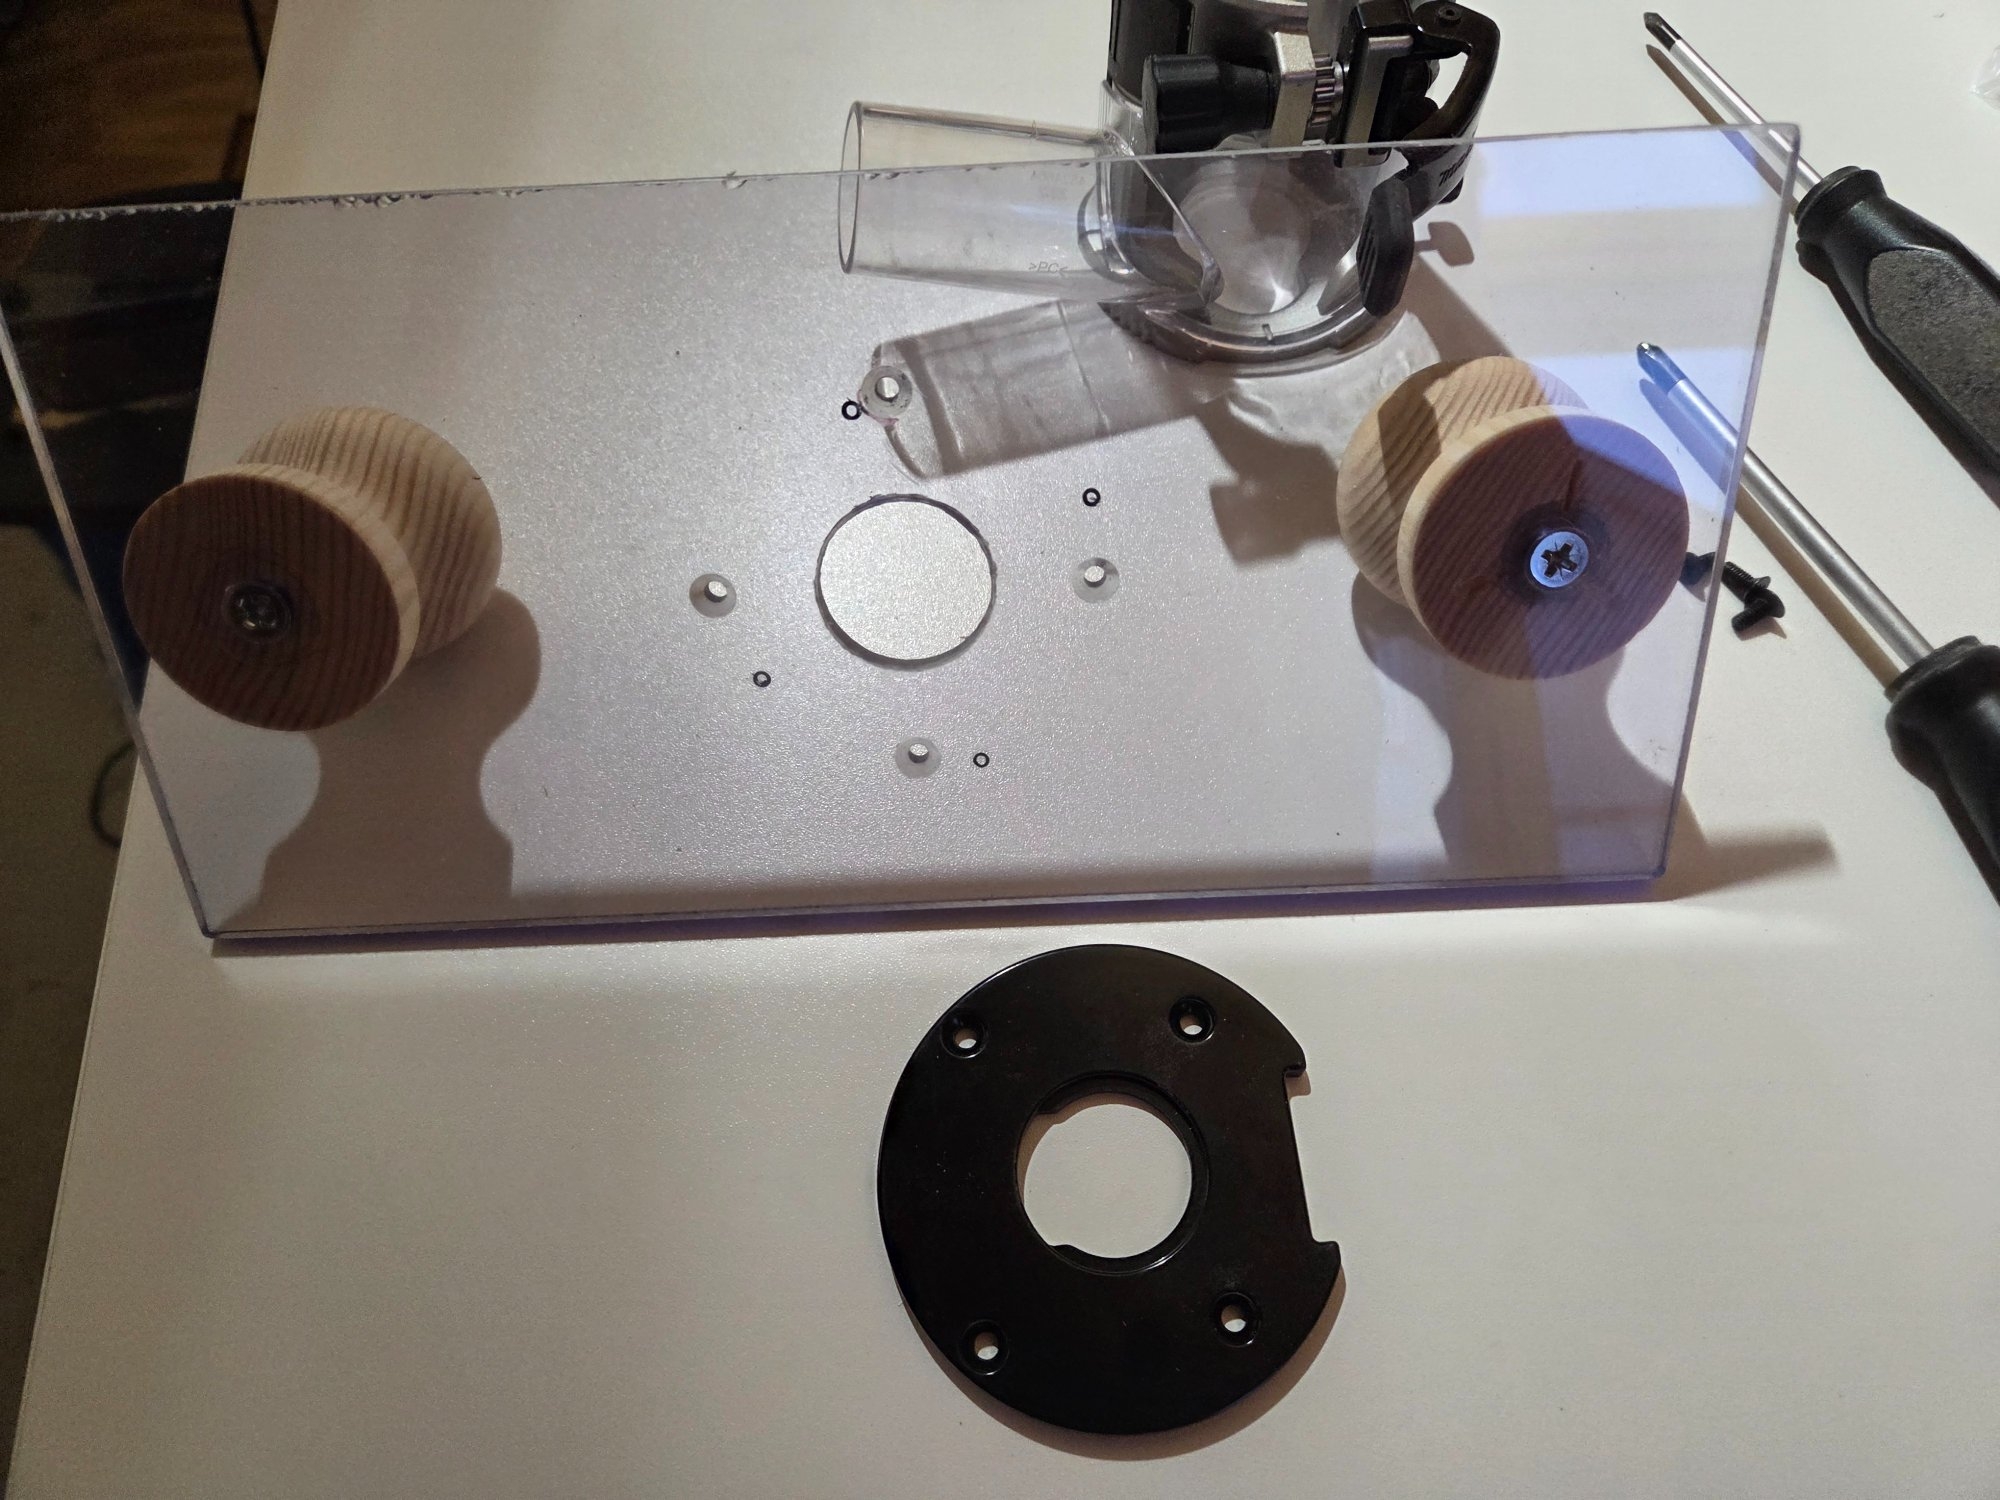
When I got the router mounted I realized the 6mm plexiglass was too flexible. So I cut some aluminum L-brackets and some more holes.
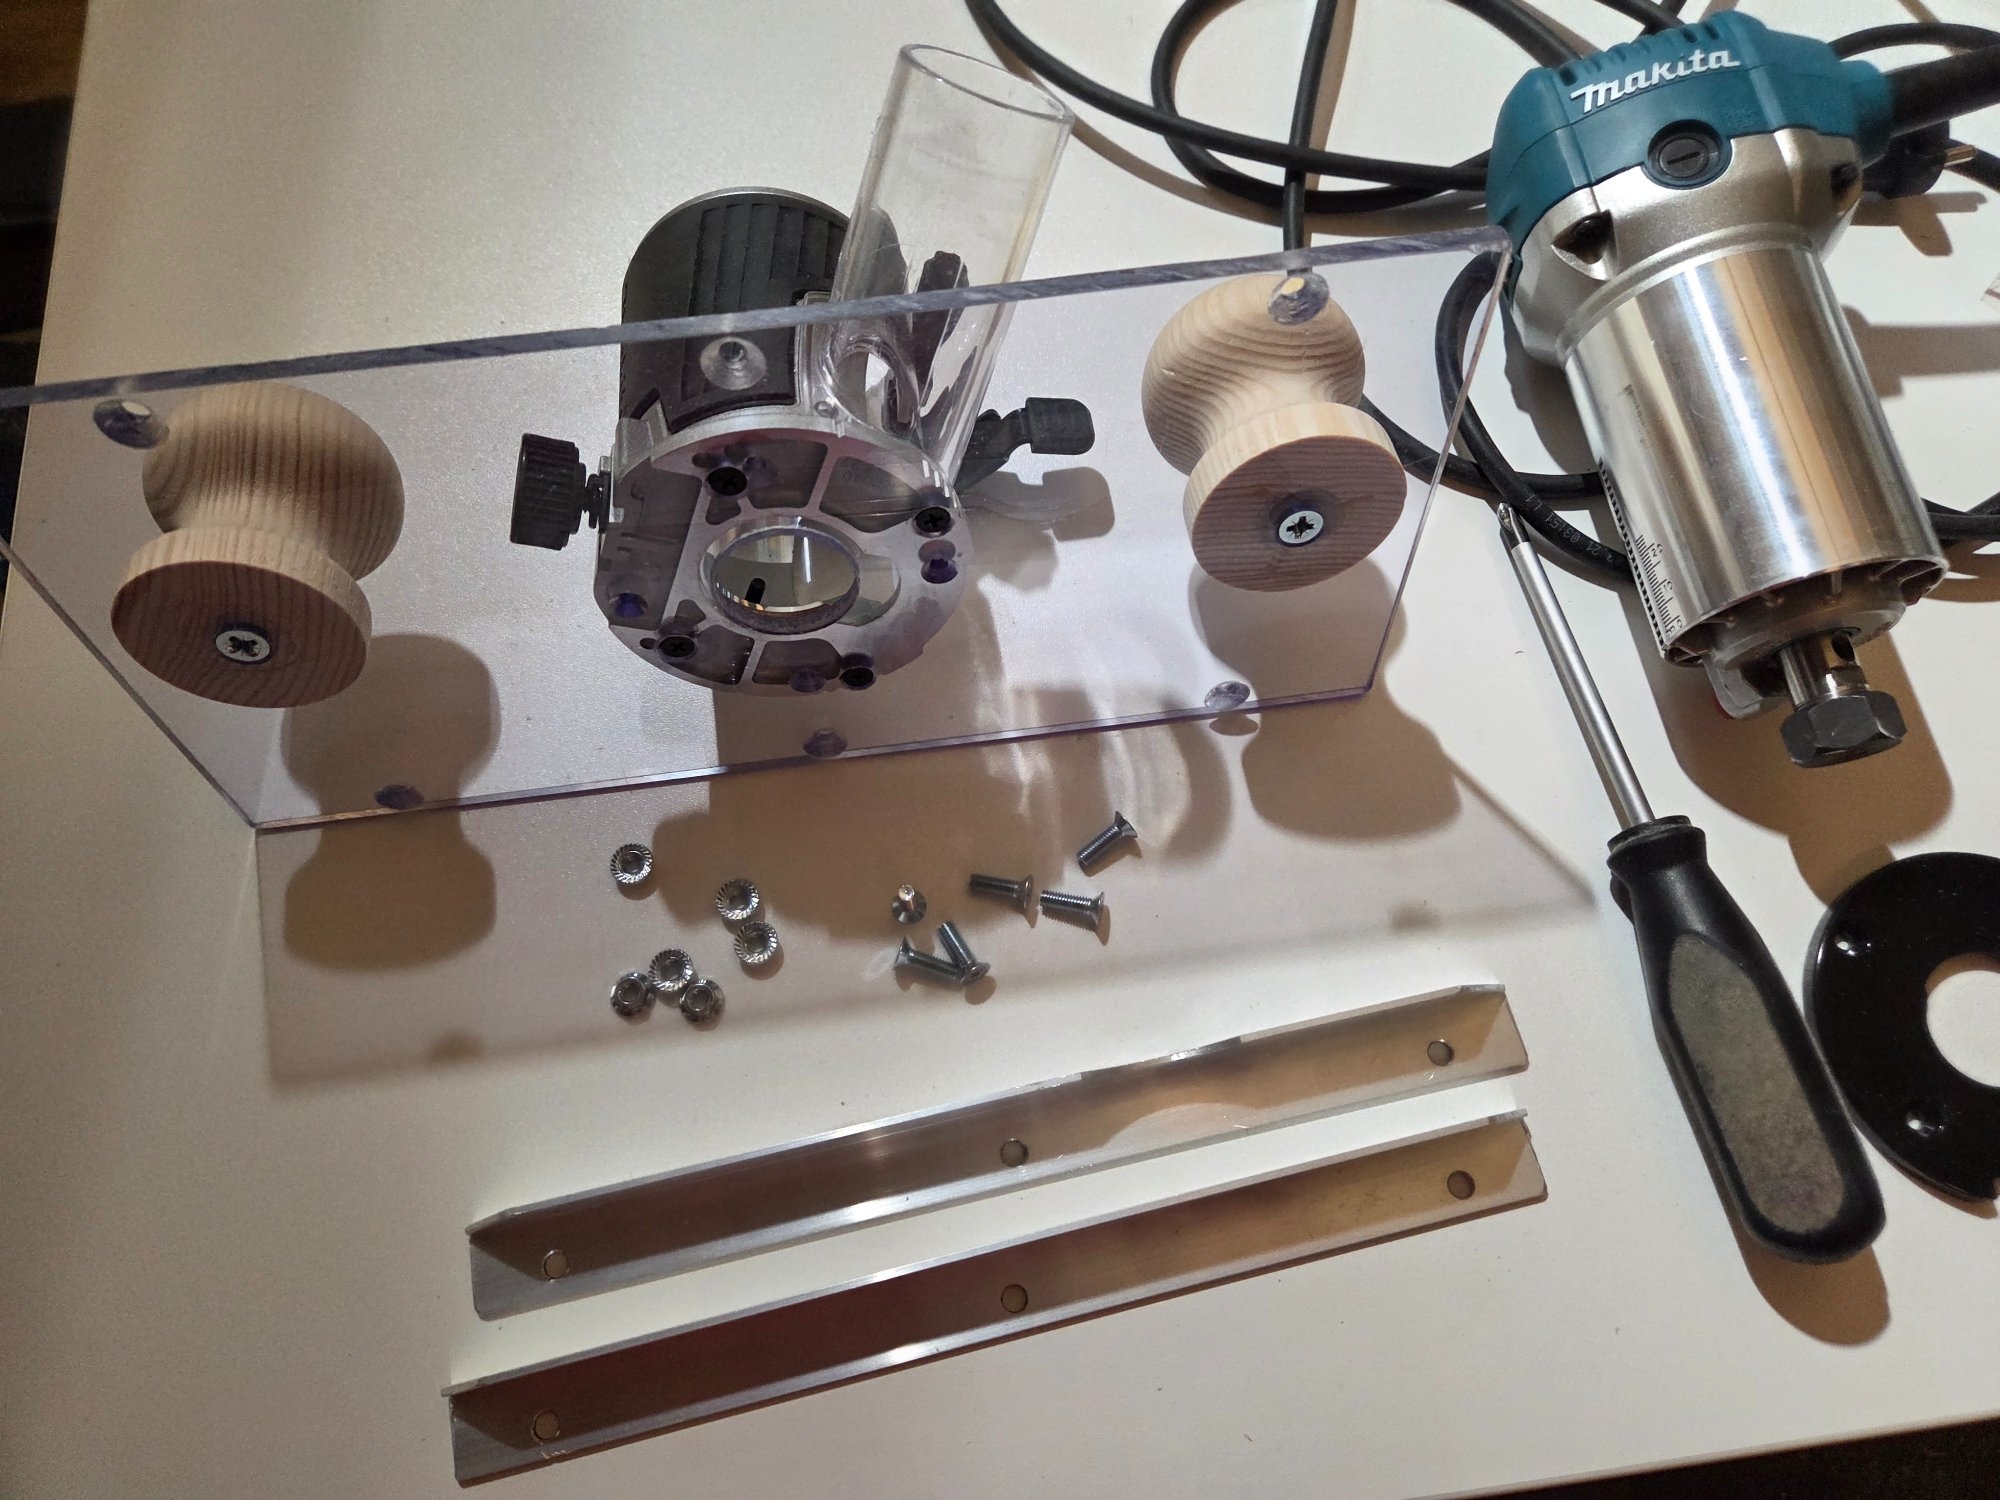
I attached them with some m6 screws and flanged nuts. After this it started to feel like it could actually be used for something.
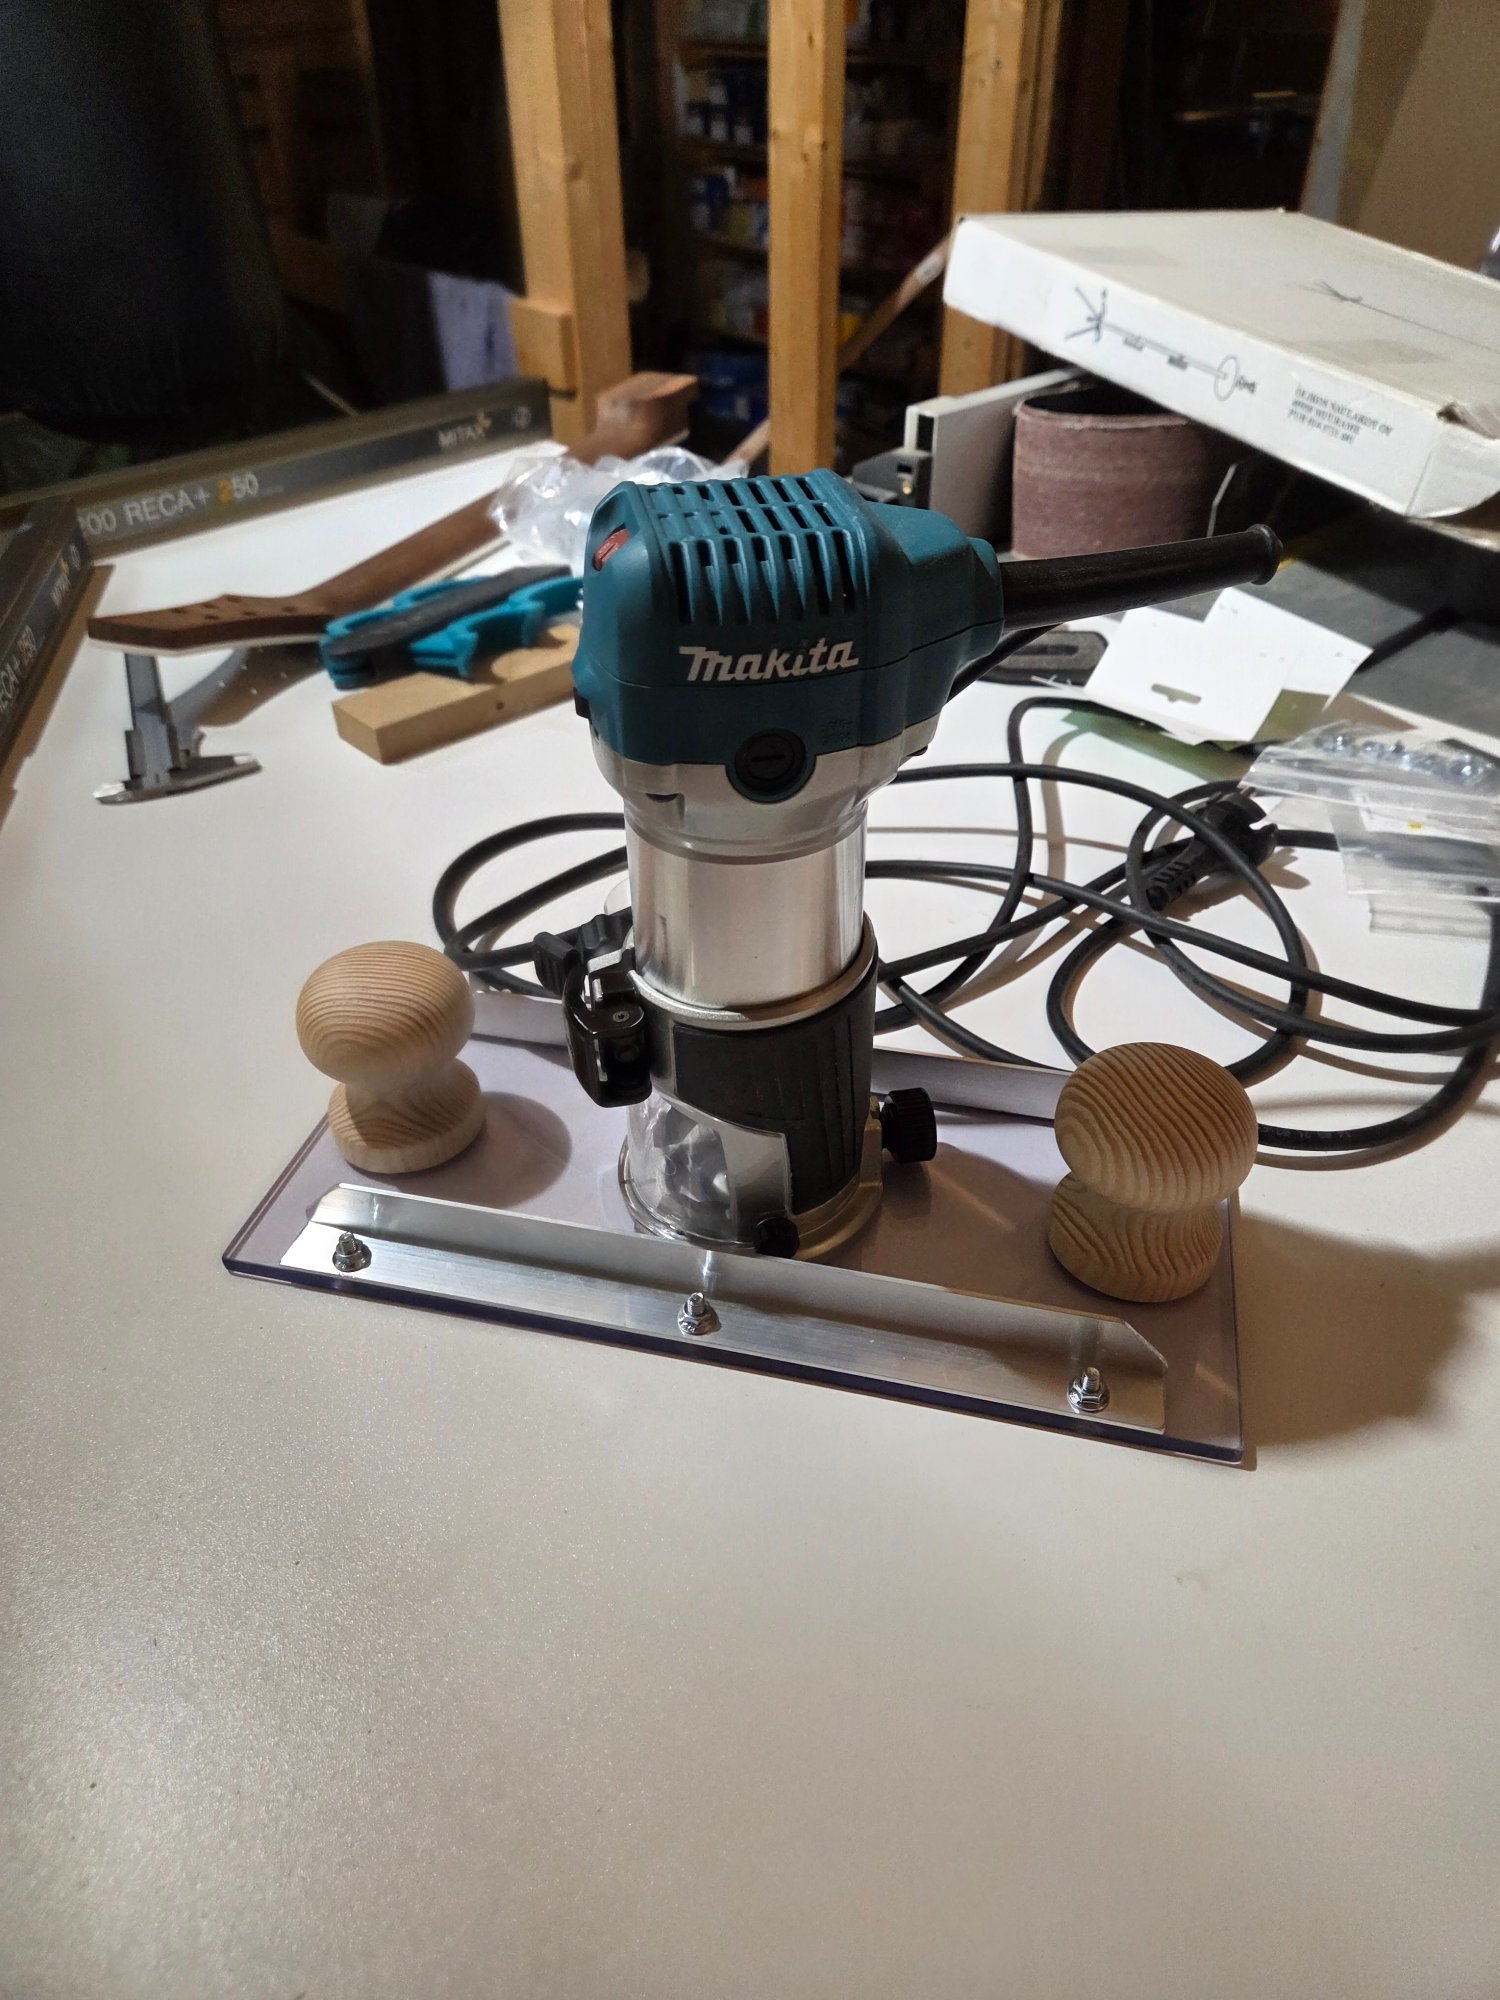
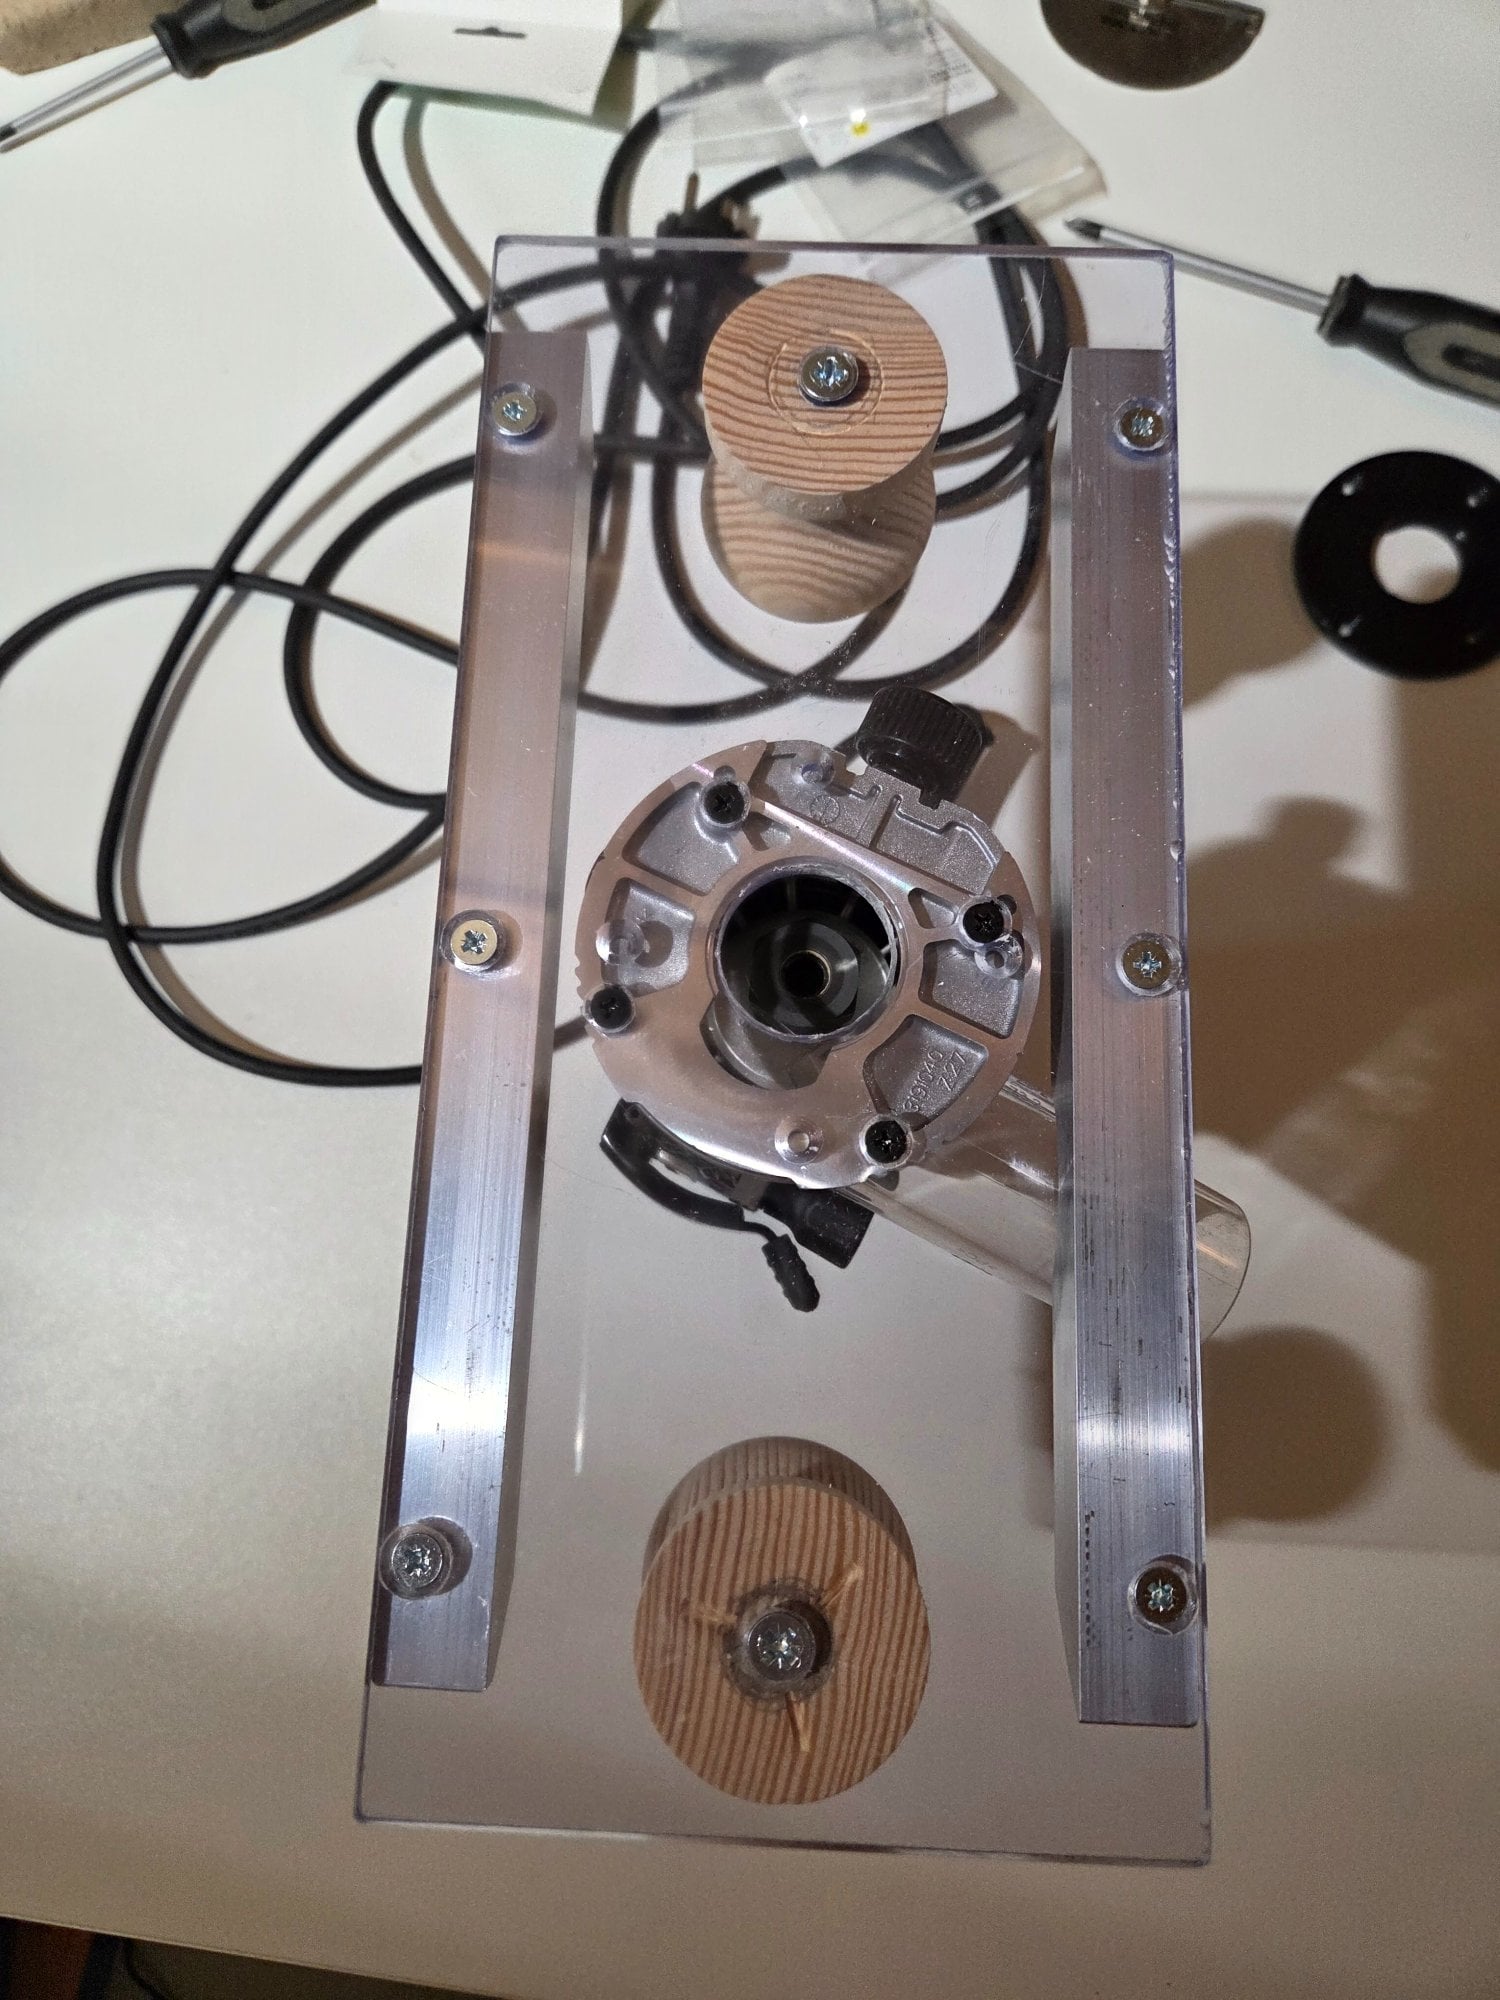
I plan to use this for the fixture for the small parts but also for neck and fingerboard stuff. And just a general larger base for many operations. Too bad the plexiglass won't stay all nice and clear and shiny.
If someone's interested, the specs are:
- base 300x140 mm (about 12 x 5 5/8)
- 6 mm SAN (styrene acrylonitrile resin)
- 2 x 20 mm al L-bracket (about 3/4 inch x 3/32)
- Wooden sauna door knobs for handles
First part was making the sled. I have a Makita trim router, which should be about the right size for this. I used the standard trimmer base. I made the base from plexiglass. Not acrylic I found out, but some styrene-acrylic hybrid.
Of course the plexiglass couldn't take the conical thread on that drill bit. It split it in half faster than I could see what was happening. So I called it a day and bought a properly sized hole saw.
This worked nicely. Unfortunately that wasn't the only thing to go south. Next I found out that the screw holes on the Makita base where not centered and symmetrical. I just assumed they were, measured, marked and drilled. Of course none of the holes fit. So I needed to find a position where the new holes would be far enough from the old ones. And drill again.
When I got the router mounted I realized the 6mm plexiglass was too flexible. So I cut some aluminum L-brackets and some more holes.
I attached them with some m6 screws and flanged nuts. After this it started to feel like it could actually be used for something.
I plan to use this for the fixture for the small parts but also for neck and fingerboard stuff. And just a general larger base for many operations. Too bad the plexiglass won't stay all nice and clear and shiny.
If someone's interested, the specs are:
- base 300x140 mm (about 12 x 5 5/8)
- 6 mm SAN (styrene acrylonitrile resin)
- 2 x 20 mm al L-bracket (about 3/4 inch x 3/32)
- Wooden sauna door knobs for handles
Last edited:
This fixture is meant for router planing small parts. The previous post was about the sled, this one is for what the sled runs on.
After somewhat careful consideraration I chose a 175 x 350 mm (about 7" x 14") working area. It should be enough for headstock weneers, tailpieces, pickup rings etc. The rails will be detachable for two reasons: I plan to make different ones. And I want to use this for sanding too, so the rails could be in the way.
I have never worked with a vacuum table but I thought it might be the smart way to approach this. So I made a box out of 19 mm (3/4") mdf. With a LOT of holes.


After all that was done I assembled it with 4x50 mm wood screws. I want to be able to remove the top later on.
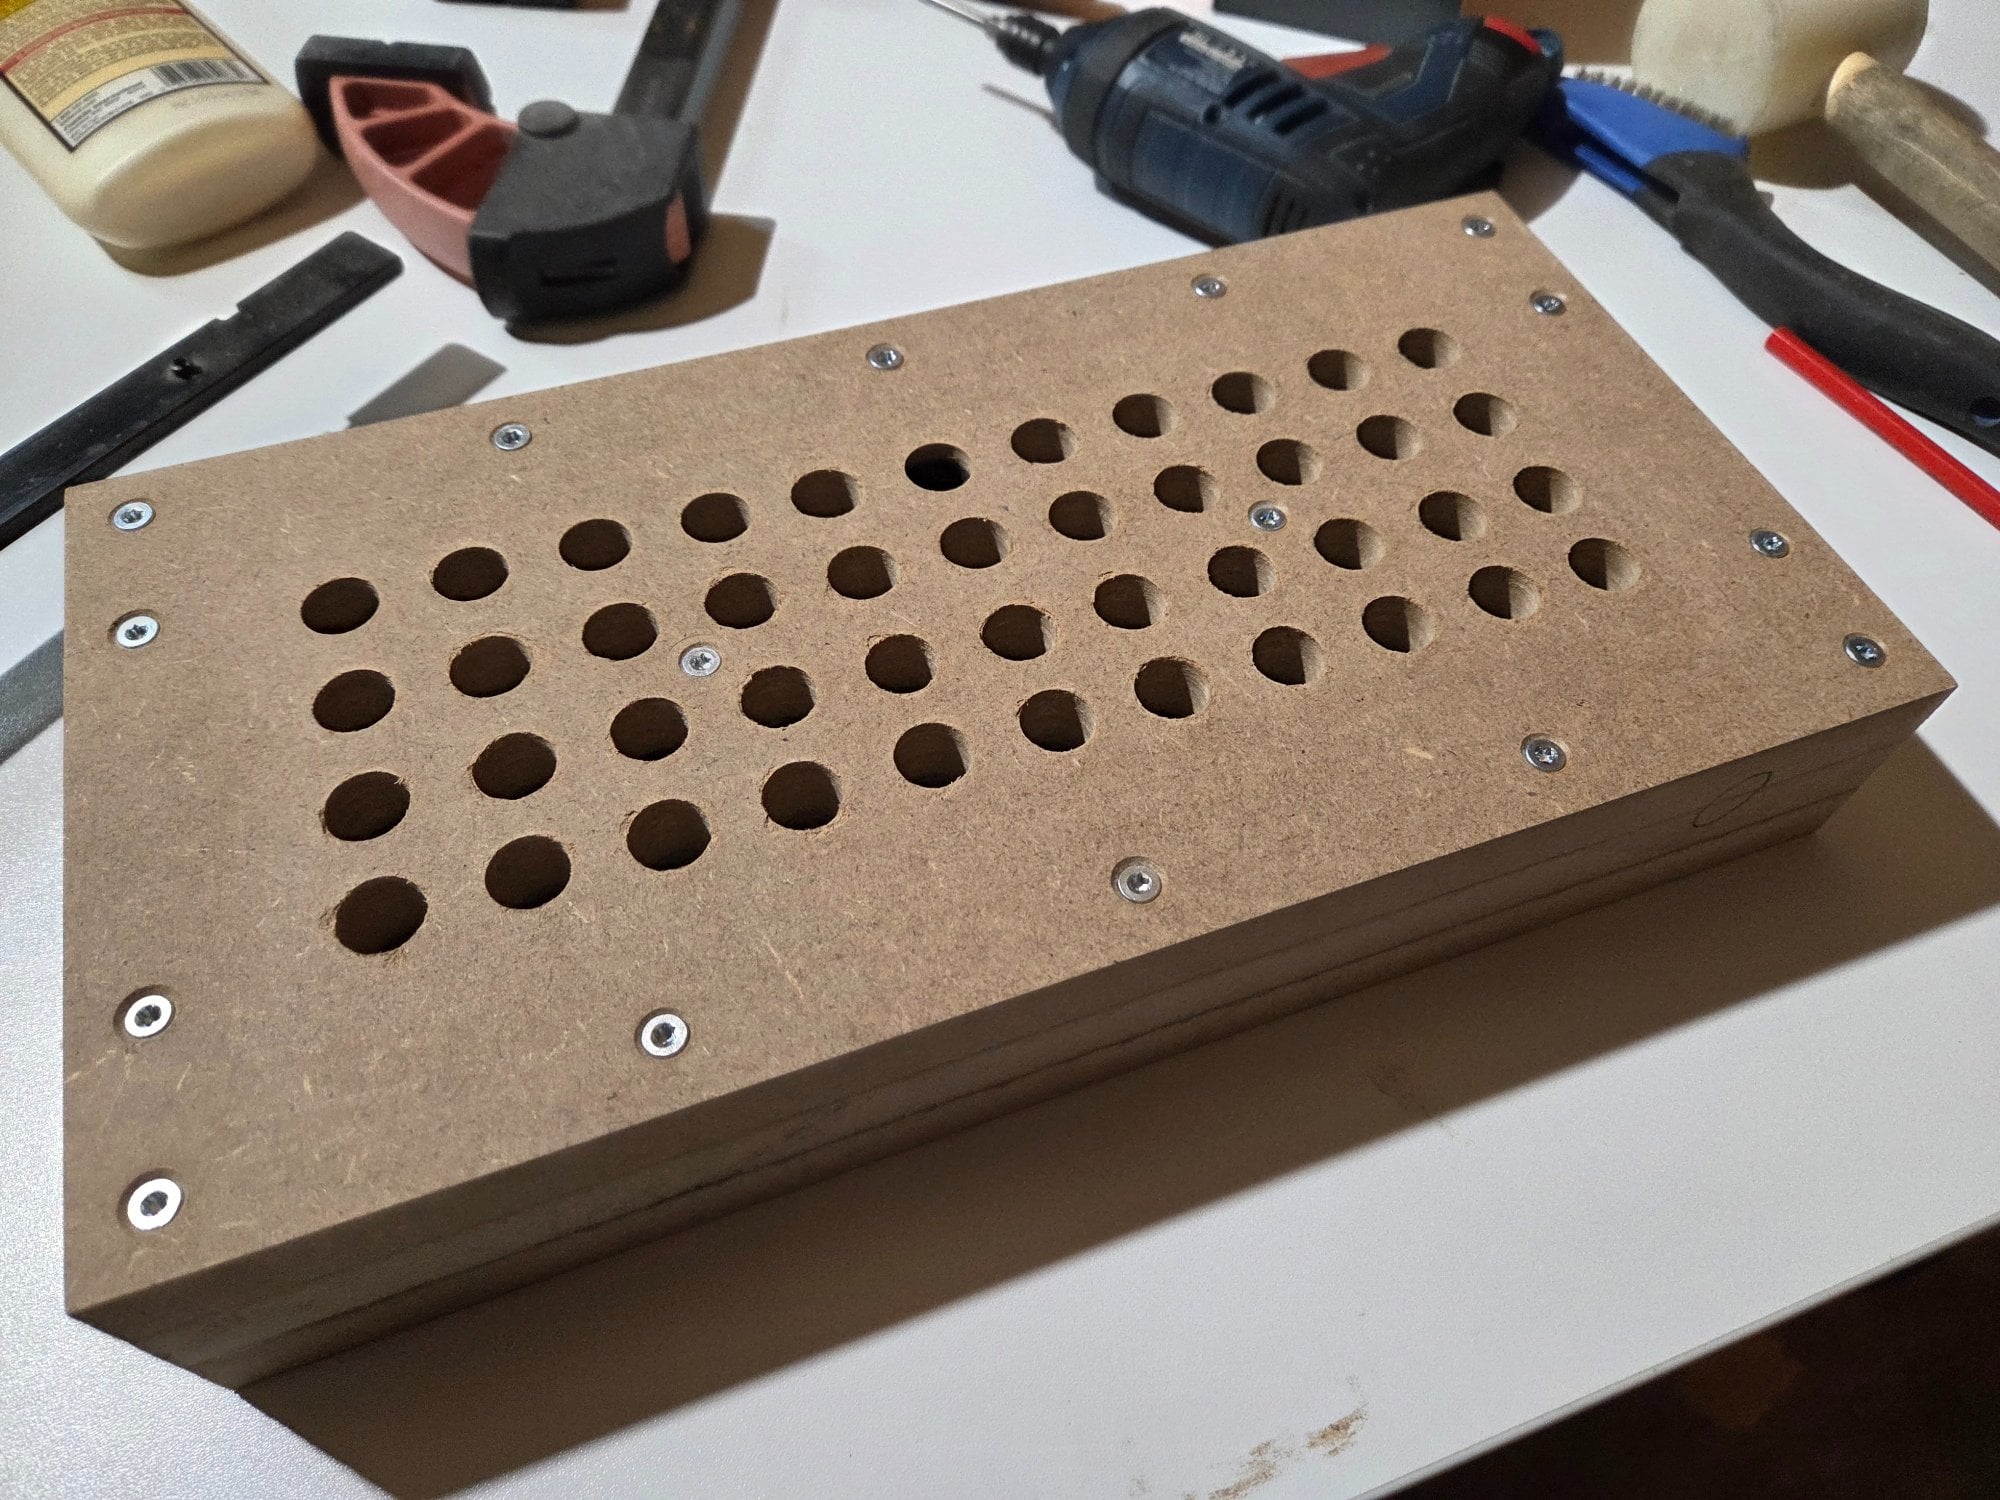
Then it was time to drill one more hole for the shop vac. The end"grain" on mdf isn't usually fun to work on. I would have rather used a hole saw but couldn't find the right size easily available. So I went with the crazy aggressive 35 mm Bosch bit.
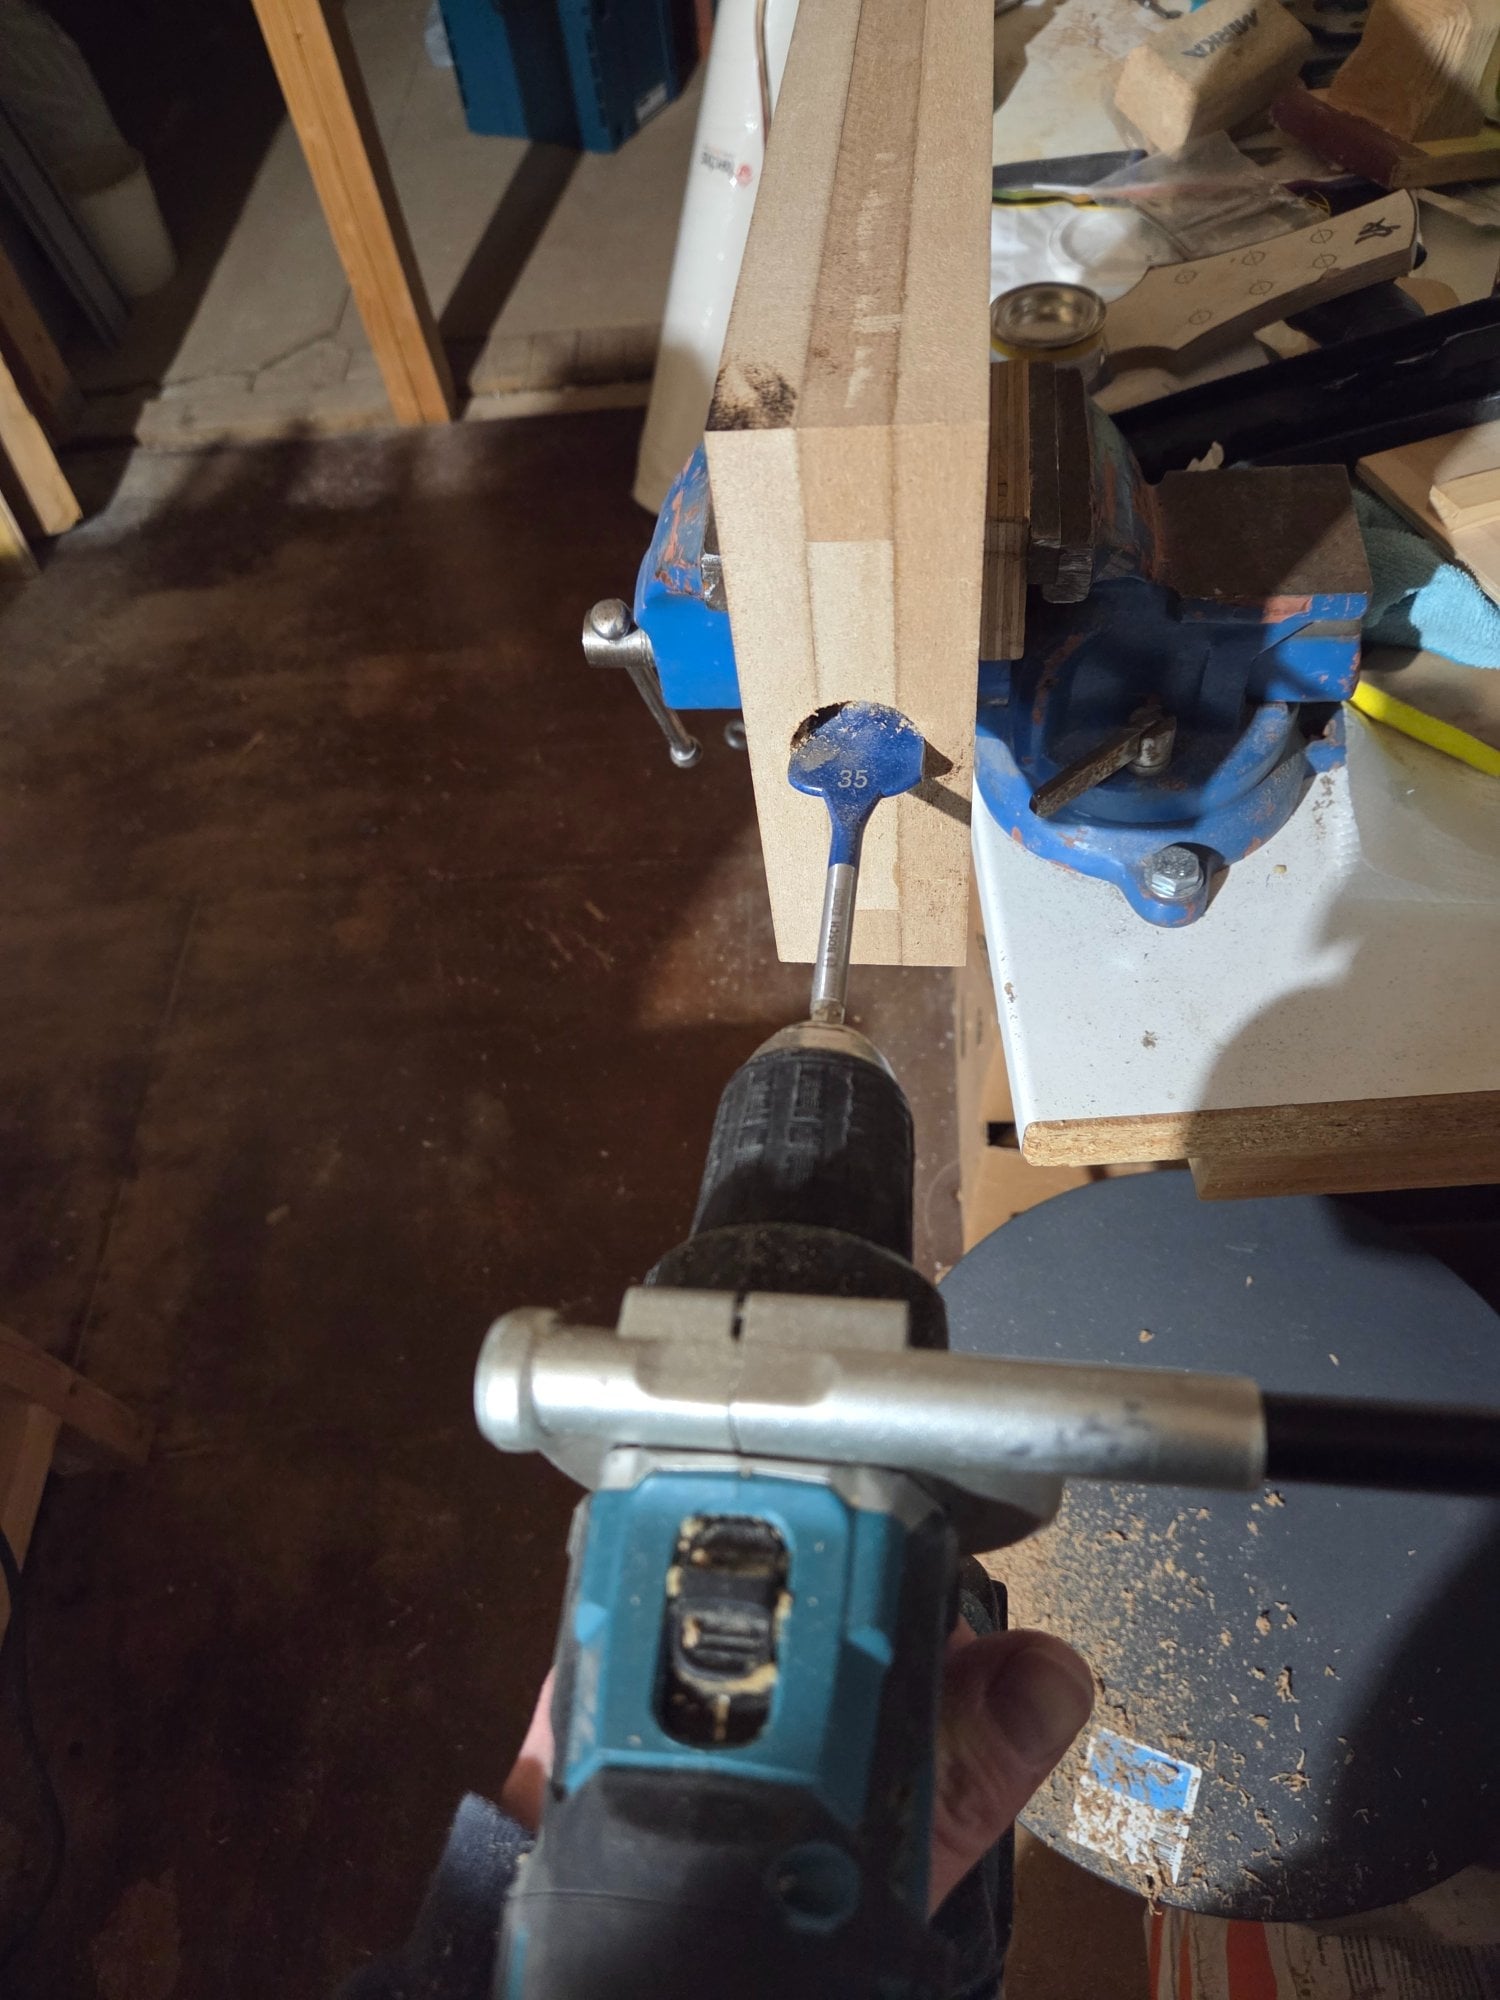
Those are great for doing big holes fast on construction lumber. But not finer work. Thankfully it only felt and sounded like it would explode. In the end it got the work done surprisingly neatly.
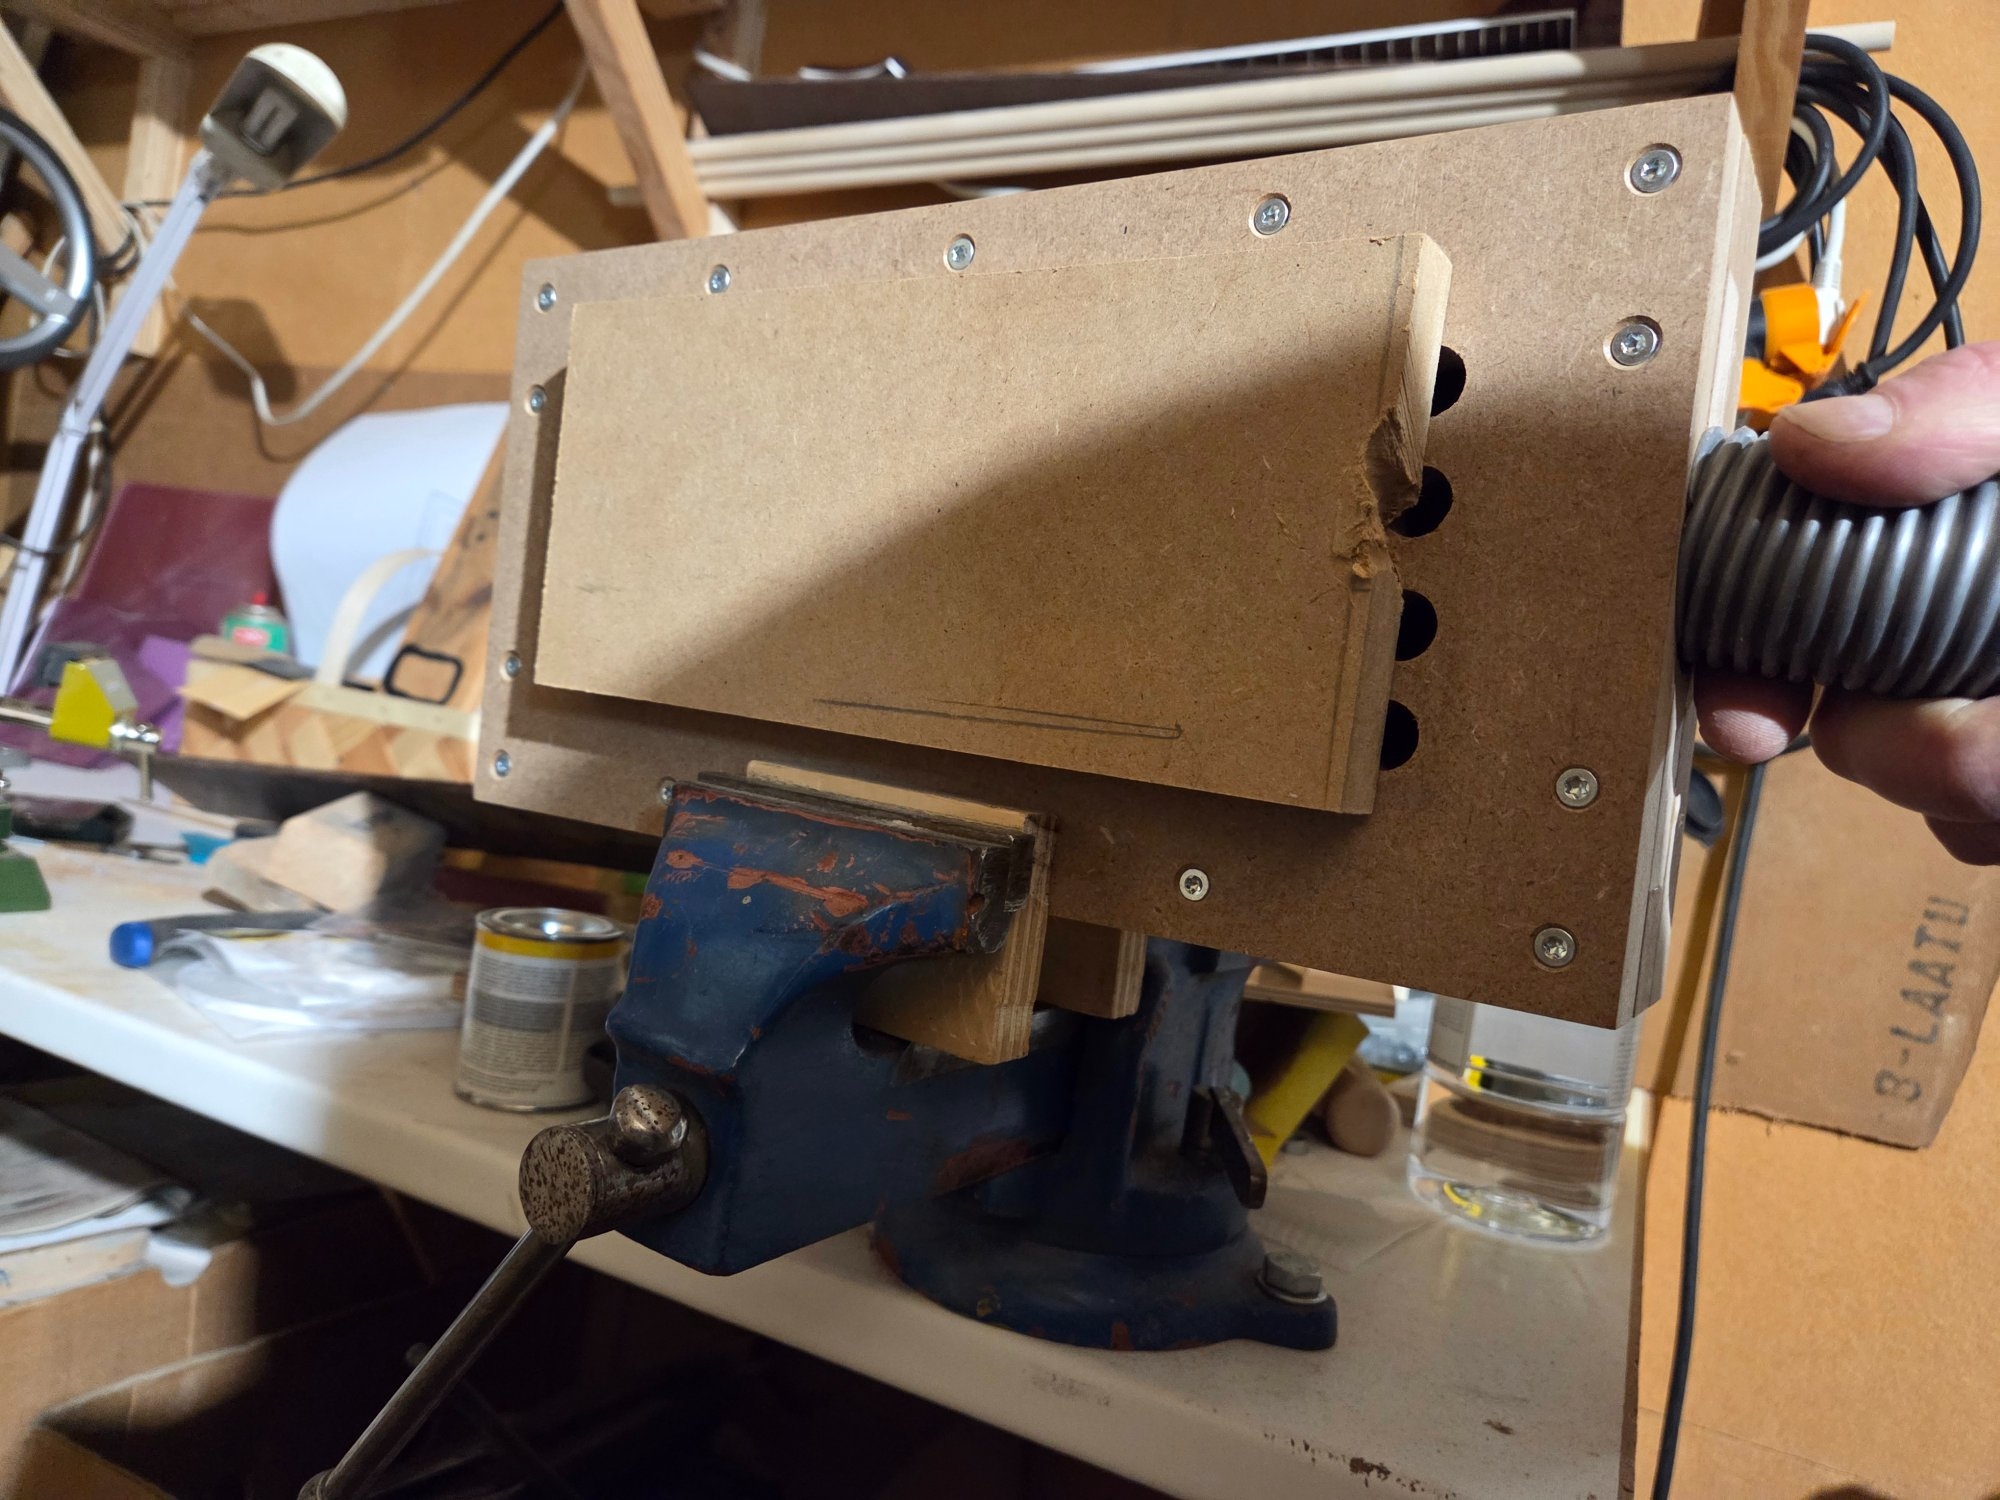
I had to test it with the dust collectors connector hose. It did hold the test piece of mdf there ok. Not great, but the seal wasn't great either.
I still have a few things to do before a proper test run. But I'm feeling this could actually work as intended.
After somewhat careful consideraration I chose a 175 x 350 mm (about 7" x 14") working area. It should be enough for headstock weneers, tailpieces, pickup rings etc. The rails will be detachable for two reasons: I plan to make different ones. And I want to use this for sanding too, so the rails could be in the way.
I have never worked with a vacuum table but I thought it might be the smart way to approach this. So I made a box out of 19 mm (3/4") mdf. With a LOT of holes.
After all that was done I assembled it with 4x50 mm wood screws. I want to be able to remove the top later on.
Then it was time to drill one more hole for the shop vac. The end"grain" on mdf isn't usually fun to work on. I would have rather used a hole saw but couldn't find the right size easily available. So I went with the crazy aggressive 35 mm Bosch bit.
Those are great for doing big holes fast on construction lumber. But not finer work. Thankfully it only felt and sounded like it would explode. In the end it got the work done surprisingly neatly.
I had to test it with the dust collectors connector hose. It did hold the test piece of mdf there ok. Not great, but the seal wasn't great either.
I still have a few things to do before a proper test run. But I'm feeling this could actually work as intended.
Last edited:

That only means you weren't fully committed.Thankfully it only felt and sounded like it would explode.
If you cover the remaining holes it will stick MUCH better to the vacuum table. If the piece only patially covers holes try sealing with painters tape and see if your suction doesn't improve. You can use any smooth material like mdf for the fully exposed holes.This fixture is meant for router planing small parts. The previous post was about the sled, this one is for what the sled runs on.
After somewhat careful consideraration I chose a 175 x 350 mm (about 7" x 14") working area. It should be enough for headstock weneers, tailpieces, pickup rings etc. The rails will be detachable for two reasons: I plan to make different ones. And I want to use this for sanding too, so the rails could be in the way.
I have never worked with a vacuum table but I thought it might be the smart way to approach this. So I made a box out of 19 mm (3/4") mdf. With a LOT of holes.
View attachment 7439241
View attachment 7439242
View attachment 7439243
View attachment 7439244
View attachment 7439245
View attachment 7439246
View attachment 7439247
After all that was done I assembled it with 4x50 mm wood screws. I want to be able to remove the top later on.
View attachment 7439248
Then it was time to drill one more hole for the shop vac. The end"grain" on mdf isn't usually fun to work on. I would have rather used a hole saw but couldn't find the right size easily available. So I went with the crazy aggressive 35 mm Bosch bit.
View attachment 7439249
Those are great for doing big holes fast on construction lumber. But not finer work. Thankfully it only felt and sounded like it would explode. In the end it got the work done surprisingly neatly.
View attachment 7439250
I had to test it with the dust collectors connector hose. It did hold the test piece of mdf there ok. Not great, but the seal wasn't great either.
I still have a few things to do before a proper test run. But I'm feeling this could actually work as intended.
Thanks for the comment. Yeah, the plan is to cover the extra holes. On smaller pieces most of the holes will be open if not covered with something else. I also plan to treat the top surface so that it stays intact even when pulling tape off.If you cover the remaining holes it will stick MUCH better to the vacuum table. If the piece only patially covers holes try sealing with painters tape and see if your suction doesn't improve. You can use any smooth material like mdf for the fully exposed holes.
But I'll get back to this when I have the time. Hopefully later this week.

My local big box store often has a large stack of "sink cutouts", 3/4 mdf covered in countertop laminate that is a discard when countertops have the sink area cut out. Those work really well for small projects like this where you want a durable and flat surface.
I managed to put a litle time into the small parts jig discussed a few posts back. First I opened the box and smoothed the vacuum outlet a bit.
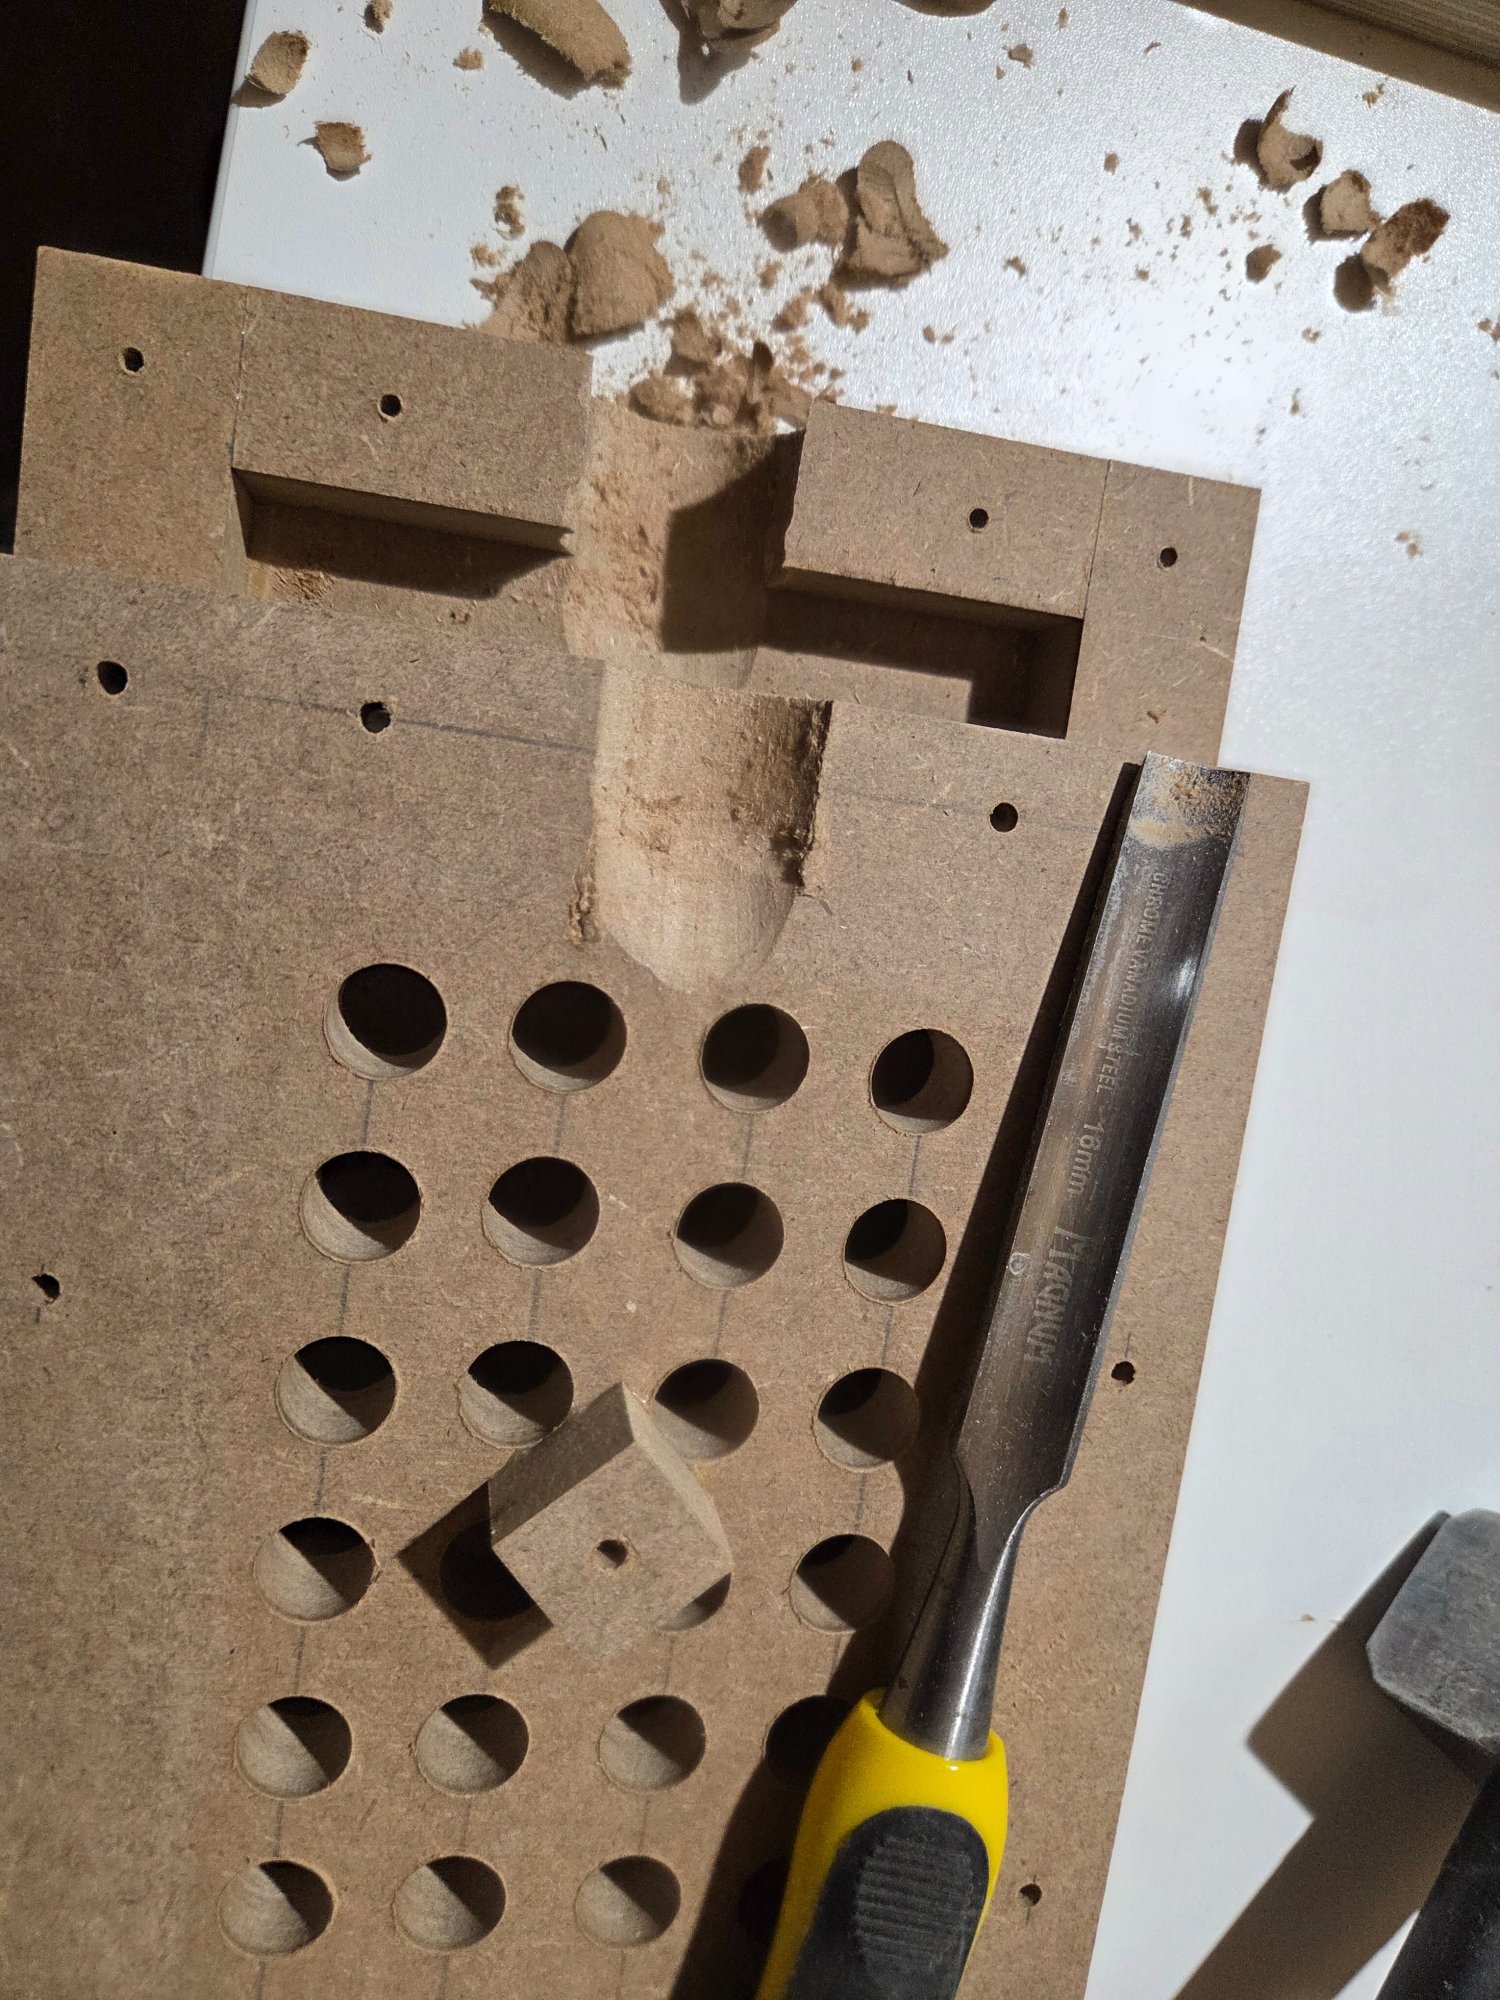
Propably for no actual benefit. But it's nice to klow the air can flow smoothly. The next step was treating the surface with some finishing oil from Liberon. Maybe not the best stuff for this, but that's what I had available.
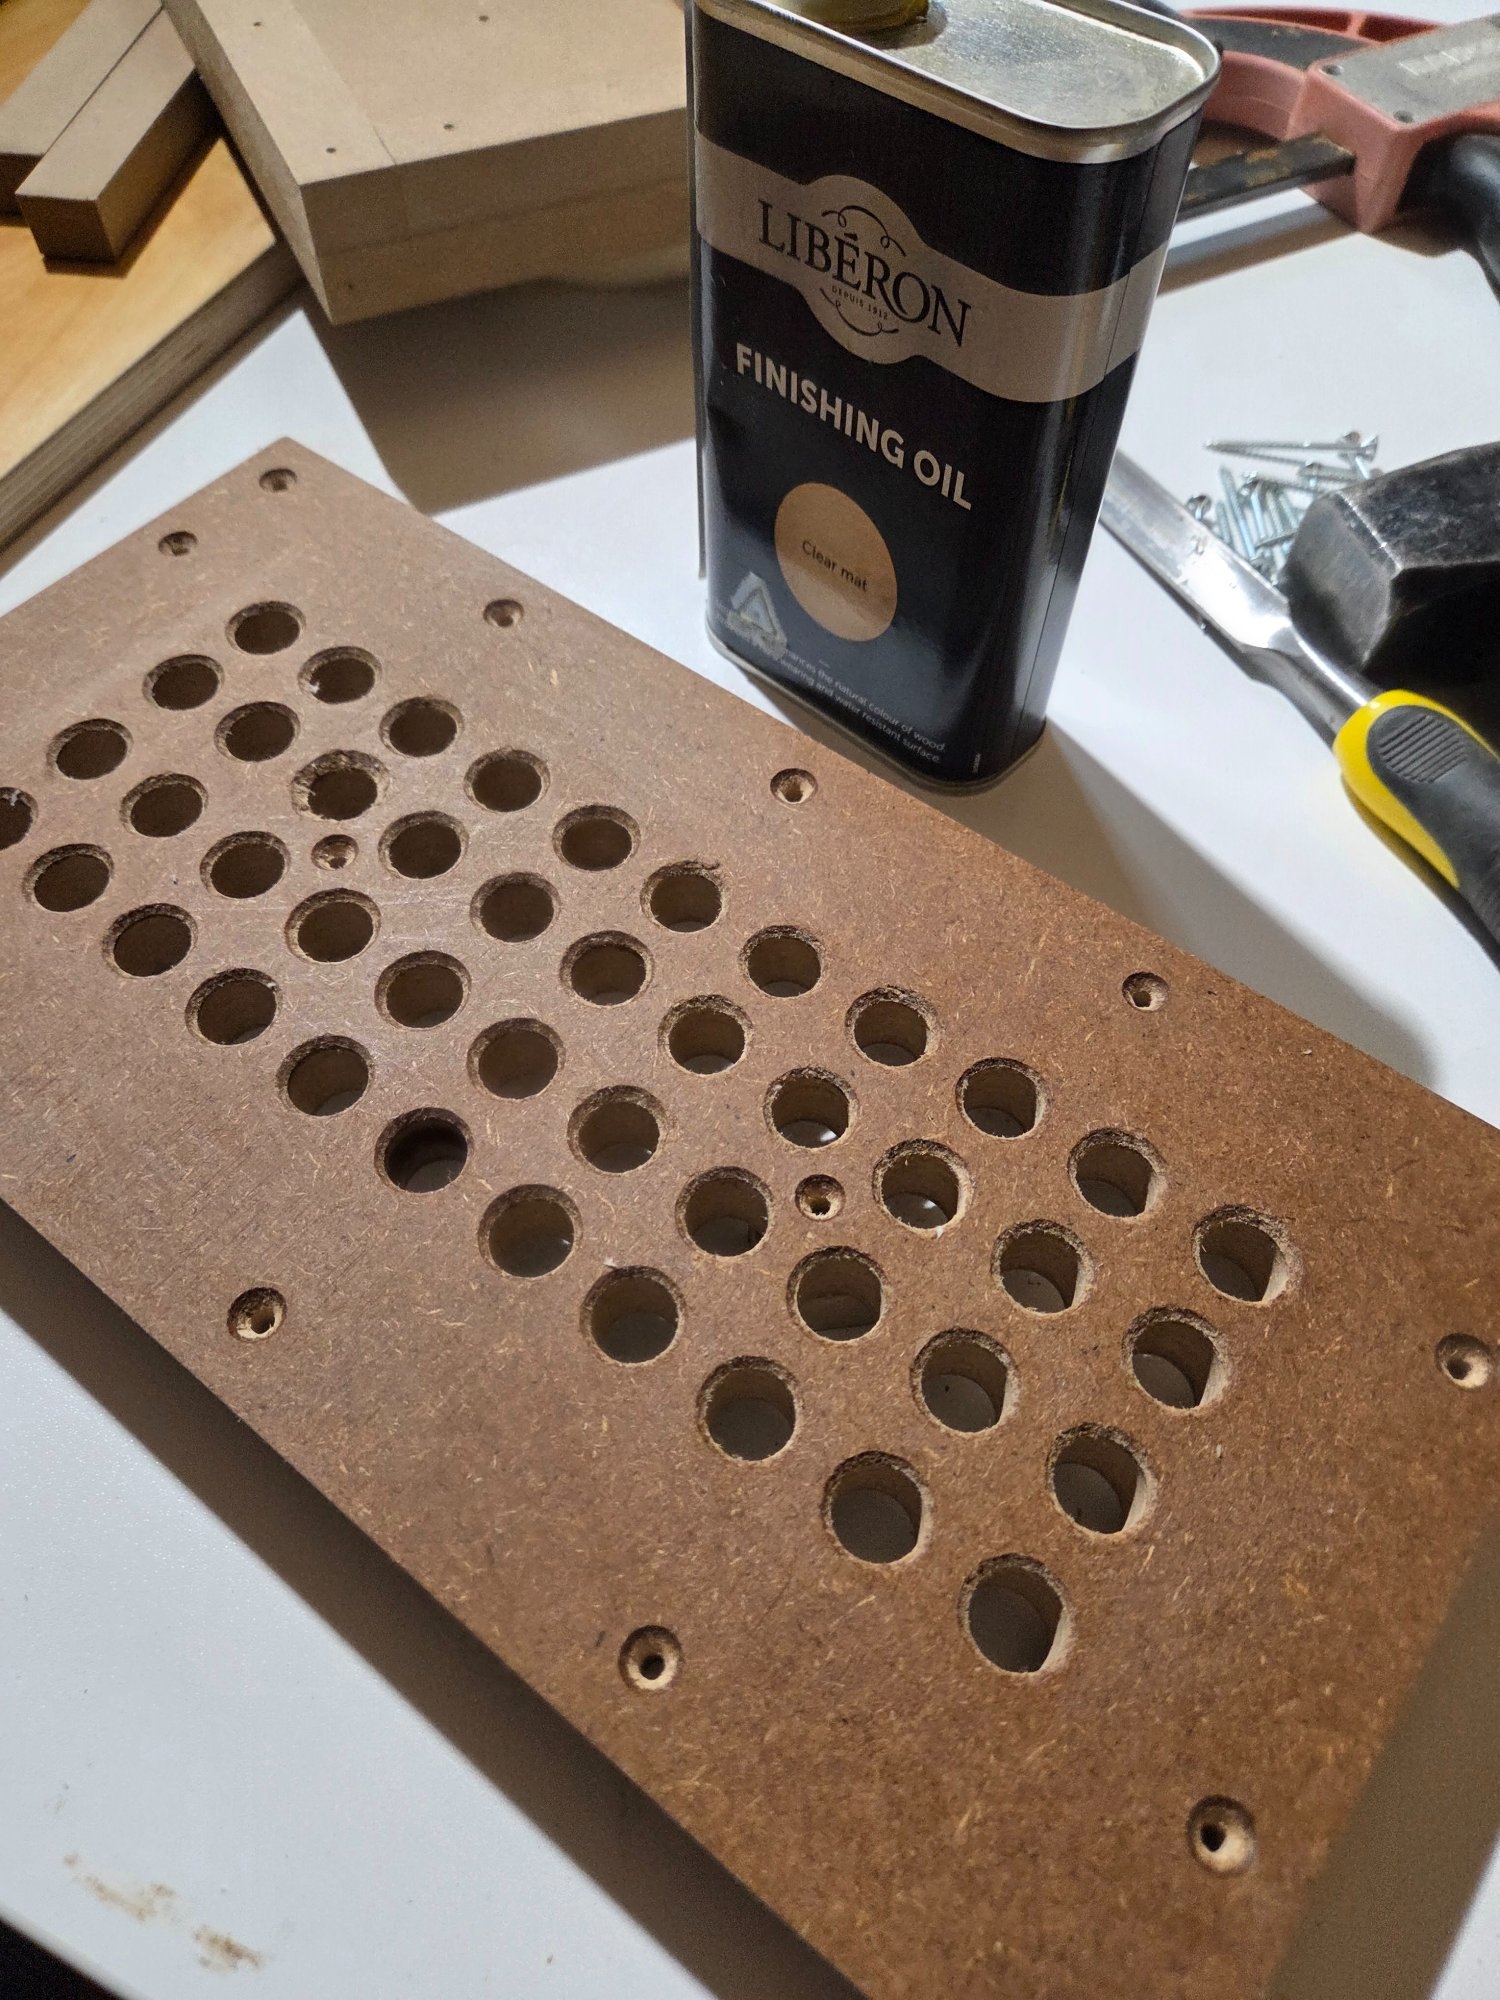
Then I made the rails. I had some old thinner mdf-like material available. It's about 8 mm or 5/16". I made two strips that were about 20 mm or 3/4" higher than the box. I sanded the long edges flat and made 3 elongated holes for adjustabilty.


I thought about routing them but decided to go old school. (Yes, I know, oscillating multitools are not really old school.)
Anyways I cut three M8 threaded holes on both sides of the box. The side"grain" on the mdf is far from ideal thread material. But it seemed to work decent enough. I would not use it as a regular thread. But for a glued in rod it's ok.
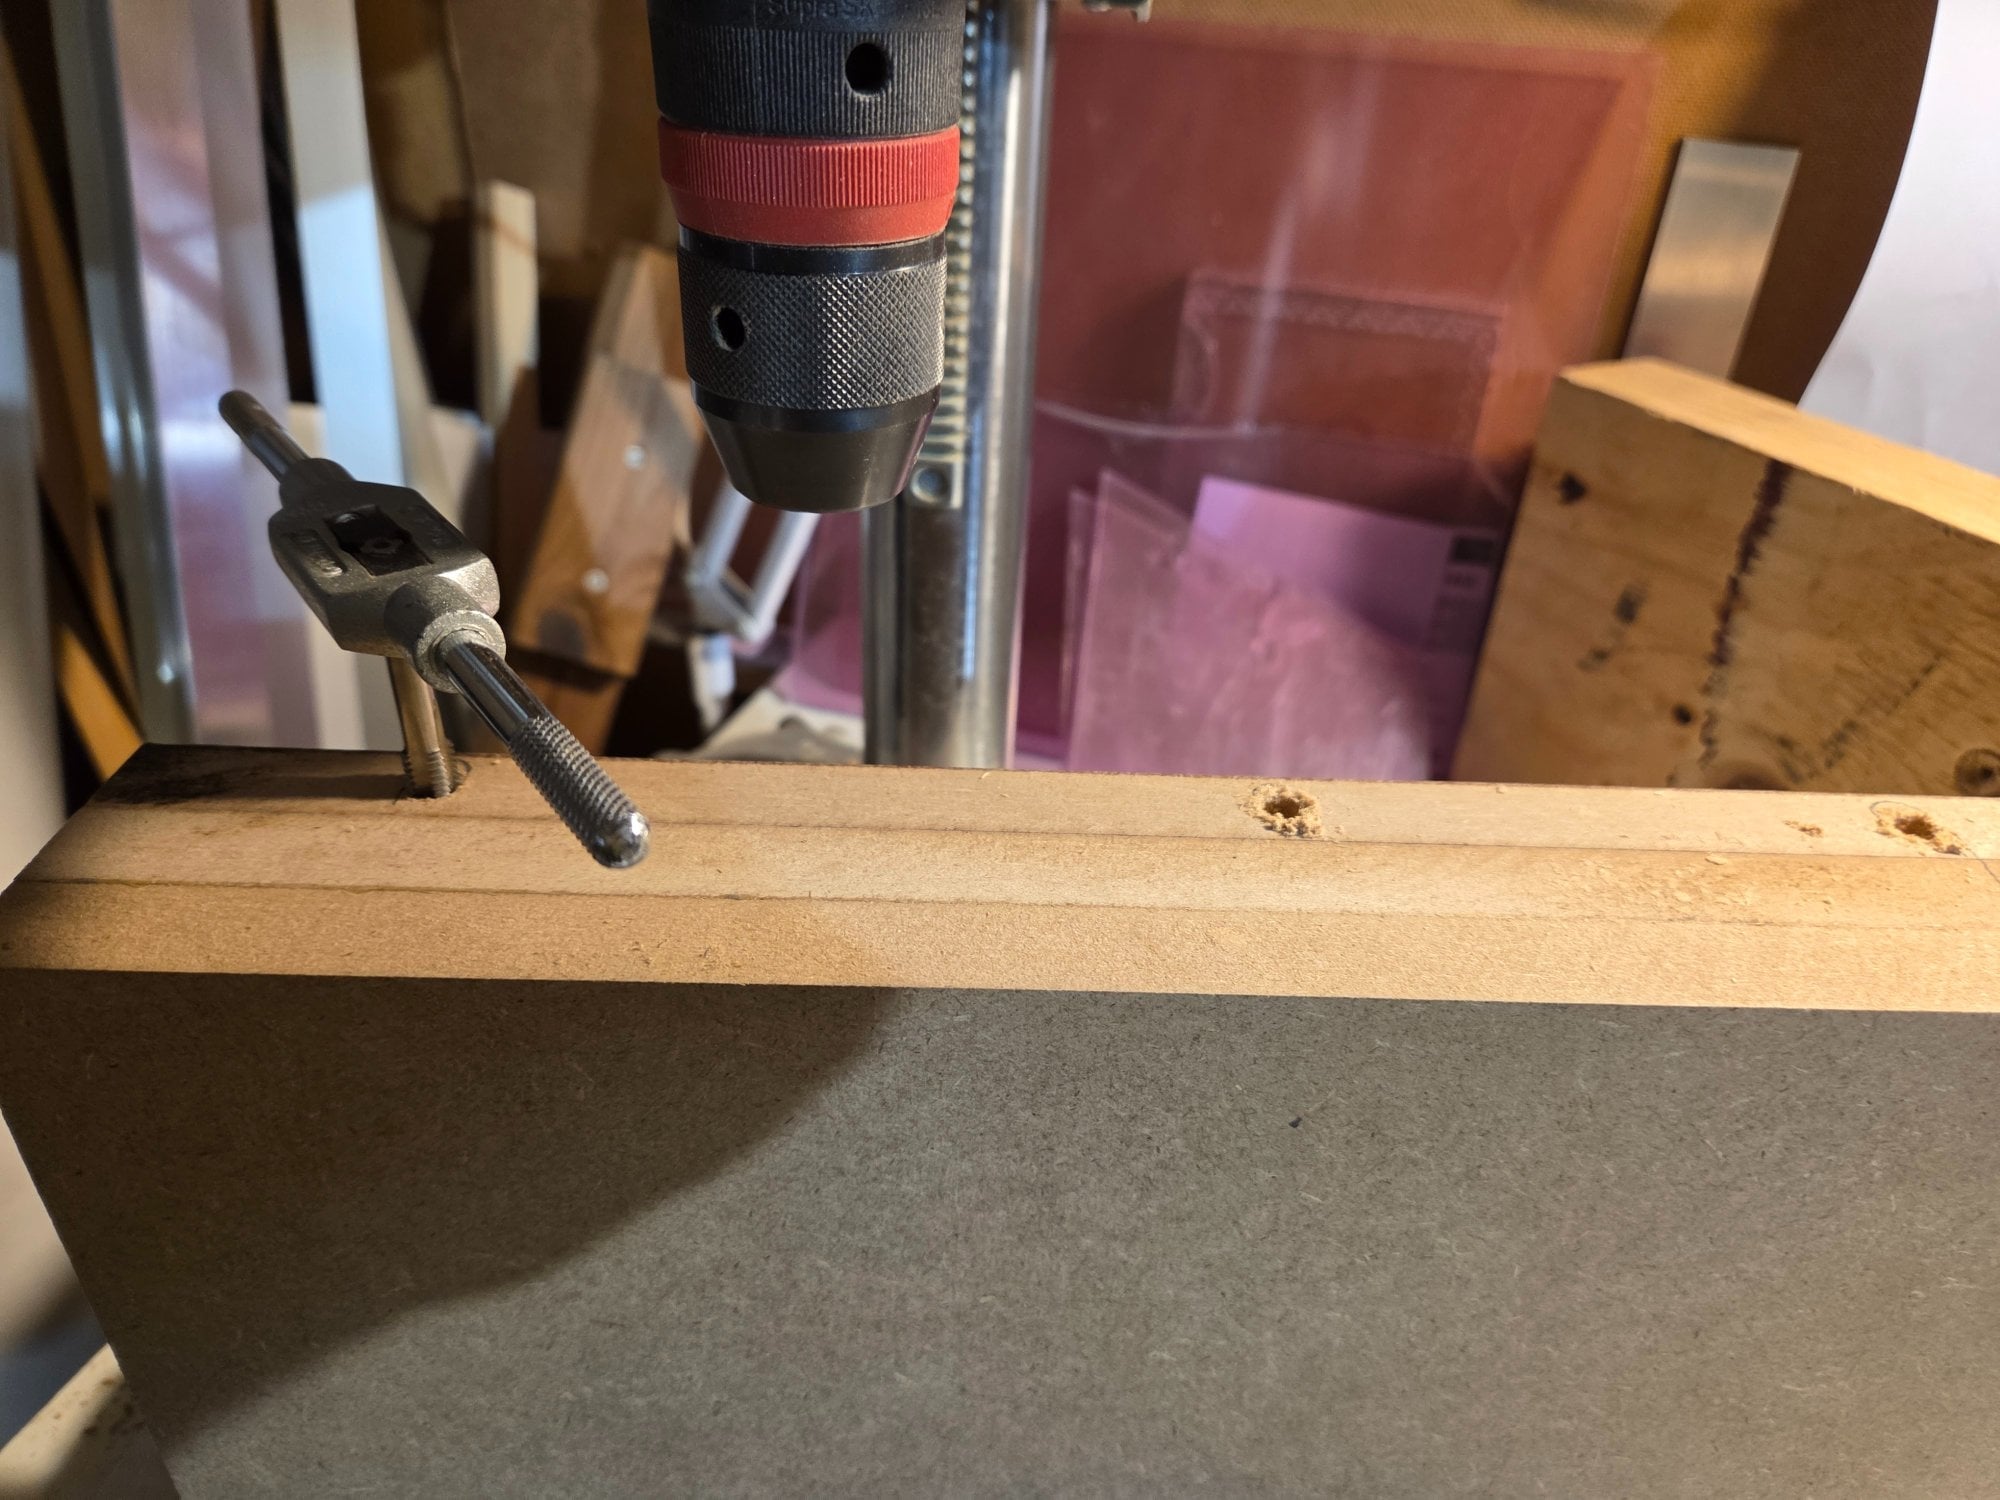
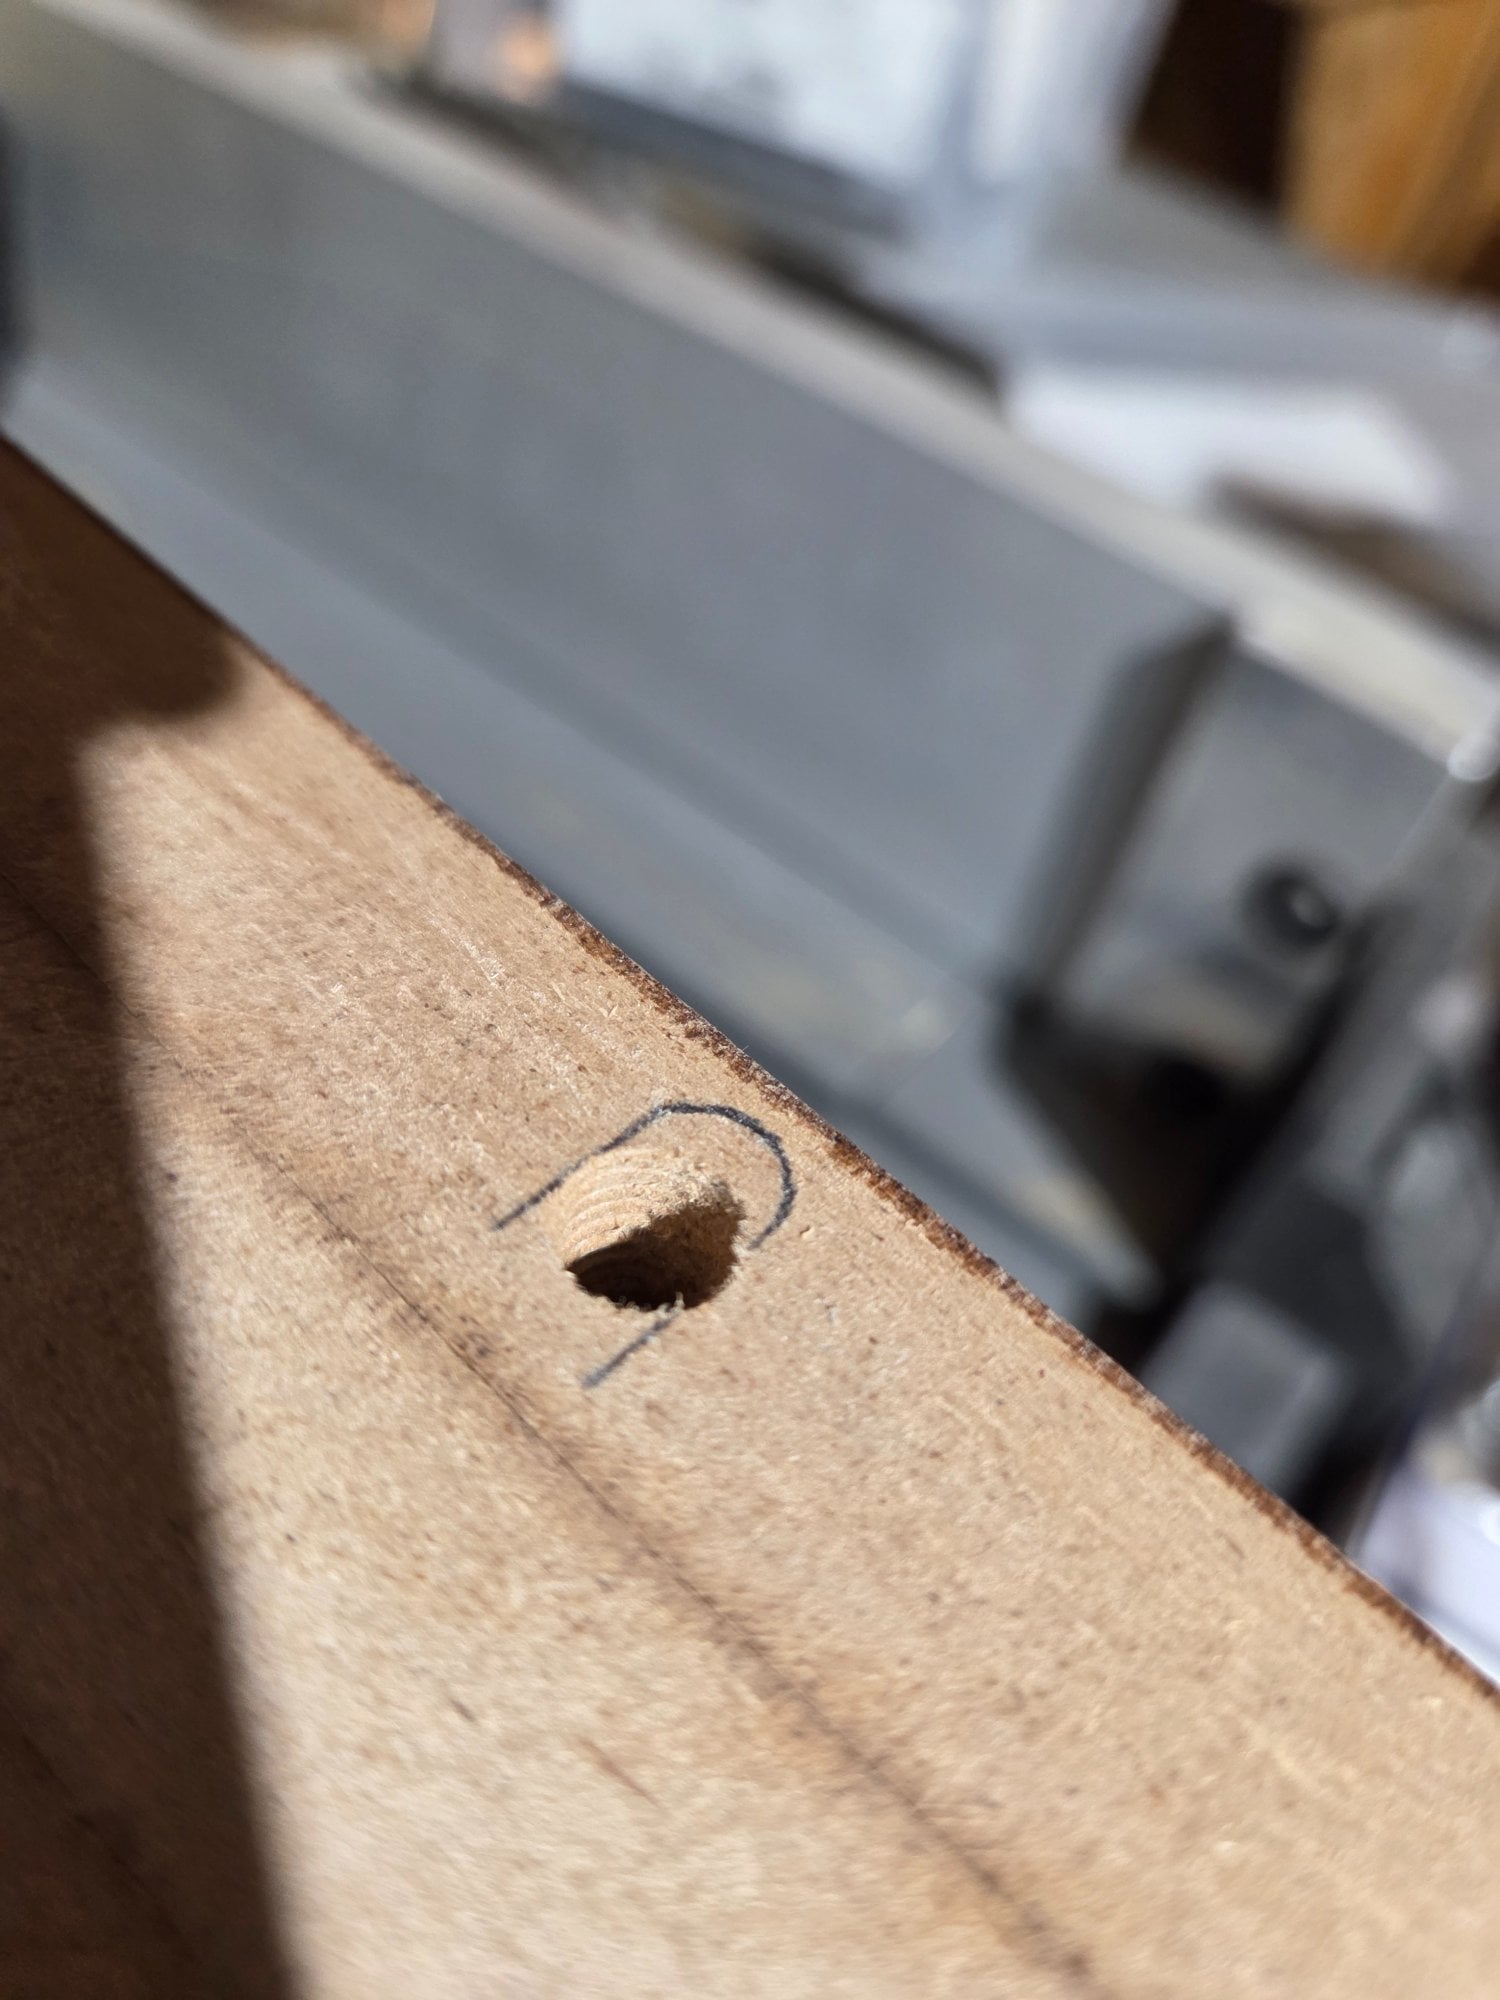
I test fitted the fasteners for the rails and glued the rods in the appropriate depth. I used superglue. For the final assembly I used some toothed spring washers for added friction.
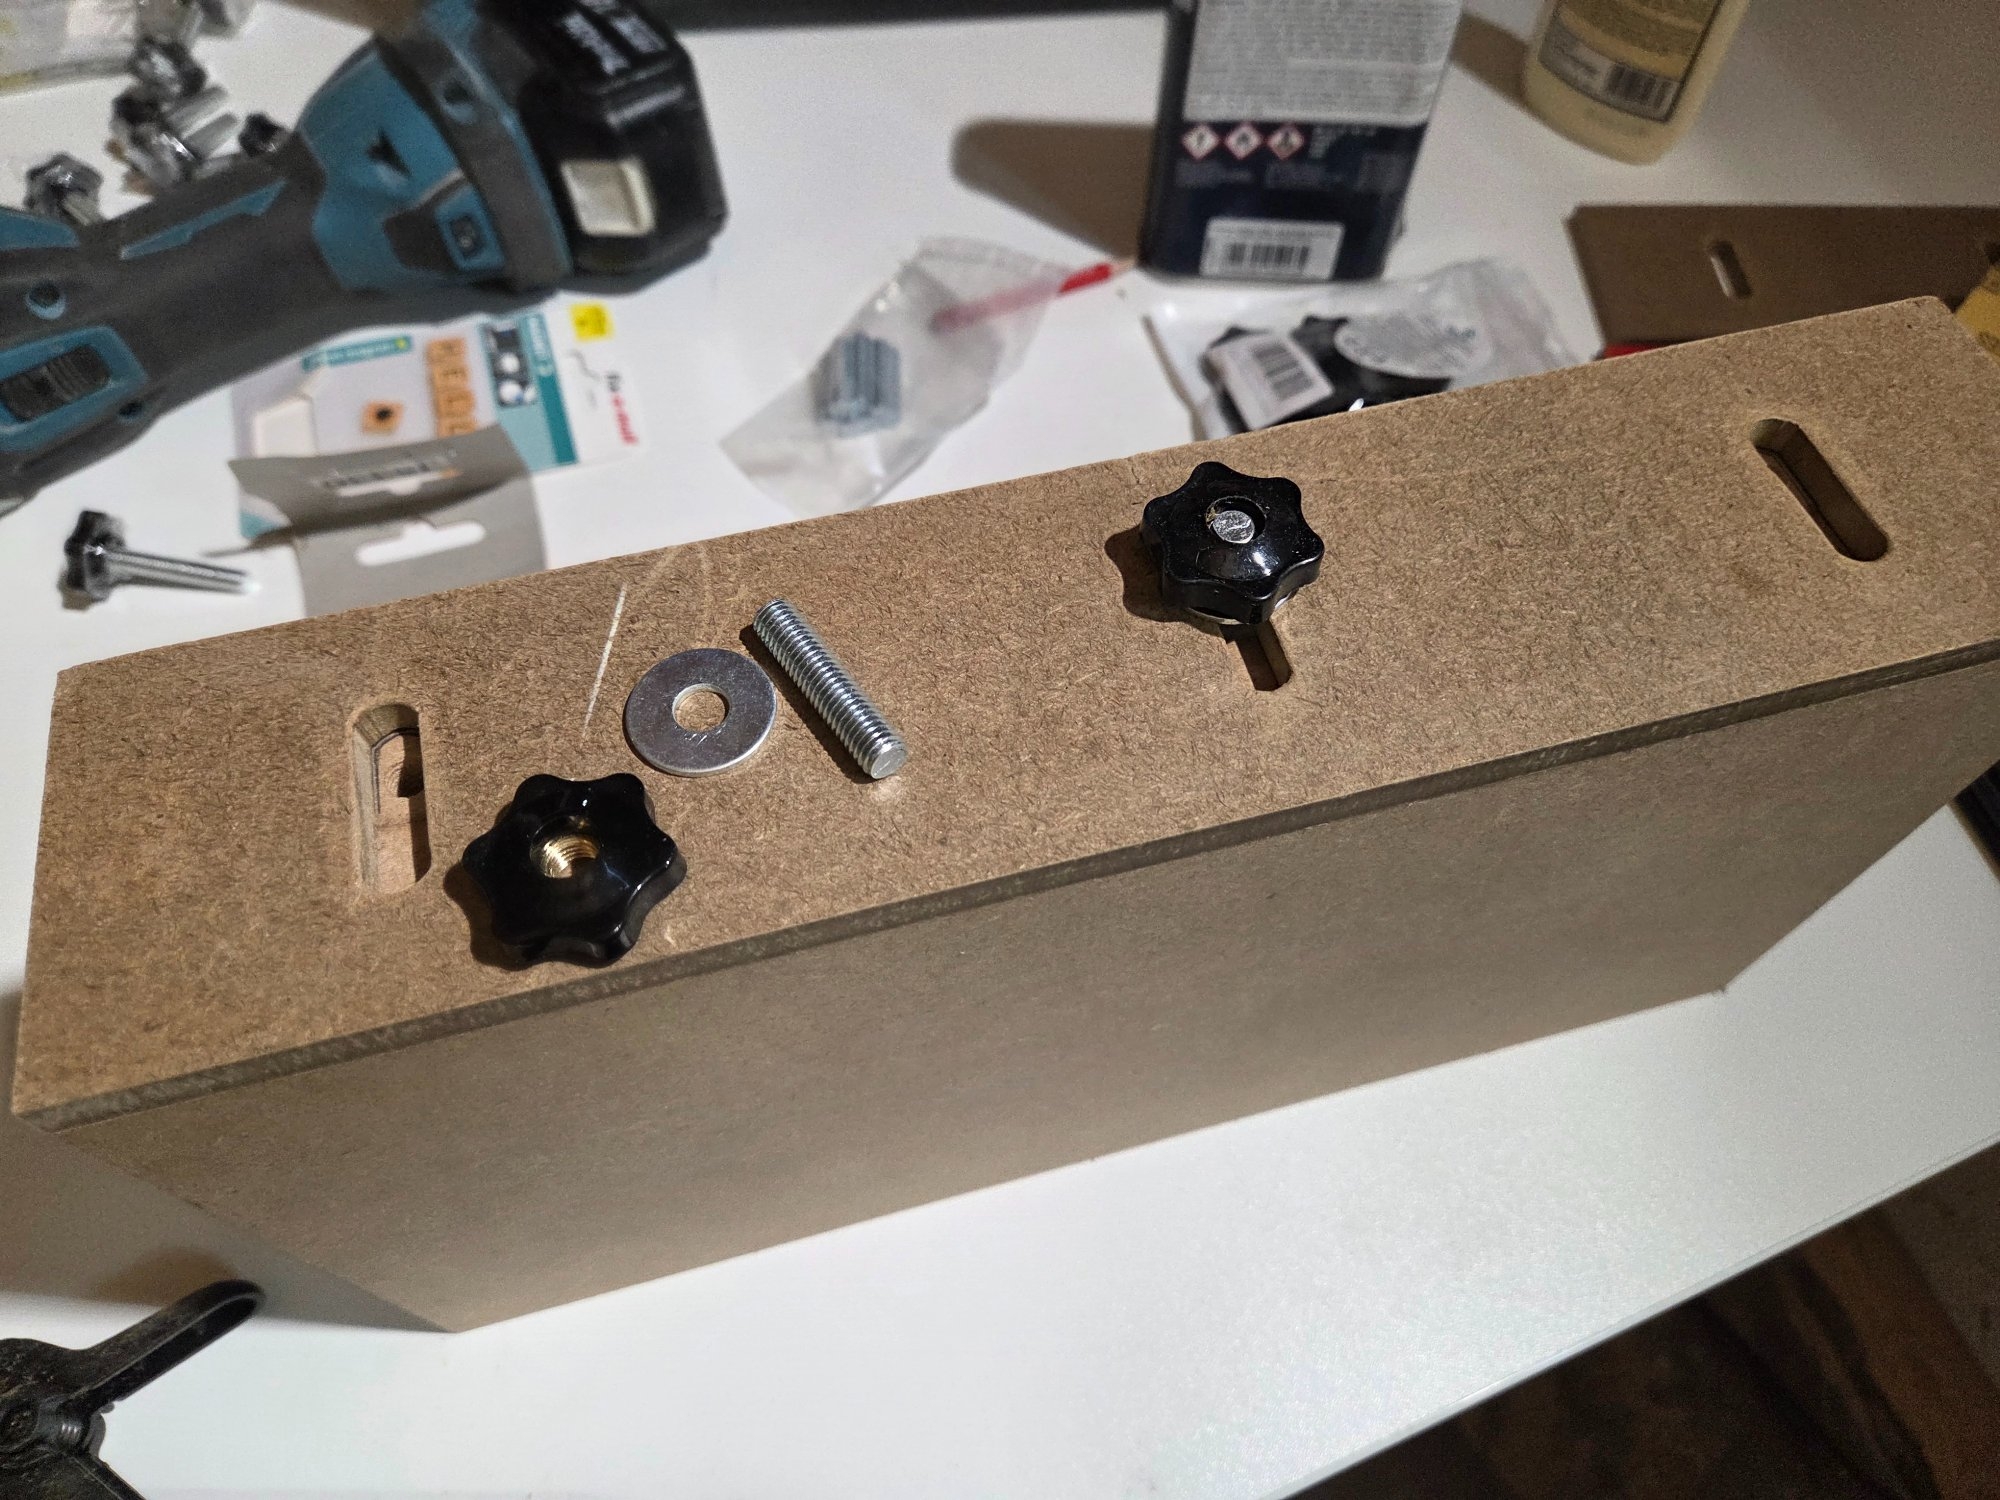
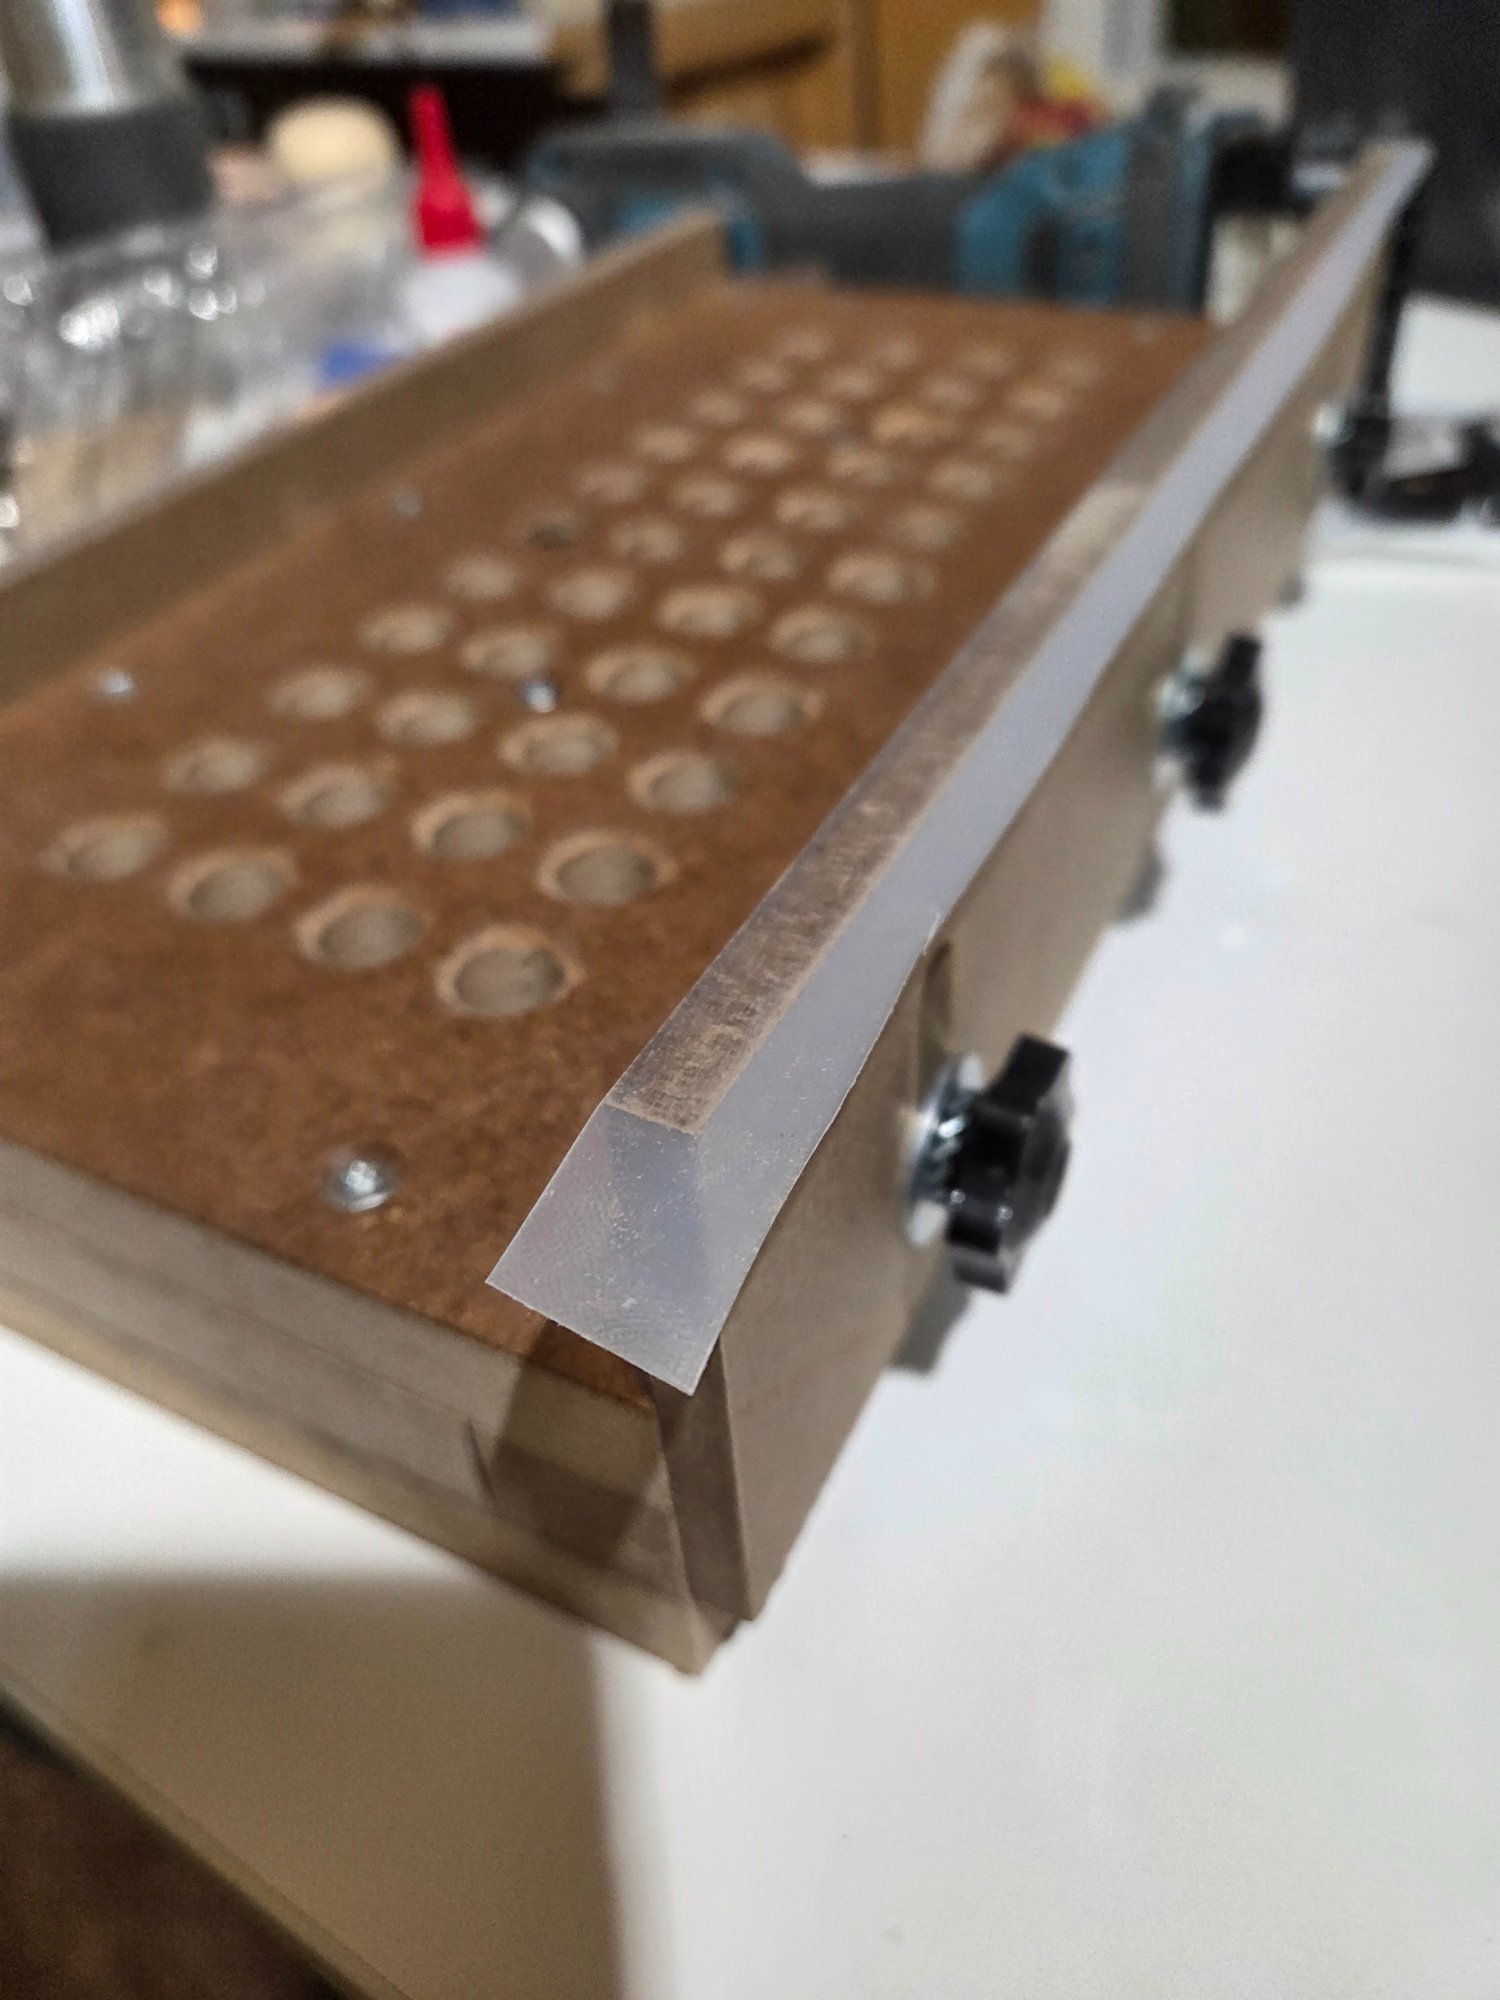
I remembered I had some UHMWPE tape (which is a fun thing to say) and decided to try and use it for the rails. It seems to work okay. I might replace it with some tubes someday. But maybe after I actually do something with this.
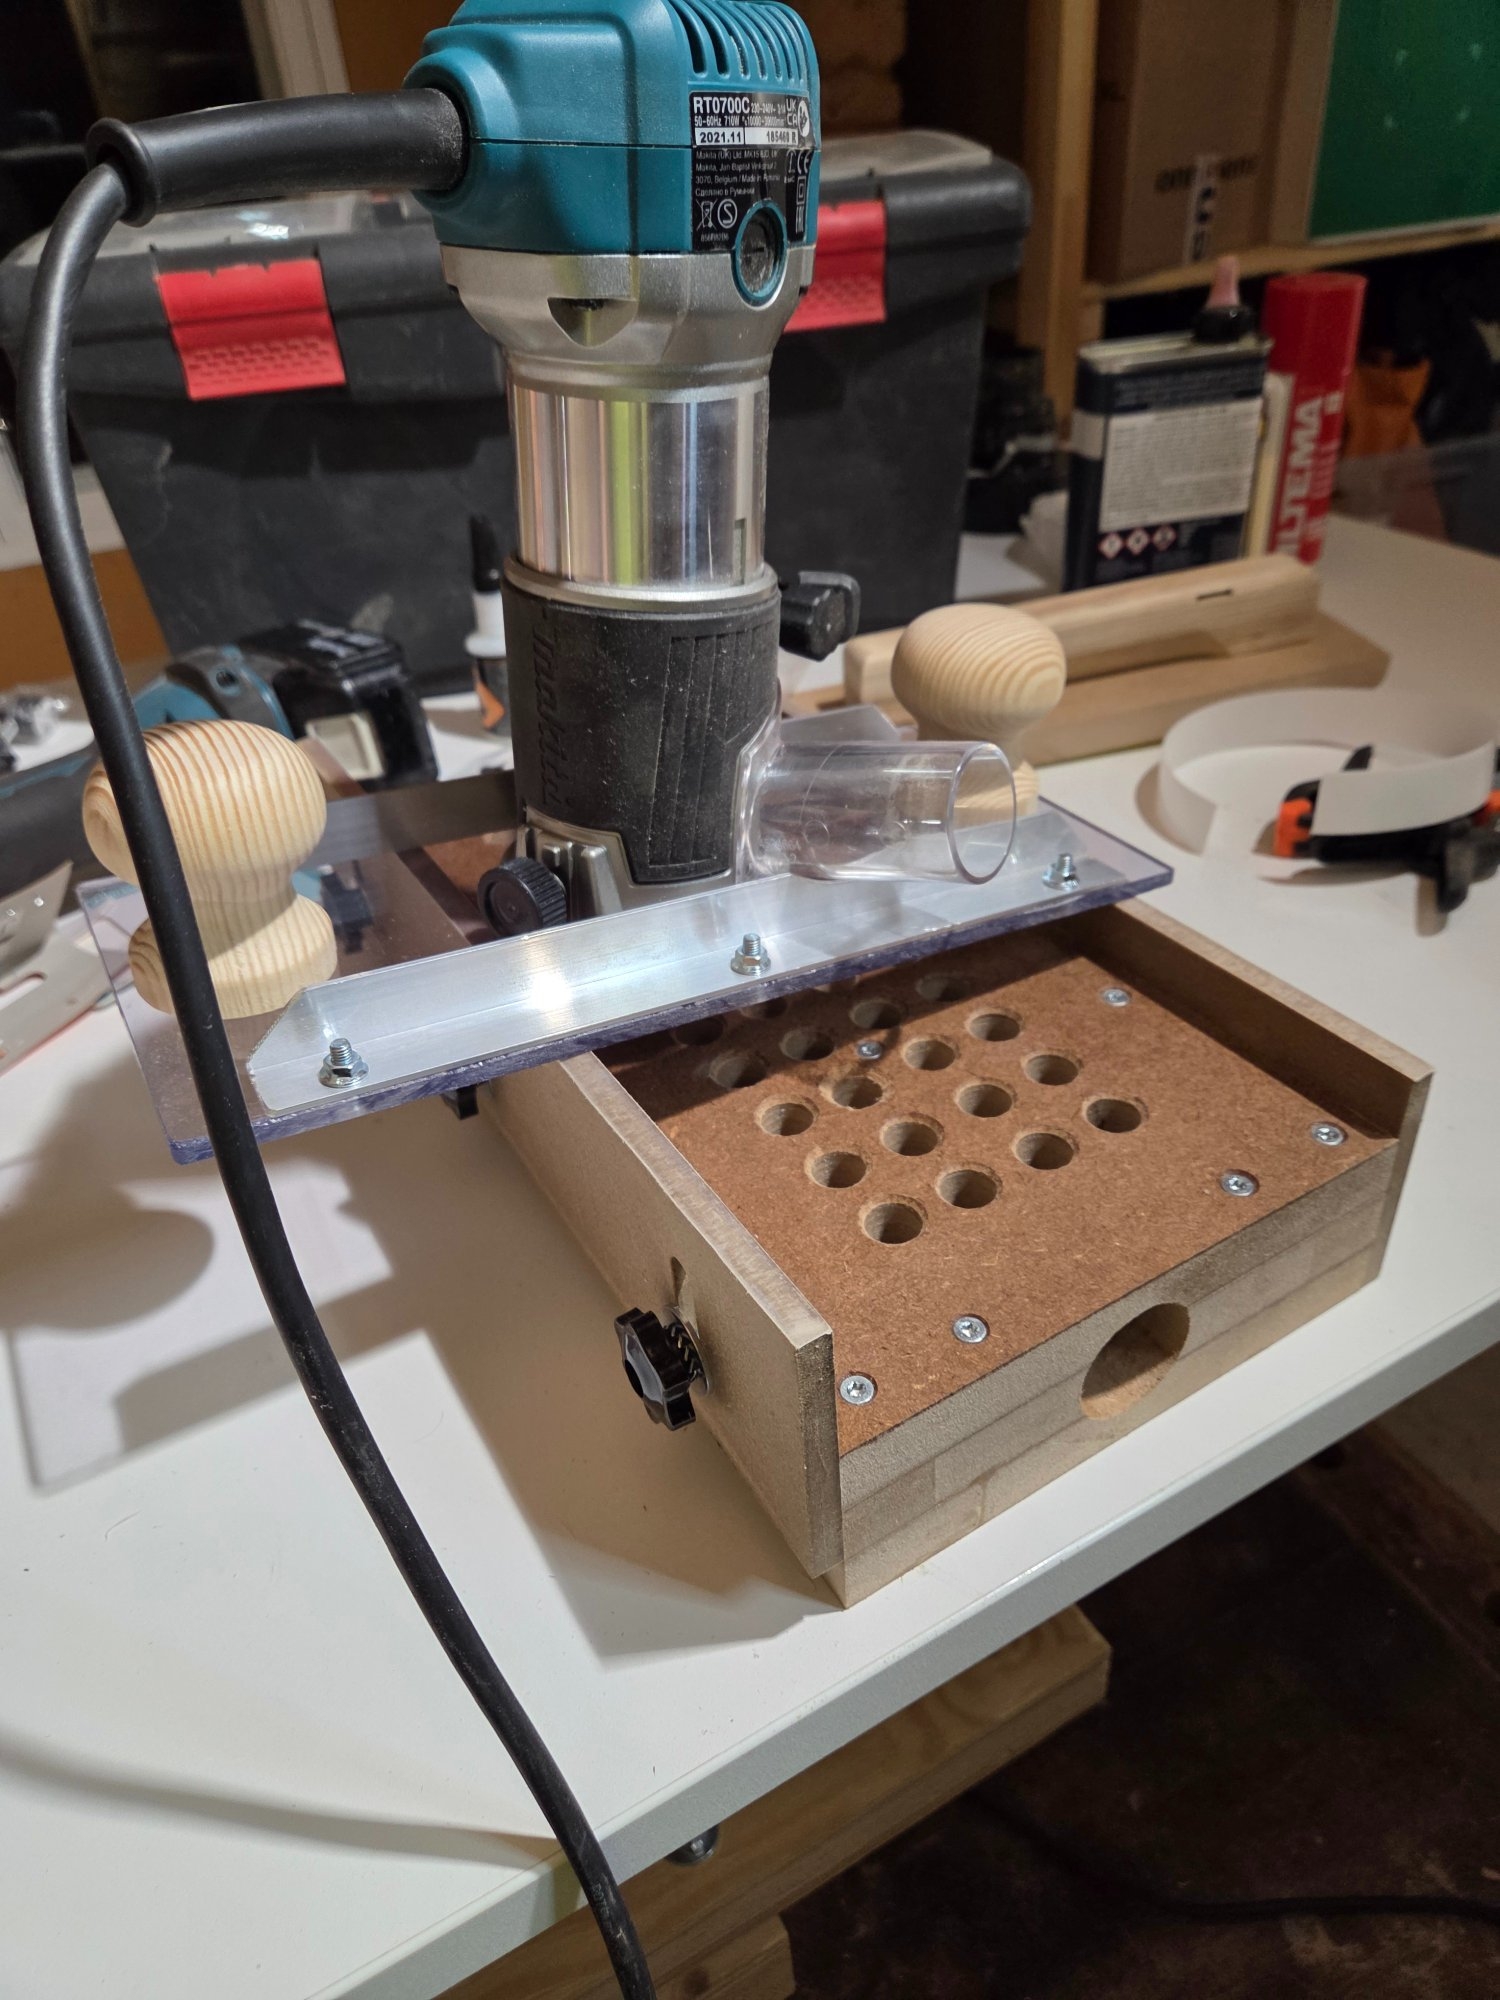
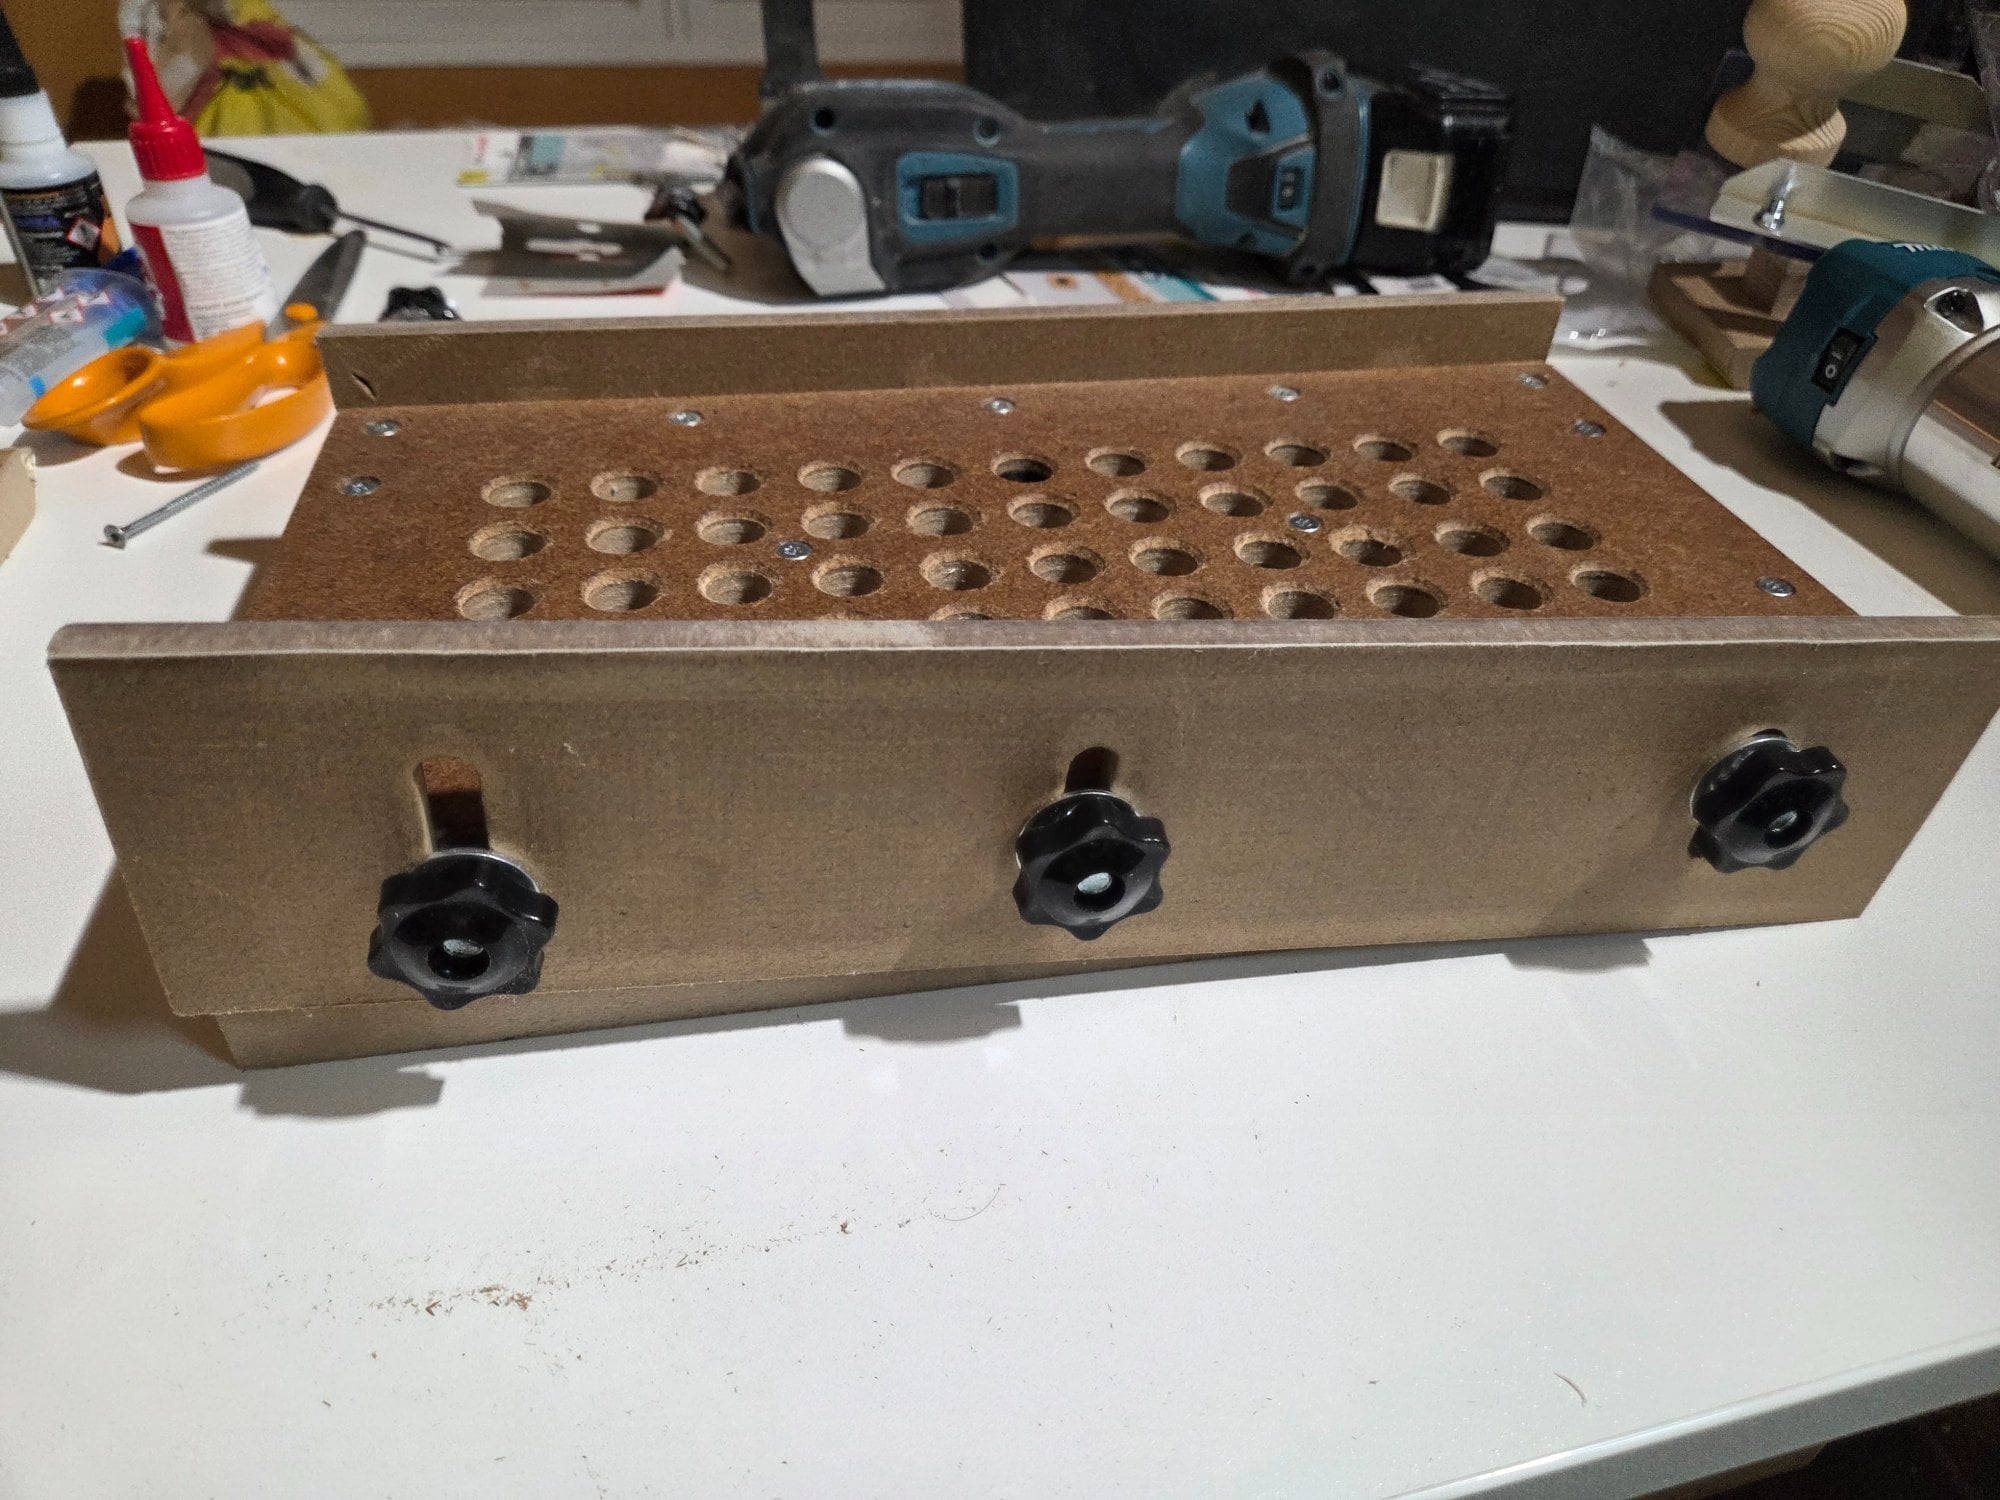
I think it's ready for a test run. Fingers crossed.
Propably for no actual benefit. But it's nice to klow the air can flow smoothly. The next step was treating the surface with some finishing oil from Liberon. Maybe not the best stuff for this, but that's what I had available.
Then I made the rails. I had some old thinner mdf-like material available. It's about 8 mm or 5/16". I made two strips that were about 20 mm or 3/4" higher than the box. I sanded the long edges flat and made 3 elongated holes for adjustabilty.
I thought about routing them but decided to go old school. (Yes, I know, oscillating multitools are not really old school.)
Anyways I cut three M8 threaded holes on both sides of the box. The side"grain" on the mdf is far from ideal thread material. But it seemed to work decent enough. I would not use it as a regular thread. But for a glued in rod it's ok.
I test fitted the fasteners for the rails and glued the rods in the appropriate depth. I used superglue. For the final assembly I used some toothed spring washers for added friction.
I remembered I had some UHMWPE tape (which is a fun thing to say) and decided to try and use it for the rails. It seems to work okay. I might replace it with some tubes someday. But maybe after I actually do something with this.
I think it's ready for a test run. Fingers crossed.
Last edited:

Well thank you.Nice job @Bonkersville
I did a litle test run with some spruce scraps. I thought I'd try and use some cardboard packing to seal the unused holes. It worked somewhat, but was a little tricky to set up and the hold on the smaller test piece was not enough. The bigger was fine.
To be fair the shop vac was quite full and clogged with some lime plaster residue. I think it would've been fine with a clean filter. Anyways I tried again with some masking tape. This time the grip was great. The 25 mm or 1" Bosch bit took the 1,5mm (1/16") pass easily on it's whole width.
All in all I'm quite pleased on the thing. The dust extraction worked surprisingly well through the router base. When I had it on that is. Other times not so great.
I will propably make some reusable gasket strips so I don't have to fiddle with the cardboard or the tape. At least as much. And maybe add some rubber studs on the bottom to better hold it's place on the work surface. Other than those I think it's done. Time for some actual use.
Here's a few shorts of the fixture ready to go. I think it took me 10-15 hours to make with the router base. Would've been a lot less If I had a clear plan from the start.
Cheers,
Ville
Last edited:
yup, I just put a little tab of painters tape on each exposed hole , just big enough to seal and if the piece is bowed I will tape the raised sides to create a seal. It will take 3 passes to get a piece nicely planed, but usually only need tape on the first pass (if at all). Just plane, flip, plane, flip, final plane...
Vacuum boards make this work so much easier.
Vacuum boards make this work so much easier.
Back with the small part routing fixture. The oil and the holed mdf didn't work well together. When I was starting to actually use this on something, I noticed the part rocking on the top surface.
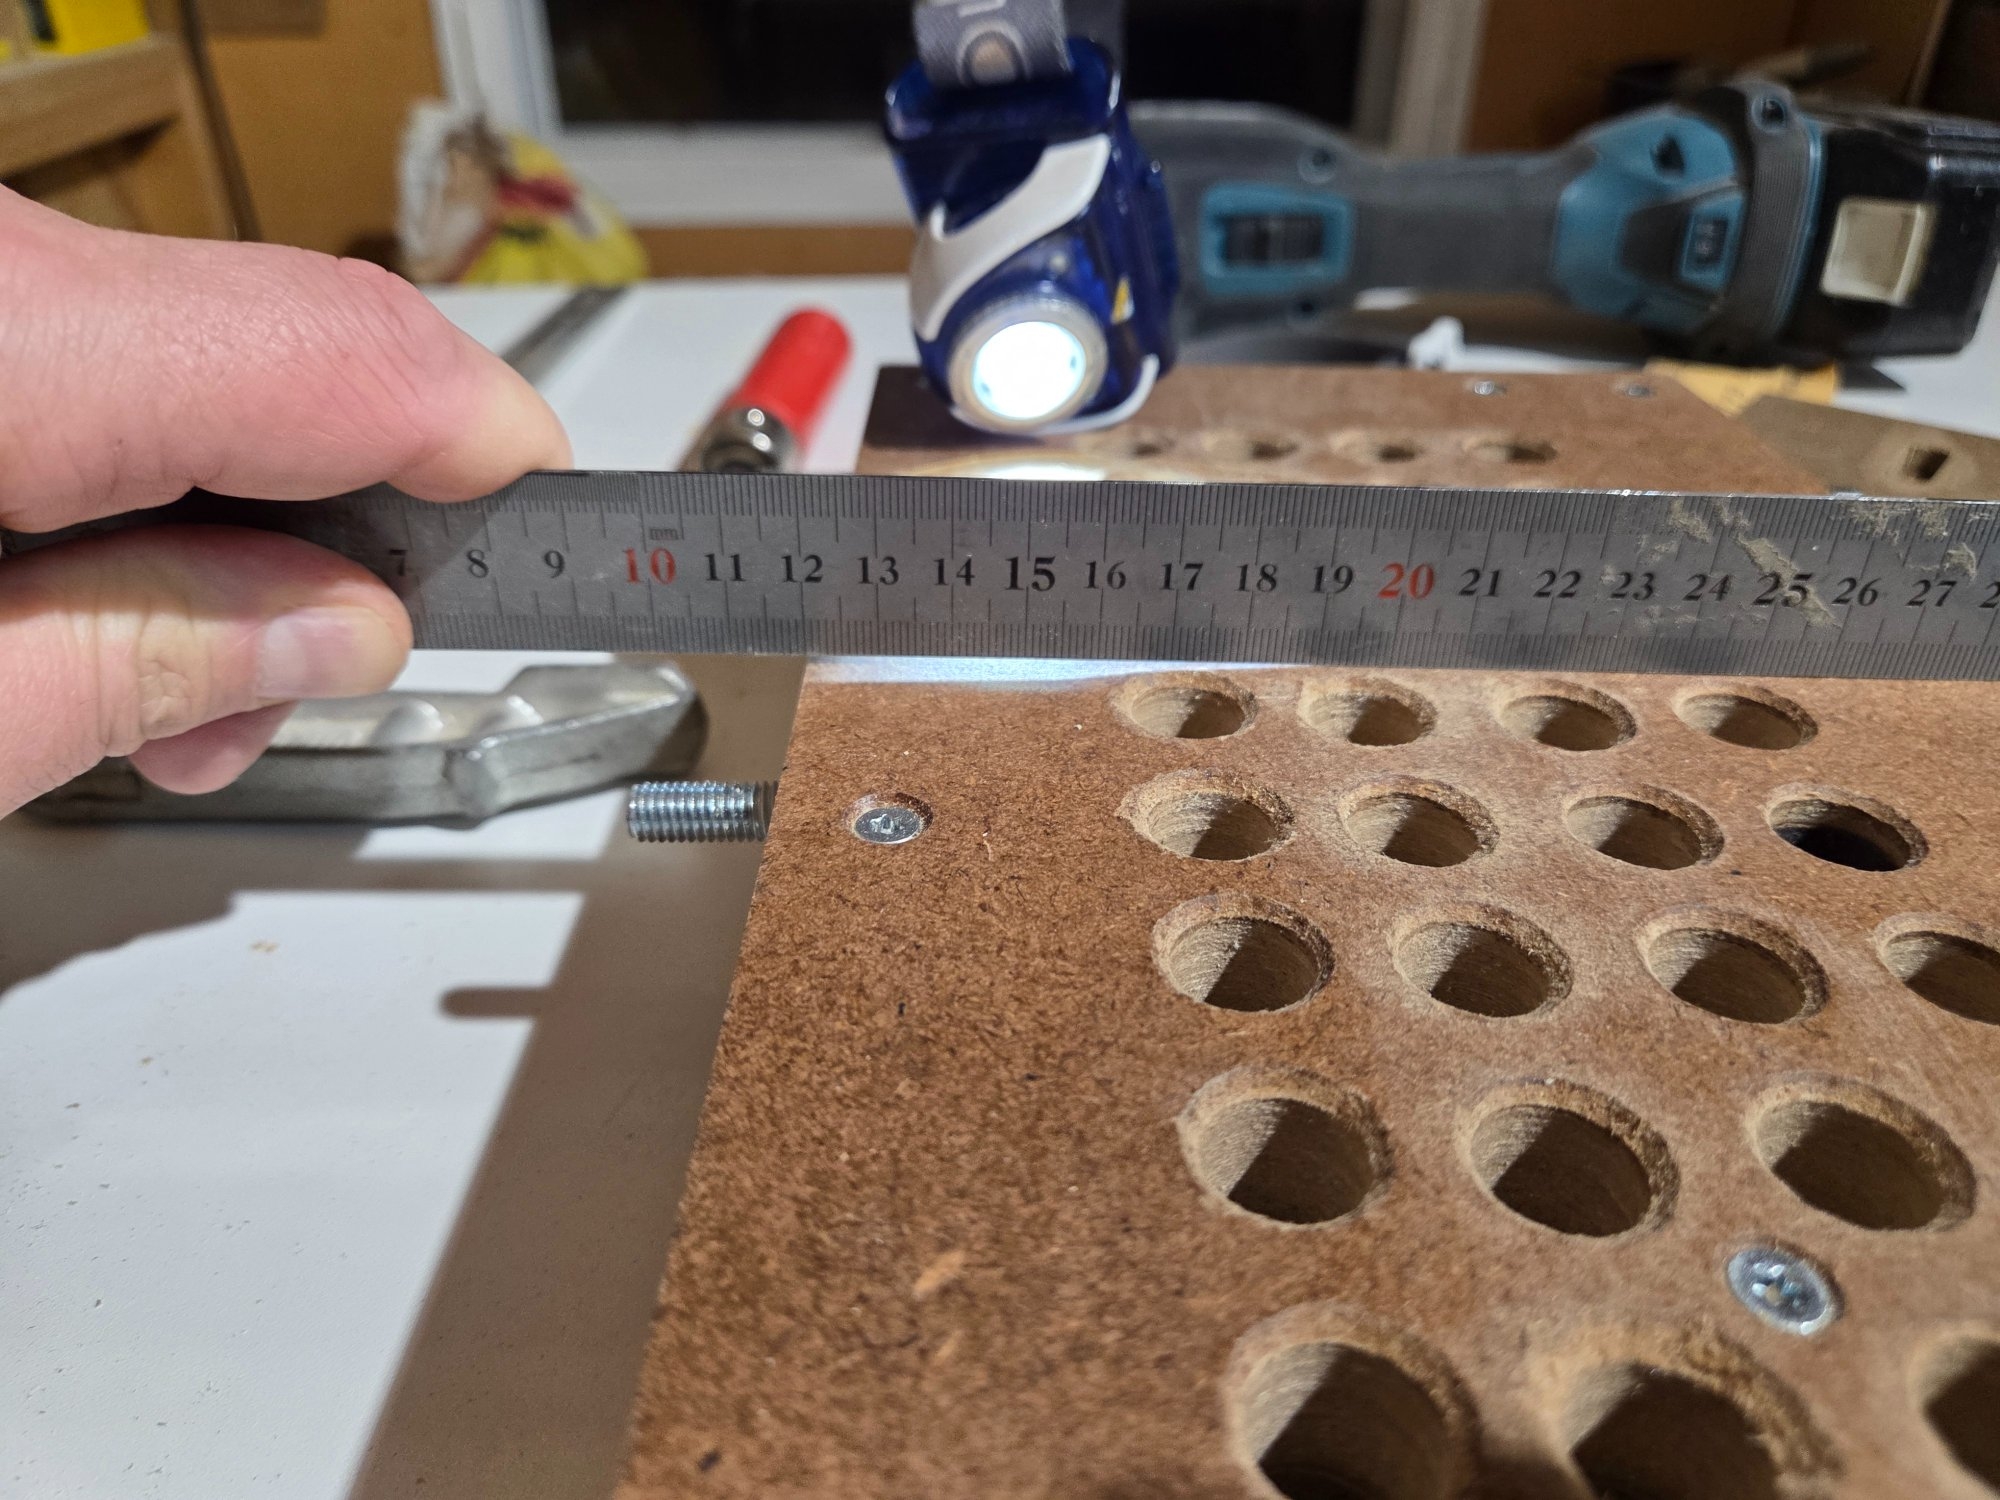
The oil made the mdf swell quite a bit. I had to check multiple times, because somehow I thought only water based stuff would do that. I was wrong. The bottom of the top plate stayed dead flat.
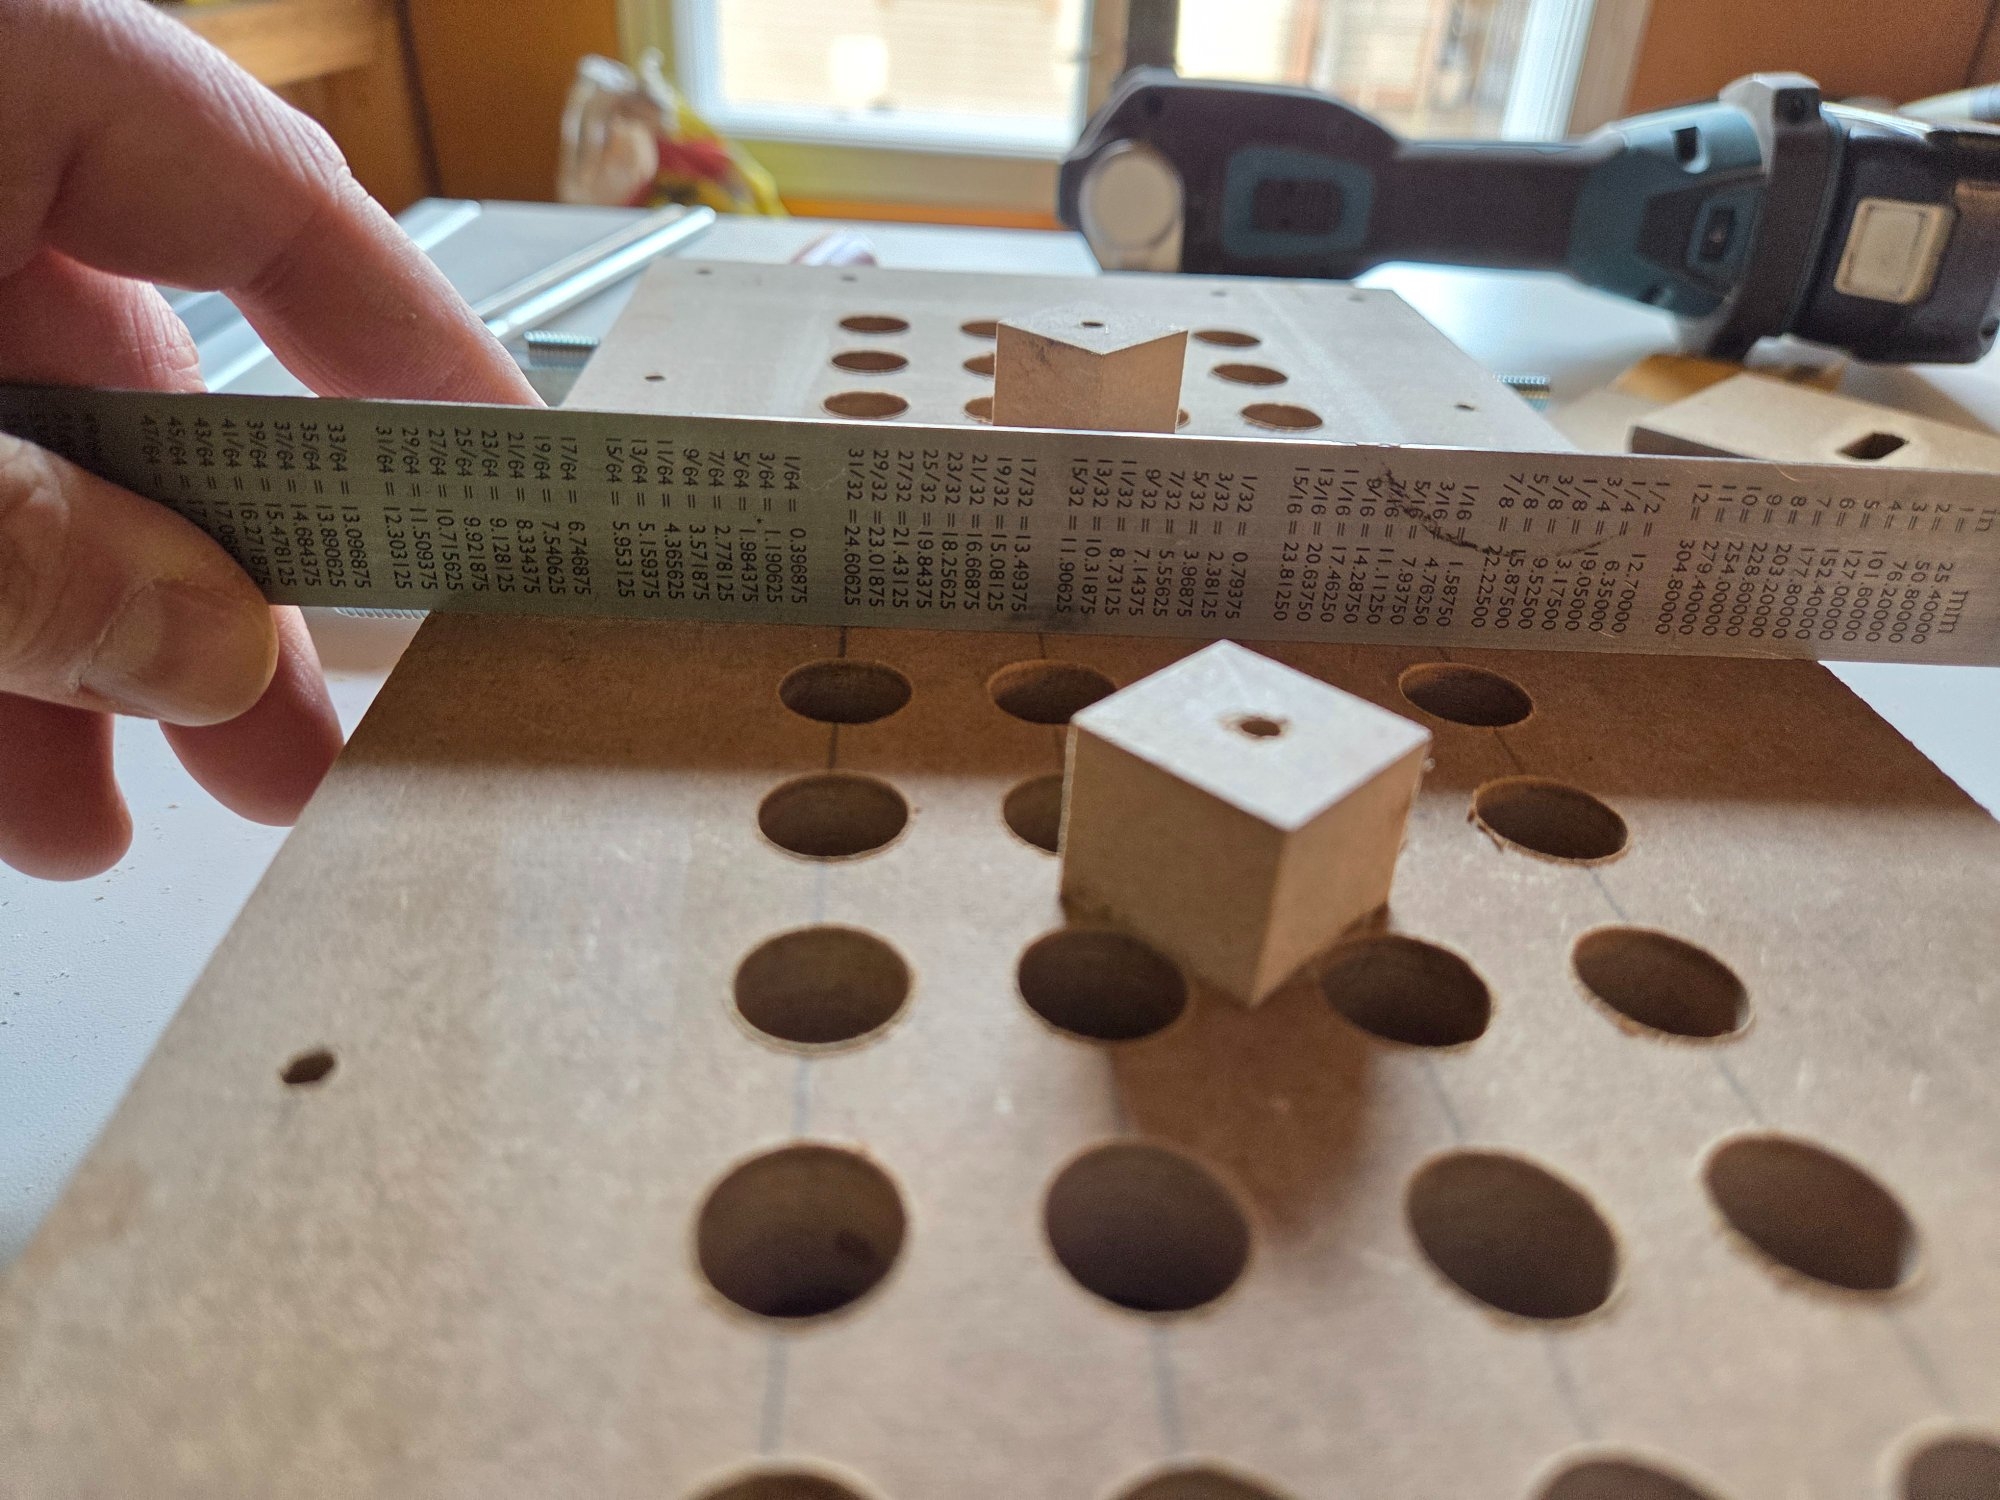
I first considered using the router and sled, but went with a sanding block instead.
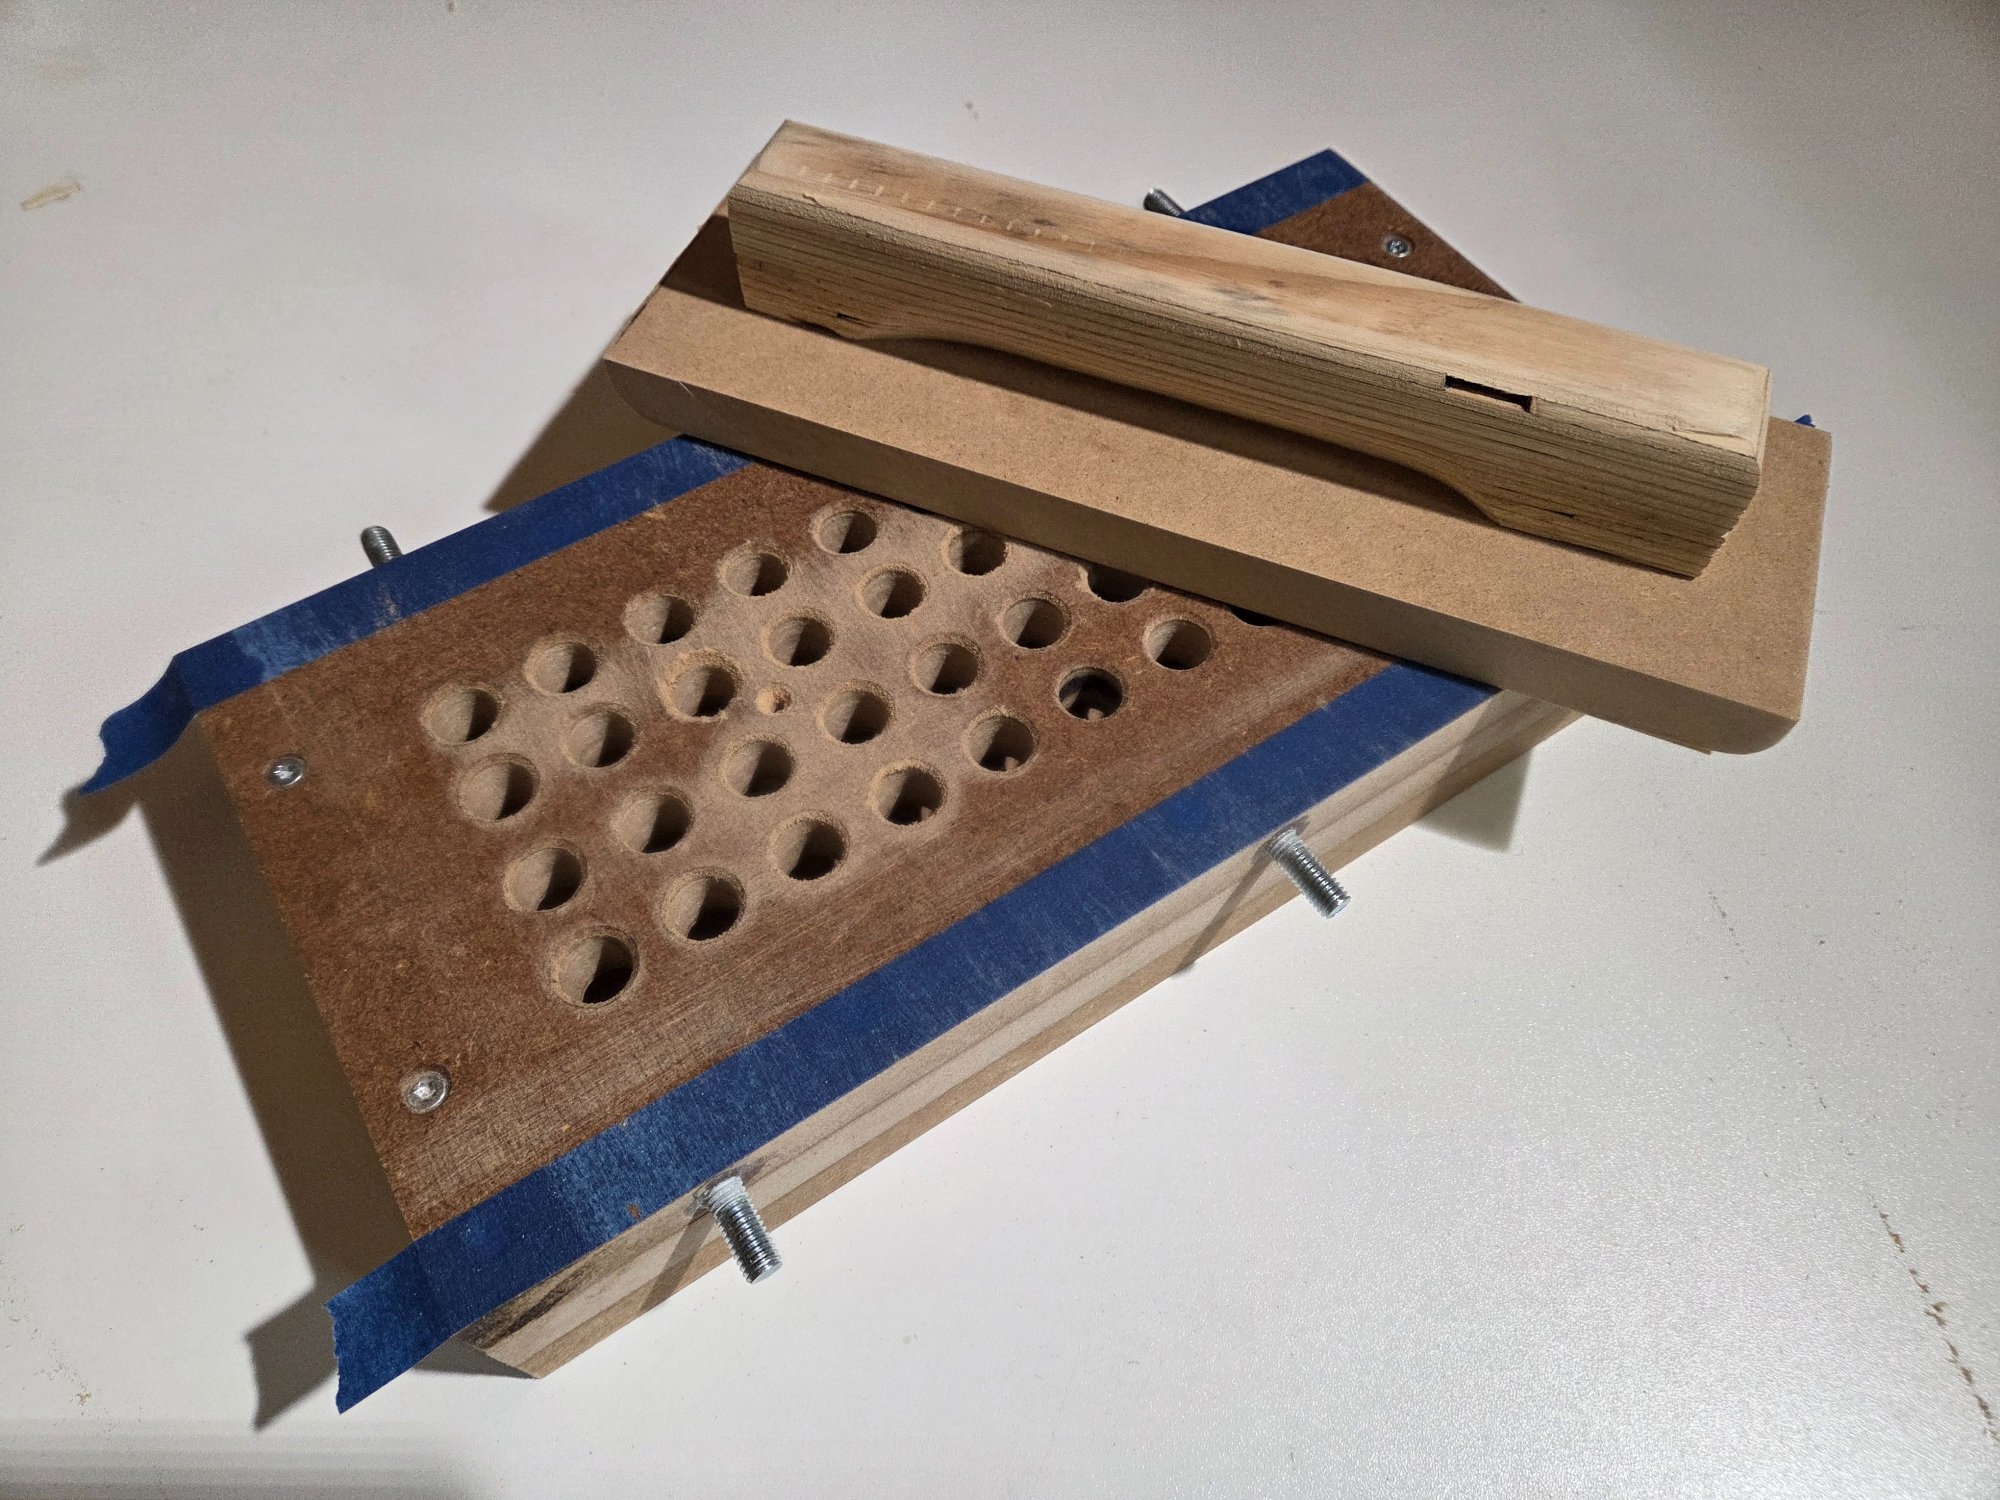
After about twenty minutes of sweating on the sanding block and the routing fixture it was flat again. This time I used black paint to seal the surface.
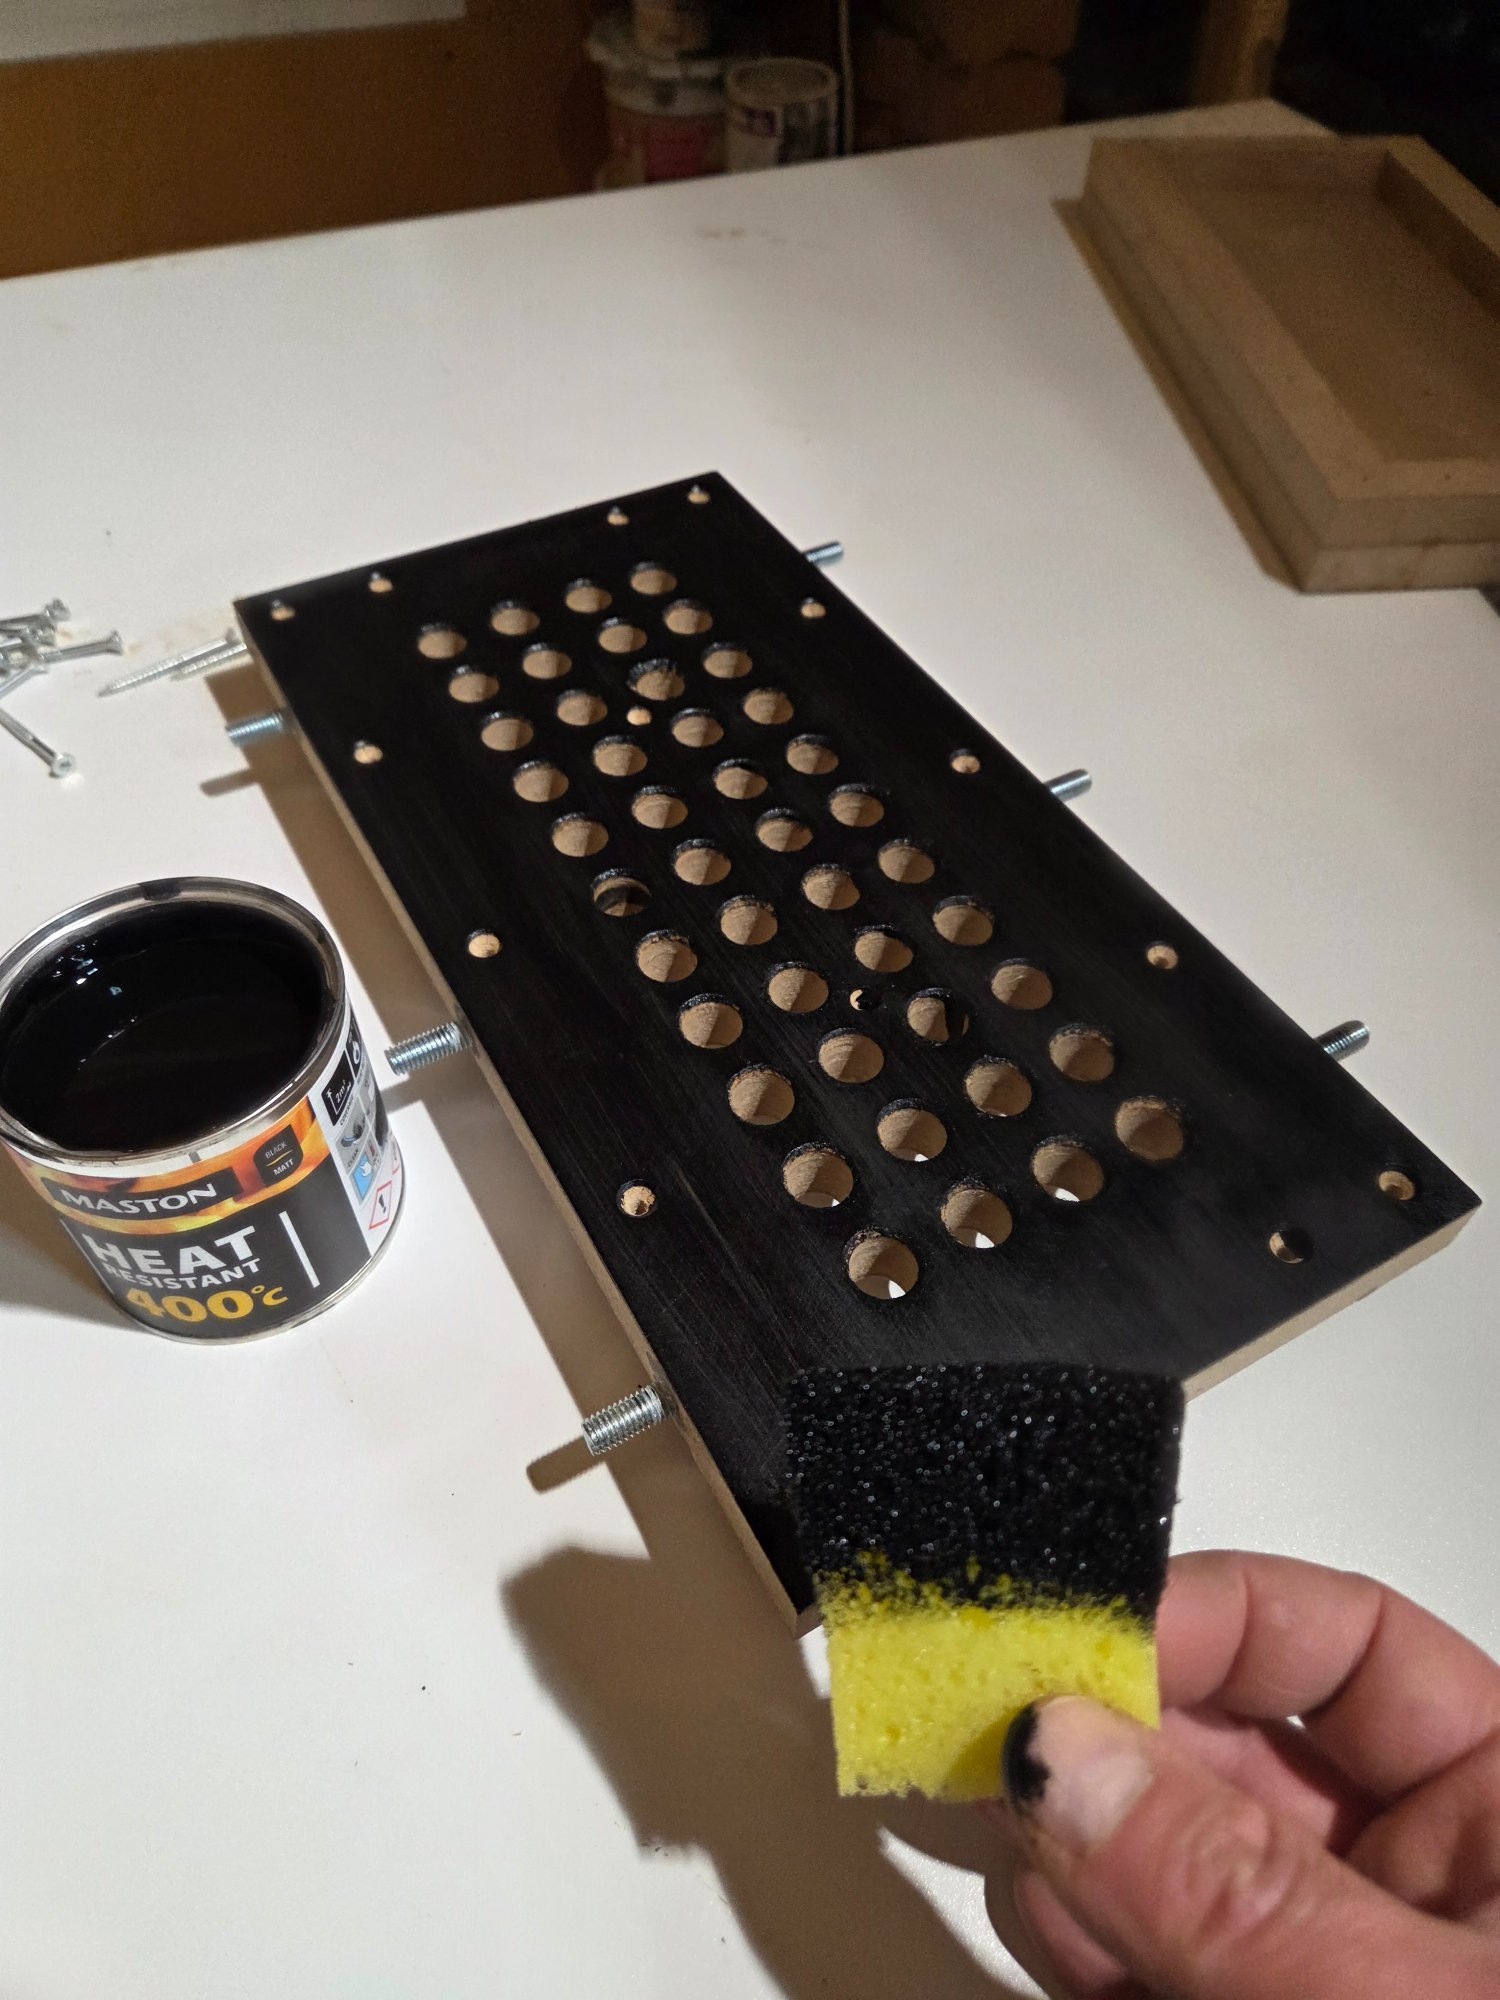
No swelling this time. After the second coat it was assembly time again.
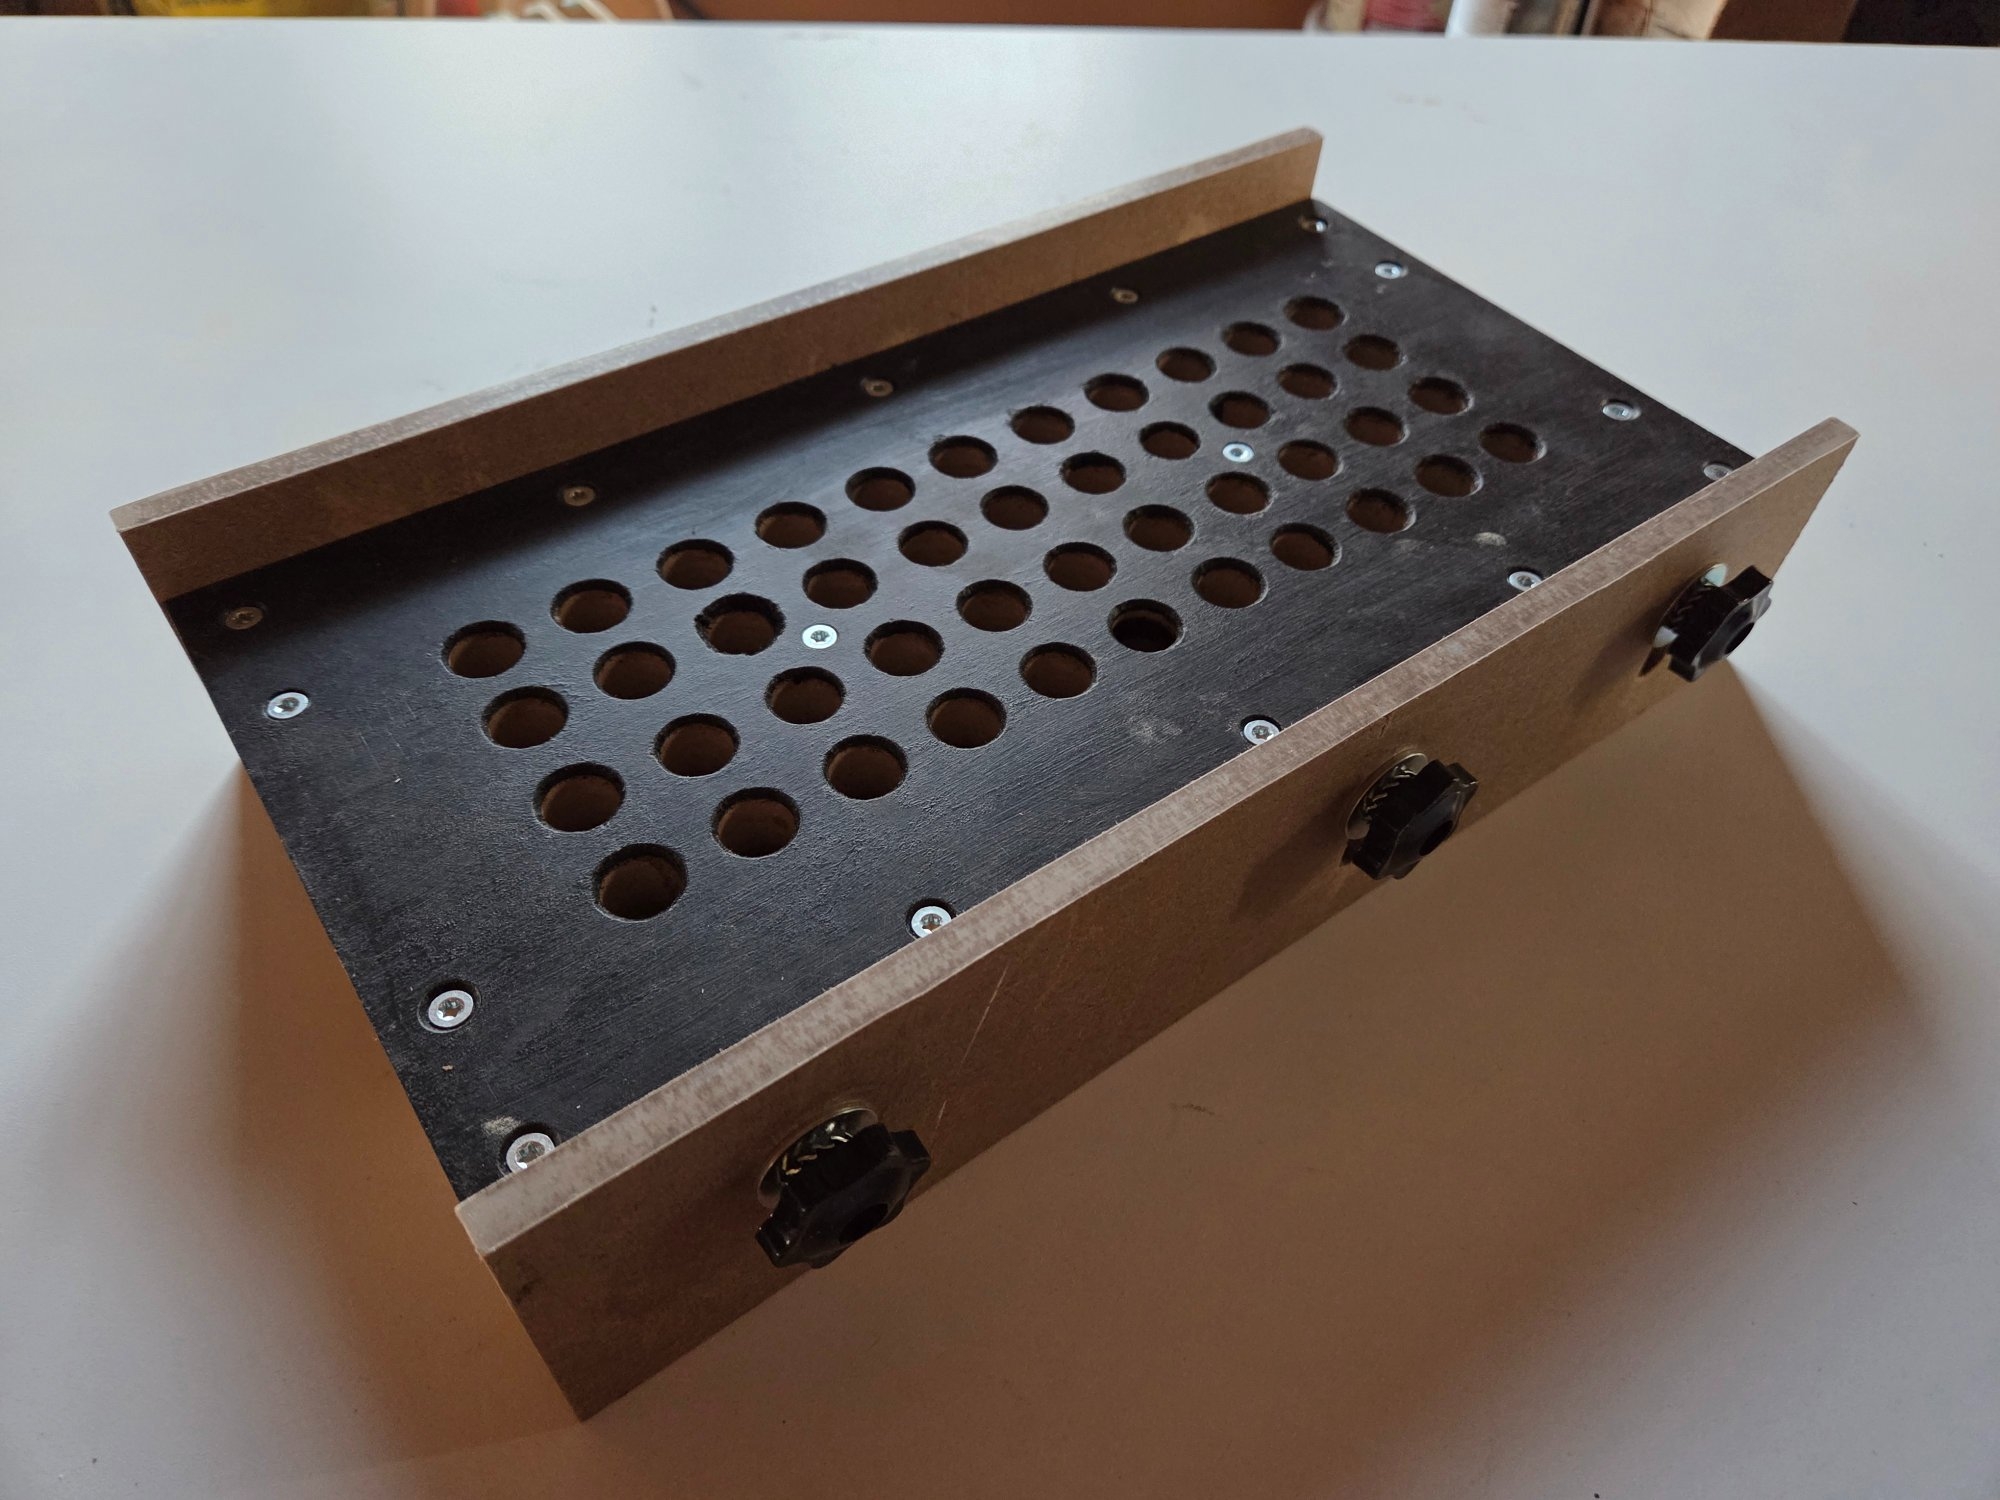
The oil made the mdf swell quite a bit. I had to check multiple times, because somehow I thought only water based stuff would do that. I was wrong. The bottom of the top plate stayed dead flat.
I first considered using the router and sled, but went with a sanding block instead.
After about twenty minutes of sweating on the sanding block and the routing fixture it was flat again. This time I used black paint to seal the surface.
No swelling this time. After the second coat it was assembly time again.
The first actual use scenario for the small part fixture was making wenge veneer for my Winter Buildoff 2026 entry. I had an old scrap fingerboard that was a perfect candidate for this. I cut two pieces short enough to fit the working area of the router bit and went at it.
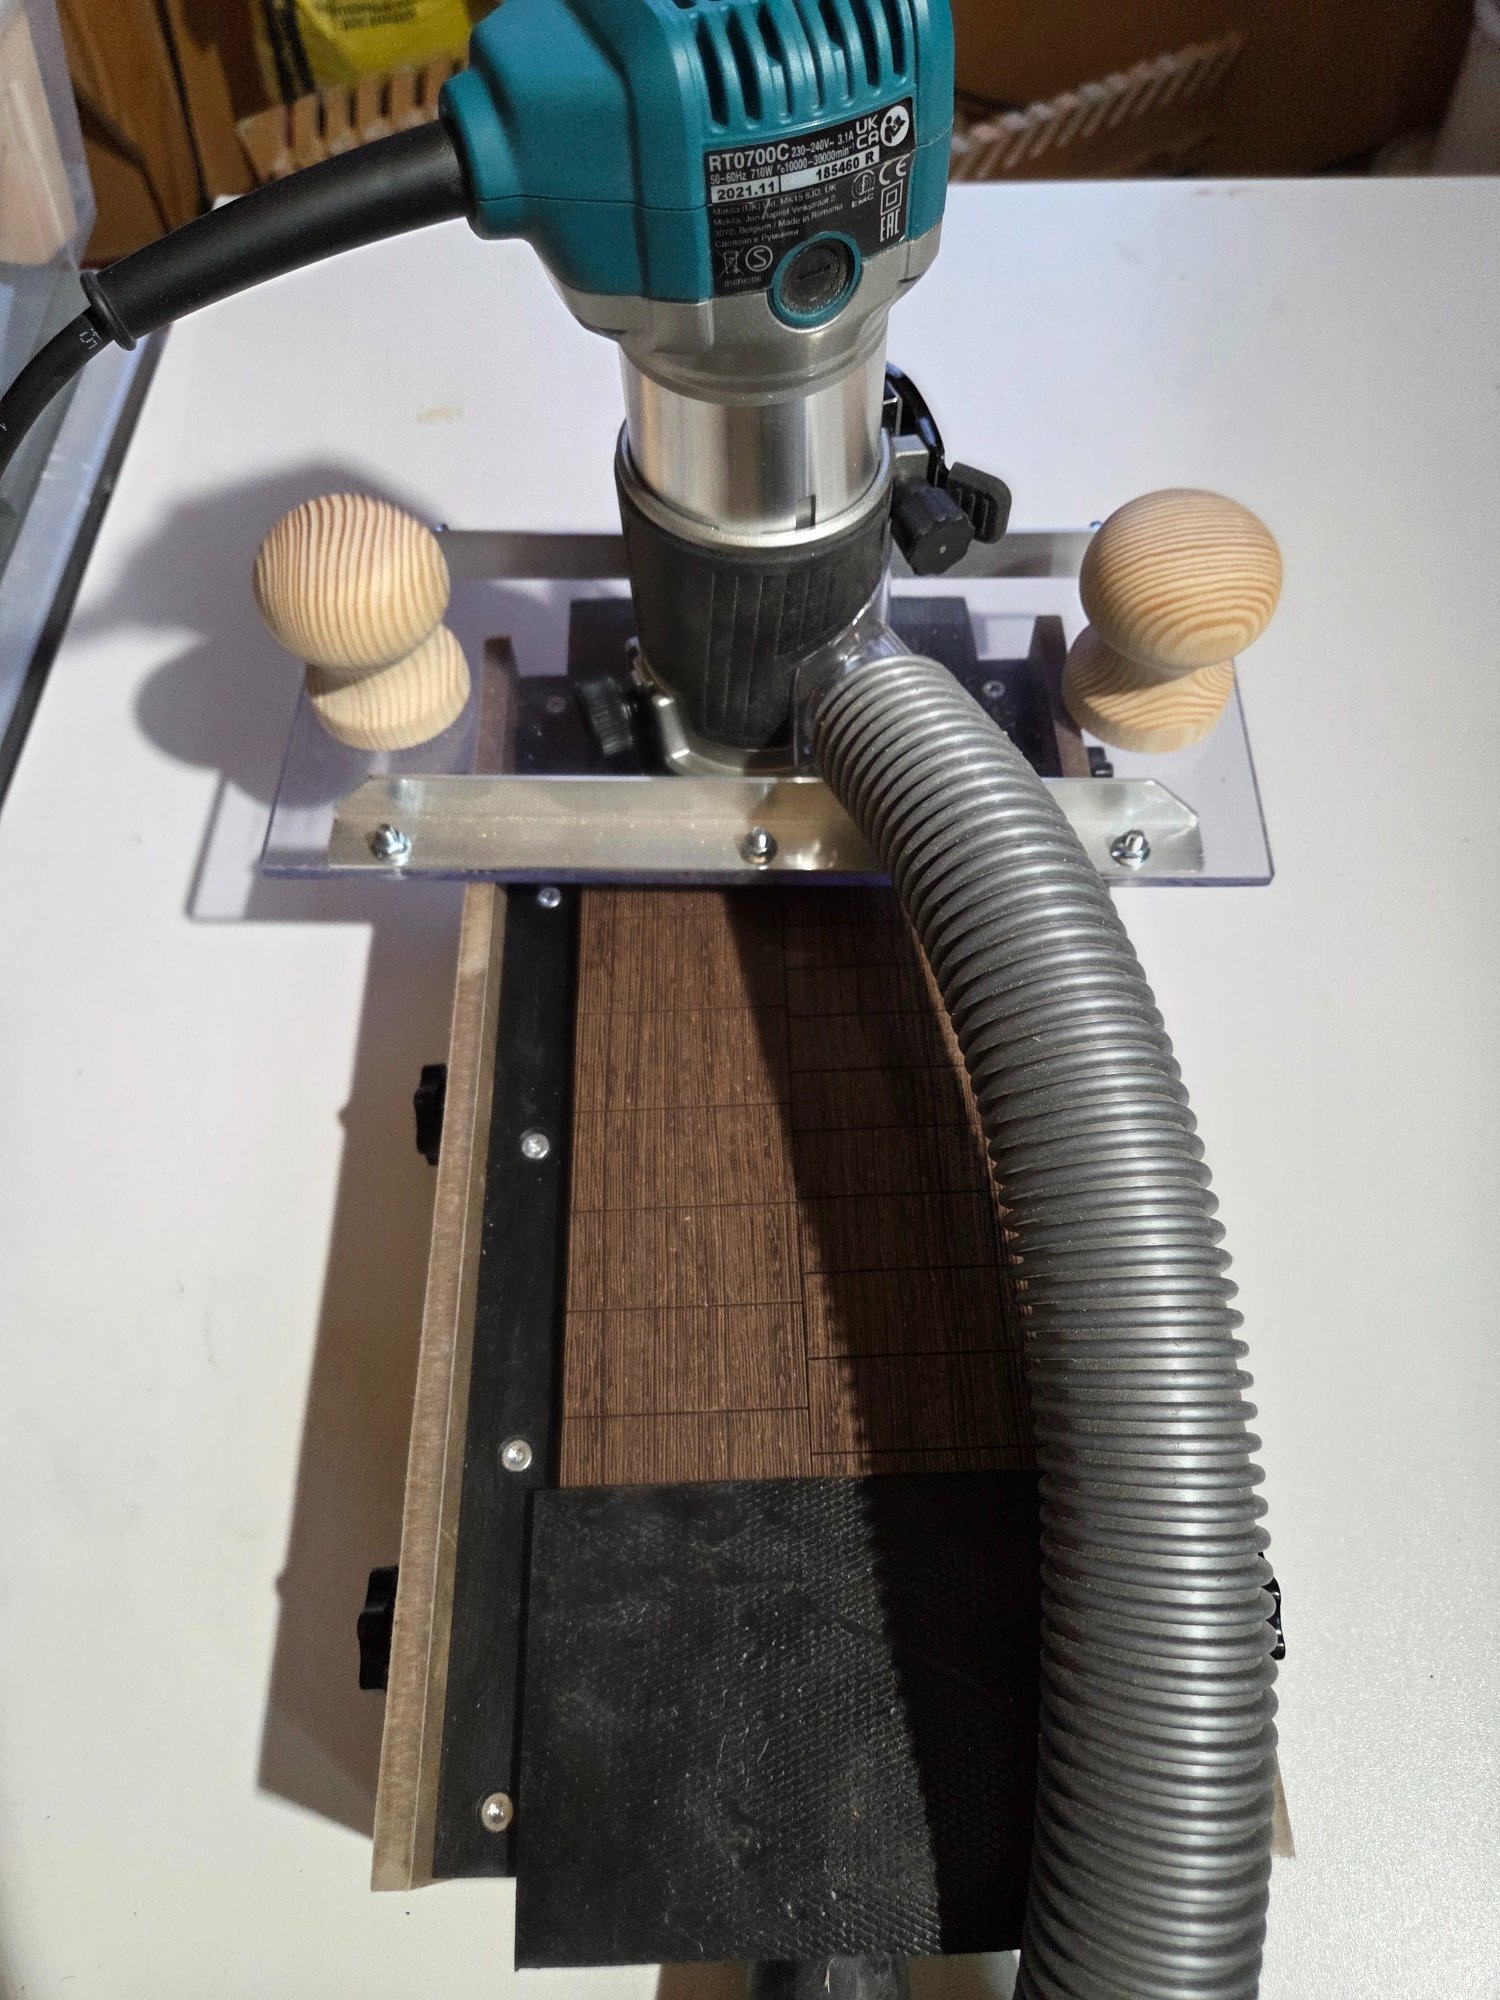
I used a 25 mm (1") two flute bosch bit for this. It did ok up to about 1 mm cut depth, but less was better. I have a 3/4" bowl bit I might try next.
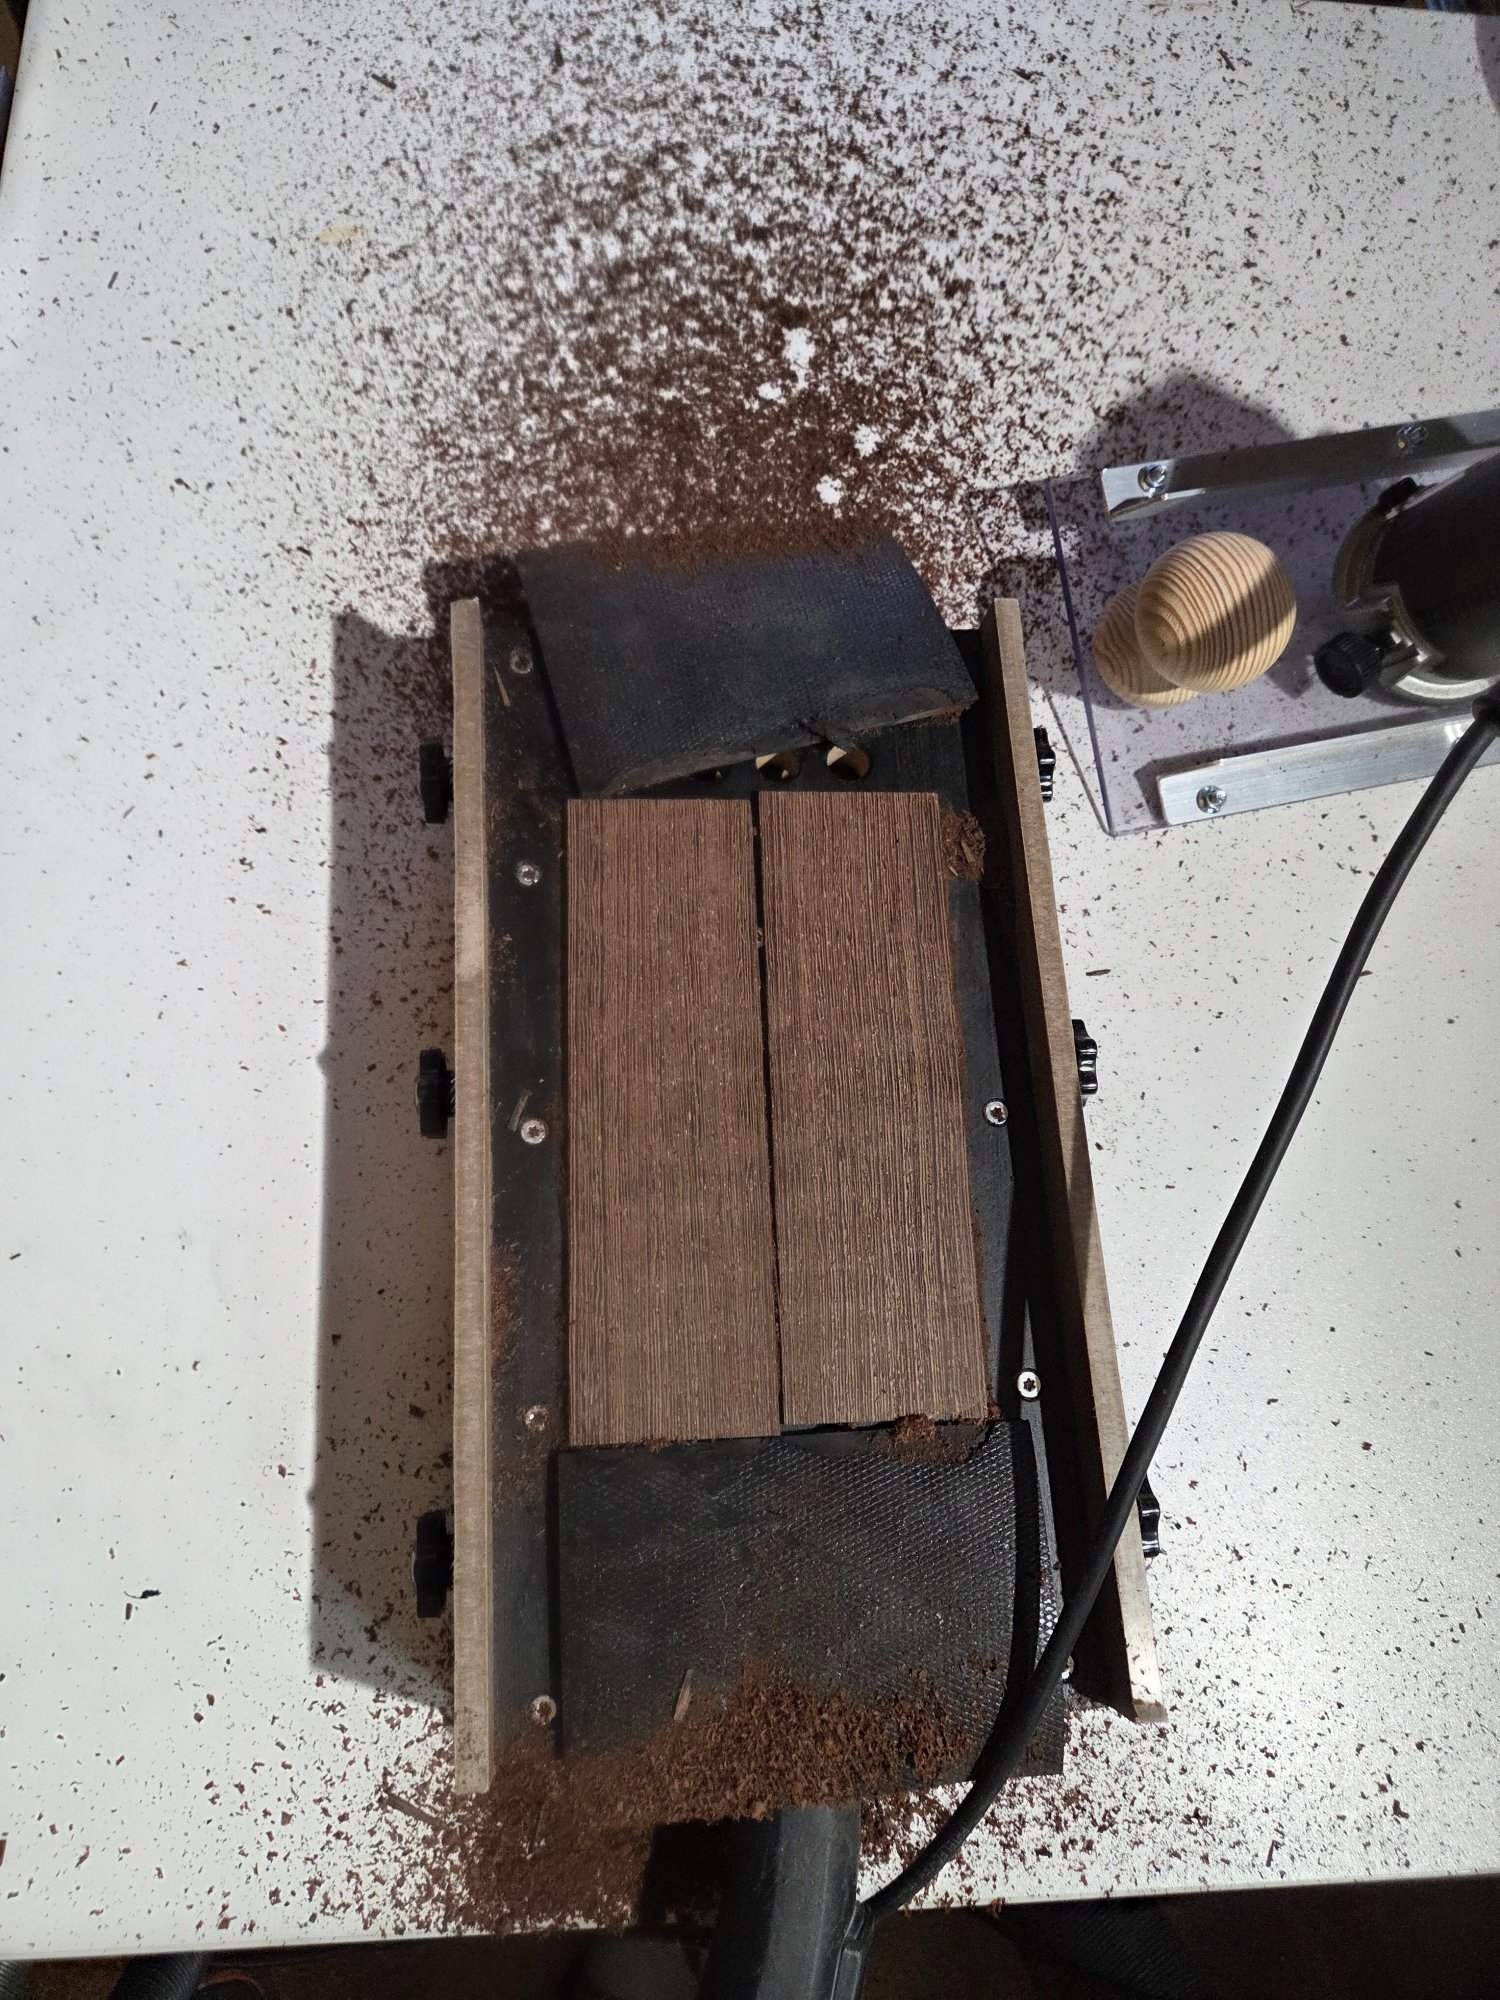
Anyways the cut quality was good and the parts stayed put as long as I wasn't forcing the bit. I cut some 4 mm soft rubber to cover the extra holes. I plan on using these again.
The dust extraction worked ok on the smaller particles, which is more important. The bigger shavings landed somewhere in the proximity.
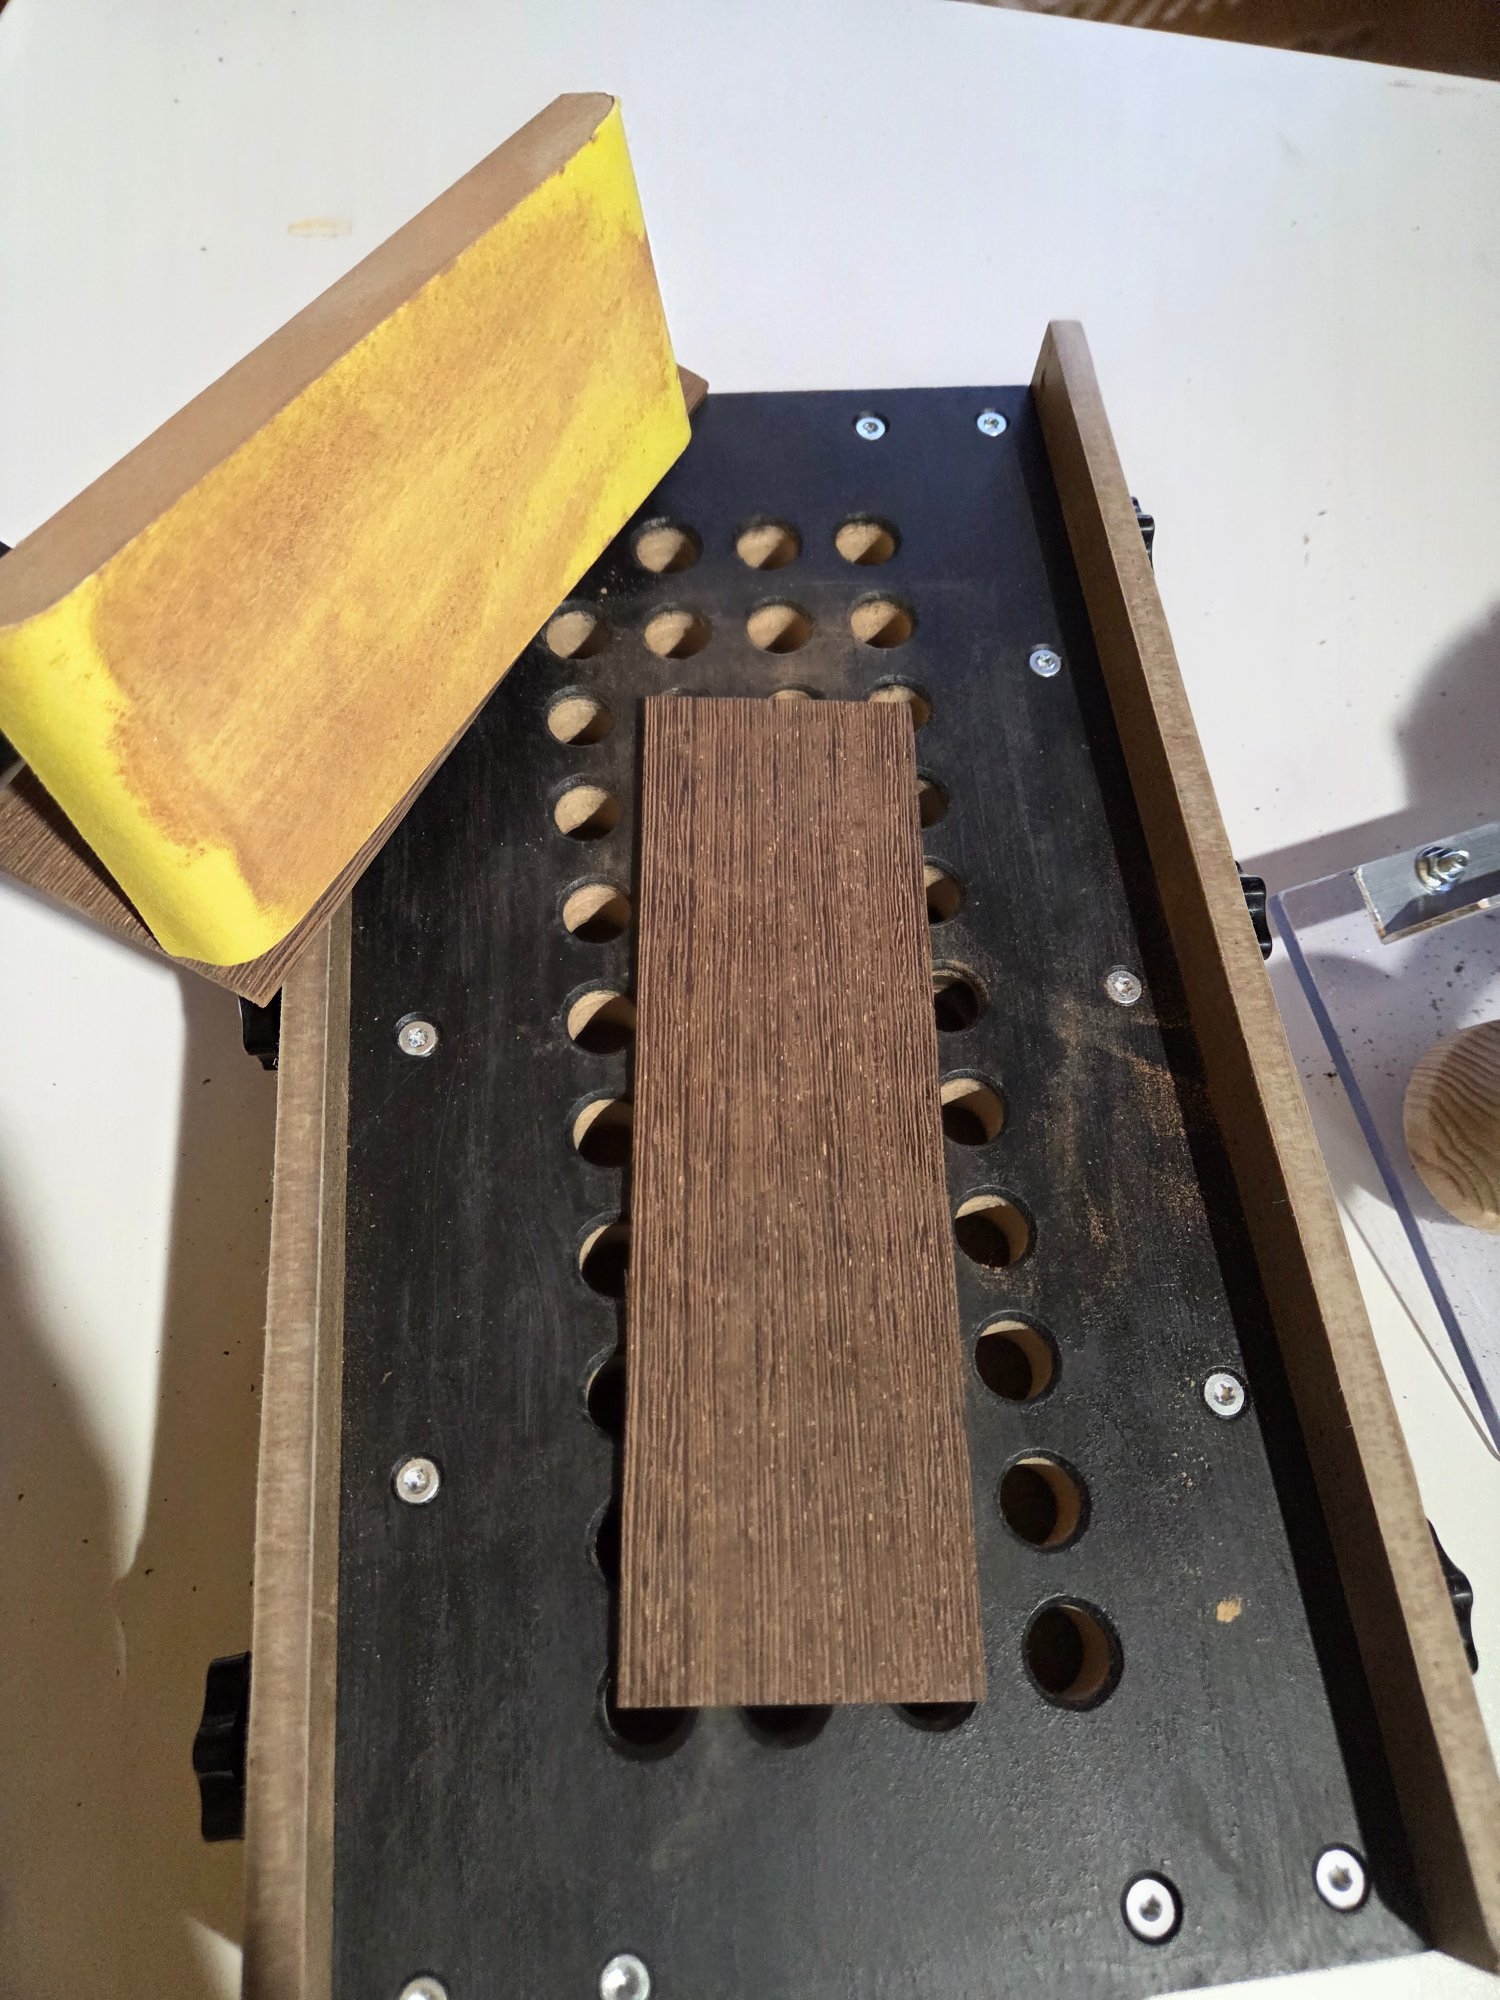
I tried it also as down draft table when lightly sanging the veneers after routing. It works, but I have to choose between the vacuum or the dust extraction. Not enough suction for both.
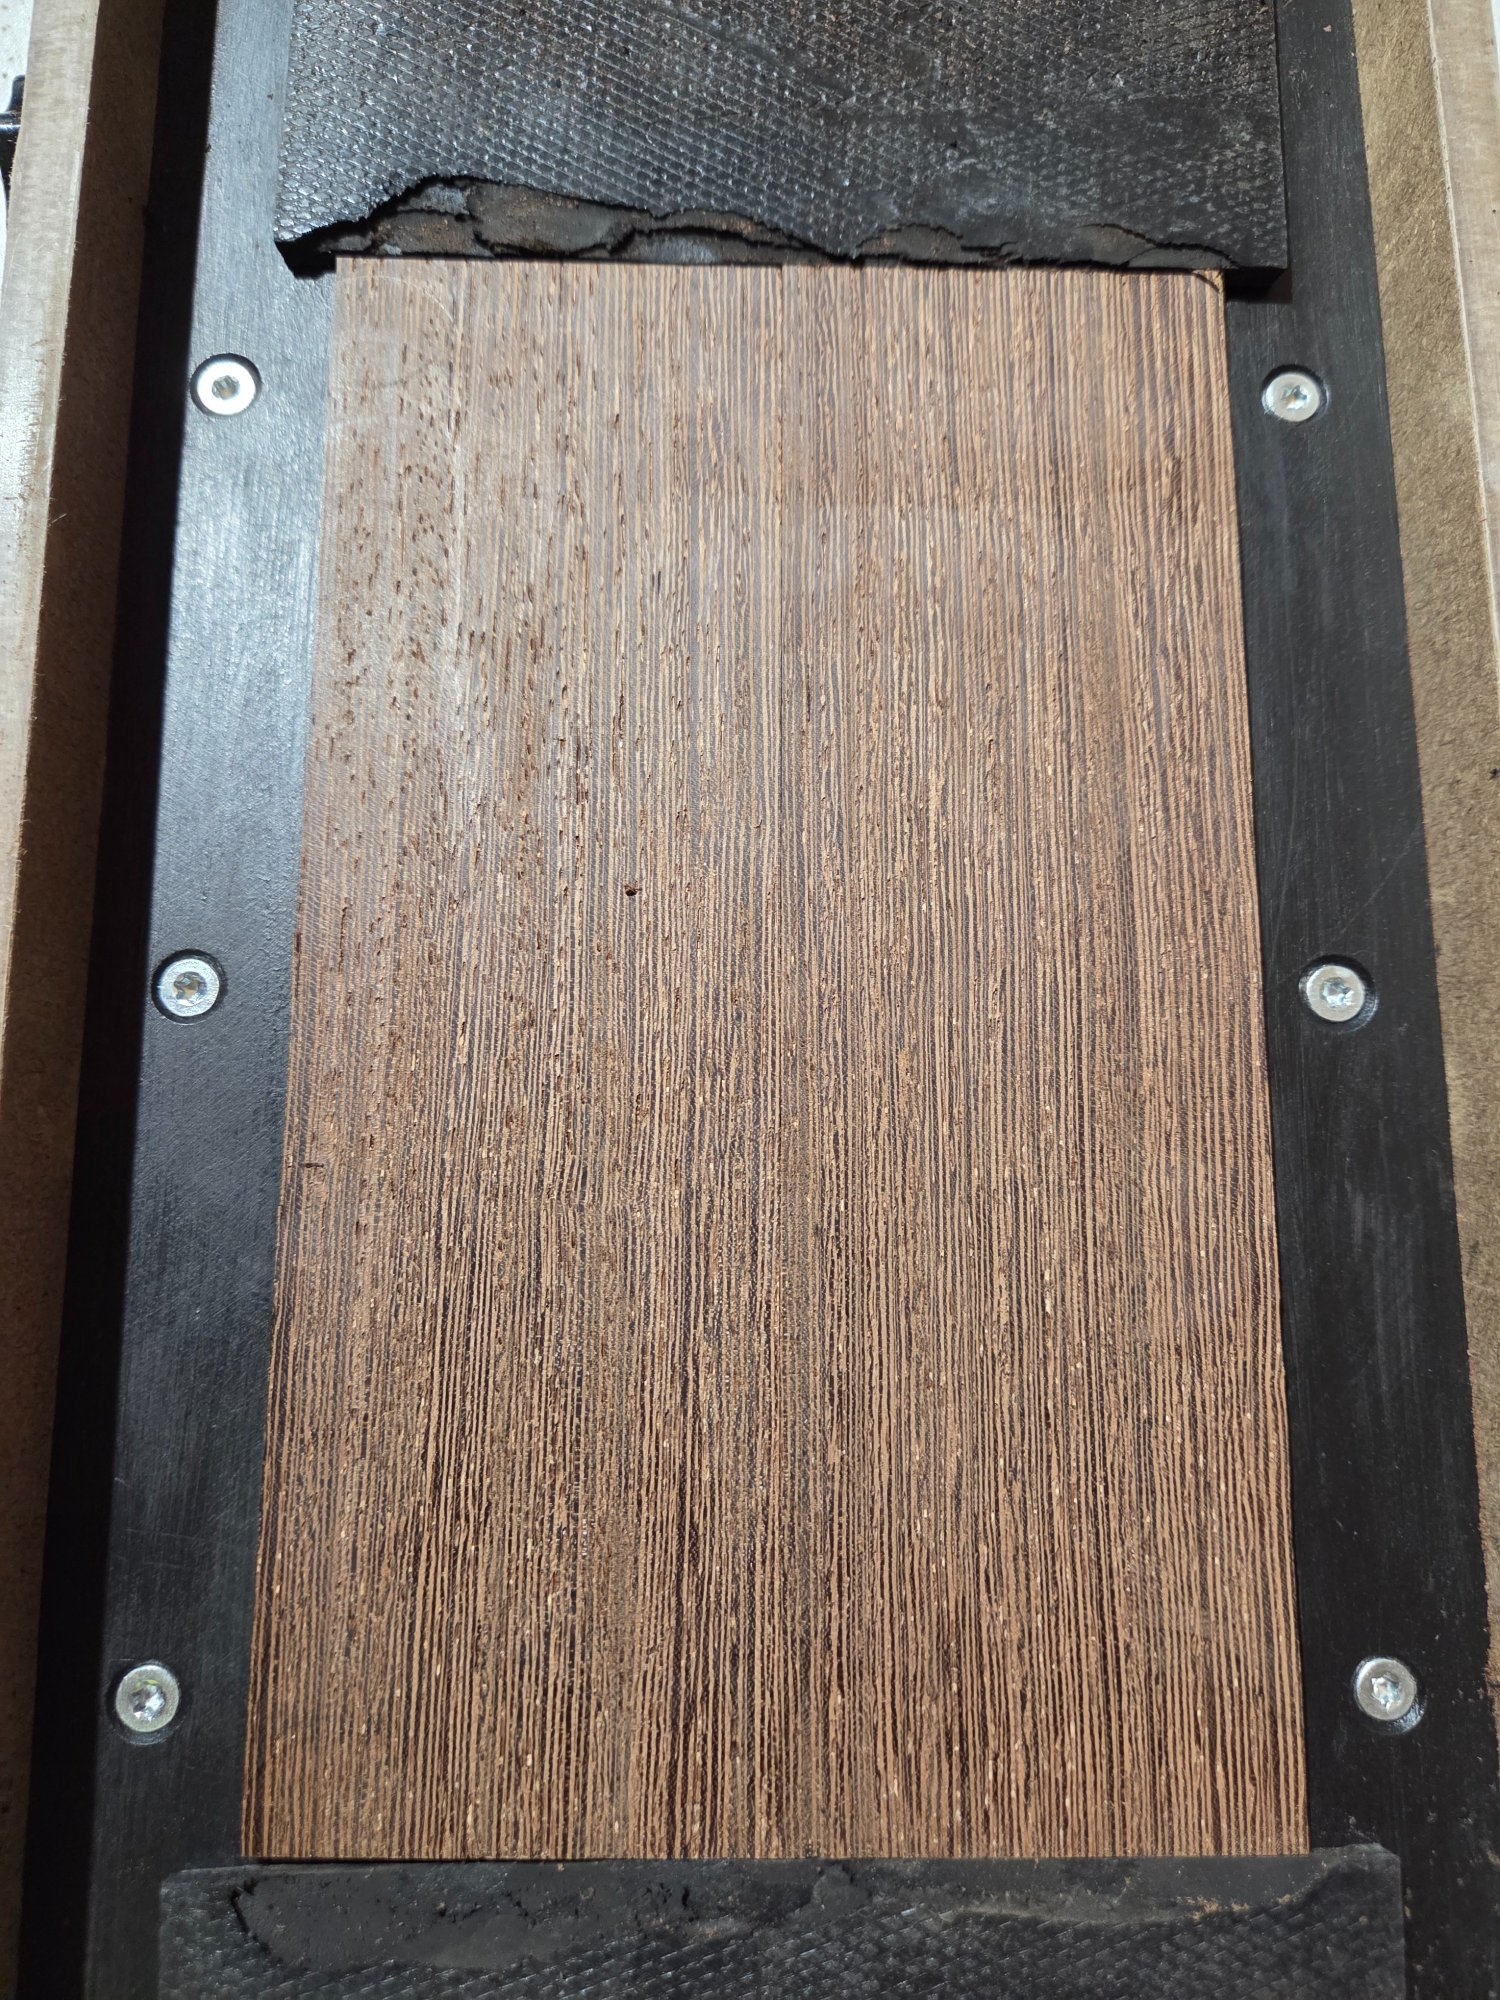
Anyways the final result is great. I believe I'll get some mileage on this in the years to come.
I used a 25 mm (1") two flute bosch bit for this. It did ok up to about 1 mm cut depth, but less was better. I have a 3/4" bowl bit I might try next.
Anyways the cut quality was good and the parts stayed put as long as I wasn't forcing the bit. I cut some 4 mm soft rubber to cover the extra holes. I plan on using these again.
The dust extraction worked ok on the smaller particles, which is more important. The bigger shavings landed somewhere in the proximity.
I tried it also as down draft table when lightly sanging the veneers after routing. It works, but I have to choose between the vacuum or the dust extraction. Not enough suction for both.
Anyways the final result is great. I believe I'll get some mileage on this in the years to come.


