• TalkBass has been independent since 1998. Add your voice.
    Create a free account to reply to discussions, view embedded media, and browse with fewer display ads.
    Join freeLog in
    Want zero display ads or expanded classifieds tools? Compare plans.

The Hossenfeffer II Build

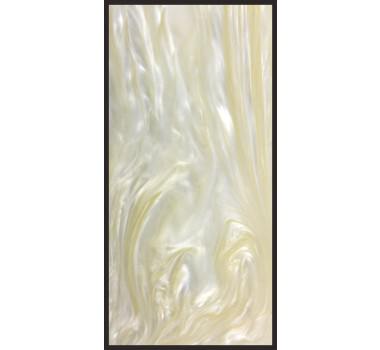
Here's another Kirinite option for inlays, the "antique pearl", think it might go better than white pearloid in a walnut bass?

This:
LTNp8ys.jpg


Vs. This:
fUcHWHW.jpg


This is the white Kirinite used for a pickguard:
 
Could you use something like this metal sink tailpiece and hold it in a vice and heat with a heat gun or torch and use that to bend the binding on? I’ve seen that setup used to bend wood on the cheap. I don’t know if it would work on binding but if you already have a way to heat it, it’s an inexpensive investment to try. Just get the one with the extension for a garbage disposal so you have the smaller diameter. You could probably squeeze the pipe into an oval shape for a tighter radius also. Just a thought.

EECD2956-7D28-4931-B819-945B32983BC8.jpeg
 
  • Like
Reactions: Gilmourisgod
As an Amazon Associate, TalkBass may receive commissions from qualifying purchases made via links on this site.
  • Like
Reactions: Gilmourisgod
Hey Alex
I've tried the various sheet materials, but prefer crushed mother of pearl...
I use this, with West Systems epoxy:
https://www.amazon.com/gp/product/B01LXO9QCE/ref=oh_aui_search_detailpage?ie=UTF8&psc=1

Matches perfectly with the original 60's material. Bonus points as it's real pearl and is inexpensive.

Mike and Ike, we think alike! I have that exact stuff in my Amazon shopping cart, haven't pulled the trigger because I wan't sure how it would look in person. Got any photos of a completed inlay, or tips on best process?
 
As an Amazon Associate, TalkBass may receive commissions from qualifying purchases made via links on this site.
The method that works for me, is to dam up the sides of the board and put tape (blue painters or similar) on the face to protect the board.
Coat the entire cavity with the epoxy (West 105/206), then add the MOP flake in layers with poured epoxy. Make sure the flake is embedded, and not loose.
If you cover the sides of the cavity with enough MOP, you don't have to paint them like some others do.
Stop when you have good coverage, and leave a layer (1/16" or so) of just the epoxy on the surface. This allows you to sand/polish in your radius, without any flakes caught at the surface.

I've done this a couple of times, and recently did this on my 1968 4001 to repair a missing section of inlay. The repair and original section are a perfect match.
I'm in the middle of moving now and don't have access to my photo library, but will post a pic for you when I can.

Nice work on this build Alex!
 
  • Like
Reactions: Gilmourisgod
Thanks @xsubs
I have a scrap mahogany blank test piece I cut the triangular slots in as a test on the HF 1, perfect test bed for trying this out. I was planning on painting the sides of the slots, I had a couple things faintly show through the inlays on HF 1, shoulda back-painted them. My West hardener has gone a bit “pink” on me. Still works fine, but it’s got a definite pink or amber tint when dry, I might get some water clear epoxy like Envirotex instead. If you find some photos, I’d love to see your results.
 
My West hardener has gone a bit “pink” on me. Still works fine, but it’s got a definite pink or amber tint when dry, I might get some water clear epoxy like Envirotex instead.

When I was filling gaps on my lined fretless torrified maple neck with ebony fingerboard, some epoxy dripped down the side onto the unfinished maple and got spread thin when I hastily wiped it. After it had dried the neck had a distinct pink tone where the epoxy had dried. But my West System materials are pretty fresh, and I've never seen that occur anywhere else on the build.

Just wondering if maybe the color has migrated from the wood itself...do you think it is possible?
 
Finally got a chance to work on this thing, been a hot, unproductive summer so far. I found a lovely 7/8" thick figured bubinga plank at Gilmer Wood, enough for 4 fingerboards, hopefully. I love this stuff!
Vl4Pd8X.jpg


Cut and planed part of it down to 3/8" thickness, I'll mail it to LMI for fret slotting unless I can find a good place to do it for less. Still haven't tried my hand at fret slotting, and with my tiny output, not really worth building a jig for it.
yPucejD.jpg


The Mummy Returns! After multiple attempt, finally got the top "hook" binding pre-bent by the simple expedient of wrapping it around a 7/8" dowel under heat. I dissolved some binding in acetone and goobered the miters, hides all sins....
zX0LMDd.jpg


The end result after some scraping and sanding, pretty happy with it, another first for me.
FwKwpbo.jpg

z0DiOiL.jpg

wxyuDEZ.jpg

RsnLiM0.jpg

1IIHJtW.jpg


Next up... Glitter Triangle Inlays! Whoot!
 
Thanks @Rôckhewer! That’s your donated figured walnut on the headstock, that’s really going to pop with some oil on it. Fingerboard blank off to LMI for slotting tomorrow. The Bubinga came with a coat of what looks like shellac sealer on it, so I slapped a coat of de-waxed shellac on the new planed and cut edges. I do NOT want it cupping on me in transit!
 
  • Like
Reactions: AGH and Rôckhewer
After 4 months of complete inactivity on this build, we commence.....

Failed Crushed MOP Inlay Attempt #1
HN1QGcu.jpg

I found this crushed flake MOP on Amazon, also the Castin Craft "Opaque" (it isn't) epoxy colorant. The idea was to mix the pearlescent colorant with West system epoxy and paint it into the bubinga FB triangle routes to create a pearly white background that the MOP could then be adhered to in layers, the goal being to make sure none of the reddish bubinga shows through at the inlays. I quickly realized that I'd probably have to mix to whole bottle of the Castin Craft pigment to get anything approaching "opaque". This stuff can be used to tint polyester, I'm wondering if I can just use the white gelcoat pigment, or even a cream colored oil paint? Will epoxy stick to oil paints? Where you see the lack of a background is along the vertical edges of the inlay route, that has to be a clean white or cream background.

Having failed to produce an opaque background, I figured I'd just try the MOP flake anyway in this test piece, which is just a cutoff from the fret slotted fingerboard. I like the scale of the flakes, but it's too big to walk up onto the sides of the inlay routes. The same company makes a crushed MOP in finer ground flakes, or maybe I just throw some of this stuff in a coffee bean grinder? I didn't bother sumerging this in clear epoxy, it's clearly not going to look right yet.
8wzYdqL.jpg


Speaking of epoxy, using the West System with metered pumps is going to be too wasteful, plus it seems to develope a ton of bubbles mixing it, and looks way to amber for my taste. I think I'll try one of the 1:1 ratio water-clear epoxies instead. Any tips on how to keep the bubbles out of it? Once I get the background issues sorted, I figure out how to dam the slots so the finished clear epoxy ends up slightly prroud of the slots prior to radius sanding the whole board. I've seen people use foam double-stick tape.
 
Any tips on how to keep the bubbles out of it?
Mix it in a vessel like a small mason jar ...that will take vaccuum pressure. Then rig a lid with a vaccuum line.
Suck the bubbles out. ;)

I have seen it done like that in a small vaccuum chamber... appears to work very well.
The epoxy looks like it's boiling for a minute....

The mason jar is my idea...:D
 
  • Like
Reactions: Gilmourisgod
After 4 months of complete inactivity on this build, we commence.....
Speaking of epoxy, using the West System with metered pumps is going to be too wasteful, plus it seems to develope a ton of bubbles mixing it.... Any tips on how to keep the bubbles out of it?

Heres How I did mine

Step 1)
Pour a little straight epoxy into the cavity you are filling. Not a lot, just enough to work into all of your right angles. Bubbles seem to get trapped in those corners and tend to rise after you de-bubble it.

Step 2)
With a pre-made mixture of epoxy and crushed MOP fill your cavities about half way full. The mixture should be have alot of crushed MOP in it

Step 3)
De-buble by lightly passing torch over pored mixture (see pic) and make sure all bubbles have risen to the top and popped

Step 4)
Fill the rest of the cavity with epoxy only

Step 5)
Repeat Step 3 to get bubbles out

Step 6)
Radius FB as required

Step 7)
Seal FB. If you don't do this, you'll get your white swirl remover in all the little pores. There are other ways to prevent this. proceed how you best see fit

Step 8)
Polish out epoxy

It's good that you are running some experiments

Cheers

20181103_192843.jpg
 
Heres How I did mine

Step 1)
Pour a little straight epoxy into the cavity you are filling. Not a lot, just enough to work into all of your right angles. Bubbles seem to get trapped in those corners and tend to rise after you de-bubble it.

Step 2)
With a pre-made mixture of epoxy and crushed MOP fill your cavities about half way full. The mixture should be have alot of crushed MOP in it

Step 3)
De-buble by lightly passing torch over pored mixture (see pic) and make sure all bubbles have risen to the top and popped

Step 4)
Fill the rest of the cavity with epoxy only

Step 5)
Repeat Step 3 to get bubbles out

Step 6)
Radius FB as required

Step 7)
Seal FB. If you don't do this, you'll get your white swirl remover in all the little pores. There are other ways to prevent this. proceed how you best see fit

Step 8)
Polish out epoxy

It's good that you are running some experiments

Cheers

View attachment 3202541

I think this is correct. On doing epoxy fills on tables. You just do small layers of epoxy, and use heat to help bring the bubbles up.
 

Latest posts