• TalkBass has been independent since 1998. Add your voice.
    Create a free account to reply to discussions, view embedded media, and browse with fewer display ads.
    Join freeLog in
    Want zero display ads or expanded classifieds tools? Compare plans.

Winter Build Off 2026 - 18 Years in the Making

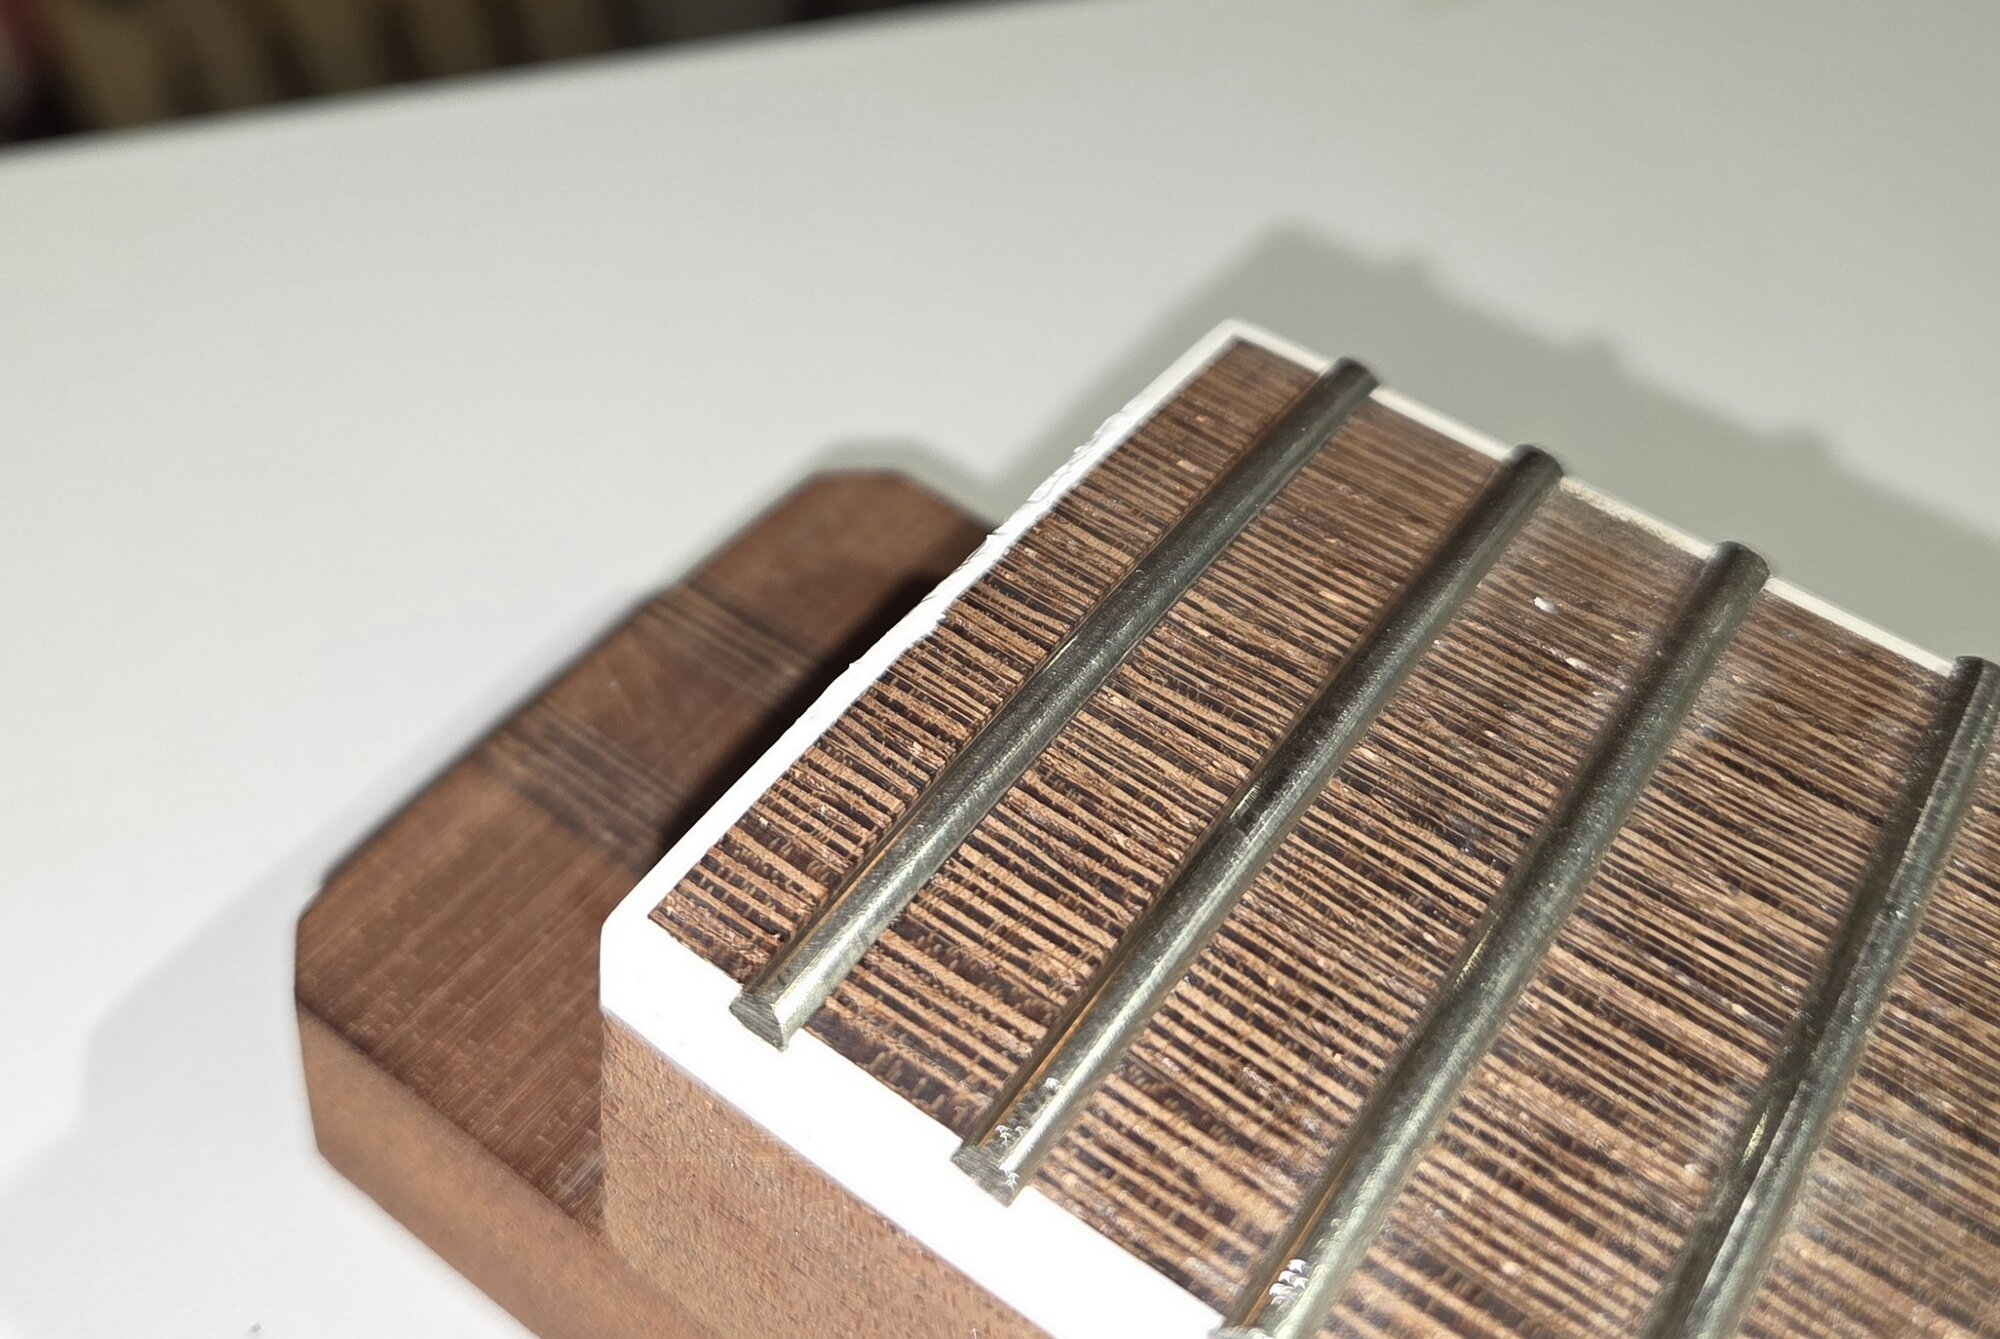
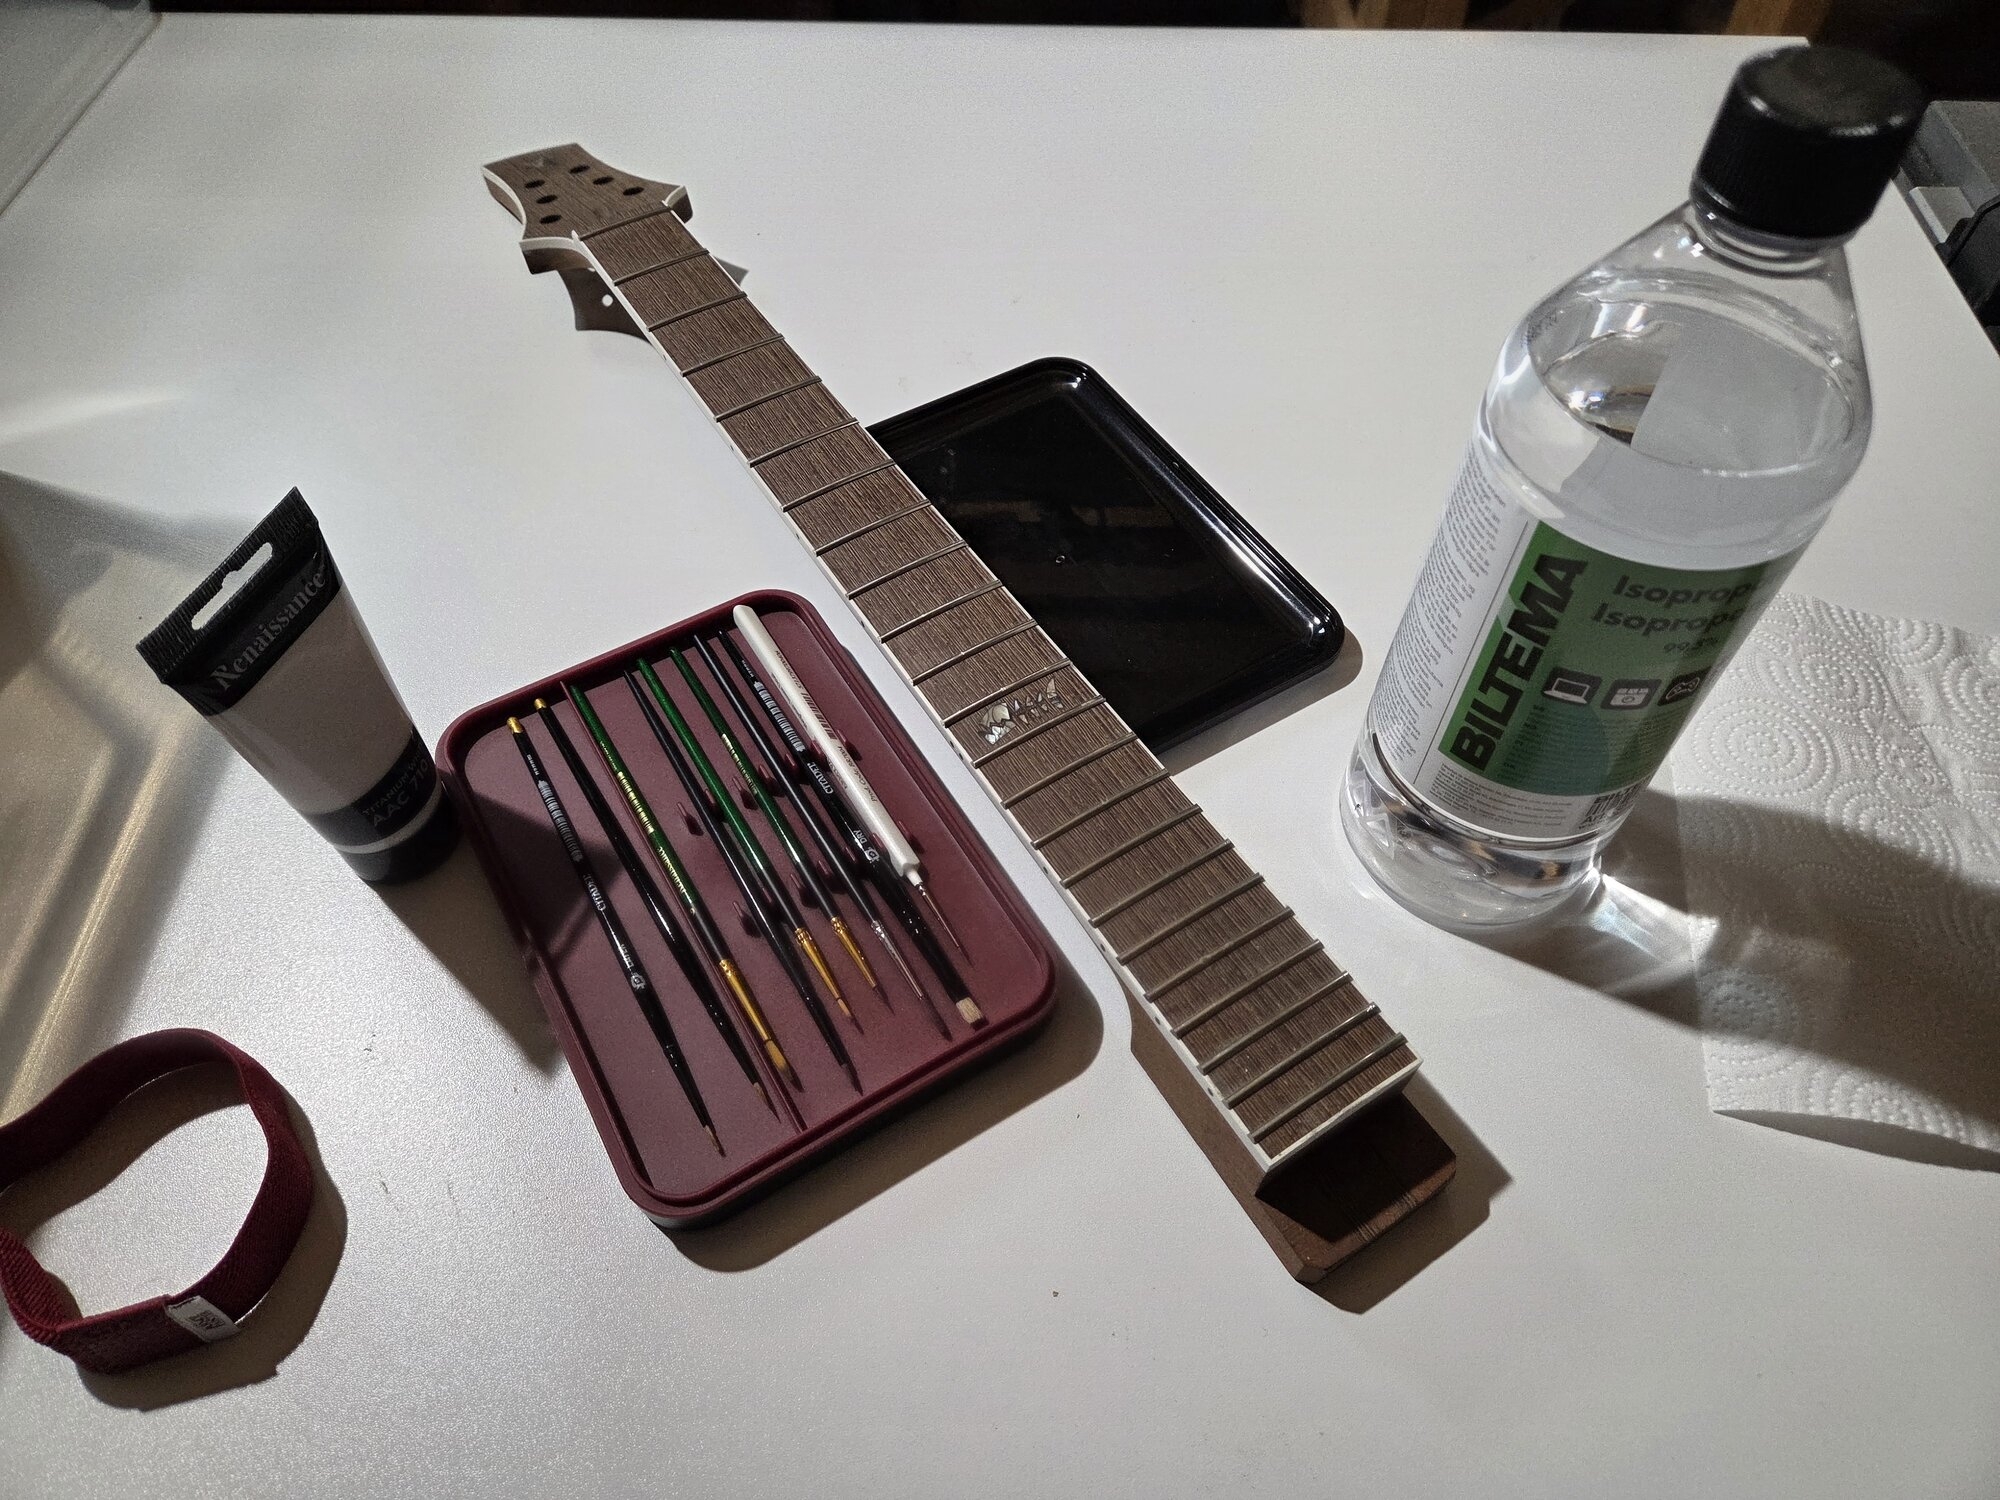
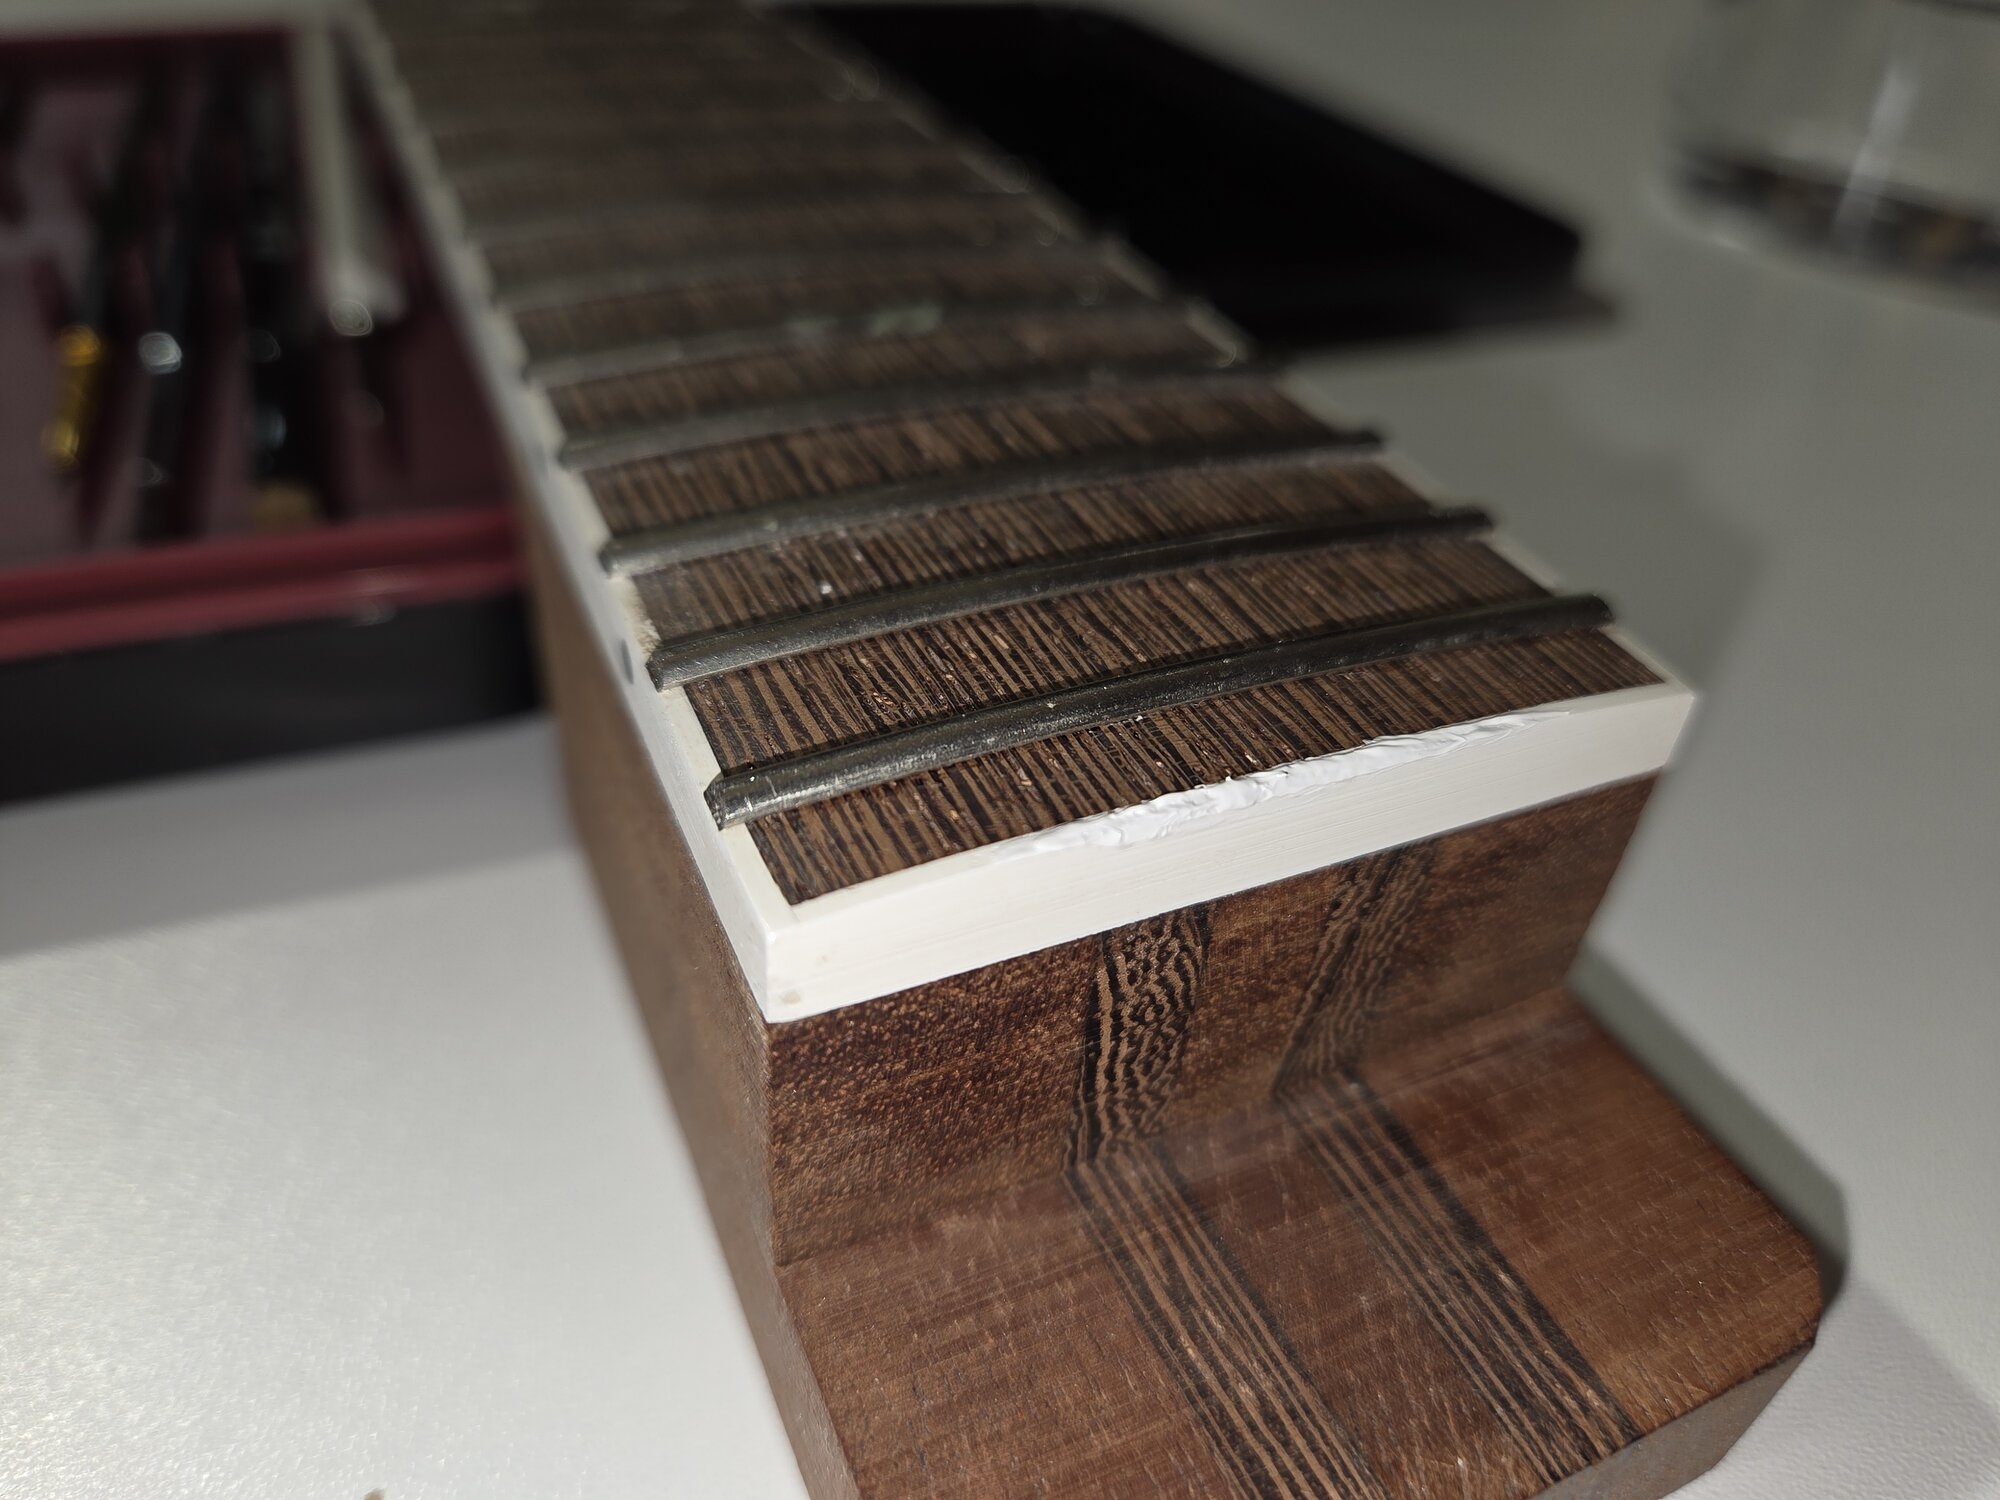
So I decided to try the acrylic. I dug out the mini painting set we haven't used much lately.
20260206_195019.jpg

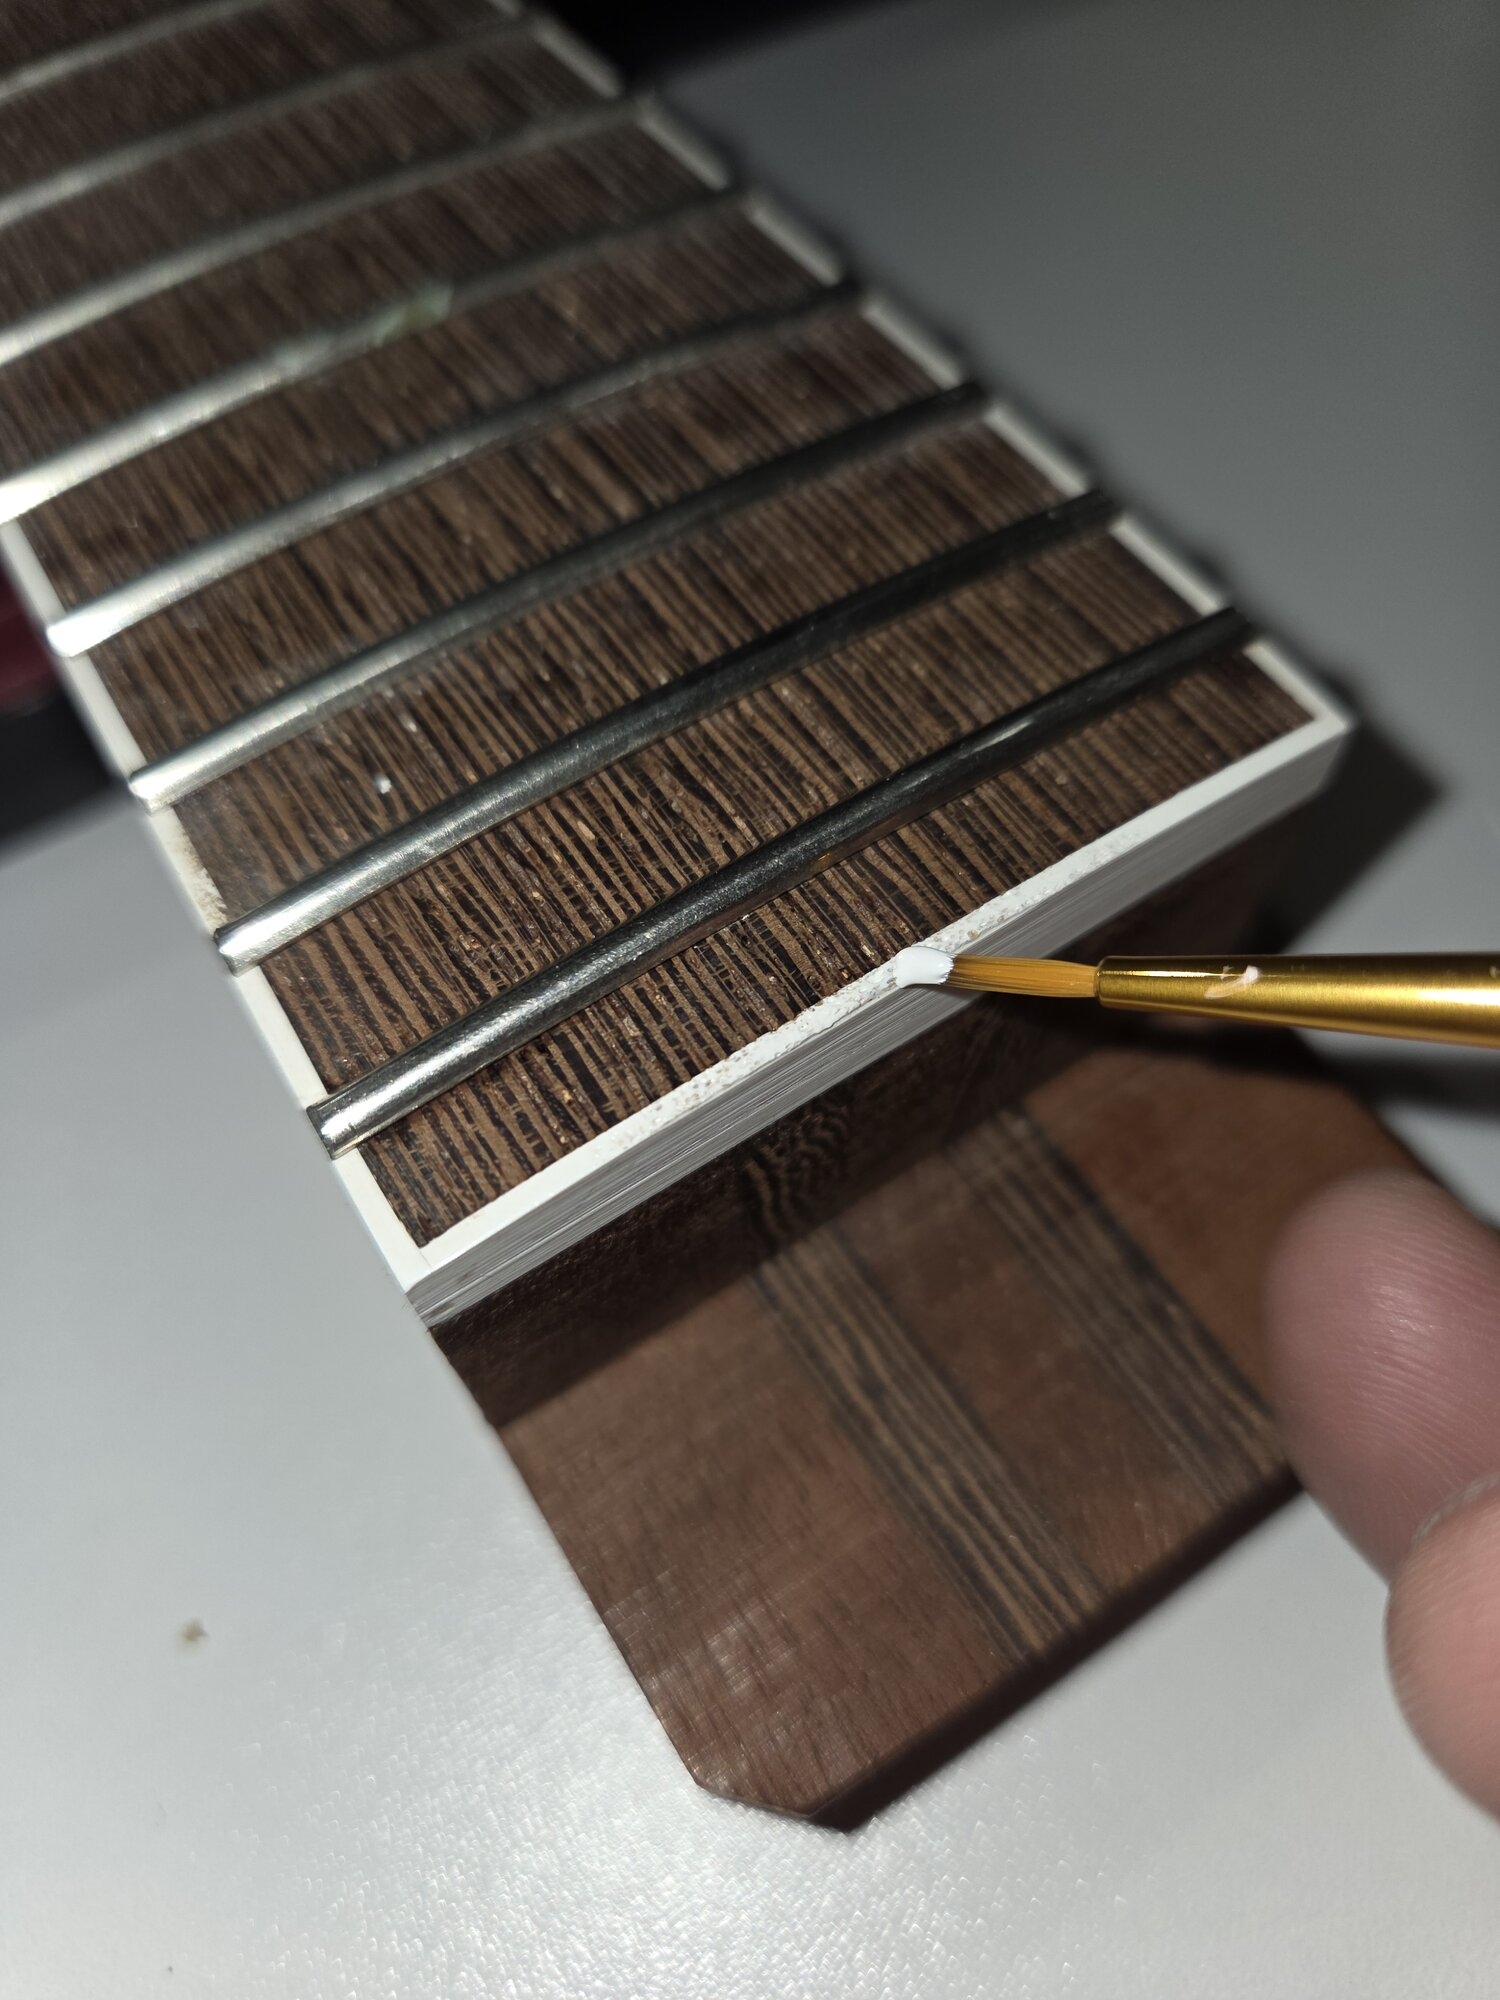
Then cleaned it with some ipa. No hoppy stuff this time but isopropanol or isopropyl alcohol. This stuff is not for drinking. It didn't melt the binding, which was nice. I started to build a layer of acrylic.
20260206_195527.jpg

I can do a few rounds this evening and sand tomorrow to see how it actually went. The paint is a little brighter white than the binding but hopefully not too much.
20260206_200047.jpg

20260206_200325(1).jpg
 

Attachments

  • 20260206_200325.jpg
    20260206_200325.jpg
    760 KB · Views: 16
20260215_193236.jpg

Well it did work. Eventually. The day after the last post I was pretty sure it would not. The paint was too soft and gummy, even if it felt it had hardened decently.

But the thing is it's paint. And like many that are based on evaporation, it creates a film on top while the inside remains elastic. I had tried to build it up too fast. So I gave it a couple of days, sanded it lightly and redid it. And again. And again. It took about 4 runs and a week to get it filled. It didn't take more than 5-10 minutes per sanding and reapplication which was nice. Besides I didn't have more time to work on this anyways.

But I'm glad it worked.
 
Last edited:
So onwards with it. I thought I might just proceed with the neck before I find anything else to fix. I got some of that gold Mirka stuff and went on with the grits.
20260215_193324.jpg

I went up to 320, wetted the grain and stopped at 400. Did not take pictures of every piece of the sandpaper. Even if it's indeed lovely stuff. I rounded all sharp edges until my sensitive fingertips were satisfied.
20260216_204413.jpg

Then I taped the heel so I wouldn't get finish in the neck joint. I first did a negative while the neck was on the body, then used that as a guide to do the final line about 2 mm in the body.
20260216_205332.jpg
20260216_205237.jpg
After this I wiped the whole neck with the ipa a few times until I didn't get much red mahogany dust on the towel. When the alcohol had evaporated I put the neck in the vice and put on the first coat of Liberon's Finishing Oil. The change in colour was once again very dramatic.
20260216_214743.jpg

I pretty much work the same way with this stuff every time. The first coat I wipe on a few times without actually flooding the surface. When it feels it's saturated (or gets tacky on bigger surfaces) I wipe it with a dry rag. It has a relatively high solids content and builds up quite fast. Doesn't usually take more than 3-4 rounds to final coat. And I do it once a day.
20260216_221226.jpg
 
Last edited:
20260217_180010.jpg

I was really tempted to leave it at one coat. I rubbed it with a grey Mirka pad (scotchbrite). The feel was great and most of the neck had a nice satin sheen. But there were areas that could use a bit more.
20260217_180105(1).jpg

20260217_180119(1).jpg

The fingerboard was a bit lighter as it had no finish on it. I also liked what the oil did with the paua inlay on the headstock. So I put the second coat on the fingerboard as well, trying to keep the amount of oil as low as I could and still get it distributed evenly.
20260217_181128.jpg

The oil made the inlay to pop nicely. Unfortunately it also showed me a fair amount of imperfections, scratches and a deeper, although small dent on the fingerboard surface. That stuff is not easy to get rid off between the frets.

Honestly I might not even try to do much. Others will propably not notice. And I can live with a lot more nowadays than I could 20 years ago.
 
Last edited:
I don't know how many of you are familiar with Liberon's Finishing Oil. Or on it's availability overseas. The stuff is easy to use and requires less coats than say a danish oil.

I would propably call it an oil based varnish. Or maybe it's closer to an oil and varnish blend. Of course Liberon does not say what's in it. The smell is close to danish oil.

You can build a film with it. The film isn't that hard but it does offer decent protection. I did our kitchen counters wit this stuff. It resists water, oils and staining very well. Dents and scratches less so. And it's easy to redo.

Some of the oils evaporate or polymerize slowly. The surface will look less oily after a few months. It can make some imperfections like glue joints more visible. But all in all, I think this is good stuff. It's versatile and easy to use. And fast.
 
Last edited:
  • Love
  • Like
Reactions: BishopJP and Lo-E
Almost forgot. I did go through the frets and hammered them gently in with a nylon mallet. It did work on all except the 11th. After inspecting it a bit closer I found it was twisted counter clockwise from the center to the low E side.

I almost removed it, but thought to try and give it a little cold forging treatment. What harm could that do, huh? And turned out it didn't, luckily. Tapping it gently and firmly with a small steel hammer for a few dozen times got rid of most of the twist and it seated a lot better.
 
I don't know how many of you are familiar with Liberon's Finishing Oil. Or on it's availability overseas. The stuff is easy to use and requires less coats than say a danish oil.

I would propably call it an oil based varnish. Or maybe it's closer to an oil and varnish blend. Of course Liberon does not say what's in it. The smell is close to danish oil.

You can build a film with it. The film isn't that hard but it does offer decent protection. I did our kitchen counters wit this stuff. It resists water, oils and staining very well. Dents and scratches less so. And it's easy to redo.

Some of the oils evaporate or polymerize slowly. The surface will look less oily after a few months. It can make some imperfections like glue joints more visible. But all in all, I think this is good stuff. It's versatile and easy to use. And fast.
I used Liberon on some walnut furniture pieces I made last year, but with a little poly mixed in. I think I used 2 or 3 coats?
Might try it on a guitar one of these days.
 
  • Like
Reactions: Bonkersville
The second coat was mostly enough. The back of the headstock felt like it could use one more layer. And the fingerboard needed a second one. So I redid just those. I didn't feel like taking the same photos again. And didn't have any ideas for new angles.

Maybe this will be enough and the neck will be ready for some fretwork. It has been a long time since I did a whole fretboard. I'll propably let the oil cure completely before taping the fretboard. Gives me a little time to see if I can find all the tools somewhere. Well just files. And not that many.
 
I also ordered some stuff. Like white abs binding, a set of quality nut files, the bridge, electronics etc. I'm pretty excited about the files. Never actually tried a proper nut file.

I'm still wondering about the tuners. I like the Hipshot ones with visible gear. I usually favor locking but really fancy the lightweight open backed ones without the locking nut.
 
Ok, the neck is finished. Has been finished? Has got enough finish on it. The fretboard is not awesome but it'll do. It would've been a lot smarter to do before hammering the frets in. Or just use different finish (oil).
20260219_191411.jpg

I do (again) work the layers the same way: after it has cured, I scuff it with the grey Mirka pad and either do another layer or rub it to a sheen with a cotton towel. Doing this between the frets was not easy. It's doable but hard to get even results. I'll get back to it after the fretwork is done.

I also noticed new marks on the fretboard. And traced them back to a titanium ring on my left ring finger. It's big and has quite sharp edges. I should propably remove it when doing this kind of work...
20260219_191224.jpg

Otherwise I'm quite happy with how the neck looks. I really dig the quartersawn wenge. But I've been a fan of that stuff for a long time.
20260219_190904.jpg

The blue tape worked. It kept the oil out of the neck joint. This was not the best quality tape and left a lot of glue on the bare wood. A little ipa took care of that. But it seems not all blue tape is created equal.
20260219_190826.jpg

Next inline is the fretwork, nut and trussrod cover. But I think I'll let the oil cure for some time and concentrate on the other end of the instrument.
 
Last edited:
I dug a little in the ancient luthiery stash and found a piece of brass I can use for the nut. I plan to make it thin. This has a zero fret, so the nut will just be used for string placement. I might still use bone though, since it goes well with the white binding.
20260219_230706.jpg

I also found the original headstock and neck joint templates. It seems the original design for the headstock was even smaller.
20260219_230730.jpg

Apparently I have nailed the jig together. And used masking tape to protect the top. I have also adjusted the angle with a few layers of tape.
20260219_230815.jpg

The neck joint jig was a good find. I can use this when determining the angles for the pickup rings etc. It's easier than measuring the neck pocket or making a t-block to transfer the angle on a piece of something. Which I had already planned to do.
 

Attachments

  • 20260219_230730.jpg
    20260219_230730.jpg
    1.1 MB · Views: 20
Last edited:
It seems to be about six weeks since my last post. Partly due to other things taking all the little free time I had.

But some of the reason was I didn't expect Schaller to build bridges on my order. Or at least that's what the timeline felt like. When I ordered it they said one to two weeks. It turned out to take six. But other than a bit of planning I would not have done much with it. So I don't hold a grudge.
20260402_215212.jpg

And it's a pretty bridge. Very nicely made as all the Schaller stuff has been. At least the parts I've had. Anyways I test fitted all the bits and pieces before going further. So far so good.
20260402_195746.jpg

When I got the bridge I was slightly amused with the size of the box, which could easily fit ten of these in bubblewrap. But it's just the right size for all the body end hardware and electronics. And, of course, the box is also nicely made.
20260402_200433.jpg

And I also actually built a little. I took some 8-9 mm plywood and made rough mockups of the pickup ring, the bridge plate and the tailpiece. The relatively new simple crosscut sled worked nicely.
20260402_204958.jpg

These pieces are just to help determine the proportions. Although I do plan to keep the shapes relatively simple. I might move the volume pot to allow for a longer bridge plate and a less cramped up feel. But we'll see.
20260402_205156.jpg
 
It seems to be about six weeks since my last post. Partly due to other things taking all the little free time I had.

But some of the reason was I didn't expect Schaller to build bridges on my order. Or at least that's what the timeline felt like. When I ordered it they said one to two weeks. It turned out to take six. But other than a bit of planning I would not have done much with it. So I don't hold a grudge.
View attachment 7465786
And it's a pretty bridge. Very nicely made as all the Schaller stuff has been. At least the parts I've had. Anyways I test fitted all the bits and pieces before going further. So far so good.
View attachment 7465782
When I got the bridge I was slightly amused with the size of the box, which could easily fit ten of these in bubblewrap. But it's just the right size for all the body end hardware and electronics. And, of course, the box is also nicely made.
View attachment 7465783
And I also actually built a little. I took some 8-9 mm plywood and made rough mockups of the pickup ring, the bridge plate and the tailpiece. The relatively new simple crosscut sled worked nicely.
View attachment 7465784
These pieces are just to help determine the proportions. Although I do plan to keep the shapes relatively simple. I might move the volume pot to allow for a longer bridge plate and a less cramped up feel. But we'll see.
View attachment 7465785


I used one of those Schallers on the multiscale guitar I finished last year and there's supposed to be another one in the mailbox now. Both guitars have wider necks and standard spaced tune-o-matics just don't have enough spread. It's a nice bit of hardware.
 
As I said in some post before I plan to make wenge pickup rings and covers. Or more precisely, at least wenge veneered. I don't have a clear vision on how they will be made. But I firmly believe they will be.

The first method I came up with was a plywood core for the rings with white bonding and wenge veneer on top. And black plastic covers with wenge veneer. I have a couple of extra covers to mess around with.

I started the prototyping with the pickup rings. I cut the parts with the crosscut sled. The pen with the piece of doublesided tape is there to keep the saw from inhaling the small parts.
20260403_185359.jpg

I adjusted the fit until I was happy and glued the rings together. I always save some of the backing paper from the wider double sided tape. It's good for protecting surfaces with glueups like these. And sorry, no clamps involved.
20260403_192542.jpg

20260403_193630.jpg

After they had a while to dry I scraped the excess glue and test fitted them. The neck pickup ring will actually be cut open to fit the neck as the pickup will butt up against the end of the neck. But I'll do that last.
20260403_210446.jpg

I made a longer version of the bridge plate model. I think I'll go with that. Well not quite tha, but a similar length. The pots will fit ok a bit lower. Besides I don't use the volume pot that actively while playing. And can't stand the ones that are too close to the bridge.
 
Last edited: