
Enjoy the benefits of a premium membership!
Upgrade Account
-
TalkBass has been independent since 1998. Add your voice.
Create a free account to reply to discussions, view embedded media, and browse with fewer display ads.
Join free Log in
Want zero display ads or expanded classifieds tools? Compare plans.
You are using an out of date browser. It may not display this or other websites correctly.
You should upgrade or use an alternative browser.
You should upgrade or use an alternative browser.
5-String Fanned Hybrid Headless
- Thread starter Dave Higham
- Start date
More options
Who Replied?

There isn't a single spec of dust in any of your pictures.
Have you noticed a sheet of kraft paper in a lot of the photos? It's usually covering up the junk! And I do try to clean a little space for the photo.
I recall that particular adjustment tool being commonly referred to as a Raleigh Wrench
Hadn't heard that one. We sometimes used to say things looked as if they'd been assembled with a 'Manchester screwdriver'.

Tell me, is there some magic vacuum cleaner following you around all the time. There isn't a single spec of dust in any of your pictures, except for the ones that show shavings from the planer.
I'm impressed both by both the build and the neatness.
I suspect that despite Monsieur Higham's attempts at modesty, the truth is he has crafted for himself a dutiful French maid robot which has no greater purpose than to scour its creator's workspace clean of all dust and debris.
I suspect that despite Monsieur Higham's attempts at modesty, the truth is he has crafted for himself a dutiful French maid robot which has no greater purpose than to scour its creator's workspace clean of all dust and debris.
I definitively think this is the correct explanation. I don't buy that craft paper explanation.


Dave,
I have no idea how I missed your thread. Looks great so far and everything is incredibly precise. Loved the pictures of how you made your own tuners unit and the design of the bass is really cool. Well done!
Maurizio
I have no idea how I missed your thread. Looks great so far and everything is incredibly precise. Loved the pictures of how you made your own tuners unit and the design of the bass is really cool. Well done!
Maurizio

Years ago when I was a bicycle mechanic, I recall that particular adjustment tool being commonly referred to as a Raleigh Wrench
- Jeff
We always called the the BFH Tool.

Once again, thanks for the nice comments. It's especially nice when they come from someone whose work you admire. 
No magic vacuum cleaners or robotic French maids. If I don't keep some sort of order I spend more time looking for some tool I've just put down than I do using it once I find it again.
Here's a bit more progress.
Now I cut the slots for the carbon fibre stiffening bars. This was done on the router table in the same way as the truss-rod slot. The bars are1/8 wide and ½ deep and are partially let into the fingerboard as well as the neck. As the neck is mostly light weight mahogany, I thought it might be a good idea to stiffen it as much as possible, hence the ½ deep CF. Ive used 1/8 x 3/8 CF in the past but two ½ deep bars are 2.37 times more resistant to bending than two 3/8 bars. I stuck the fingerboard blank to a piece of plywood exactly the same width as the neck blank, using double sided tape. This ensured that the slots in the fingerboard matched those in the neck blank exactly. Here the slots have been cut and one of the CF bars is in place being marked for cutting off the surplus.
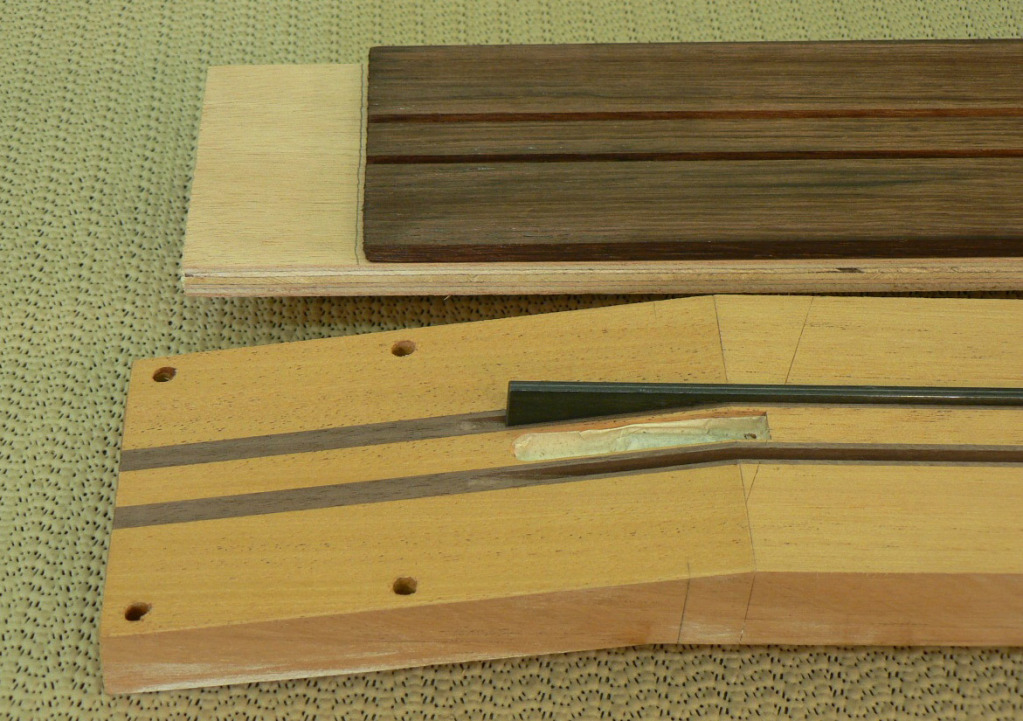
Here it is marked.
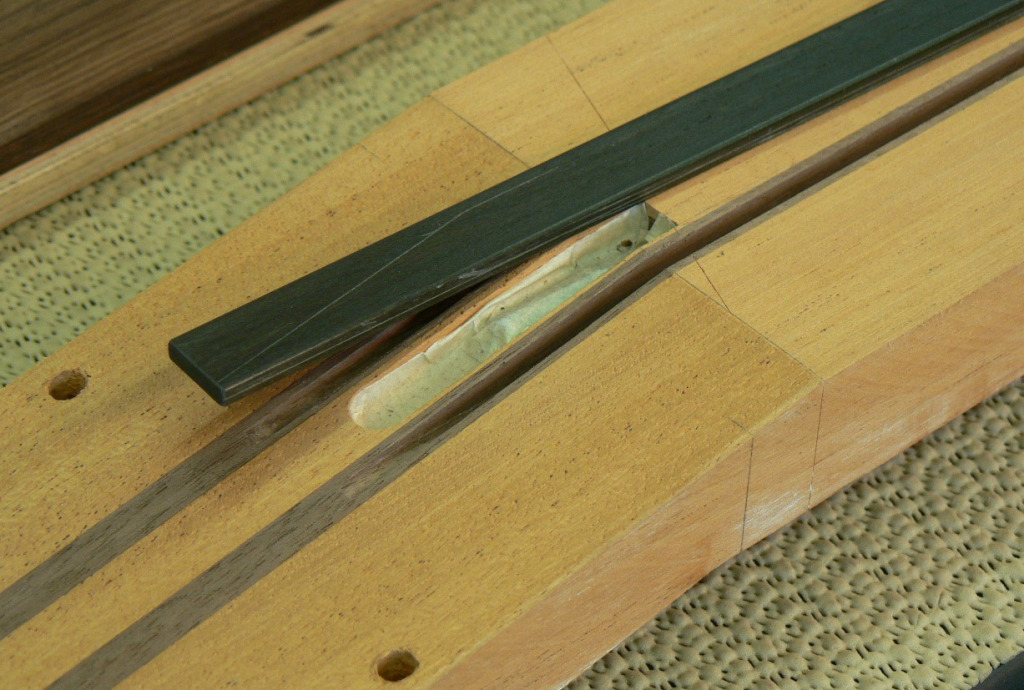
Here are both bars, trimmed and in place.
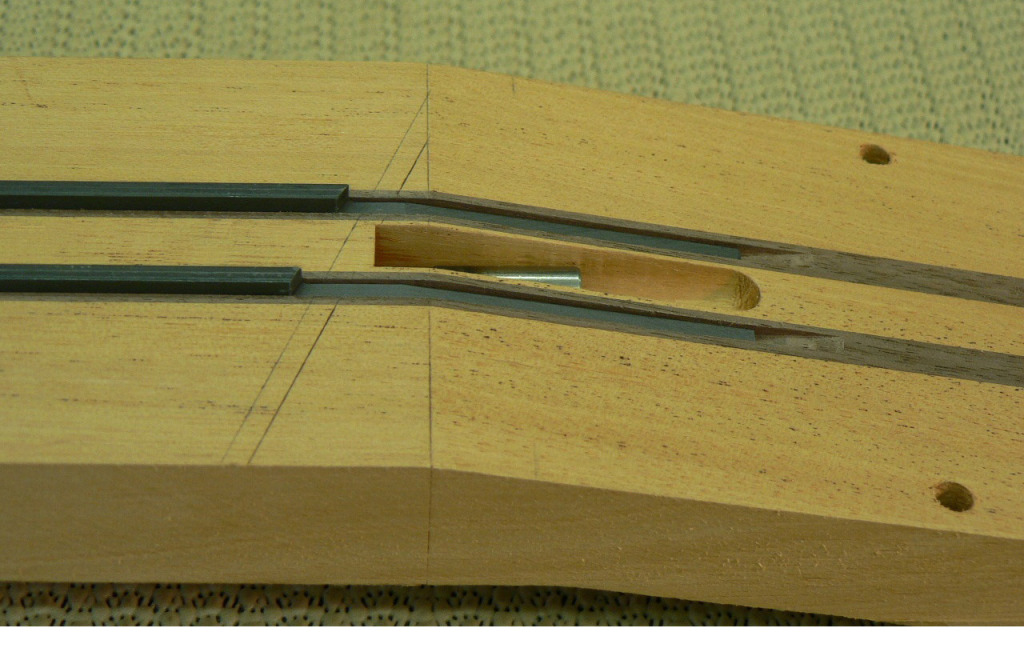
You may have noticed that the line where the face of the headstock intersects the face of the neck is at right angles to the necks centre-line and not parallel to the first fret. Thats because Im not going to skew the headstock as most people do on multi-scale headstocks. Theres another way of dealing with the problem. First I cut a piece of the off-cut from the surplus which was cut off the other end of the neck blank.
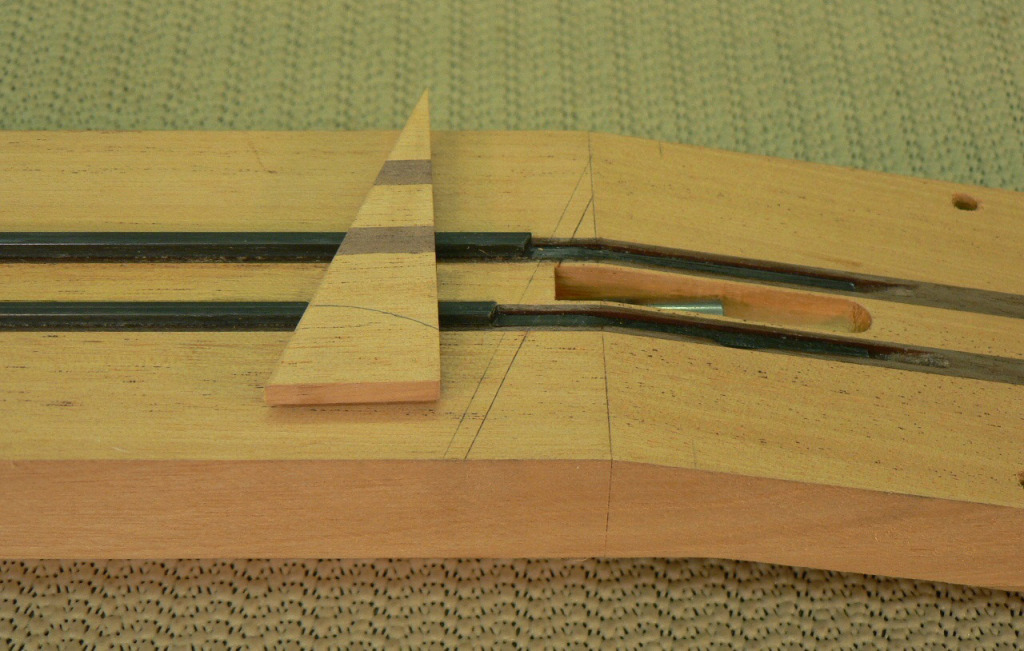
This was then glued onto the surface of the neck, overlapping slightly the neck/headstock intersection and the nut position.
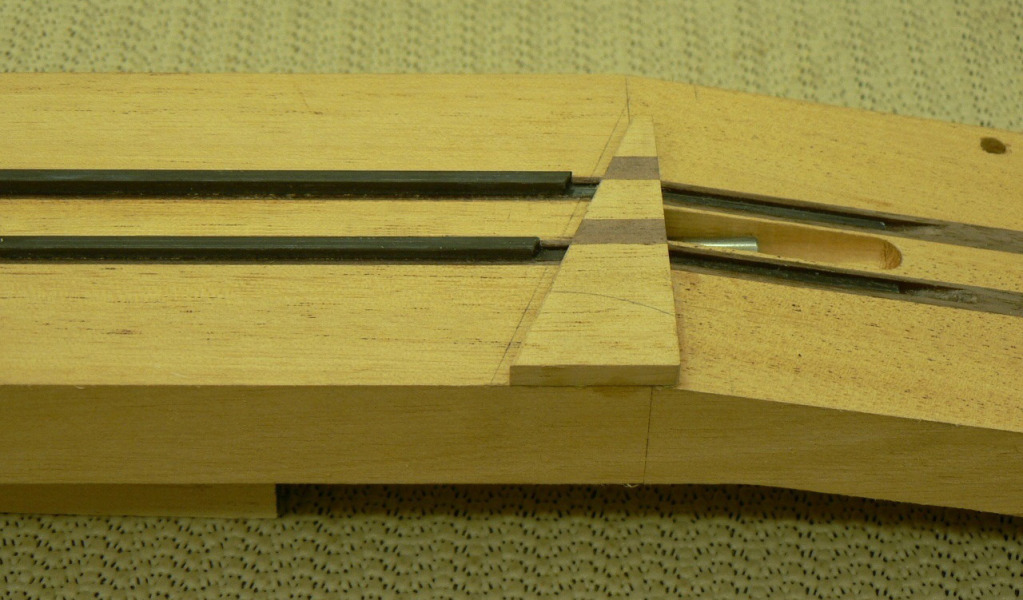
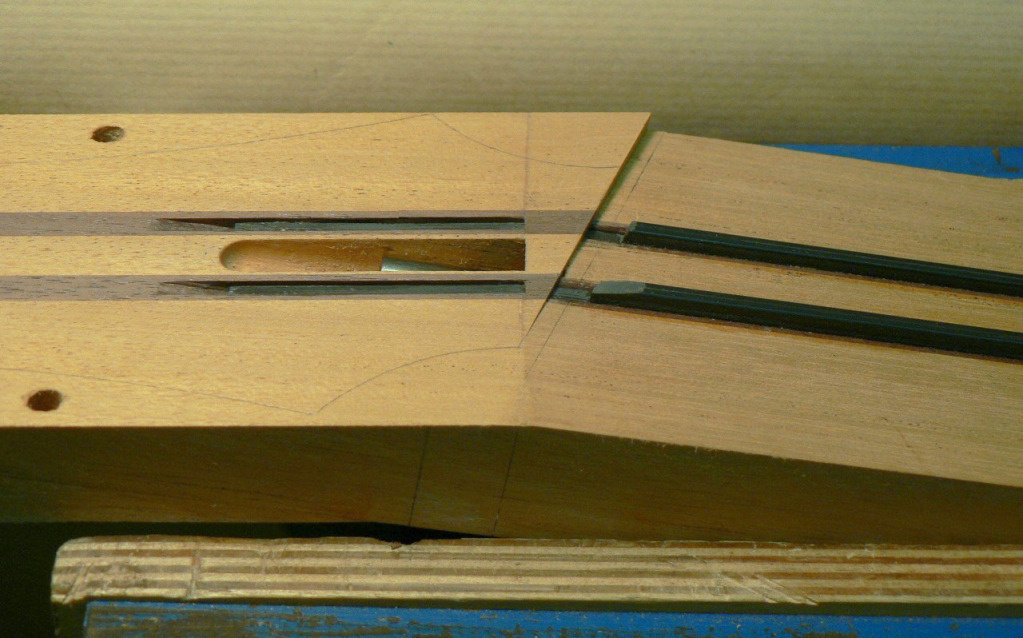
I then planed it down flush with the surface of the headstock. This photo is taken from the other side (the headstock's on the left now) as it shows the result more clearly. Doing it this way means that the surface of the headstock veneer will be closer to the top of the nut on the treble side than on the bass side, but it shouldnt be close enough to cause a problem.
Thanks for looking... back soon...
No magic vacuum cleaners or robotic French maids. If I don't keep some sort of order I spend more time looking for some tool I've just put down than I do using it once I find it again.
Here's a bit more progress.
Now I cut the slots for the carbon fibre stiffening bars. This was done on the router table in the same way as the truss-rod slot. The bars are1/8 wide and ½ deep and are partially let into the fingerboard as well as the neck. As the neck is mostly light weight mahogany, I thought it might be a good idea to stiffen it as much as possible, hence the ½ deep CF. Ive used 1/8 x 3/8 CF in the past but two ½ deep bars are 2.37 times more resistant to bending than two 3/8 bars. I stuck the fingerboard blank to a piece of plywood exactly the same width as the neck blank, using double sided tape. This ensured that the slots in the fingerboard matched those in the neck blank exactly. Here the slots have been cut and one of the CF bars is in place being marked for cutting off the surplus.
Here it is marked.
Here are both bars, trimmed and in place.
You may have noticed that the line where the face of the headstock intersects the face of the neck is at right angles to the necks centre-line and not parallel to the first fret. Thats because Im not going to skew the headstock as most people do on multi-scale headstocks. Theres another way of dealing with the problem. First I cut a piece of the off-cut from the surplus which was cut off the other end of the neck blank.
This was then glued onto the surface of the neck, overlapping slightly the neck/headstock intersection and the nut position.
I then planed it down flush with the surface of the headstock. This photo is taken from the other side (the headstock's on the left now) as it shows the result more clearly. Doing it this way means that the surface of the headstock veneer will be closer to the top of the nut on the treble side than on the bass side, but it shouldnt be close enough to cause a problem.
Thanks for looking... back soon...

You just described the way I do. It really, really pisses me off that I just can't keep my working space clean and in order. I try and I try, but still almost no progress in this area.If I don't keep some sort of order I spend more time looking for some tool I've just put down than I do using it once I find it again.

Musiclogic
Commercial User
- Aug 6, 2005
- 6,505
- 73
- 60
- Disclosures
- Owner/Builder: HJC Customs USA, The Cool Lute, C G O
Now to move on to the headstock veneer.
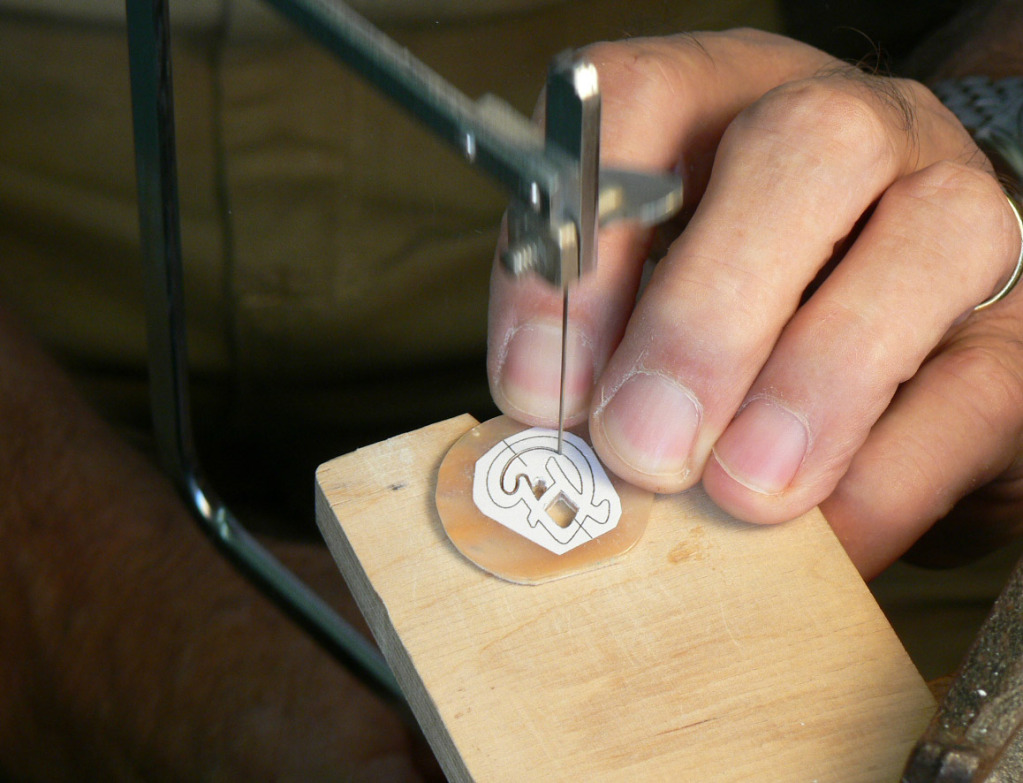
I started by cutting out my headstock inlay using a jewellers piercing saw.
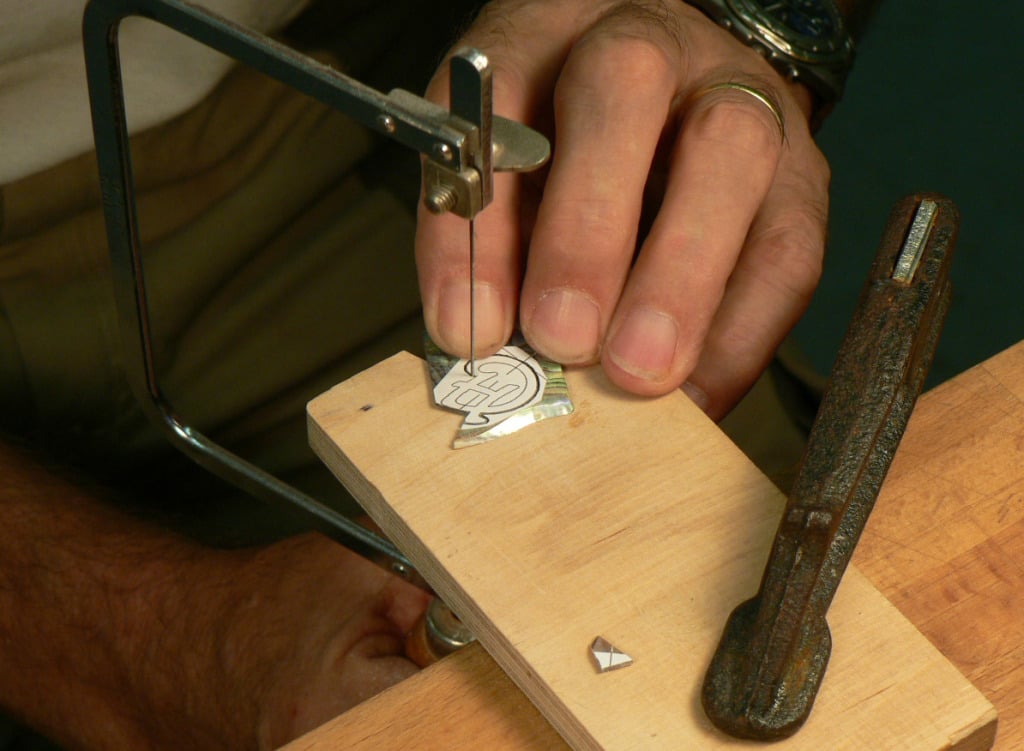
Managed to cut it out without breaking it (or the blade!).
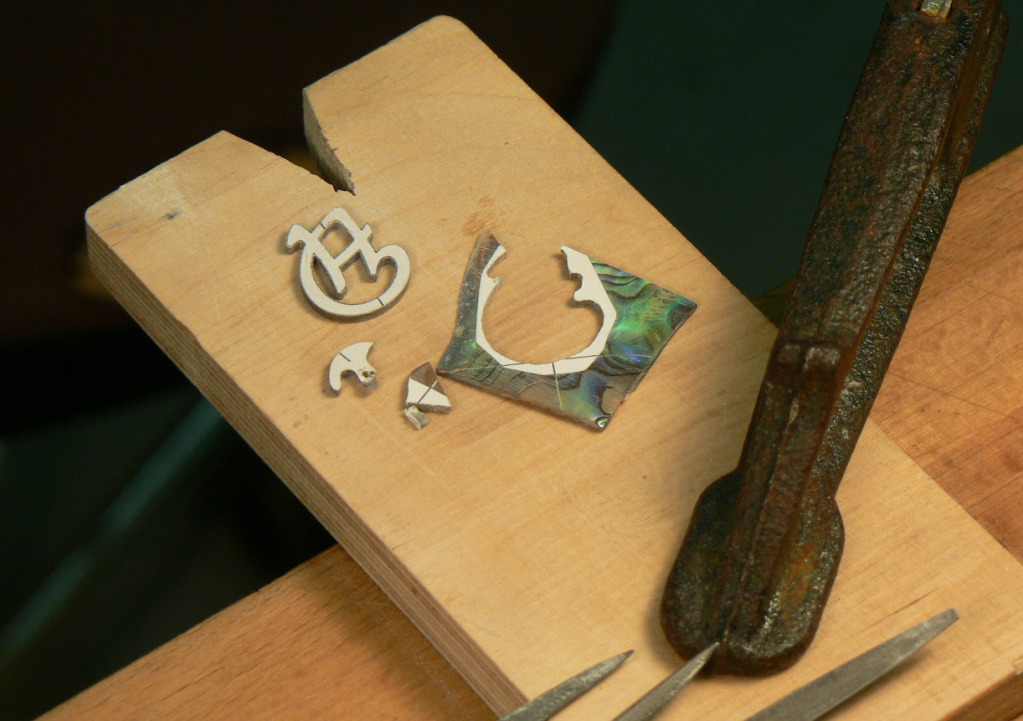
Then decided that, although the abalone is very pretty, its not right for this size of logo. The strong black lines break up the outline and from a distance you cant even make out what it's supposed to be.
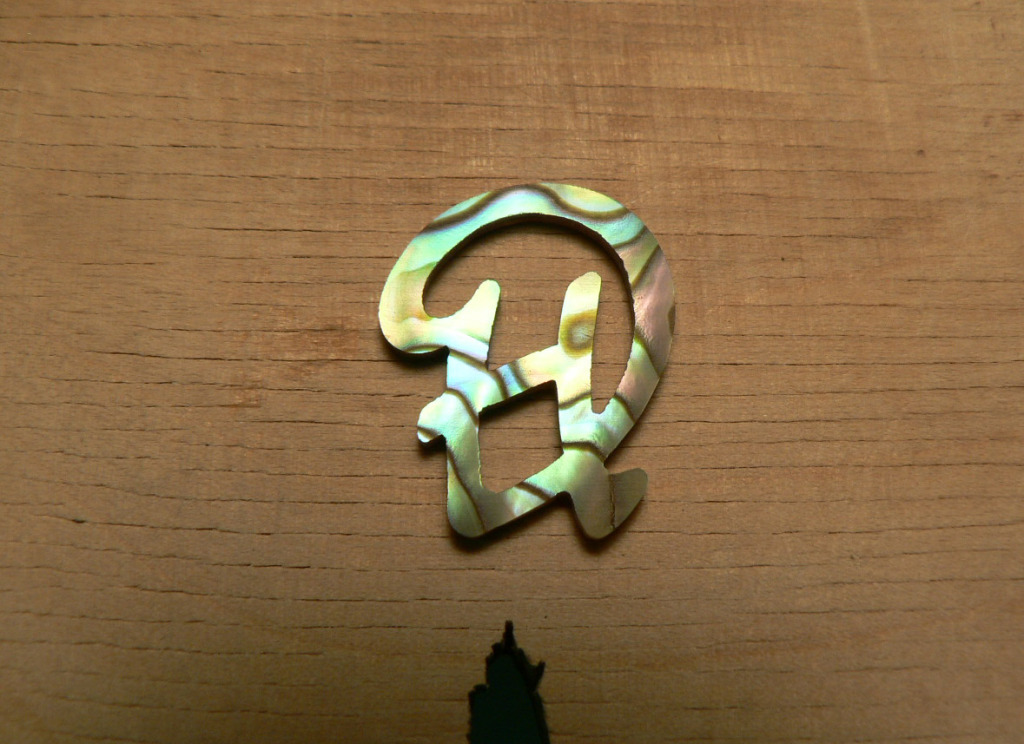
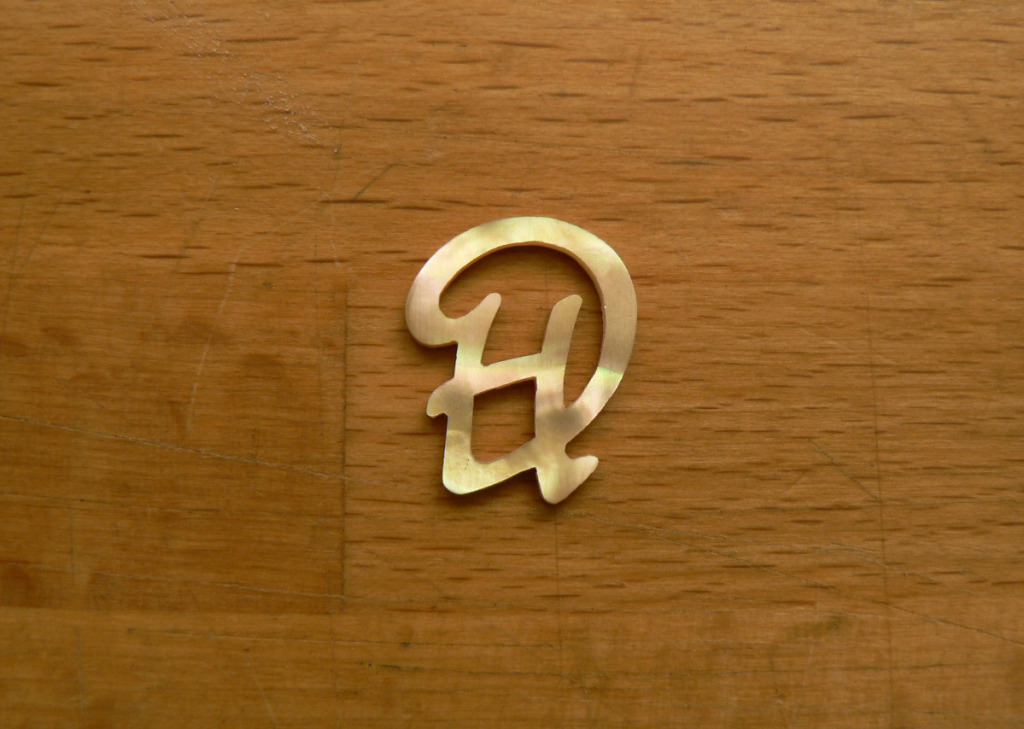
So I cut out another one. I think this might be gold MOP. I bought a few of these discs because they were pretty and cheap, but theyre not very thick and not very flat. Should be OK though.
There, that looks better.
I started by cutting out my headstock inlay using a jewellers piercing saw.
Managed to cut it out without breaking it (or the blade!).
Then decided that, although the abalone is very pretty, its not right for this size of logo. The strong black lines break up the outline and from a distance you cant even make out what it's supposed to be.
So I cut out another one. I think this might be gold MOP. I bought a few of these discs because they were pretty and cheap, but theyre not very thick and not very flat. Should be OK though.
There, that looks better.
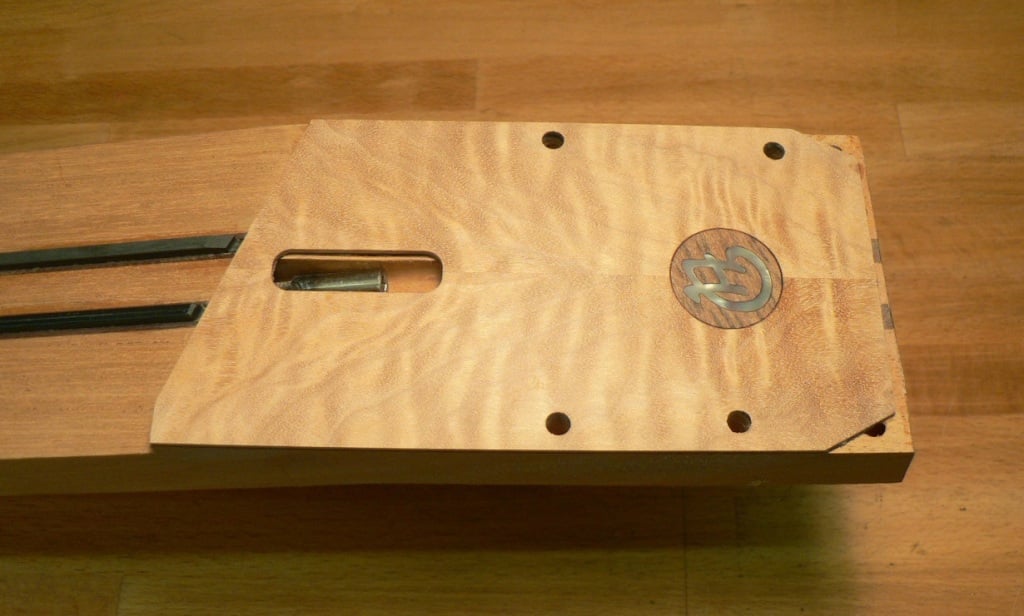
Well, yes it does, but the problem now is that the gold MOP is just about the same colour as the maple, so I inlaid it into a disc of darker wood (Tasmanian tiger myrtle actually) to make it show up better. Then I inlaid the disc into the head plate. Actually, it doesnt seem to show up very well against the darker wood either. I think that, because its thin and rather translucent, the dark wood is showing through. I should have painted the back of the pearl white, but its glued in now so itll have to do.
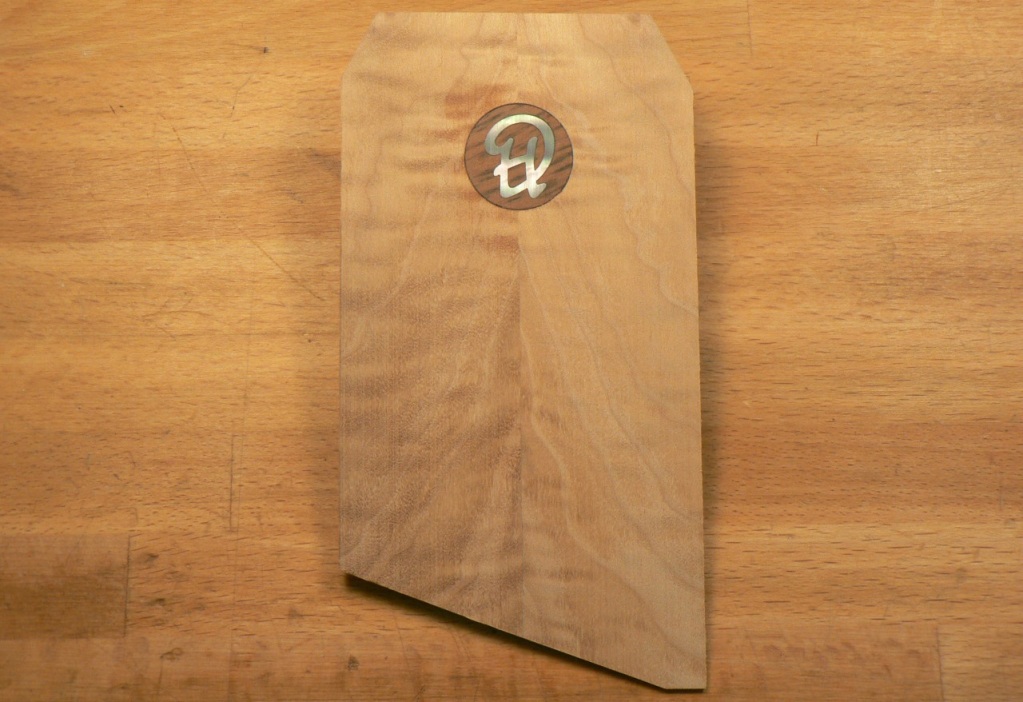
Before gluing the head plate on, I milled an access slot for the truss-rod. Although the colours will change when its finished, at the moment the head plate looks almost the same colour as the mahogany, so I sandwiched a dyed black veneer between the head plate and the head when gluing it in place. You cant see it; its in the shadow.
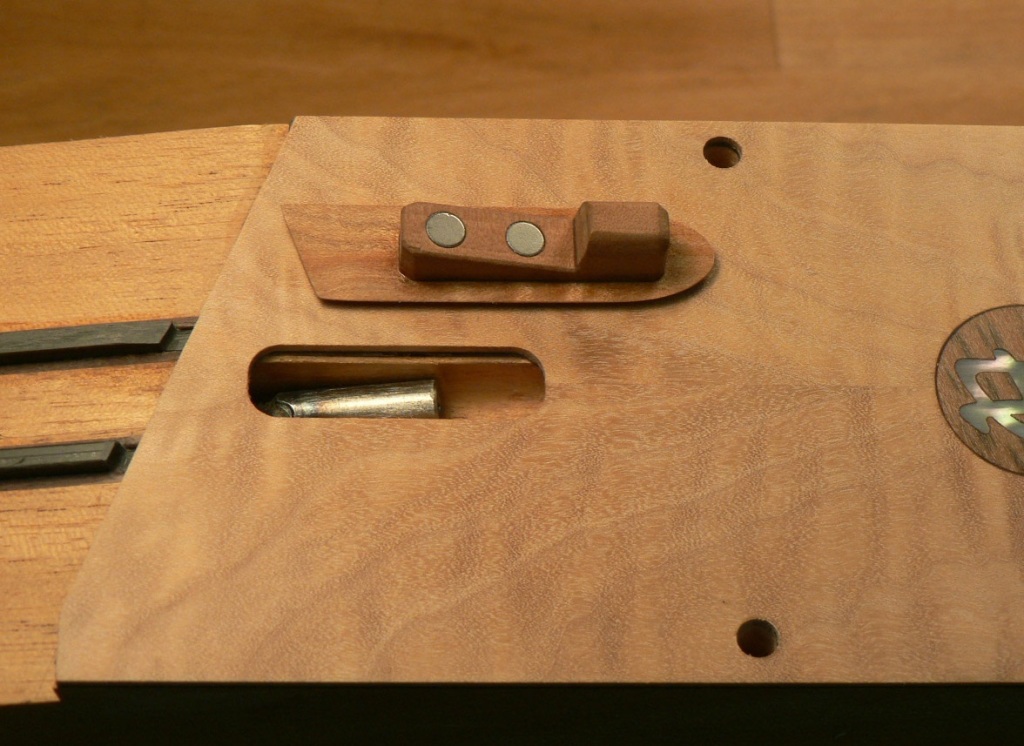
I then made a truss-rod cover from a bit of the headstock veneer. As you can see, its held in place by a couple of small neodymium magnets. The magnets dont quite touch the truss-rod nut, which means the cover is constantly being pulled against the plate and shouldnt rattle.
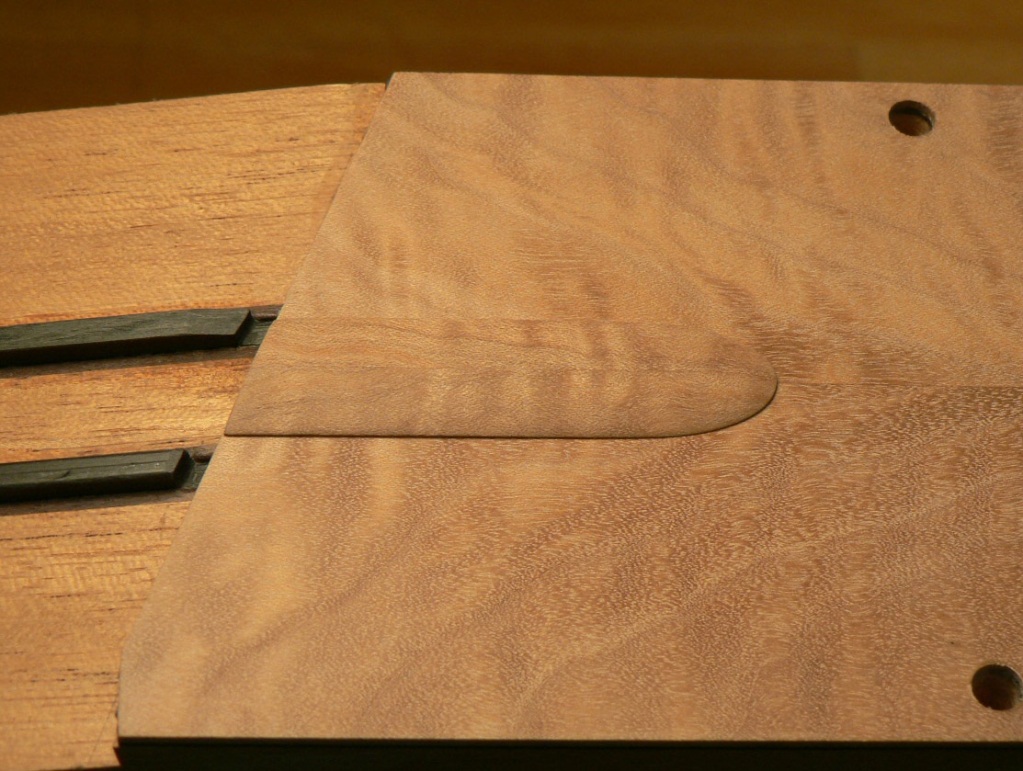
Here it is in place.
Before gluing the head plate on, I milled an access slot for the truss-rod. Although the colours will change when its finished, at the moment the head plate looks almost the same colour as the mahogany, so I sandwiched a dyed black veneer between the head plate and the head when gluing it in place. You cant see it; its in the shadow.
I then made a truss-rod cover from a bit of the headstock veneer. As you can see, its held in place by a couple of small neodymium magnets. The magnets dont quite touch the truss-rod nut, which means the cover is constantly being pulled against the plate and shouldnt rattle.
Here it is in place.



I really like that truss rod cover. I was wondering recently if anyone used magnets for anything other than control cavity covers.
lbridenstine said:I really like that truss rod cover. I was wondering recently if anyone used magnets for anything other than control cavity covers.
I used them to retain wooden bridge saddles.
Is there's thumb notch or something to remove it?
I've done one like this before and I just use a blunt knife which I slide carefully under the edge to lift it off. Not very satifactory, really.
I thought about making a removal tool which would look a bit like a rubber stamp. Instead of the stamp part, it would be shaped to match the cover and would have a larger magnet embedded in it and a layer of felt on the surface. I'd stick this to the cover and pull.
It's not my idea; I've seen it done by someone else but I can't remember who.
Well, yes it does, but the problem now is that the gold MOP is just about the same colour as the maple, so I inlaid it into a disc of darker wood (Tasmanian tiger myrtle actually) to make it show up better. Then I inlaid the disc into the head plate. Actually, it doesnt seem to show up very well against the darker wood either. I think that, because its thin and rather translucent, the dark wood is showing through. I should have painted the back of the pearl white, but its glued in now so itll have to do.
Dave, I know I'm a bit late on this... anyway... A neat trick to retain the MOP shine on dark wood is to glue a layer of aluminum foil on the back. The finish will likely darken the wood so the contrast will be very nice and your solution of inlaying the MOP in a darker circle is quite elegant.
I really like what you did with the truss rod cover. Yes, it might be a bit tricky to remove. But good design sometimes demands a little effort of us
And how often one would need to do that anyway, right? Your idea of an accessory with a stronger magnet is a cool unobtrusive solution - I would surely misplace it, but I'm a lost cause LOL... Your design and the execution are so far superb in every detail. This is one thread I really enjoy following.
I really like that truss rod cover. I was wondering recently if anyone used magnets for anything other than control cavity covers.
I used them to fit the truss rod cover on my first Über-Jay. http://www.talkbass.com/forum/f57/building-uber-j-620583/index11.html
Watching the cover snap into position by itself is so cool I regularly must check the truss rod....ahahaha.... I'm sure Dave knows what I mean
Neo magnets are so cool!


